開發環境: 安裝JDK8 安裝STS http://spring.io/tools/sts/ 安裝MySql 伺服器 https://www.mysql.com/downloads/ 客戶端 Navicat Premium 12 ...
開發環境:
安裝JDK8
安裝STS
http://spring.io/tools/sts/
安裝MySql
伺服器 https://www.mysql.com/downloads/
客戶端 Navicat Premium 12
代碼結構:
項目:Maven多模塊項目
wtrover-security:主模塊
wtrover-security-core:核心業務邏輯
表單登陸,手機驗證碼登陸,第三方登陸
wtrover-security-browser
瀏覽器安全特定代碼
wtrover-security-app
app安全特定代碼
wtrover-security-demo
樣常式序
創建項目
Eclipse
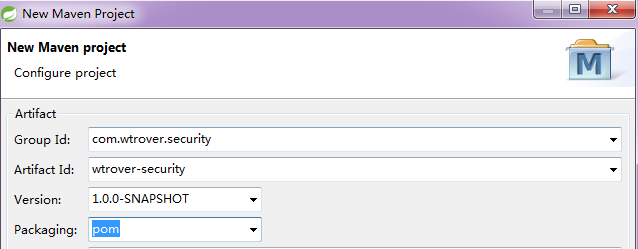
1.父項目wtrover-security,註意Packaging選pom,因為作為父項目本事並不包含代碼,它只是用來打包的。

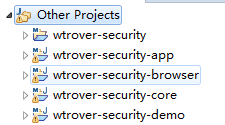
再把其他幾個項目都建起來,註意剩下的四個項目Packaging都選擇jar。

2.挨個配置pom文件
wtrover-security添加依賴Spring IO平臺,作用是替我們管理maven依賴的版本,寫依賴時不用寫版本。除了IO還需要添加Spring Cloud。有了這兩個我們整個項目的版本就應該被控制起來了。因為整個項目會在JDK8下編寫,所以要指定一下編譯的版本。
最後我們要把那四個項目加到wtrover-security里,作為它的子模塊。在Overview-Modules點Add,把四個項目選上,註意勾選上"Update POM parent section in selected projects"。
<properties>
    <wtrover.security.version>1.0.0-SNAPSHOT</wtrover.security.version>
</properties>

<dependencyManagement>
    <dependencies>
        <dependency>
            <groupId>io.spring.platform</groupId>
            <artifactId>platform-bom</artifactId>
            <version>Brussels-SR4</version>
            <type>pom</type>
            <scope>import</scope>
        </dependency>
        <dependency>
            <groupId>org.springframework.cloud</groupId>
            <artifactId>spring-cloud-dependencies</artifactId>
            <version>Dalston.SR2</version>
            <type>pom</type>
            <scope>import</scope>
        </dependency>
    </dependencies>
</dependencyManagement>

<build>
    <plugins>
        <plugin>
            <groupId>org.apache.maven.plugins</groupId>
            <artifactId>maven-compiler-plugin</artifactId>
            <version>2.3.2</version>
            <configuration>
                <source>1.8</source>
                <target>1.8</target>
                <encoding>UTF-8</encoding>
            </configuration>
        </plugin>
    </plugins>
</build>
<modules>
    <module>../wtrover-security-app</module>
    <module>../wtrover-security-browser</module>
    <module>../wtrover-security-core</module>
    <module>../wtrover-security-demo</module>
</modules>
wtrover-security-core
<dependencies>
    <dependency>
        <groupId>org.springframework.cloud</groupId>
        <artifactId>spring-cloud-starter-oauth2</artifactId>
    </dependency>
    <dependency>
        <groupId>org.springframework.boot</groupId>
        <artifactId>spring-boot-starter-data-redis</artifactId>
    </dependency>
    <dependency>
        <groupId>org.springframework.boot</groupId>
        <artifactId>spring-boot-starter-jdbc</artifactId>
    </dependency>
    <dependency>
        <groupId>mysql</groupId>
        <artifactId>mysql-connector-java</artifactId>
    </dependency>
    <!-- spring social -->
    <!-- 提供Java 配置 -->
    <dependency>
        <groupId>org.springframework.social</groupId>
        <artifactId>spring-social-config</artifactId>
    </dependency>
    <!-- 提供社交連接框架和OAuth 客戶端支持 -->
    <dependency>
        <groupId>org.springframework.social</groupId>
        <artifactId>spring-social-core</artifactId>
    </dependency>
    <!-- 提供社交安全支持 -->
    <dependency>
        <groupId>org.springframework.social</groupId>
        <artifactId>spring-social-security</artifactId>
    </dependency>
    <!-- 管理web應用程式的連接 -->
    <dependency>
        <groupId>org.springframework.social</groupId>
        <artifactId>spring-social-web</artifactId>
    </dependency>
    <!-- commons工具包 -->
    <dependency>
        <groupId>commons-lang</groupId>
        <artifactId>commons-lang</artifactId>
    </dependency>
    <dependency>
        <groupId>commons-collections</groupId>
        <artifactId>commons-collections</artifactId>
    </dependency>
    <dependency>
        <groupId>commons-io</groupId>
        <artifactId>commons-io</artifactId>
    </dependency>
    <dependency>
        <groupId>commons-beanutils</groupId>
        <artifactId>commons-beanutils</artifactId>
    </dependency>
</dependencies>
wtrover-security-app,其中${wtrover.security.version}是聲明在主模塊wtrover-security pom中的變數。
<dependencies>
    <dependency>
        <groupId>com.wtrover.security</groupId>
        <artifactId>wtrover-security-core</artifactId>
        <version>${wtrover.security.version}</version>
    </dependency>
</dependencies>
wtrover-security-browser
<dependencies>
    <dependency>
        <groupId>com.wtrover.security</groupId>
        <artifactId>wtrover-security-core</artifactId>
        <version>${wtrover.security.version}</version>
    </dependency>
    <dependency>
        <groupId>org.springframework.session</groupId>
        <artifactId>spring-session</artifactId>
    </dependency>
</dependencies>
wtrover-security-demo,先從瀏覽器安全開始講,所以先去引用wtrover-security-browser這個項目。
<dependencies>
    <dependency>
        <groupId>com.wtrover.security</groupId>
        <artifactId>wtrover-security-browser</artifactId>
        <version>${wtrover.security.version}</version>
    </dependency>
</dependencies>
3.寫個Hello World
DemoApplication
import org.springframework.boot.SpringApplication;
import org.springframework.boot.autoconfigure.SpringBootApplication;
import org.springframework.web.bind.annotation.GetMapping;
import org.springframework.web.bind.annotation.RestController;

@SpringBootApplication
@RestController
public class DemoApplication {

    public static void main(String[] args) {
        SpringApplication.run(DemoApplication.class, args);
    }

    @GetMapping("/hello")
    public String hello() {
        return "hello spring security";
    }
}
在配置文件配置jdbc連接,session,security

spring:
  profiles:
    active: dev
  datasource:
    driver-class-name: com.mysql.jdbc.Driver
    url: jdbc:mysql://127.0.0.1:3306/spring?characterEncoding=utf8&useSSL=false
    username: root
    password: root
server:
  port: 8065

spring:
  session:
    store-type: none

security:
  basic:
    enabled: false
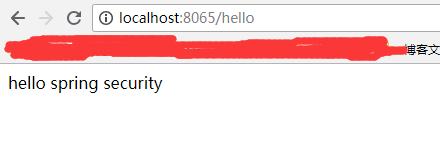
運行即可。瀏覽器輸入http://localhost:8065/hello,頁面顯示"hello spring security"


