
" " 思維導圖可在 "幕布" 找到 1. 基礎 如果在相對佈局里,控制項沒有指明相對位置,則預設都是在相對佈局的左上角: gravity 屬性用來設置容器內組件的對齊方式 效果為 2. 根據兄弟控制項定位 2.1 相對兄弟組件的位置 代碼示例 等屬性通過制定控制項的 來選擇需要參考的兄弟組件,即 : 顯 ...
思維導圖可在幕布找到
1. 基礎
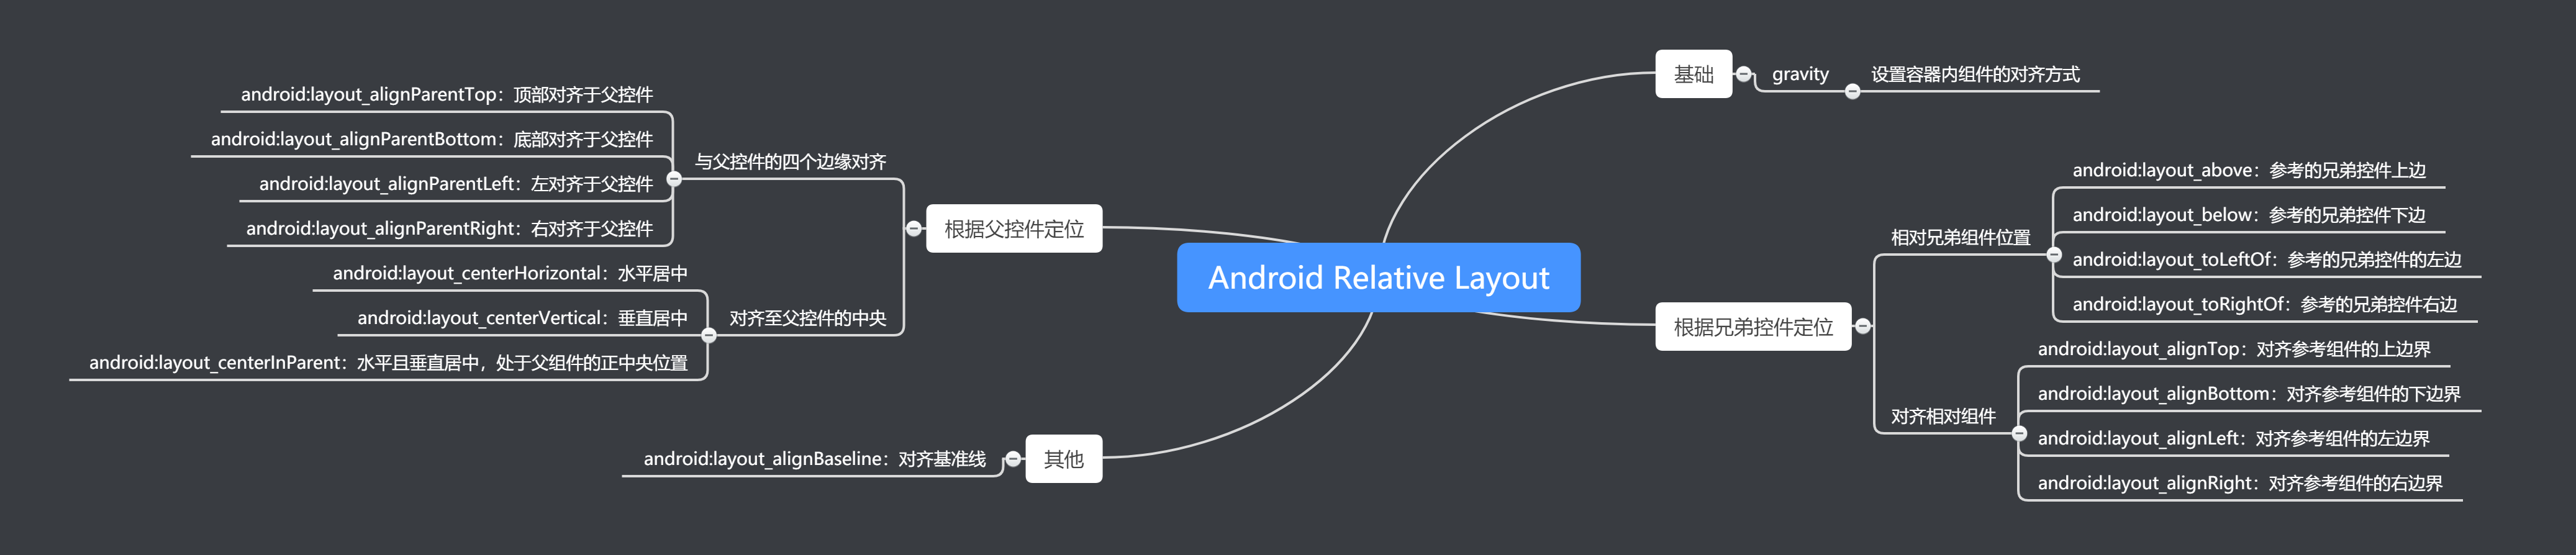
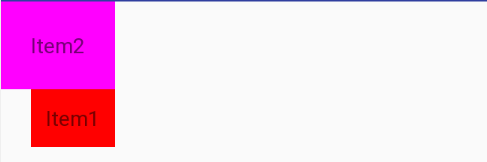
如果在相對佈局里,控制項沒有指明相對位置,則預設都是在相對佈局的左上角:
<TextView
    android:layout_width="wrap_content"
    android:layout_height="wrap_content"
    android:background="#FF00FF"
    android:padding="20dp"
    android:text="Item2"/>

<TextView
    android:layout_width="wrap_content"
    android:layout_height="wrap_content"
    android:background="#FF0000"
    android:text="Item1"/>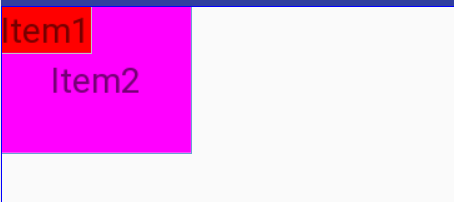
gravity
gravity屬性用來設置容器內組件的對齊方式
<TextView
    android:layout_width="match_parent"
    android:layout_height="wrap_content"
    android:gravity="center"
    android:background="#FF4081"
    android:text="Item1" />
效果為
2. 根據兄弟控制項定位
2.1 相對兄弟組件的位置
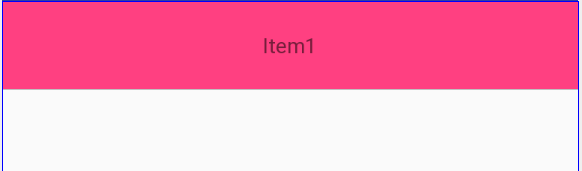
android:layout_above:// 參考的兄弟控制項上邊
android:layout_below:// 參考的兄弟控制項下邊
android:layout_toLeftOf // 參考的兄弟控制項的左邊
android:layout_toRightOf // 參考的兄弟控制項右邊
代碼示例
android:layout_below等屬性通過制定控制項的id來選擇需要參考的兄弟組件,即@id/firstText:
<TextView
    android:id="@+id/firstText"
    android:layout_width="wrap_content"
    android:layout_height="wrap_content"
    android:background="#FF0000 "
    android:text="firstText" />

<TextView
    android:id="@+id/rightText"
    android:layout_width="wrap_content"
    android:layout_height="wrap_content"
    android:background="#00FF00"
    android:layout_toRightOf="@id/firstText"
    android:text="rightText" />

<TextView
    android:id="@+id/bottomText"
    android:layout_width="wrap_content"
    android:layout_height="wrap_content"
    android:background="#00FF00"
    android:layout_below="@id/firstText"
    android:text="bottomText" />
顯示的效果為
2.2 對齊相對組件
對齊兄弟相對組件的有四個屬性,為android:layout_align${方向}
android:layout_alignTop // 對齊參考組件的上邊界
android:layout_alignBottom // 對齊參考組件的下邊界
android:layout_alignLeft // 對齊參考組件的左邊界
android:layout_alignRight // 對齊參考組件的右邊界android:layout_alignTop等屬性同樣是通過制定控制項的ID來設置參考的組件的邊界線:
代碼示例1
<TextView
    android:id="@+id/item1"
    android:layout_width="wrap_content"
    android:layout_height="wrap_content"
    android:background="#FF00FF"
    android:padding="20dp"
    android:text="Item2"/>

<TextView
    android:id="@+id/item2"
    android:layout_width="wrap_content"
    android:layout_height="wrap_content"
    android:background="#FF0000"
    android:padding="10dp"
    android:layout_below="@id/item1"
    android:layout_alignRight="@id/item1"
    android:text="Item1"/>
效果為
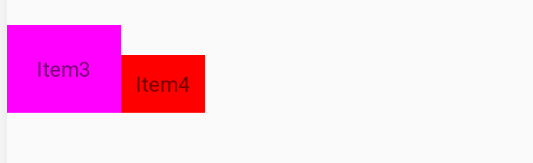
代碼實例2
<TextView
    android:id="@+id/item3"
    android:layout_width="wrap_content"
    android:layout_height="wrap_content"
    android:background="#FF00FF"
    android:padding="20dp"
    android:text="Item3"/>

<TextView
    android:id="@+id/item4"
    android:layout_width="wrap_content"
    android:layout_height="wrap_content"
    android:background="#FF0000"
    android:padding="10dp"
    android:layout_toRightOf="@+id/item3"
    android:layout_alignBottom="@id/item3"
    android:text="Item4"/>
效果為
3. 根據父控制項定位
3.1 與父控制項的四個邊緣對齊
與父控制項的邊緣對齊的屬性由android:layout_alignParent${方向}組成
android:layout_alignParentTop  // 頂部對齊於父控制項
android:layout_alignParentBottom // 底部對齊於父控制項
android:layout_alignParentLeft // 左對齊於父控制項
android:layout_alignParentRight // 右對齊於父控制項
需要註意的是,這些屬性是通過布爾值來設置是否對齊於父控制項的某個方向的:
<RelativeLayout
    android:layout_width="match_parent"
    android:layout_height="300dp">
    <TextView
        android:layout_width="wrap_content"
        android:layout_height="wrap_content"
        android:text="first"
        android:textSize="50dp"
        android:background="#FF0000"
        android:layout_alignParentRight="true"
        android:layout_alignParentBottom="true"/>
</RelativeLayout>
效果為:

除此之外還有layout_alignParentLeft、layout_alignParentTop
3.2 對齊至父控制項的中央
對齊至父控制項中央的屬性可以用來設置居中的佈局位置:
android:layout_centerHorizontal  // 水平居中
android:layout_centerVertical // 垂直居中
android:layout_centerInParent // 水平且垂直居中,處於父組件的正中央位置
代碼示例
同樣,這些屬性也是通過設置的值也是布爾類型:
<TextView
    android:layout_width="wrap_content"
    android:layout_height="wrap_content"
    android:text="centerHorizontal"
    android:textSize="50dp"
    android:background="#FF0000"
    android:layout_centerHorizontal="true"/>

<TextView
    android:layout_width="wrap_content"
    android:layout_height="wrap_content"
    android:text="centerVertical"
    android:textSize="50dp"
    android:background="#FF0000"
    android:layout_centerVertical="true"/>

<TextView
    android:layout_width="wrap_content"
    android:layout_height="wrap_content"
    android:text="centerInParent"
    android:textSize="15dp"
    android:background="#0000FF"
    android:layout_centerInParent="true"/>
效果為:

4. 其他
對齊至控制項的基準線
<TextView
    android:id="@+id/firstText"
    android:layout_width="wrap_content"
    android:layout_height="wrap_content"
    android:textSize="100dp"
    android:text="Hello" />

<TextView
    android:layout_width="wrap_content"
    android:layout_height="wrap_content"
    android:layout_toRightOf="@+id/firstText"
    android:text="World" />
如果沒有使用對齊基準線,那麼當Hello的字體的大於world時,world則無法和hello在同一基準線上:

通過給world的TextView添加layout_alignBaseline屬性來實現對齊firstText控制項的基準線:
android:layout_alignBaseline="@+id/firstText"效果為:

5. 實例
用相對佈局來完成經典的梅花佈局
    <!--中央-->
    <ImageView
        android:id="@+id/img1"
        android:layout_width="80dp"
        android:layout_height="80dp"
        android:layout_centerInParent="true"
        android:src="@drawable/pic1"/>

    <!--右邊-->
    <ImageView
        android:layout_width="80dp"
        android:layout_height="80dp"
        android:layout_centerInParent="true"
        android:layout_toLeftOf="@+id/img1"
        android:layout_centerVertical="true"
        android:src="@drawable/pic2"/>

    <!--左邊-->
    <ImageView
        android:layout_width="80dp"
        android:layout_height="80dp"
        android:layout_toRightOf="@+id/img1"
        android:layout_centerVertical="true"
        android:src="@drawable/pic3"/>

    <!--上邊-->
    <ImageView
        android:layout_width="80dp"
        android:layout_height="80dp"
        android:layout_above="@+id/img1"
        android:layout_centerHorizontal="true"
        android:src="@drawable/pic4"/>

    <!--下邊-->
    <ImageView
        android:layout_width="80dp"
        android:layout_height="80dp"
        android:layout_below="@+id/img1"
        android:layout_centerHorizontal="true"
        android:src="@drawable/pic5"/>
效果圖為

參考資料


