
1. 學習計劃 1、Activemq整合spring的應用場景 2、添加商品同步索引庫 3、商品詳情頁面動態展示 4、展示詳情頁面使用緩存 2. Activemq整合spring 2.1. 使用方法 第一步:引用相關的jar包。 第二步:配置Activemq整合spring。配置Connection ...
1. 學習計劃
1、Activemq整合spring的應用場景
2、添加商品同步索引庫
3、商品詳情頁面動態展示
4、展示詳情頁面使用緩存
2. Activemq整合spring
2.1. 使用方法
第一步:引用相關的jar包。
    <dependency>
            <groupId>org.springframework</groupId>
            <artifactId>spring-jms</artifactId>
        </dependency>
        <dependency>
            <groupId>org.springframework</groupId>
            <artifactId>spring-context-support</artifactId>
        </dependency>
第二步:配置Activemq整合spring。配置ConnectionFactory
<?xml version="1.0" encoding="UTF-8"?>
<beans xmlns="http://www.springframework.org/schema/beans"
    xmlns:context="http://www.springframework.org/schema/context" xmlns:p="http://www.springframework.org/schema/p"
    xmlns:aop="http://www.springframework.org/schema/aop" xmlns:tx="http://www.springframework.org/schema/tx"
xmlns:xsi="http://www.w3.org/2001/XMLSchema-instance"
    xsi:schemaLocation="http://www.springframework.org/schema/beans http://www.springframework.org/schema/beans/spring-beans-4.2.xsd
    http://www.springframework.org/schema/context http://www.springframework.org/schema/context/spring-context-4.2.xsd
    http://www.springframework.org/schema/aop http://www.springframework.org/schema/aop/spring-aop-4.2.xsd
    http://www.springframework.org/schema/tx http://www.springframework.org/schema/tx/spring-tx-4.2.xsd
    http://www.springframework.org/schema/util http://www.springframework.org/schema/util/spring-util-4.2.xsd">


    <!-- 真正可以產生Connection的ConnectionFactory,由對應的 JMS服務廠商提供 -->
    <bean id="targetConnectionFactory" class="org.apache.activemq.ActiveMQConnectionFactory">
        <property name="brokerURL" value="tcp://192.168.25.168:61616" />
    </bean>
    <!-- Spring用於管理真正的ConnectionFactory的ConnectionFactory -->
    <bean id="connectionFactory"
        class="org.springframework.jms.connection.SingleConnectionFactory">
        <!-- 目標ConnectionFactory對應真實的可以產生JMS Connection的ConnectionFactory -->
        <property name="targetConnectionFactory" ref="targetConnectionFactory" />
    </bean>
</beans>
第三步:配置生產者。
使用JMSTemplate對象。發送消息。
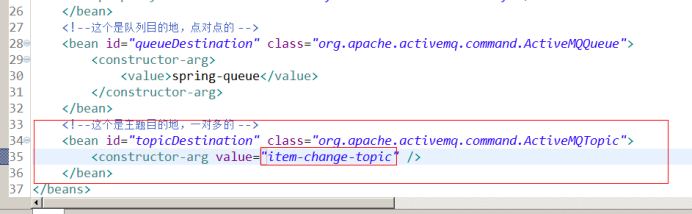
第四步:在spring容器中配置Destination。
<?xml version="1.0" encoding="UTF-8"?>
<beans xmlns="http://www.springframework.org/schema/beans"
    xmlns:context="http://www.springframework.org/schema/context" xmlns:p="http://www.springframework.org/schema/p"
    xmlns:aop="http://www.springframework.org/schema/aop" xmlns:tx="http://www.springframework.org/schema/tx"
    xmlns:xsi="http://www.w3.org/2001/XMLSchema-instance"
    xsi:schemaLocation="http://www.springframework.org/schema/beans http://www.springframework.org/schema/beans/spring-beans-4.2.xsd
    http://www.springframework.org/schema/context http://www.springframework.org/schema/context/spring-context-4.2.xsd
    http://www.springframework.org/schema/aop http://www.springframework.org/schema/aop/spring-aop-4.2.xsd http://www.springframework.org/schema/tx http://www.springframework.org/schema/tx/spring-tx-4.2.xsd
    http://www.springframework.org/schema/util http://www.springframework.org/schema/util/spring-util-4.2.xsd">

    <!-- 真正可以產生Connection的ConnectionFactory,由對應的 JMS服務廠商提供 -->
    <bean id="targetConnectionFactory" class="org.apache.activemq.ActiveMQConnectionFactory">
        <property name="brokerURL" value="tcp://192.168.25.168:61616" />
    </bean>
    <!-- Spring用於管理真正的ConnectionFactory的ConnectionFactory -->
    <bean id="connectionFactory"
        class="org.springframework.jms.connection.SingleConnectionFactory">
        <!-- 目標ConnectionFactory對應真實的可以產生JMS Connection的ConnectionFactory -->
        <property name="targetConnectionFactory" ref="targetConnectionFactory" />
    </bean>
    <!-- 配置生產者 -->
    <!-- Spring提供的JMS工具類,它可以進行消息發送、接收等 -->
    <bean id="jmsTemplate" class="org.springframework.jms.core.JmsTemplate">
        <!-- 這個connectionFactory對應的是我們定義的Spring提供的那個ConnectionFactory對象 -->
        <property name="connectionFactory" ref="connectionFactory" />
    </bean>
    <!--這個是隊列目的地,點對點的 -->
    <bean id="queueDestination" class="org.apache.activemq.command.ActiveMQQueue">
        <constructor-arg>
            <value>spring-queue</value>
        </constructor-arg>
    </bean>
    <!--這個是主題目的地,一對多的 -->
    <bean id="topicDestination" class="org.apache.activemq.command.ActiveMQTopic">
        <constructor-arg value="topic" />
    </bean>
</beans>
第五步:代碼測試
@Test
    public void testSpringActiveMq() throws Exception {
        //初始化spring容器
        ApplicationContext applicationContext = new ClassPathXmlApplicationContext("classpath:spring/applicationContext-activemq.xml");
        //從spring容器中獲得JmsTemplate對象
        JmsTemplate jmsTemplate = applicationContext.getBean(JmsTemplate.class);
        //從spring容器中取Destination對象
        Destination destination = (Destination) applicationContext.getBean("queueDestination");
        //使用JmsTemplate對象發送消息。
        jmsTemplate.send(destination, new MessageCreator() {

            @Override
            public Message createMessage(Session session) throws JMSException {
                //創建一個消息對象並返回
                TextMessage textMessage = session.createTextMessage("spring activemq queue message");
                return textMessage;
            }
        });
    }
2.2. 代碼測試
2.2.1. 發送消息
第一步:初始化一個spring容器
第二步:從容器中獲得JMSTemplate對象。
第三步:從容器中獲得一個Destination對象
第四步:使用JMSTemplate對象發送消息,需要知道Destination
@Test
    public void testQueueProducer() throws Exception {
        // 第一步:初始化一個spring容器
        ApplicationContext applicationContext = new ClassPathXmlApplicationContext("classpath:spring/applicationContext-activemq.xml");
        // 第二步:從容器中獲得JMSTemplate對象。
        JmsTemplate jmsTemplate = applicationContext.getBean(JmsTemplate.class);
        // 第三步:從容器中獲得一個Destination對象
        Queue queue = (Queue) applicationContext.getBean("queueDestination");
        // 第四步:使用JMSTemplate對象發送消息,需要知道Destination
        jmsTemplate.send(queue, new MessageCreator() {

            @Override
            public Message createMessage(Session session) throws JMSException {
                TextMessage textMessage = session.createTextMessage("spring activemq test");
                return textMessage;
            }
        });
    }
2.2.2. 接收消息
e3-search-Service中接收消息。
第一步:把Activemq相關的jar包添加到工程中
第二步:創建一個MessageListener的實現類。
@Test
    public void testQueueProducer() throws Exception {
        // 第一步:初始化一個spring容器
        ApplicationContext applicationContext = new ClassPathXmlApplicationContext("classpath:spring/applicationContext-activemq.xml");
        // 第二步:從容器中獲得JMSTemplate對象。
        JmsTemplate jmsTemplate = applicationContext.getBean(JmsTemplate.class);
        // 第三步:從容器中獲得一個Destination對象
        Queue queue = (Queue) applicationContext.getBean("queueDestination");
        // 第四步:使用JMSTemplate對象發送消息,需要知道Destination
        jmsTemplate.send(queue, new MessageCreator() {

            @Override
            public Message createMessage(Session session) throws JMSException {
                TextMessage textMessage = session.createTextMessage("spring activemq test");
                return textMessage;
            }
        });
    }
第三步:配置spring和Activemq整合。
<?xml version="1.0" encoding="UTF-8"?>
<beans xmlns="http://www.springframework.org/schema/beans"
    xmlns:context="http://www.springframework.org/schema/context" xmlns:p="http://www.springframework.org/schema/p"
    xmlns:aop="http://www.springframework.org/schema/aop" xmlns:tx="http://www.springframework.org/schema/tx"
    xmlns:xsi="http://www.w3.org/2001/XMLSchema-instance"
    xsi:schemaLocation="http://www.springframework.org/schema/beans http://www.springframework.org/schema/beans/spring-beans-4.2.xsd
    http://www.springframework.org/schema/context http://www.springframework.org/schema/context/spring-context-4.2.xsd
    http://www.springframework.org/schema/aop http://www.springframework.org/schema/aop/spring-aop-4.2.xsd http://www.springframework.org/schema/tx http://www.springframework.org/schema/tx/spring-tx-4.2.xsd
    http://www.springframework.org/schema/util http://www.springframework.org/schema/util/spring-util-4.2.xsd">

    <!-- 真正可以產生Connection的ConnectionFactory,由對應的 JMS服務廠商提供 -->
    <bean id="targetConnectionFactory" class="org.apache.activemq.ActiveMQConnectionFactory">
        <property name="brokerURL" value="tcp://192.168.25.168:61616" />
    </bean>
    <!-- Spring用於管理真正的ConnectionFactory的ConnectionFactory -->
    <bean id="connectionFactory"
        class="org.springframework.jms.connection.SingleConnectionFactory">
        <!-- 目標ConnectionFactory對應真實的可以產生JMS Connection的ConnectionFactory -->
        <property name="targetConnectionFactory" ref="targetConnectionFactory" />
    </bean>
    <!--這個是隊列目的地,點對點的 -->
    <bean id="queueDestination" class="org.apache.activemq.command.ActiveMQQueue">
        <constructor-arg>
            <value>spring-queue</value>
        </constructor-arg>
    </bean>
    <!--這個是主題目的地,一對多的 -->
    <bean id="topicDestination" class="org.apache.activemq.command.ActiveMQTopic">
        <constructor-arg value="topic" />
    </bean>
    <!-- 接收消息 -->
    <!-- 配置監聽器 -->
    <bean id="myMessageListener" class="cn.e3mall.search.listener.MyMessageListener" />
    <!-- 消息監聽容器 -->
    <bean class="org.springframework.jms.listener.DefaultMessageListenerContainer">
        <property name="connectionFactory" ref="connectionFactory" />
        <property name="destination" ref="queueDestination" />
        <property name="messageListener" ref="myMessageListener" />
    </bean>
</beans>
第四步:測試代碼。
@Test
    public void testQueueConsumer() throws Exception {
        //初始化spring容器
        ApplicationContext applicationContext = new ClassPathXmlApplicationContext("classpath:spring/applicationContext-activemq.xml");
        //等待
        System.in.read();
    }
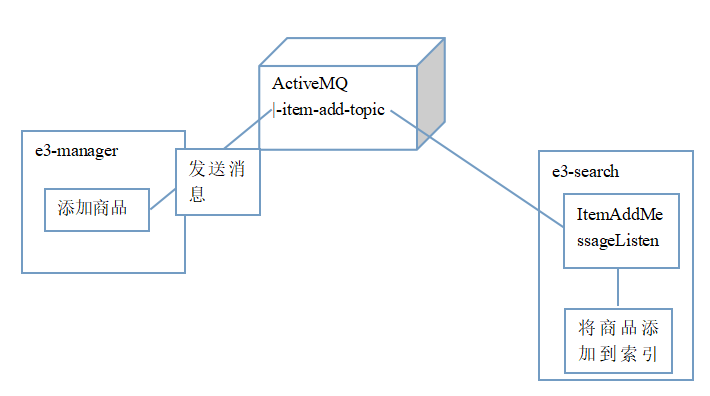
3. 添加商品同步索引庫
3.1. Producer
e3-manager-server工程中發送消息。
當商品添加完成後發送一個TextMessage,包含一個商品id。
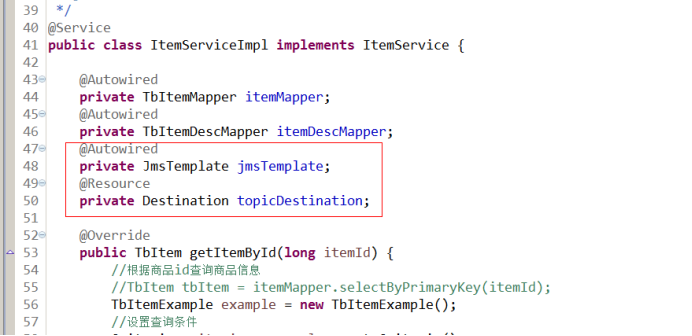
@Override
    public e3Result addItem(TbItem item, String desc) {
        // 1、生成商品id
        final long itemId = IDUtils.genItemId();
        // 2、補全TbItem對象的屬性
        item.setId(itemId);
        //商品狀態,1-正常,2-下架,3-刪除
        item.setStatus((byte) 1);
        Date date = new Date();
        item.setCreated(date);
        item.setUpdated(date);
        // 3、向商品表插入數據
        itemMapper.insert(item);
        // 4、創建一個TbItemDesc對象
        TbItemDesc itemDesc = new TbItemDesc();
        // 5、補全TbItemDesc的屬性
        itemDesc.setItemId(itemId);
        itemDesc.setItemDesc(desc);
        itemDesc.setCreated(date);
        itemDesc.setUpdated(date);
        // 6、向商品描述表插入數據
        itemDescMapper.insert(itemDesc);
        //發送一個商品添加消息
        jmsTemplate.send(topicDestination, new MessageCreator() {

            @Override
            public Message createMessage(Session session) throws JMSException {
                TextMessage textMessage = session.createTextMessage(itemId + "");
                return textMessage;
            }
        });
        // 7、e3Result.ok()
        return e3Result.ok();
    }
3.2. Consumer
3.2.1. 功能分析
1、接收消息。需要創建MessageListener介面的實現類。
2、取消息,取商品id。
3、根據商品id查詢資料庫。
4、創建一SolrInputDocument對象。
5、使用SolrServer對象寫入索引庫。
6、返回成功,返回e3Result。
3.2.2. Dao層
根據商品id查詢商品信息。

映射文件:
<select id="getItemById" parameterType="long" resultType="cn.e3mall.common.pojo.SearchItem">
        SELECT
            a.id,
            a.title,
            a.sell_point,
            a.price,
            a.image,
            b. NAME category_name,
            c.item_desc
        FROM
            tb_item a
        JOIN tb_item_cat b ON a.cid = b.id
        JOIN tb_item_desc c ON a.id = c.item_id
        WHERE a.status = 1
          AND a.id=#{itemId}
    </select>
3.2.3. Service層
參數:商品ID
業務邏輯:
1、根據商品id查詢商品信息。
2、創建一SolrInputDocument對象。
3、使用SolrServer對象寫入索引庫。
4、返回成功,返回e3Result。
返回值:e3Result
public e3Result addDocument(long itemId) throws Exception {
        // 1、根據商品id查詢商品信息。
        SearchItem searchItem = searchItemMapper.getItemById(itemId);
        // 2、創建一SolrInputDocument對象。
        SolrInputDocument document = new SolrInputDocument();
        // 3、使用SolrServer對象寫入索引庫。
        document.addField("id", searchItem.getId());
        document.addField("item_title", searchItem.getTitle());
        document.addField("item_sell_point", searchItem.getSell_point());
        document.addField("item_price", searchItem.getPrice());
        document.addField("item_image", searchItem.getImage());
        document.addField("item_category_name", searchItem.getCategory_name());
        document.addField("item_desc", searchItem.getItem_desc());
        // 5、向索引庫中添加文檔。
        solrServer.add(document);
        solrServer.commit();
        // 4、返回成功,返回e3Result。
        return e3Result.ok();
    }
3.2.4. Listener
public class ItemChangeListener implements MessageListener {

    @Autowired
    private SearchItemServiceImpl searchItemServiceImpl;

    @Override
    public void onMessage(Message message) {
        try {
            TextMessage textMessage = null;
            Long itemId = null;
            //取商品id
            if (message instanceof TextMessage) {
                textMessage = (TextMessage) message;
                itemId = Long.parseLong(textMessage.getText());
            }
            //向索引庫添加文檔
            searchItemServiceImpl.addDocument(itemId);

        } catch (Exception e) {
            e.printStackTrace();
        }
    }

}
3.2.5. Spring配置監聽

3.2.6. 實現流程
4. 商品詳情頁面展示
創建一個商品詳情頁面展示的工程。是一個表現層工程。
4.1. 工程搭建
e3-item-web。打包方式war。可以參考e3-portal-web
4.1.1. Pom文件
<project xmlns="http://maven.apache.org/POM/4.0.0" xmlns:xsi="http://www.w3.org/2001/XMLSchema-instance"
    xsi:schemaLocation="http://maven.apache.org/POM/4.0.0 http://maven.apache.org/xsd/maven-4.0.0.xsd">
    <modelVersion>4.0.0</modelVersion>
    <parent>
        <groupId>cn.e3mall</groupId>
        <artifactId>e3-parent</artifactId>
        <version>0.0.1-SNAPSHOT</version>
    </parent>
    <groupId>cn.e3mall</groupId>
    <artifactId>e3-item-web</artifactId>
    <version>0.0.1-SNAPSHOT</version>
    <packaging>war</packaging>
    <dependencies>
        <dependency>
            <groupId>cn.e3mall</groupId>
            <artifactId>e3-manager-interface</artifactId>
            <version>0.0.1-SNAPSHOT</version>
        </dependency>
        <!-- Spring -->
        <dependency>
            <groupId>org.springframework</groupId>
            <artifactId>spring-context</artifactId>
        </dependency>
        <dependency>
            <groupId>org.springframework</groupId>
            <artifactId>spring-beans</artifactId>
        </dependency>
        <dependency>
            <groupId>org.springframework</groupId>
            <artifactId>spring-webmvc</artifactId>
        </dependency>
        <dependency>
            <groupId>org.springframework</groupId>
            <artifactId>spring-jdbc</artifactId>
        </dependency>
        <dependency>
            <groupId>org.springframework</groupId>
            <artifactId>spring-aspects</artifactId>
        </dependency>
        <dependency>
            <groupId>org.springframework</groupId>
            <artifactId>spring-jms</artifactId>
        </dependency>
        <dependency>
            <groupId>org.springframework</groupId>
            <artifactId>spring-context-support</artifactId>
        </dependency>
        <!-- JSP相關 -->
        <dependency>
            <groupId>jstl</groupId>
            <artifactId>jstl</artifactId>
        </dependency>
        <dependency>
            <groupId>javax.servlet</groupId>
            <artifactId>servlet-api</artifactId>
            <scope>provided</scope>
        </dependency>
        <dependency>
            <groupId>javax.servlet</groupId>
            <artifactId>jsp-api</artifactId>
            <scope>provided</scope>
        </dependency>
        <!-- dubbo相關 -->
        <dependency>
            <groupId>com.alibaba</groupId>
            <artifactId>dubbo</artifactId>
            <!-- 排除依賴 -->
            <exclusions>
                <exclusion>
                    <groupId>org.springframework</groupId>
                    <artifactId>spring</artifactId>
                </exclusion>
                <exclusion>
                    <groupId>org.jboss.netty</groupId>
                    <artifactId>netty</artifactId>
                </exclusion>
            </exclusions>
        </dependency>
        <dependency>
            <groupId>org.apache.zookeeper</groupId>
            <artifactId>zookeeper</artifactId>
        </dependency>
        <dependency>
            <groupId>com.github.sgroschupf</groupId>
            <artifactId>zkclient</artifactId>
        </dependency>
        <dependency>
            <groupId>junit</groupId>
            <artifactId>junit</artifactId>
        </dependency>
    </dependencies>
    <!-- 配置tomcat插件 -->
    <build>
        <plugins>
            <plugin>
                <groupId>org.apache.tomcat.maven</groupId>
                <artifactId>tomcat7-maven-plugin</artifactId>
                <configuration>
                    <port>8086</port>
                    <path>/</path>
                </configuration>
            </plugin>
        </plugins>
    </build>
</project>
4.2. 功能分析
在搜索結果頁面點擊商品圖片或者商品標題,展示商品詳情頁面。

請求的url:/item/{itemId}
參數:商品id


