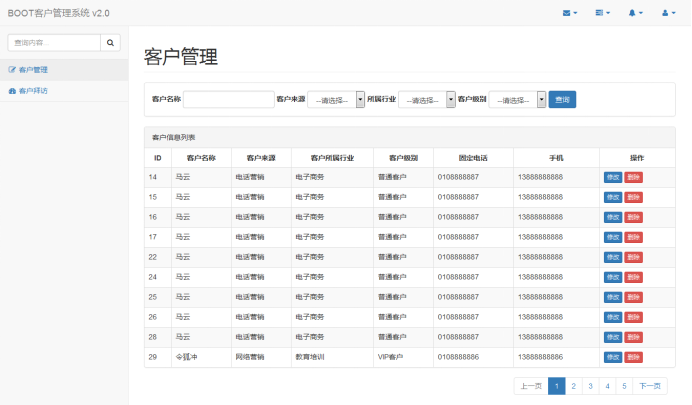
1 CRM項目外觀 1 CRM項目外觀 1. 開發環境 IDE: Eclipse Mars2 Jdk: 1.7 資料庫: MySQL 2. 創建資料庫 資料庫sql文件位置如下圖: 創建crm資料庫,執行sql 效果如下圖: 3. 工程搭建 使用的Bootstrap前端框架,官方網站 http:// ...
1 CRM項目外觀
1. 開發環境
IDE: Eclipse Mars2
Jdk: 1.7
資料庫: MySQL
2. 創建資料庫
資料庫sql文件位置如下圖:
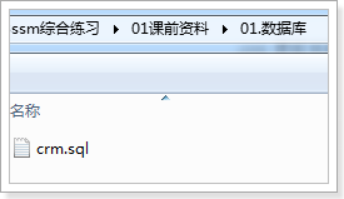
創建crm資料庫,執行sql
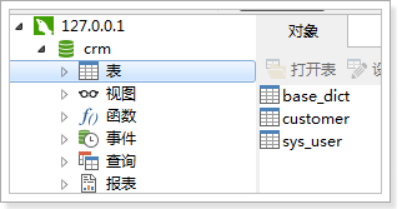
效果如下圖:
3. 工程搭建
使用的Bootstrap前端框架,官方網站
http://www.bootcss.com/
工程使用Springmvc、spring、mybatis框架整合完成。
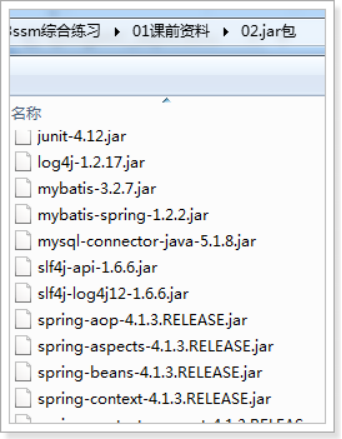
3.1. 需要的jar包
- spring(包括springmvc)
- mybatis
- mybatis-spring整合包
- 資料庫驅動
- 第三方連接池。
- Json依賴包Jackson
jar包位置如下圖:
3.2. 整合思路
Dao層:
1、SqlMapConfig.xml,空文件即可,但是需要文件頭。
2、applicationContext-dao.xml
a) 資料庫連接Druid
b) SqlSessionFactory對象,需要spring和mybatis整合包下的。
c) 配置mapper文件掃描器。Mapper動態代理開發 增強版
Service層:
1、applicationContext-service.xml包掃描器,掃描@service註解的類。
2、applicationContext-trans.xml配置事務。
Controller層:
1、Springmvc.xml
a) 包掃描器,掃描@Controller註解的類。
b) 配置註解驅動
c) 配置視圖解析器
Web.xml文件:
1、配置spring監聽器
2、配置前端控制器。
3.3. 創建工程
創建動態web工程,步驟如下圖:
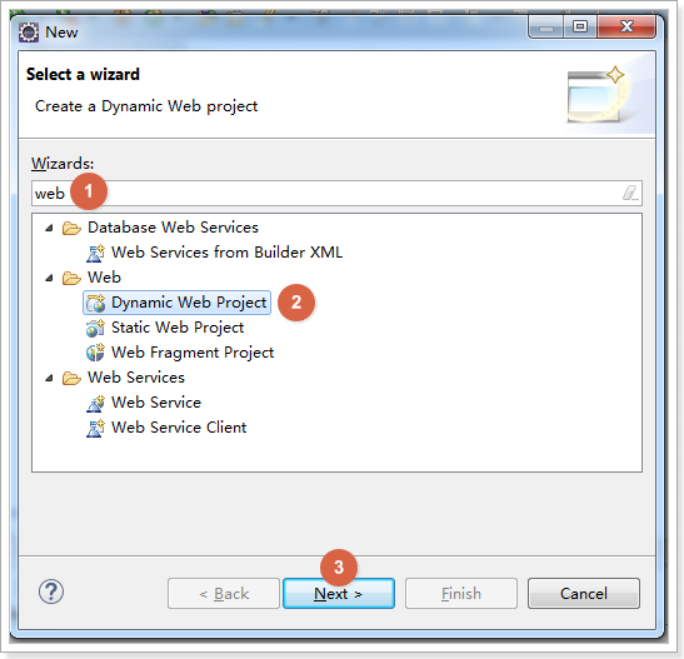
創建boot-crm,如下圖
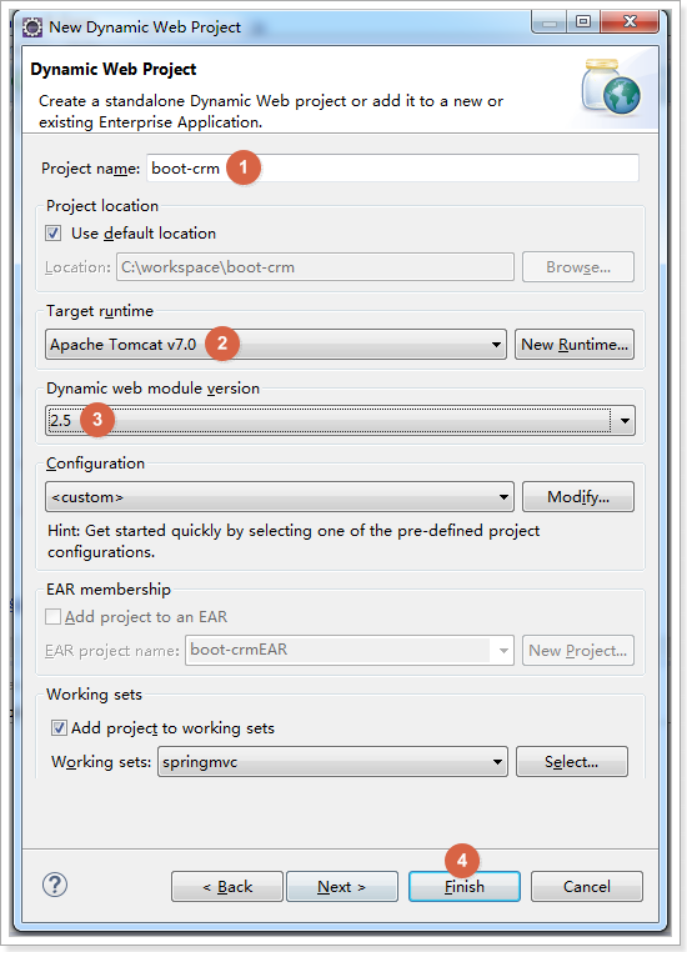
3.4. 加入jar包
加入課前資料中的jar包
3.5. 加入配置文件
創建config資源文件夾,在裡面創建mybatis和spring文件夾
3.5.1. SqlMapConfig.xml
空文件即可
<?xml version="1.0" encoding="UTF-8" ?>
<!DOCTYPE configuration PUBLIC "-//mybatis.org//DTD Config 3.0//EN"
"http://mybatis.org/dtd/mybatis-3-config.dtd">
<configuration>

</configuration>
當然也可以加上包別名,在後面的Mapper xml文件中可以不用寫全類名
<typeAliases>
<package name="com.xyp.crm.entity"/>
</typeAliases>
3.5.2. applicationContext-dao.xml
需要配置:
載入properties文件,數據源,SqlSessionFactory,Mapper掃描
<?xml version="1.0" encoding="UTF-8"?>
<beans xmlns="http://www.springframework.org/schema/beans"
    xmlns:context="http://www.springframework.org/schema/context" xmlns:p="http://www.springframework.org/schema/p"
    xmlns:aop="http://www.springframework.org/schema/aop" xmlns:tx="http://www.springframework.org/schema/tx"
    xmlns:xsi="http://www.w3.org/2001/XMLSchema-instance"
    xsi:schemaLocation="http://www.springframework.org/schema/beans http://www.springframework.org/schema/beans/spring-beans-4.0.xsd
    http://www.springframework.org/schema/context http://www.springframework.org/schema/context/spring-context-4.0.xsd
    http://www.springframework.org/schema/aop http://www.springframework.org/schema/aop/spring-aop-4.0.xsd http://www.springframework.org/schema/tx http://www.springframework.org/schema/tx/spring-tx-4.0.xsd
    http://www.springframework.org/schema/util http://www.springframework.org/schema/util/spring-util-4.0.xsd">

    <!-- 配置 讀取properties文件 jdbc.properties -->
    <context:property-placeholder location="classpath:jdbc.properties" />

    <!-- 配置 數據源 -->
    <bean id="dataSource" class="com.alibaba.druid.pool.DruidDataSource">
        <property name="driverClassName" value="${jdbc.driver}" />
        <property name="url" value="${jdbc.url}" />
        <property name="username" value="${jdbc.username}" />
        <property name="password" value="${jdbc.password}" />
    </bean>

    <!-- 配置SqlSessionFactory -->
    <bean class="org.mybatis.spring.SqlSessionFactoryBean">
        <!-- 設置MyBatis核心配置文件 -->
        <property name="configLocation" value="classpath:mybatis/SqlMapConfig.xml" />
        <!-- 設置數據源 -->
        <property name="dataSource" ref="dataSource" />
    </bean>

    <!-- 配置Mapper掃描 -->
    <bean class="org.mybatis.spring.mapper.MapperScannerConfigurer">
        <!-- 設置Mapper掃描包 -->
        <property name="basePackage" value="cn.itcast.crm.mapper" />
    </bean>
</beans>
3.5.3. jdbc.properties
配置資料庫信息
jdbc.driver=com.mysql.jdbc.Driver
jdbc.url=jdbc:mysql://localhost:3306/crm?characterEncoding=utf-8
jdbc.username=root
jdbc.password=root
3.5.4. log4j.properties
配置日誌信息
# Global logging configuration
log4j.rootLogger=DEBUG, stdout
# Console output...
log4j.appender.stdout=org.apache.log4j.ConsoleAppender
log4j.appender.stdout.layout=org.apache.log4j.PatternLayout
log4j.appender.stdout.layout.ConversionPattern=%5p [%t] - %m%n
3.5.5. applicationContext-service.xml
配置service掃描
<?xml version="1.0" encoding="UTF-8"?>
<beans xmlns="http://www.springframework.org/schema/beans"
    xmlns:context="http://www.springframework.org/schema/context" xmlns:p="http://www.springframework.org/schema/p"
    xmlns:aop="http://www.springframework.org/schema/aop" xmlns:tx="http://www.springframework.org/schema/tx"
    xmlns:xsi="http://www.w3.org/2001/XMLSchema-instance"
    xsi:schemaLocation="http://www.springframework.org/schema/beans http://www.springframework.org/schema/beans/spring-beans-4.0.xsd
    http://www.springframework.org/schema/context http://www.springframework.org/schema/context/spring-context-4.0.xsd
    http://www.springframework.org/schema/aop http://www.springframework.org/schema/aop/spring-aop-4.0.xsd http://www.springframework.org/schema/tx http://www.springframework.org/schema/tx/spring-tx-4.0.xsd
    http://www.springframework.org/schema/util http://www.springframework.org/schema/util/spring-util-4.0.xsd">

    <!-- 配置Service掃描 -->
    <context:component-scan base-package="cn.itcast.crm.service" />
</beans>
3.5.6. applicationContext-trans.xml
配置事務管理:事務管理器、通知、切麵
<?xml version="1.0" encoding="UTF-8"?>
<beans xmlns="http://www.springframework.org/schema/beans"
    xmlns:context="http://www.springframework.org/schema/context" xmlns:p="http://www.springframework.org/schema/p"
    xmlns:aop="http://www.springframework.org/schema/aop" xmlns:tx="http://www.springframework.org/schema/tx"
    xmlns:xsi="http://www.w3.org/2001/XMLSchema-instance"
    xsi:schemaLocation="http://www.springframework.org/schema/beans http://www.springframework.org/schema/beans/spring-beans-4.0.xsd
    http://www.springframework.org/schema/context http://www.springframework.org/schema/context/spring-context-4.0.xsd
    http://www.springframework.org/schema/aop http://www.springframework.org/schema/aop/spring-aop-4.0.xsd http://www.springframework.org/schema/tx http://www.springframework.org/schema/tx/spring-tx-4.0.xsd
    http://www.springframework.org/schema/util http://www.springframework.org/schema/util/spring-util-4.0.xsd">

    <!-- 事務管理器 -->
    <bean id="transactionManager"    class="org.springframework.jdbc.datasource.DataSourceTransactionManager">
        <!-- 數據源 -->
        <property name="dataSource" ref="dataSource" />
    </bean>

    <!-- 通知 -->
    <tx:advice id="txAdvice" transaction-manager="transactionManager">
        <tx:attributes>
            <!-- 傳播行為 -->
            <tx:method name="save*" propagation="REQUIRED" />
            <tx:method name="insert*" propagation="REQUIRED" />
            <tx:method name="add*" propagation="REQUIRED" />
            <tx:method name="create*" propagation="REQUIRED" />
            <tx:method name="delete*" propagation="REQUIRED" />
            <tx:method name="update*" propagation="REQUIRED" />
            <tx:method name="find*" propagation="SUPPORTS" read-only="true" />
            <tx:method name="select*" propagation="SUPPORTS" read-only="true" />
            <tx:method name="get*" propagation="SUPPORTS" read-only="true" />
            <tx:method name="query*" propagation="SUPPORTS" read-only="true" />
        </tx:attributes>
    </tx:advice>

    <!-- 切麵 -->
    <aop:config>
        <aop:advisor advice-ref="txAdvice"
            pointcut="execution(* cn.itcast.crm.service.*.*(..))" />
    </aop:config>

</beans>
3.5.7. Springmvc.xml
配置SpringMVC表現層:Controller掃描、註解驅動、視圖解析器
<?xml version="1.0" encoding="UTF-8"?>
<beans xmlns="http://www.springframework.org/schema/beans"
    xmlns:xsi="http://www.w3.org/2001/XMLSchema-instance" xmlns:p="http://www.springframework.org/schema/p"
    xmlns:context="http://www.springframework.org/schema/context"
    xmlns:mvc="http://www.springframework.org/schema/mvc"
    xsi:schemaLocation="http://www.springframework.org/schema/beans http://www.springframework.org/schema/beans/spring-beans-4.0.xsd
        http://www.springframework.org/schema/mvc http://www.springframework.org/schema/mvc/spring-mvc-4.0.xsd
        http://www.springframework.org/schema/context http://www.springframework.org/schema/context/spring-context-4.0.xsd">
    <!-- 配置Controller掃描 -->
    <context:component-scan base-package="cn.itcast.crm.controller" />

    <!-- 配置註解驅動 -->
    <mvc:annotation-driven />

    <!-- 配置視圖解析器 -->
    <bean    class="org.springframework.web.servlet.view.InternalResourceViewResolver">
        <!-- 首碼 -->
        <property name="prefix" value="/WEB-INF/jsp/" />
        <!-- 尾碼 -->
        <property name="suffix" value=".jsp" />
    </bean>
</beans>
3.5.8. Web.xml
配置Spring、SpringMVC、解決post亂碼問題
<?xml version="1.0" encoding="UTF-8"?>
<web-app xmlns:xsi="http://www.w3.org/2001/XMLSchema-instance"
    xmlns="http://java.sun.com/xml/ns/javaee"
    xsi:schemaLocation="http://java.sun.com/xml/ns/javaee http://java.sun.com/xml/ns/javaee/web-app_2_5.xsd"
    id="WebApp_ID" version="2.5">
    <display-name>boot-crm</display-name>
    <welcome-file-list>
        <welcome-file>index.jsp</welcome-file>
    </welcome-file-list>

    <!-- 配置spring -->
    <context-param>
        <param-name>contextConfigLocation</param-name>
        <param-value>classpath:spring/applicationContext-*.xml</param-value>
    </context-param>

    <!-- 配置監聽器載入spring -->
    <listener>
        <listener-class>org.springframework.web.context.ContextLoaderListener</listener-class>
    </listener>

    <!-- 配置過濾器,解決post的亂碼問題 -->
    <filter>
        <filter-name>encoding</filter-name>    <filter-class>org.springframework.web.filter.CharacterEncodingFilter</filter-class>
        <init-param>
            <param-name>Encoding</param-name>
            <param-value>utf-8</param-value>
        </init-param>
    </filter>
    <filter-mapping>
        <filter-name>encoding</filter-name>
        <url-pattern>/*</url-pattern>
    </filter-mapping>

    <!-- 配置SpringMVC -->
    <servlet>
        <servlet-name>boot-crm</servlet-name>
        <servlet-class>org.springframework.web.servlet.DispatcherServlet</servlet-class>
        <init-param>
            <param-name>contextConfigLocation</param-name>
            <param-value>classpath:spring/springmvc.xml</param-value>
        </init-param>
        <!-- 配置springmvc什麼時候啟動,參數必須為整數 -->
        <!-- 如果為0或者大於0,則springMVC隨著容器啟動而啟動 -->
        <!-- 如果小於0,則在第一次請求進來的時候啟動 -->
        <load-on-startup>1</load-on-startup>
    </servlet>
    <servlet-mapping>
        <servlet-name>boot-crm</servlet-name>
        <!-- 所有的請求都進入springMVC -->
        <url-pattern>/</url-pattern>
    </servlet-mapping>
</web-app>
3.6. 加入靜態資源
最終效果如下圖:
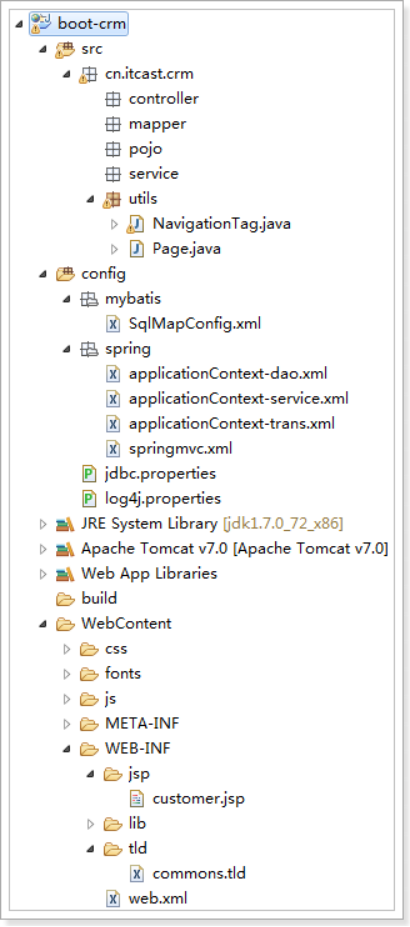
4. 實現頁面展示
4.1. 代碼實現
編寫CustomerController 顯示用戶列表
@Controller
@RequestMapping("customer")
public class CustomerController {

    /**
     * 顯示用戶列表
     *
     * @return
     */
    @RequestMapping("list")
    public String queryCustomerList() {
        return "customer";
    }

}
4.2. 頁面顯示問題
訪問頁面,發現不能正常顯示
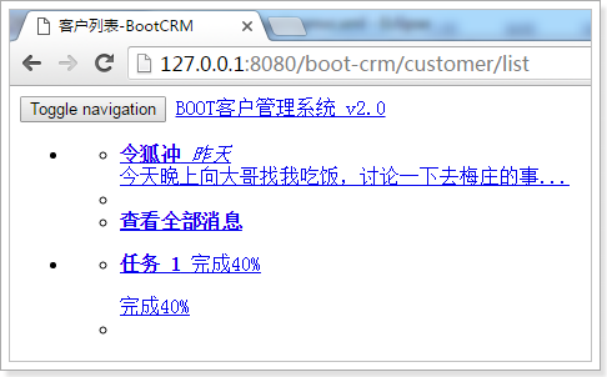
打開開發者工具,選擇Network,
發現css、js等資源文件無法載入
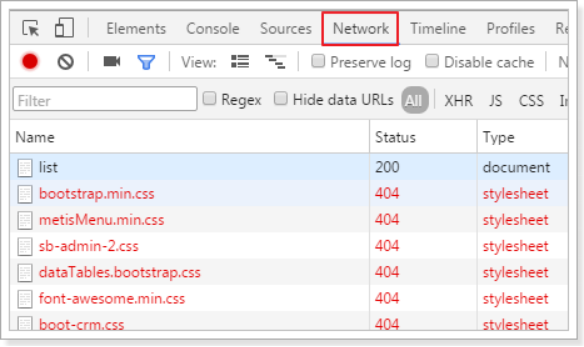
原因:web.xml配置時,是設置所有的請求都進入SpringMVC。但是SpringMVC 無法處理css、js等靜態資源,所以無法正常顯示
解決方案:
方法一:通過mvc:resources
    <!-- 對靜態資源進行放行 -->
    <mvc:resources location="/css/" mapping="/css/**"/>
    <mvc:resources location="/fonts/" mapping="/fonts/**"/>
    <mvc:resources location="/js/" mapping="/js/**"/>
方法二:
在springmvc.xml中配置
    <!-- 解決靜態資源無法被springMVC處理的問題 -->
    <mvc:default-servlet-handler />
方法三:
修改web.xml,讓所有以action結尾的請求都進入SpringMVC
    <servlet-mapping>
        <servlet-name>boot-crm</servlet-name>
        <!-- 所有的請求都進入springMVC -->
        <url-pattern>*.action</url-pattern>
    </servlet-mapping>
解決後的效果如下圖,可以正常顯示頁面樣式:
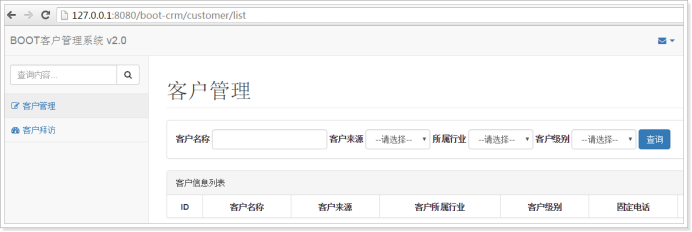
我們使用第二種方式解決,因為此項目中的頁面的請求都是以action結尾的,所以使用第二種方式,在web.xml裡面進行相應的配置
    <servlet-mapping>
        <servlet-name>boot-crm</servlet-name>
        <!-- 所有以action結尾的請求都進入springMVC -->
        <url-pattern>*.action</url-pattern>
    </servlet-mapping>
5. 實現查詢條件初始化
5.1. 需求分析

頁面效果如上圖,在查詢客戶的時候,可以選擇客戶來源,所屬行業,客戶級別信息,頁面載入時需要初始化查詢條件下拉列表。
前端jsp邏輯
<form class="form-inline" action="${pageContext.request.contextPath }/customer/list.action" method="get">
    <div class="form-group">
        <label for="customerName">客戶名稱</label>
        <input type="text" class="form-control" id="customerName" value="${custName }" name="custName">
    </div>
    <div class="form-group">
        <label for="customerFrom">客戶來源</label>
        <select    class="form-control" id="customerFrom" placeholder="客戶來源" name="custSource">
            <option value="">--請選擇--</option>
            <c:forEach items="${fromType}" var="item">
                <option value="${item.dict_id}"<c:if test="${item.dict_id == custSource}"> selected</c:if>>${item.dict_item_name }</option>
            </c:forEach>
        </select>
    </div>
    <div class="form-group">
        <label for="custIndustry">所屬行業</label>
        <select    class="form-control" id="custIndustry"  name="custIndustry">
            <option value="">--請選擇--</option>
            <c:forEach items="${industryType}" var="item">
                <option value="${item.dict_id}"<c:if test="${item.dict_id == custIndustry}"> selected</c:if>>${item.dict_item_name }</option>
            </c:forEach>
        </select>
    </div>
    <div class="form-group">
        <label for="custLevel">客戶級別</label>
        <select    class="form-control" id="custLevel" name="custLevel">
            <option value="">--請選擇--</option>
            <c:forEach items="${levelType}" var="item">
                <option value="${item.dict_id}"<c:if test="${item.dict_id == custLevel}"> selected</c:if>>${item.dict_item_name }</option>
            </c:forEach>
        </select>
    </div>
    <button type="submit" class="btn btn-primary">查詢</button>
</form>
按照jsp的要求,把對應的數據查詢出來,放到模型中。
數據存放在base_dict表,可以使用dict_type_code類別代碼進行查詢
使用需要獲取的數據如下圖:

使用的sql:
SELECT * FROM base_dict WHERE dict_type_code = '001'
5.2. 實現DAO開發
5.2.1. pojo
因為頁面顯示的名字是下劃線方式,和資料庫表列名一樣,根據頁面的樣式,編寫pojo
public class BaseDict {
    private String dict_id;
    private String dict_type_code;
    private String dict_type_name;
    private String dict_item_name;
    private String dict_item_code;
    private Integer dict_sort;
    private String dict_enable;
    private String dict_memo;
get/set。。。。。。
}
5.2.2. Mapper
編寫BaseDictMapper
public interface BaseDictMapper {
    /**
     * 根據類別代碼查詢數據
     *
     * @param dictTypeCode
     * @return
     */
    List<BaseDict> queryBaseDictByDictTypeCode(String dictTypeCode);

}
5.2.3. Mapper.xml
編寫BaseDictMapper.xml
<?xml version="1.0" encoding="UTF-8" ?>
<!DOCTYPE mapper
PUBLIC "-//mybatis.org//DTD Mapper 3.0//EN"
"http://mybatis.org/dtd/mybatis-3-mapper.dtd">
<mapper namespace="cn.itcast.crm.mapper.BaseDictMapper">

    <!-- 根據類別代碼查詢數據 -->
    <select id="queryBaseDictByDictTypeCode" parameterType="String"
        resultType="cn.itcast.crm.pojo.BaseDict">
        SELECT * FROM base_dict WHERE dict_type_code =
        #{dict_type_code}
    </select>

</mapper>
5.3. 實現Service開發
5.3.1. BaseDictService 介面
public interface BaseDictService {

    /**
     * 根據類別代碼查詢
     *
     * @param dictTypeCode
     * @return
     */
    List<BaseDict> queryBaseDictByDictTypeCode(String dictTypeCode);
}
5.3.2. BaseDictServiceImpl 實現類
@Service
public class BaseDictServiceImpl implements BaseDictService {

    @Autowired
    private BaseDictMapper baseDictMapper;

    @Override
    public List<BaseDict> queryBaseDictByDictTypeCode(String dictTypeCode) {

        List<BaseDict> list = this.baseDictMapper.queryBaseDictByDictTypeCode(dictTypeCode);
        return list;
    }
}


