
資料參考來源 : 我姓區不姓區 有關於WIF的介紹以及環境配置在此不多說,可以去網上搜索,或者點擊上方鏈接前往查看,以下所述都基於WIF配置完成的條件上; 以下很多東西都是從 我姓區不姓區 的博客直接copy過來的,我另外加的就是我跟著他的博客一路中所踩的坑以及我自己的理解; 開始單點登錄踩坑之旅: ...
資料參考來源 : 我姓區不姓區
有關於WIF的介紹以及環境配置在此不多說,可以去網上搜索,或者點擊上方鏈接前往查看,以下所述都基於WIF配置完成的條件上;
以下很多東西都是從 我姓區不姓區 的博客直接copy過來的,我另外加的就是我跟著他的博客一路中所踩的坑以及我自己的理解;
開始單點登錄踩坑之旅:
我們接下來的demo將包括以下的工程:
- SiteA —— 基於.net framework 4.5的MVC 4程式,使用WIF 4.5的SDK,第一個RP
- SiteB —— 基於.net framework 4.5的MVC 4程式,使用WIF 3.5的SDK,第二個RP
- SiteC —— 基於.net framework 4.0的MVC 4程式,使用WIF 3.5的SDK,第三個RP
- SiteD —— 基於.net framework 4.0 的WebApplication程式,使用WIF 3.5的SDK,第四個RP
- STS —— 基於.net framework 4.5 的MVC 4程式,作為IP
一、創建第一個RP
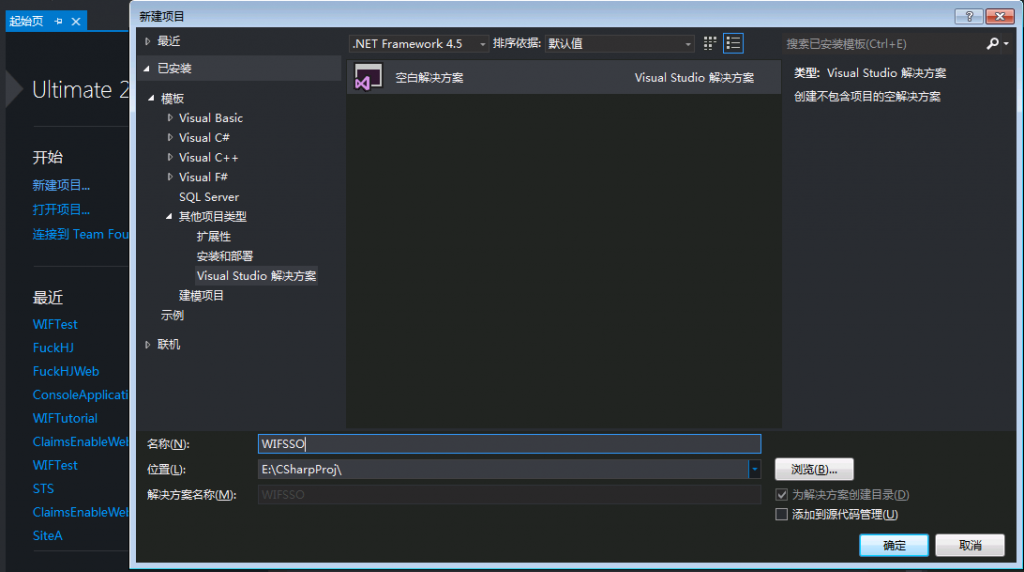
以管理員身份打開vs2012,在起始頁上點擊“新建項目”,在左邊的“模板”樹下,展開“其它項目類型”,然後選擇“Visual Studio解決方案”,“名稱”輸入框里輸入WIFSSO,然後選擇解決方案的路徑後點擊”確定“,如圖:
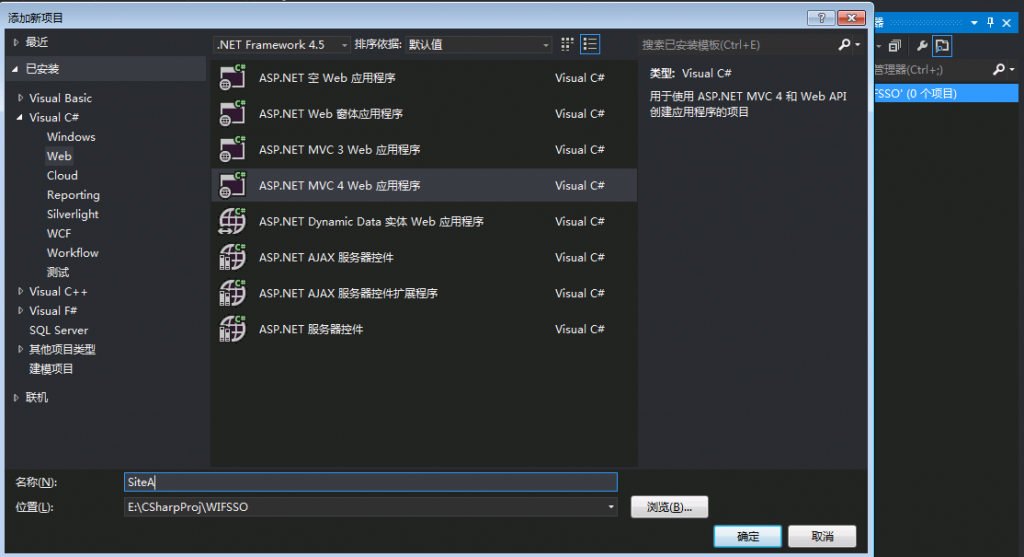
在”解決方案資源管理器“中,在新建好的解決方案上點右鍵,選擇”添加“->”新建項目“。在彈出的對話框中選擇”ASP.NET MVC 4 Web應用程式“,記得.Net Framework版本選4.5,名稱起名為”SiteA“,然後點確定,如圖:
在彈出的“新ASP.NET MVC 4項目”對話框中直接點“確定”,第一個RP項目新建完成後,添加以下兩個引用:System.IdentityModel和System.IdentityModel.Services。這次的教程不使用Identity and Access Tool,而是直接修改web.config文件,這樣能使大家對WIF的配置有更深入的瞭解。
打開web.config文件,將configSections節里的entityFramework配置節點刪掉,因為我們不需要用到Entity Framework。最好把web.config中關於Entity Framework相關的配置全都刪掉,因為我們都用不上。然後加上以下這兩個節點:
<section name="system.identityModel" type="System.IdentityModel.Configuration.SystemIdentityModelSection, System.IdentityModel, Version=4.0.0.0, Culture=neutral, PublicKeyToken=B77A5C561934E089" />
<section name="system.identityModel.services" type="System.IdentityModel.Services.Configuration.SystemIdentityModelServicesSection, System.IdentityModel.Services, Version=4.0.0.0, Culture=neutral, PublicKeyToken=B77A5C561934E089" />
將authentication節的mode屬性設為None,並把裡面的form節點刪掉,因為我們採用的是WIF的身份驗證方式,而不是傳統的Forms身份驗證。然後增加authorization節點,不允許匿名用戶訪問站點:
<authorization>
  <deny users="?"/>
</authorization>
在system.webServer節點下增加2個HttpModule的配置節點:
<modules>
  <add name="WSFederationAuthenticationModule" type="System.IdentityModel.Services.WSFederationAuthenticationModule, System.IdentityModel.Services, Version=4.0.0.0, Culture=neutral, PublicKeyToken=b77a5c561934e089" preCondition="managedHandler" />
  <add name="SessionAuthenticationModule" type="System.IdentityModel.Services.SessionAuthenticationModule, System.IdentityModel.Services, Version=4.0.0.0, Culture=neutral, PublicKeyToken=b77a5c561934e089" preCondition="managedHandler" />
</modules>
最後,增加WIF的配置節點:
<system.identityModel>
  <identityConfiguration>
    <audienceUris mode="Always">
      <add value="http://www.sitea.com" />
    </audienceUris>
    <issuerNameRegistry type="System.IdentityModel.Tokens.ConfigurationBasedIssuerNameRegistry, System.IdentityModel, Version=4.0.0.0, Culture=neutral, PublicKeyToken=b77a5c561934e089">
      <trustedIssuers>
        <add name="http://www.sts.com" thumbprint="FD1425A2F30937786F46E52E43B01AFD54E5D64D"/>
      </trustedIssuers>
    </issuerNameRegistry>
  </identityConfiguration>
</system.identityModel>
<system.identityModel.services>
  <federationConfiguration>
    <cookieHandler requireSsl="false" />
    <wsFederation passiveRedirectEnabled="true" issuer="http://www.sts.com" realm="http://www.sitea.com" reply="http://www.sitea.com" requireHttps="false"/>
  </federationConfiguration>
</system.identityModel.services>
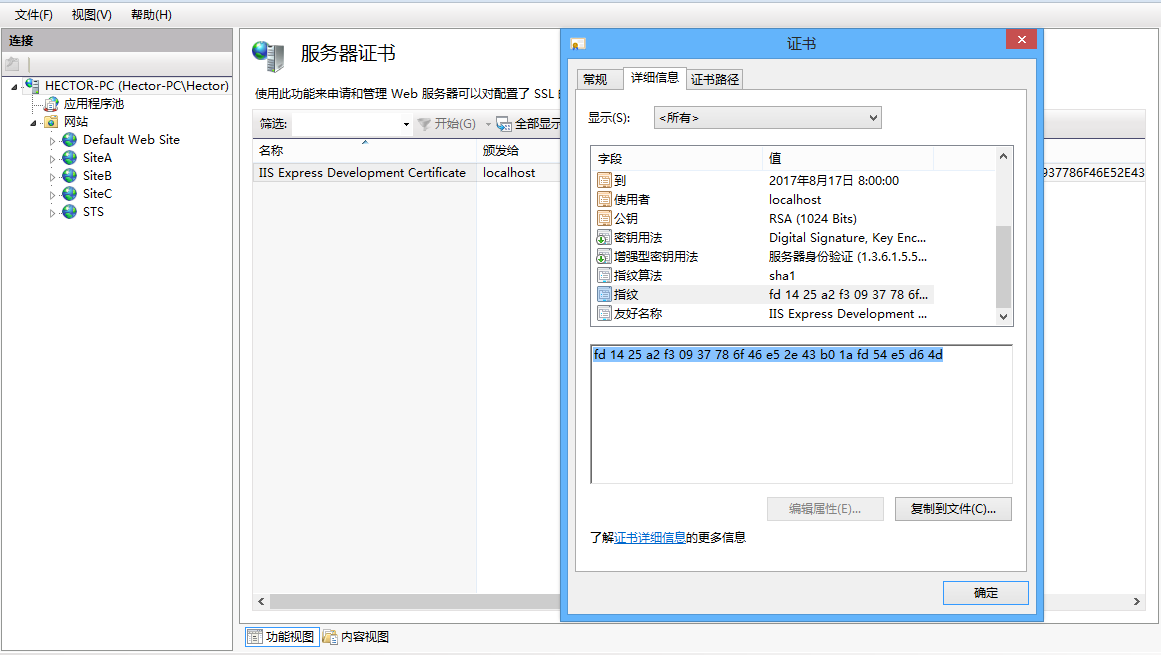
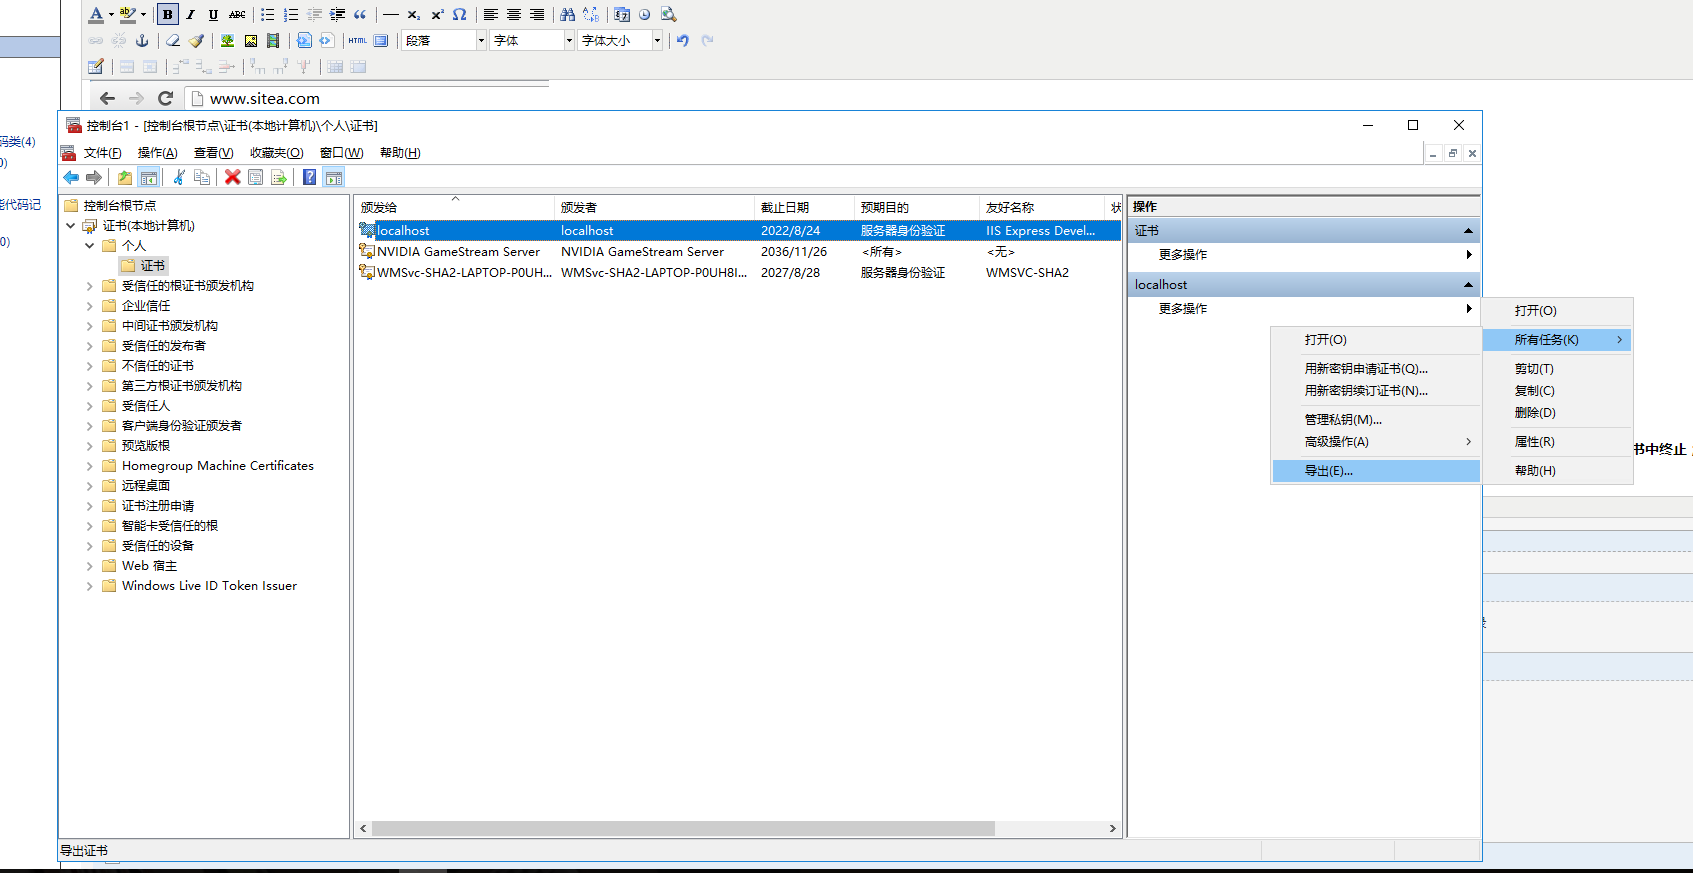
我來詳細解釋一下這些節點的意義。audienceUris指定了一組可以被RP接受的身份標識URI,只有這些配置中的URI範圍內的令牌才可以被接受。這裡,我把siteA配置在這裡。trustedIssuers就是受信任的發行者,由於我們這個demo沒有用到SSL,所以這裡我指定的thumbprint是IIS Express的指紋,這個指紋在哪裡可以獲得呢?打開IIS管理器,在左側樹點擊根節點,然後在“功能視圖”里雙擊“伺服器證書",如下圖:

在打開的證書列表裡,找到IIS Express Development Certificate,雙擊,在彈出的”證書“對話框中點擊“詳細信息”頁簽,找到“指紋”然後點擊,把框里的指紋拷下來,全都改成大寫後粘貼到thumbnail的值里去:
接下來配置federationConfiguration節點,它表示配置WSFederationAuthenticationModule (WSFAM) 和SessionAuthenticationModule (SAM) 時使用聯合身份驗證通過的 WS 聯合身份驗證協議。這裡我們使用WS 聯合身份驗證的身份驗證模塊 (WSFAM),關於該節點的詳細配置信息,請參考:http://msdn.microsoft.com/zh-cn/library/office/apps/hh568665.aspx
好,這樣一來,SiteA的配置就已經完成了,然後我們來加點代碼。
打開/Views/Home/Index.cshtml,將原有的代碼刪掉,改為如下代碼:
@using System.Security.Claims
@{
    ViewBag.Title = "SiteA主頁";
    ClaimsIdentity ci = User.Identity as ClaimsIdentity;
    if(ci!=null)
    {
        <h2>@ci.FindFirst(ClaimTypes.Name).Value</h2>
        <h2>@ci.FindFirst(ClaimTypes.Email).Value</h2>
    }
}

<a href="http://www.sts.com/Account/LogOff">退出</a>
代碼很簡單,只要當前用戶處於已登錄狀態,就把用戶的名稱和Email顯示在頁面上。
至此,SiteA就已經完成了。你是不是迫不及待的想要運行了呢?別急,雖然有SiteA了,但還沒有STS呢,現在啟動SiteA,由於沒登錄,所以它會跳轉到STS,但STS還不存在,所以會出錯的。
二、創建STS
接下來我們來創建STS,在解決方案上新建項目,新建一個名為STS的MVC 4應用程式,.Net Framework選擇4.5,項目模板選擇“Internet應用程式",確定。
添加System.IdentityModel和System.IdentityModel.Services這兩個引用,打開web.config,為forms節點添加兩個屬性:
<forms loginUrl="~/Account/Login" timeout="2880" slidingExpiration="true" name=".STSASPAUTH" />
在AppSettings里增加如下三個節點:
<add key="IssuerName" value="PassiveSigninSTS" />
<add key="SigningCertificateName" value="CN=localhost" />
<add key="EncryptingCertificateName" value="" />
同樣禁止匿名用戶訪問:
<authorization>
  <deny users="?"/>
</authorization>
在應用程式下新建一個名為Services的文件夾,在裡面新建一個類文件,名為:CertificateUtil,用於獲取證書,具體代碼如下:
public class CertificateUtil
{
    public static X509Certificate2 GetCertificate(StoreName name, StoreLocation location, string subjectName)
    {
        X509Store store = new X509Store(name, location);
        X509Certificate2Collection certificates = null;
        store.Open(OpenFlags.ReadOnly);

        try
        {
            X509Certificate2 result = null;
            certificates = store.Certificates;

            for (int i = 0; i < certificates.Count; i++)
            {
                X509Certificate2 cert = certificates[i];
                if (cert.SubjectName.Name.ToLower() == subjectName.ToLower())
                {
                    if (result != null)
                        throw new ApplicationException(string.Format("subject Name {0}存在多個證書", subjectName));
                    result = new X509Certificate2(cert);
                }
            }

            if (result == null)
            {
                throw new ApplicationException(string.Format("沒有找到用於 subject Name {0} 的證書", subjectName));
            }

            return result;
        }
        finally
        {
            if (certificates != null)
            {
                for (int i = 0; i < certificates.Count; i++)
                {
                    certificates[i].Reset();
                }
            }
            store.Close();
        }
    }

}
創建新類,名為Common,存放幾個常量:
public class Common
{
    public const string IssuerName = "IssuerName";
    public const string SigningCertificateName = "SigningCertificateName";
    public const string EncryptingCertificateName = "EncryptingCertificateName";

}
創建新類,名為SingleSignOnManager,用於註冊RP以及獲取RP列表:
public class SingleSignOnManager
{
    const string SITECOOKIENAME = "StsSiteCookie";
    const string SITENAME = "StsSite";

    /// <summary>
    /// Returns a list of sites the user is logged in via the STS
    /// </summary>
    /// <returns></returns>
    public static string[] SignOut()
    {
        if (HttpContext.Current != null &&
             HttpContext.Current.Request != null &&
             HttpContext.Current.Request.Cookies != null
            )
        {
            HttpCookie siteCookie =
                HttpContext.Current.Request.Cookies[SITECOOKIENAME];

            if (siteCookie != null)
                return siteCookie.Values.GetValues(SITENAME);
        }

        return new string[0];
    }

    public static void RegisterRP(string SiteUrl)
    {
        if (HttpContext.Current != null &&
             HttpContext.Current.Request != null &&
             HttpContext.Current.Request.Cookies != null
            )
        {
            // get an existing cookie or create a new one
            HttpCookie siteCookie =
                HttpContext.Current.Request.Cookies[SITECOOKIENAME];
            if (siteCookie == null)
                siteCookie = new HttpCookie(SITECOOKIENAME);

            siteCookie.Values.Add(SITENAME, SiteUrl);

            HttpContext.Current.Response.AppendCookie(siteCookie);
        }
    }

}
創建新類,CustomSecurityTokenService,自定義令牌服務,繼承SecurityTokenService,用於返回需要的聲明令牌:
public class CustomSecurityTokenService : SecurityTokenService
{
    private readonly SigningCredentials signingCreds;
    private readonly EncryptingCredentials encryptingCreds;

    public CustomSecurityTokenService(SecurityTokenServiceConfiguration config)
        : base(config)
    {
        this.signingCreds = new X509SigningCredentials(
            CertificateUtil.GetCertificate(StoreName.My, StoreLocation.LocalMachine, WebConfigurationManager.AppSettings[Common.SigningCertificateName]));

        if (!string.IsNullOrWhiteSpace(WebConfigurationManager.AppSettings[Common.EncryptingCertificateName]))
        {
            this.encryptingCreds = new X509EncryptingCredentials(
                CertificateUtil.GetCertificate(StoreName.My, StoreLocation.LocalMachine, WebConfigurationManager.AppSettings[Common.EncryptingCertificateName]));
        }
    }

    /// <summary>
    /// 此方法返回要發佈的令牌內容。內容由一組ClaimsIdentity實例來表示,每一個實例對應了一個要發佈的令牌。當前Windows Identity Foundation只支持單個令牌發佈,因此返回的集合必須總是只包含單個實例。
    /// </summary>
    /// <param name="principal">調用方的principal</param>
    /// <param name="request">進入的 RST,我們這裡不用它</param>
    /// <param name="scope">由之前通過GetScope方法返回的範圍</param>
    /// <returns></returns>
    protected override ClaimsIdentity GetOutputClaimsIdentity(ClaimsPrincipal principal, RequestSecurityToken request, Scope scope)
    {
        //返回一個預設聲明集,裡面了包含自己想要的聲明
        //這裡你可以通過ClaimsPrincipal來驗證用戶,並通過它來返回正確的聲明。
        string identityName = principal.Identity.Name;
        string[] temp = identityName.Split('|');
        ClaimsIdentity outgoingIdentity = new ClaimsIdentity();
        outgoingIdentity.AddClaim(new Claim(ClaimTypes.Email, temp[0]));
        outgoingIdentity.AddClaim(new Claim(ClaimTypes.DateOfBirth, temp[1]));
        outgoingIdentity.AddClaim(new Claim(ClaimTypes.Name, temp[2]));
        SingleSignOnManager.RegisterRP(scope.AppliesToAddress);
        return outgoingIdentity;
    }

    /// <summary>
    /// 此方法返回用於令牌發佈請求的配置。配置由Scope類表示。在這裡,我們只發佈令牌到一個由encryptingCreds欄位表示的RP標識        /// </summary>
    /// <param name="principal"></param>
    /// <param name="request"></param>
    /// <returns></returns>
    protected override Scope GetScope(ClaimsPrincipal principal, RequestSecurityToken request)
    {
        // 使用request的AppliesTo屬性和RP標識來創建Scope
        Scope scope = new Scope(request.AppliesTo.Uri.AbsoluteUri, this.signingCreds);

        if (Uri.IsWellFormedUriString(request.ReplyTo, UriKind.Absolute))
        {
            if (request.AppliesTo.Uri.Host != new Uri(request.ReplyTo).Host)
                scope.ReplyToAddress = request.AppliesTo.Uri.AbsoluteUri;
            else
                scope.ReplyToAddress = request.ReplyTo;
        }
        else
        {
            Uri resultUri = null;
            if (Uri.TryCreate(request.AppliesTo.Uri, request.ReplyTo, out resultUri))
                scope.ReplyToAddress = resultUri.AbsoluteUri;
            else
                scope.ReplyToAddress = request.AppliesTo.Uri.ToString();
        }
        if (this.encryptingCreds != null)
        {
            // 如果STS對應多個RP,要選擇證書指定到請求令牌的RP,然後再用 encryptingCreds
            scope.EncryptingCredentials = this.encryptingCreds;
        }
        else
            scope.TokenEncryptionRequired = false;
        return scope;
    }
}
最後添加新類CustomSecurityTokenServiceConfiguration,繼承SecurityTokenServiceConfiguration:
public class CustomSecurityTokenServiceConfiguration : SecurityTokenServiceConfiguration
{
    private static readonly object syncRoot = new object();
    private const string CustomSecurityTokenServiceConfigurationKey = "CustomSecurityTokenServiceConfigurationKey";

    public CustomSecurityTokenServiceConfiguration()
        : base(WebConfigurationManager.AppSettings[Common.IssuerName])
    {
        this.SecurityTokenService = typeof(CustomSecurityTokenService);
    }

    public static CustomSecurityTokenServiceConfiguration Current
    {
        get
        {
            HttpApplicationState app = HttpContext.Current.Application;
            CustomSecurityTokenServiceConfiguration config = app.Get(CustomSecurityTokenServiceConfigurationKey) as CustomSecurityTokenServiceConfiguration;
            if (config != null)
                return config;
            lock (syncRoot)
            {
                config = app.Get(CustomSecurityTokenServiceConfigurationKey) as CustomSecurityTokenServiceConfiguration;
                if (config == null)
                {
                    config = new CustomSecurityTokenServiceConfiguration();
                    app.Add(CustomSecurityTokenServiceConfigurationKey, config);
                }

                return config;
            }
        }
    }
}
打開/Controllers/HomeController.cs,將Index()方法修改如下:
public ActionResult Index()
{
    FederatedPassiveSecurityTokenServiceOperations.ProcessRequest(
        System.Web.HttpContext.Current.Request,
        User as ClaimsPrincipal,
        CustomSecurityTokenServiceConfiguration.Current.CreateSecurityTokenService(),
        System.Web.HttpContext.Current.Response);
    return View();
}
打開/Controllers/AccountController.cs,將Login(LoginModel model, string returnUrl)方法修改如下:
        [HttpPost]
        [AllowAnonymous]
        [ValidateAntiForgeryToken]
        public ActionResult Login(LoginModel model, string returnUrl)
        {
            var query = HttpUtility.ParseQueryString(Request.UrlReferrer.Query);
            if (model.UserName == "[email protected]" && model.Password == "123456")
            {
                FormsAuthentication.SetAuthCookie("[email protected]|1983-10-22|oujian", false);
                if (!string.IsNullOrEmpty(returnUrl))
                    return Redirect(returnUrl);
                return RedirectToAction("Index", "Home");
            }
            return View(model);
        }
LogOff方法修改如下:
 public ActionResult LogOff()
        {
            FormsAuthentication.SignOut();
            ViewData["AddressesExpected"] = SingleSignOnManager.SignOut().Distinct().ToArray();
            return View("Login");
        }
打開/Views/Account/Login.cshtml,添加以下代碼:
@{
    ViewBag.Title = "登錄";
    var addressesExpected = ViewData["AddressesExpected"] as string[];
    if (addressesExpected != null)
    {
        foreach (var address in addressesExpected)
        {
    <img src="@(address)?wa=wsignoutcleanup1.0" style="display:none;" />
        }
    }

}
OK,至此STS也已經完成了。把SiteA和STS都部署到IIS上,然後打開C:\Windows\System32\Drivers\etc\hosts文件,添加幾個站點:
註意:更改host文件需要管理員許可權,否則是改動不了的;這個更改的作用是:將功能變數名稱指向的網址變成本地,有喜歡惡作劇的朋友可以把別人最喜歡的功能變數名稱網站指向到本地或者其他網站等等,哈哈,不知道這個東西的人會懵比的,哈哈;
127.0.0.1   www.sitea.com
127.0.0.1   www.siteb.com
127.0.0.1   www.sitec.com
127.0.0.1   www.sited.com
127.0.0.1   www.sts.com
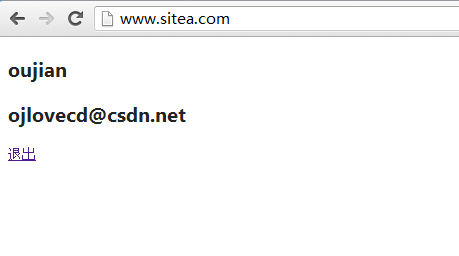
好了,在瀏覽器輸入www.sitea.com,看看如何,它馬上跳轉到了www.sts.com的登錄頁面,輸入[email protected],密碼123456,確定,登錄成功,跳回到了www.sitea.com,並顯示出了用戶名和Email:
點擊退出,將註銷當前用戶,並跳轉到登錄頁。
註意:以上是原博客中的原文,我在實踐的過程中曾報出一個問題:
錯誤:X.509 證書 CN=localhost 不在被信任的人的存儲中。 X.509 certificate CN=localhost 鏈生成失敗。所使用的證書具有無法驗證的信任鏈。請替換該證書或更改 certificateValidationMode。已處理證書鏈,但是在不受信任提供程式信任的根證書中終止;
開始看到這個問題是懵逼的,在網上搜索了好久都沒找到答案,多般曲折,最終還是找到了,http://www.cnblogs.com/pangguoming/p/5833009.html。我將localhost證書導出,然後在導入到受信任的根證書頒發機構,文件名寫CN=後面的東西,然後運行成功;
三、創建其它RP
OK,站點A搞定了,那其它站點如何呢?現在只是最簡單的登錄退出功能而已,說好的單點登錄呢?
別急,接下來就一一實現。
新建基於.NET Framework4.5的MVC4程式,添加Microsoft.IdentityModel引用。修改web.config,configSections里添加如下節點:
<section name="microsoft.identityModel" type="Microsoft.IdentityModel.Configuration.MicrosoftIdentityModelSection, Microsoft.IdentityModel, Version=3.5.0.0, Culture=neutral, PublicKeyToken=31bf3856ad364e35" />
Compilation里增加Microsoft.IdentityModel的程式集:
<compilation debug="true" targetFramework="4.5" >
  <assemblies>
    <add assembly="Microsoft.IdentityModel, Version=3.5.0.0, Culture=neutral, PublicKeyToken=31BF3856AD364E35"/>
  </assemblies>
</compilation>
身份驗證改為None,添加authorization節點,禁止匿名用戶訪問:
<authentication mode="None">
</authentication>
<authorization>
  <deny users="?" />
</authorization>
添加三個httpModules:
<httpModules>
      <add name="WSFederationAuthenticationModule" type="Microsoft.IdentityModel.Web.WSFederationAuthenticationModule, Microsoft.IdentityModel, Version=3.5.0.0, Culture=neutral, PublicKeyToken=31bf3856ad364e35" />
      <add name="SessionAuthenticationModule" type="Microsoft.IdentityModel.Web.SessionAuthenticationModule, Microsoft.IdentityModel, Version=3.5.0.0, Culture=neutral, PublicKeyToken=31bf3856ad364e35" />
      <add name="ClaimsAuthorizationModule" type="Microsoft.IdentityModel.Web.ClaimsAuthorizationModule, Microsoft.IdentityModel, Version=3.5.0.0, Culture=neutral, PublicKeyToken=31bf3856ad364e35" />
    </httpModules>
system.webServer里添加以下三個modules:
    <modules >
      <add name="WSFederationAuthenticationModule" type="Microsoft.IdentityModel.Web.WSFederationAuthenticationModule, Microsoft.IdentityModel, Version=3.5.0.0, Culture=neutral, PublicKeyToken=31bf3856ad364e35" preCondition="managedHandler" />
      <add name="SessionAuthenticationModule" type="Microsoft.IdentityModel.Web.SessionAuthenticationModule, Microsoft.IdentityModel, Version=3.5.0.0, Culture=neutral, PublicKeyToken=31bf3856ad364e35" preCondition="managedHandler" />
      <add name="ClaimsAuthorizationModule" type="Microsoft.IdentityModel.Web.ClaimsAuthorizationModule, Microsoft.IdentityModel, Version=3.5.0.0, Culture=neutral, PublicKeyToken=31bf3856ad364e35" preCondition="managedHandler" />
    </modules>
最後增加microsoft.identityModel節點:
<microsoft.identityModel>
   <service>
     <audienceUris mode="Always">
       <add value="http://www.siteb.com" />
     </audienceUris>
     <federatedAuthentication>
       <wsFederation passiveRedirectEnabled="true" issuer="http://www.sts.com" realm="http://www.siteb.com" reply="http://www.siteb.com"  requireHttps="false" />
       <cookieHandler requireSsl="false" />
     </federatedAuthentication>
     <issuerNameRegistry type="Microsoft.IdentityModel.Tokens.ConfigurationBasedIssuerNameRegistry, Microsoft.IdentityModel, Version=3.5.0.0, Culture=neutral, PublicKeyToken=31bf3856ad364e35">
       <trustedIssuers>
         <add thumbprint="FD1425A2F30937786F46E52E43B01AFD54E5D64D" name="http://www.sts.com" />
       </trustedIssuers>
     </issuerNameRegistry>
   </service>
 </microsoft.identityModel>
以上配置跟SIteA差不多,只是WIF3.5和4.5的區別而已,在這裡就不贅述了,要獲取詳細信息,請參考微軟官方網站。
打開/Views/Home/Index.cshtml,將代碼修改如下,在SiteB里我們顯示Email和生日:
@using Microsoft.IdentityModel.Claims
@{
    ViewBag.Title = "SiteB主頁";
    ClaimsIdentity ci = User.Identity as ClaimsIdentity;
    if(ci!=null)
    {
        <h2>@ci.Claims.SingleOrDefault(c=>c.ClaimType == ClaimTypes.Email).Value</h2>
        <h2>@ci.Claims.SingleOrDefault(c=>c.ClaimType == ClaimTypes.DateOfBirth).Value</h2>
    }
}


<a href="http://www.sts.com/Account/LogOff">退出</a>
OK,部署到IIS上,然後運行,頁面跳轉到了sts的登錄頁面,輸入用戶名和密碼,跳轉,哎喲我去,怎麼報錯了:
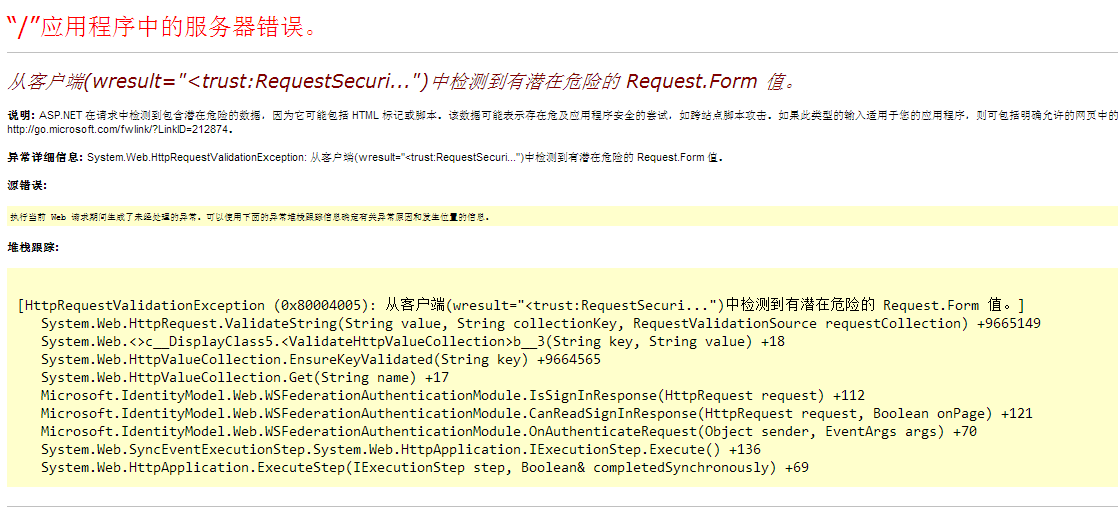
原因是從sts返回來的數據里有<>這種標簽,於是asp.net認為那是有危險的,於是拋出了異常,這個異常大家估計以前也碰到過,最簡單粗暴的方法就是把驗證請求的配置改為false,但這裡我不建議這麼乾, 為此,我們專門用一個類來處理這種情況。
在SiteB目錄下新建一個文件夾名為Services,然後添加一個類,名為SampleRequestValidator:
/// <summary>
  /// This SampleRequestValidator validates the wresult parameter of the
  /// WS-Federation passive protocol by checking for a SignInResponse message
  /// in the form post. The SignInResponse message contents are verified later by
  /// the WSFederationPassiveAuthenticationModule or the WIF signin controls.
  /// </summary>


  public class SampleRequestValidator : RequestValidator
  {
      protected override bool IsValidRequestString(HttpContext context, string value, RequestValidationSource requestValidationSource, string collectionKey, out int validationFailureIndex)
      {
          validationFailureIndex = 0;


          if (requestValidationSource == RequestValidationSource.Form && collectionKey.Equals(WSFederationConstants.Parameters.Result, StringComparison.Ordinal))
          {
                  return true;
          }


          return base.IsValidRequestString(context, value, requestValidationSource, collectionKey, out validationFailureIndex);
      }


  }
然後在web.config裡加入這個類的配置:
<httpRuntime targetFramework="4.5" requestValidationType="SiteC.Services.SampleRequestValidator" />
重新運行程式,非常完美:
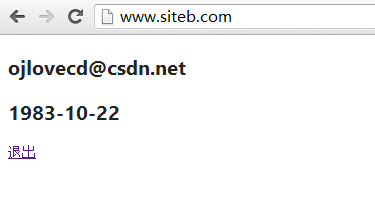
這時候再打開SIteA,發現也已經處於了登錄狀態,這時候在SiteA點擊退出,跳轉到了登錄頁,再看看這時候的SiteB呢,刷新SiteB首頁,發現也跳轉到了登錄頁,證明在SiteA的退出操作對SiteB也起了作用,確實是單點登錄了!
SiteC和SiteD的配置與SiteB類似,這裡我就不重覆了,留給大家自己練習一下,等所有的項目都配置好以後,在任意站點登錄,發現其它站點也是登錄狀態;在任意站點退出,發現其它站點也已經退出。利用WIF,單點登錄變的如此簡單~~


