前端框架層出不窮,不過萬變不離其宗,就是從MVC過渡到MVVM。從數據映射到DOM,angular中用的是watcher對象,vue是觀察者模式,react就是state了。 React通過管理狀態實現對組件的管理,通過this.state()方法更新state。當this.setState()被調 ...
前端框架層出不窮,不過萬變不離其宗,就是從MVC過渡到MVVM。從數據映射到DOM,angular中用的是watcher對象,vue是觀察者模式,react就是state了。
React通過管理狀態實現對組件的管理,通過this.state()方法更新state。當this.setState()被調用的時候,React會重新調用render方法來重新渲染UI。
本文針對React的SetState的源碼來進行解讀,根據陳屹老師的《深入React技術棧》加上自己的理解。
1. setState非同步更新
setState通過一個隊列機制實現state的更新。當執行setState時,會把需要更新的state合併後放入狀態隊列,而不會立刻更新this.state,利用這個隊列機制可以高效的批量的更新state。
// 將新的 state 合併到狀態更新隊列中
var nextState = this._processPendingState(nextProps, nextContext);

// 根據更新隊列和 shouldComponentUpdate 的狀態來判斷是否需要更新組件 var shouldUpdate =
 this._pendingForceUpdate ||
!inst.shouldComponentUpdate || inst.shouldComponentUpdate(nextProps, nextState, nextContext);如果不通過setState而直接修改this.state的值,就像這樣:this.state.value = 1,那麼該state將不會被放入狀態隊列中,下次調用this.setState並對狀態隊列進行合併時,將會忽略之前直接別修改的state,因此我們應該用setState更新state的值。
2. setState迴圈調用
當調用setState時,實際上會執行enqueueSetState方法,並對partialState以及_pendingStateQueue更新隊列進行合併,最終通過enqueueUpdate執行state更新。
而performUpdateIfNecessary方法獲取_pendingElement、_pendingStateQueue、_pendingForceUpdate,並調用reciveComponent和updateComponent方法進行組件更新。
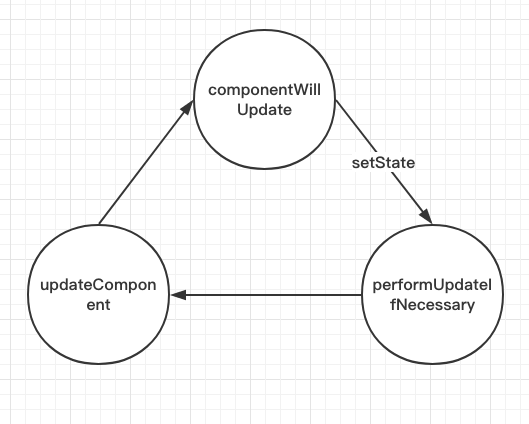
如果在shouldComponentUpdate或者componentWillUpdate方法中調用setState,此時this._pendingStateQueue != null,則perfromUpdateIfNecessary方法就會調用updateComponent方法進行組件更新,單updateComponent方法又會調用shouldComponentUpdate和componentWillUpdate方法,造成迴圈調用。

接下里我們看看setState的源碼:
// 更新 state
ReactComponent.prototype.setState = function(partialState, callback) {
    this.updater.enqueueSetState(this, partialState);
    if (callback) {
    this.updater.enqueueCallback(this, callback, 'setState');
    }
};

enqueueSetState: function(publicInstance, partialState) {
    var internalInstance = getInternalInstanceReadyForUpdate(
         publicInstance,
        'setState'
    );

    if (!internalInstance) {
    return;
    }

    // 更新隊列合併操作
    var queue = internalInstance._pendingStateQueue || (internalInstance._pendingStateQueue = []);

    queue.push(partialState);
    enqueueUpdate(internalInstance);
},

// 如果存在 _pendingElement、_pendingStateQueue和_pendingForceUpdate,則更新組件
performUpdateIfNecessary: function(transaction) {
    if (this._pendingElement != null) {
        ReactReconciler.receiveComponent(this, this._pendingElement, transaction, this._context);
    }
    if (this._pendingStateQueue !== null || this._pendingForceUpdate) {
        this.updateComponent(transaction, this._currentElement, this._currentElement, this._context, this._context);
    }
}
3. setState調用棧
對setState很瞭解是吧?來看看這個:
class Example extends React.Component {
  constructor() {
    super();
    this.state = {
      val: 0
    };
  }

  componentDidMount() {
    this.setState({val: this.state.val + 1});
    console.log(this.state.val);    // 第 1 次 log

    this.setState({val: this.state.val + 1});
    console.log(this.state.val);    // 第 2 次 log

    setTimeout(() => {
      this.setState({val: this.state.val + 1});
      console.log(this.state.val);  // 第 3 次 log

      this.setState({val: this.state.val + 1});
      console.log(this.state.val);  // 第 4 次 log
    }, 0);
  }

  render() {
    return null;
  }
};結果是:0、0、2、3,我第一次也不懂,怎麼回事呢?
下麵是一個簡化的setState調用棧。

我們說過setState最終是通過enqueueUpdate執行state更新,enqueueUpdate代碼如下:
function enqueueUpdate(component) {
    ensureInjected();

    // 如果不處於批量更新模式
    if (!batchingStrategy.isBatchingUpdates) {
        batchingStrategy.batchedUpdates(enqueueUpdate, component);
        return;
    }

    // 如果處於批量更新模式,則將該組件保存在 dirtyComponents 中
    dirtyComponents.push(component);
}
如果isBatchingUpdates也就是處於批量更新模式,就把當前調用了this.setState的組件放入dirtyComponents數組中。否則的話就不是批量更新模式,則對隊列中的所有更新執行batchedUpdates方法。例子中的4次console之所以不同,這裡的邏輯判斷起了關鍵作用。
那batchingStrategy呢?其實他就是一個簡單的對象:
var ReactDefaultBatchingStrategy = {
    isBatchingUpdates: false,

    batchedUpdates: function(callback, a, b, c, d, e) {
        var alreadyBatchingUpdates = ReactDefaultBatchingStrategy.isBatchingUpdates;
        ReactDefaultBatchingStrategy.isBatchingUpdates = true;

        if (alreadyBatchingUpdates) {
            callback(a, b, c, d, e);
        } else {
            transaction.perform(callback, null, a, b, c, d, e);
        }
    },
}
註意,batchedUpdates中有個transaction.perform調用,transaction,下麵說。
4. transaction
有人看到這裡,transaction,不就是事務嗎?保證數據一致性要用到的,然後說了幾條事務的特性,什麼原子性、穩定性,但是抱歉,這裡的事務和SQL里的事務不一樣,我個人理解這個事務有點類似於中間件,為什麼叫事務,不知道。
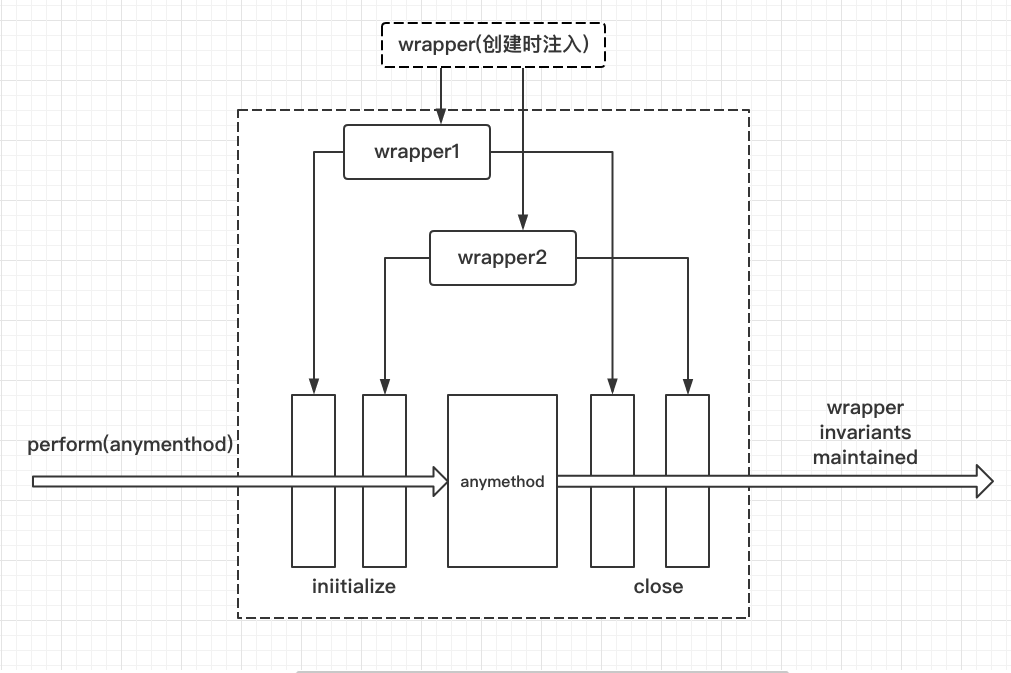
可以畫一張圖理解一下:

事務就是將需要執行的方法用wrapper封裝起來,再通過事務提供的perform方法執行。而再perform之前,先執行所wrapeer中的initialize方法,執行完需要執行的方法後,再執行close方法。一組initialize和close方法稱為一個wrapper,事務支持多個wrapper疊加。
React里涉及到很多高階函數,個人理解這個事務也就是一個高階函數嘛,也就是中間件的思想。
5. 解密setState
剛說了事務,那事務是怎麼導致前面所述的setState的各種不同的輸出呢?
很顯然,我們可以將4次setState簡單規成兩類,componentDidMount是一類,setTimeOut中的又是一類,因為這兩次在不同的調用棧中執行。
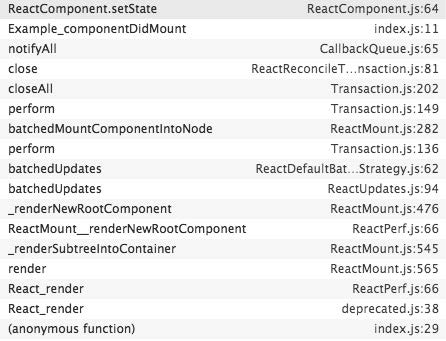
我們先看看在componentDidMount中setState的調用棧:

再看看在setTimeOut中的調用棧:

顯然,在componentDidMount中調用setState的調用棧更加複雜,那我們重點看看在componentDidMount中的調用棧,發現了batchedUpdates方法,原來在setState調用之前,就已經處於batchedUpdates執行的事務之中了。
那batchedUpdates方法是誰調用的呢?我們再往上追溯一層,原來是ReactMount.js中的_renderNewRootComponent方法。也就是說,整個將React組件渲染到DOM的過程就處於一個大的事務中了。
接下來就可以理解了,因為在componentDidMount中調用setState時,batchingStrategy的isBatchingUpdates已經被設置為true了,所以兩次setState的結果並沒有立即生效,而是被放進了dirtyComponents中。這也解釋了兩次列印this.state.val都是0的原因,因為新的state還沒被應用到組件中。
在看setTimeOut中的兩次setState,因為沒有前置的batchedUpdate調用,所以batchingStrategy的isBatchingUpdates標誌位是false,也就導致了新的state馬上生效,沒有走到dirtyComponents分支。也就是說,setTimeOut中的第一次執行,setState時,this.state.val為1,而setState完成後列印時this.state.val變成了2。第二次的setState同理。


