0.目錄 1. "前言" 2. "通過pymssql與資料庫的交互" 3. "通過pyqt與界面的交互" 4. "UI與資料庫的交互" 5. "最後的main主函數" 1.前言 版本:Python3.6.1 + PyQt5 + SQL Server 2012 以前一直覺得,機器學習、手寫體識別這種程 ...
0.目錄
1.前言
2.通過pymssql與資料庫的交互
3.通過pyqt與界面的交互
4.UI與資料庫的交互
5.最後的main主函數
1.前言
版本:Python3.6.1 + PyQt5 + SQL Server 2012
以前一直覺得,機器學習、手寫體識別這種程式都是很高大上很難的,直到偶然看到了這個視頻,聽了老師講的思路後,瞬間覺得原來這個並不是那麼的難,原來我還是有可能做到的。
於是我開始順著思路打算用Python、PyQt、SQLServer做一個出來,看看能不能行。然而中間遇到了太多的問題,資料庫方面的問題有十幾個,PyQt方面的問題有接近一百個,還有數十個Python基礎語法的問題。但好在,通過不斷的Google,終於湊出了這麼一個成品來。
最終還是把都湊在一個函數里的代碼重構了一下,改寫成了4個模塊:
main.py、Learning.py、LearningDB.py、LearningUI.py
其中LearningDB實現python與資料庫的交互,LearningUI實現界面的交互,Learning繼承LearningUI類添加上了與LearningDB資料庫類的交互,最後通過main主函數模塊運行程式。
其中涉及資料庫的知識可參考之前的文章:Python3操作SQL Server資料庫,涉及PyQt的知識可參考:Python3使用PyQt5製作簡單的畫板/手寫板
手寫體識別的主要思路是將手寫的字,用一個列表記錄其所經過的點,劃分為一個九宮格,然後數每個格子中點的數目,將數目轉化為所占總點數的百分比。然後兩兩保存的九維數,求他們之間的距離,距離越近代表越接近。
2.通過pymssql與資料庫的交互
因為使用程式之前先需要建表,建表我就直接使用SQL語句執行了:
create database PyLearningDB

drop table table0
create table table0
(dim0 int not null,
dim1 int not null,
dim2 int not null,
dim3 int not null,
dim4 int not null,
dim5 int not null,
dim6 int not null,
dim7 int not null,
dim8 int not null)

drop table table1
create table table1
(dim0 int not null,
dim1 int not null,
dim2 int not null,
dim3 int not null,
dim4 int not null,
dim5 int not null,
dim6 int not null,
dim7 int not null,
dim8 int not null)

drop table table2
create table table2
(dim0 int not null,
dim1 int not null,
dim2 int not null,
dim3 int not null,
dim4 int not null,
dim5 int not null,
dim6 int not null,
dim7 int not null,
dim8 int not null)

drop table table3
create table table3
(dim0 int not null,
dim1 int not null,
dim2 int not null,
dim3 int not null,
dim4 int not null,
dim5 int not null,
dim6 int not null,
dim7 int not null,
dim8 int not null)

drop table table4
create table table4
(dim0 int not null,
dim1 int not null,
dim2 int not null,
dim3 int not null,
dim4 int not null,
dim5 int not null,
dim6 int not null,
dim7 int not null,
dim8 int not null)

drop table table5
create table table5
(dim0 int not null,
dim1 int not null,
dim2 int not null,
dim3 int not null,
dim4 int not null,
dim5 int not null,
dim6 int not null,
dim7 int not null,
dim8 int not null)

drop table table6
create table table6
(dim0 int not null,
dim1 int not null,
dim2 int not null,
dim3 int not null,
dim4 int not null,
dim5 int not null,
dim6 int not null,
dim7 int not null,
dim8 int not null)

drop table table7
create table table7
(dim0 int not null,
dim1 int not null,
dim2 int not null,
dim3 int not null,
dim4 int not null,
dim5 int not null,
dim6 int not null,
dim7 int not null,
dim8 int not null)

drop table table8
create table table8
(dim0 int not null,
dim1 int not null,
dim2 int not null,
dim3 int not null,
dim4 int not null,
dim5 int not null,
dim6 int not null,
dim7 int not null,
dim8 int not null)

drop table table9
create table table9
(dim0 int not null,
dim1 int not null,
dim2 int not null,
dim3 int not null,
dim4 int not null,
dim5 int not null,
dim6 int not null,
dim7 int not null,
dim8 int not null)
LearningDB.py程式如下:
'''
    LearningDB類
    功能:定義資料庫類,包含一個學習函數learn_data和一個識別函數identify_data
    作者:PyLearn
    博客: http://www.cnblogs.com/PyLearn/
    最後修改日期: 2017/10/18
'''
import math
import pymssql

class LearningDB():

    def __init__(self):
        self.conn = pymssql.connect(host='127.0.0.1',
                                    user='sa',
                                    password='123',
                                    database='PyLearningDB',
                                    charset='utf8')
        self.cursor = self.conn.cursor()
        self.sql = ''
        self.distance = 0.0
        self.conn.close()

    def learn_data(self, table, dim):
        '''
            學習數據,將數據存到對應的資料庫
            table指定哪個表,dim是維度數組
        '''
        learn_result = False

        try:
            if table < 0 or table > 9:
                raise Exception("錯誤!table的值為%d!" % table)
            for num in dim:
                if num < 0:
                    raise Exception("錯誤!dim的值不能小於0!")

            self.conn = pymssql.connect(host='127.0.0.1',
                                        user='sa',
                                        password='123',
                                        database='PyLearningDB',
                                        charset='utf8')
            self.cursor = self.conn.cursor()
            self.sql = 'insert into table%d values(%d, %d, %d, %d, %d, %d, %d, %d, %d)' %(
                table, dim[0], dim[1], dim[2], dim[3], dim[4], dim[5], dim[6], dim[7], dim[8])
            self.cursor.execute(self.sql)
            self.conn.commit()
            learn_result = True
        except Exception as ex_learn:
            self.conn.rollback()
            raise ex_learn
        finally:
            self.conn.close()
        return learn_result

    def identify_data(self, test_data):
        '''
            識別數據,將數據一一對比,返回最接近的近似值
        '''
        try:
            table_data = []
            for i in range(10):
                table_data.append(self.__get_data(i, test_data))

            #返回table_data中最小值的索引
            return table_data.index(min(table_data))
        except Exception as ex_identify:
            raise ex_identify

    def __get_data(self, table, test_data):
        '''
            取出table表中所有數據
            並與測試數據進行比較,返回最小值
            如果table表中無數據,則全部取0
        '''
        try:
            if table < 0 or table > 9:
                raise Exception("錯誤!table的值不能為%d!" % table)
            self.conn = pymssql.connect(host='127.0.0.1',
                                        user='sa',
                                        password='123',
                                        database='PyLearningDB',
                                        charset='utf8')
            self.cursor = self.conn.cursor()
            self.sql = 'select * from table%d' % table
            self.cursor.execute(self.sql)
            receive_sql = self.cursor.fetchall()

            if not receive_sql:
                new_receive_sql = [(0, 0, 0, 0, 0, 0, 0, 0, 0)]
            else:
                new_receive_sql = receive_sql
        finally:
            self.conn.close()
        #計算最小值
        dim_data = []
        for receive_data in new_receive_sql:
            dim_data.append(self.__distance_data(test_data, receive_data))
        #返回dimData中最小值
        return min(dim_data)

    def __distance_data(self, test_data, table_data):
        '''
            求九維空間中兩點之間的距離
        '''
        self.distance = 0.0
        for i in range(9):
            self.distance += (test_data[i] - table_data[i]) ** 2
        return math.sqrt(self.distance)
3.通過pyqt與界面的交互
LearningUI.py程式如下:
'''
LearningUI類
功能:生成UI界面,以及定義事件處理方法
作者:PyLearn
博客: http://www.cnblogs.com/PyLearn/
最後修改日期: 2017/10/18
'''
from PyQt5.QtWidgets import (QWidget, QPushButton, QLabel, QComboBox, QDesktopWidget)
from PyQt5.QtGui import (QPainter, QPen, QFont)
from PyQt5.QtCore import Qt
class LearningUI(QWidget):
def __init__(self):
super(LearningUI, self).__init__()
self.__init_ui()
#設置只有滑鼠按下時才跟蹤移動,否則不按的時候也在畫畫
self.setMouseTracking(False)
#self.pos_xy保存所有繪畫的點
self.pos_xy = []
#設置pos_x、pos_y方便計算
self.pos_x = []
self.pos_y = []
#設置關聯事件
self.btn_learn.clicked.connect(self.btn_learn_on_clicked)
self.btn_recognize.clicked.connect(self.btn_recognize_on_clicked)
self.btn_clear.clicked.connect(self.btn_clear_on_clicked)
def __init_ui(self):
'''
定義UI界面:
三個按鈕:學習、識別、清屏
btn_learn、btn_recognize、btn_clear
一個組合框:選擇0-9
combo_table
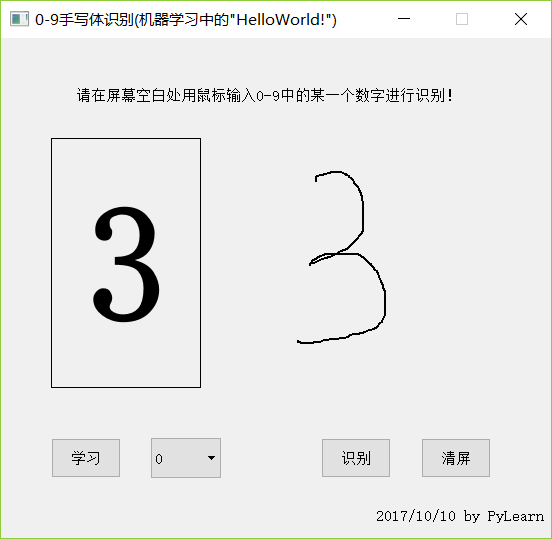
兩條標簽:請在屏幕空白處用滑鼠輸入0-9中的某一個數字進行識別!
2017/10/10 by PyLearn
一條輸出識別結果的標簽
label_output
'''
#添加三個按鈕,分別是學習、識別、清屏
self.btn_learn = QPushButton("學習", self)
self.btn_learn.setGeometry(50, 400, 70, 40)
self.btn_recognize = QPushButton("識別", self)
self.btn_recognize.setGeometry(320, 400, 70, 40)
self.btn_clear = QPushButton("清屏", self)
self.btn_clear.setGeometry(420, 400, 70, 40)
#添加一個組合框,選擇0-9
self.combo_table = QComboBox(self)
for i in range(10):
self.combo_table.addItem("%d" % i)
self.combo_table.setGeometry(150, 400, 70, 40)
#添加兩條標簽
self.label_head = QLabel('請在屏幕空白處用滑鼠輸入0-9中的某一個數字進行識別!', self)
self.label_head.move(75, 50)
self.label_end = QLabel('2017/10/10 by PyLearn', self)
self.label_end.move(375, 470)
#添加一條輸出識別結果的標簽
'''
setStyleSheet設置邊框大小、顏色
setFont設置字體大小、形狀、加粗
setAlignment設置文本居中
'''
self.label_output = QLabel('', self)
self.label_output.setGeometry(50, 100, 150, 250)
self.label_output.setStyleSheet("QLabel{border:1px solid black;}")
self.label_output.setFont(QFont("Roman times", 100, QFont.Bold))
self.label_output.setAlignment(Qt.AlignCenter)
'''
setFixedSize()固定了窗體的寬度與高度
self.center()將窗體居中顯示
setWindowTitle()設置窗體的標題
'''
self.setFixedSize(550, 500)
self.center()
self.setWindowTitle('0-9手寫體識別(機器學習中的"HelloWorld!")')
def center(self):
'''
視窗居中顯示
'''
qt_center = self.frameGeometry()
desktop_center = QDesktopWidget().availableGeometry().center()
qt_center.moveCenter(desktop_center)
self.move(qt_center.topLeft())
def paintEvent(self, event):
'''
首先判斷pos_xy列表中是不是至少有兩個點了
然後將pos_xy中第一個點賦值給point_start
利用中間變數pos_tmp遍歷整個pos_xy列表
point_end = pos_tmp
判斷point_end是否是斷點,如果是
point_start賦值為斷點
continue
判斷point_start是否是斷點,如果是
point_start賦值為point_end
continue
畫point_start到point_end之間的線
point_start = point_end
這樣,不斷地將相鄰兩個點之間畫線,就能留下滑鼠移動軌跡了
'''
painter = QPainter()
painter.begin(self)
pen = QPen(Qt.black, 2, Qt.SolidLine)
painter.setPen(pen)
if len(self.pos_xy) > 1:
point_start = self.pos_xy[0]
for pos_tmp in self.pos_xy:
point_end = pos_tmp
if point_end == (-1, -1):
point_start = point_end
continue
if point_start == (-1, -1):
point_start = point_end
continue
painter.drawLine(point_start[0], point_start[1], point_end[0], point_end[1])
point_start = point_end
painter.end()
def mouseReleaseEvent(self, event):
'''
重寫滑鼠按住後鬆開的事件
在每次鬆開後向pos_xy列表中添加一個斷點(-1, -1)
然後在繪畫時判斷一下是不是斷點就行了
是斷點的話就跳過去,不與之前的連續
'''
pos_test = (-1, -1)
self.pos_xy.append(pos_test)
self.update()
def mouseMoveEvent(self, event):
'''
按住滑鼠移動:將移動的點加入self.pos_xy列表
'''
#self.pos_x和self.pos_y總是比self.pos_xy少一到兩個點,還不知道原因在哪
self.pos_x.append(event.pos().x())
self.pos_y.append(event.pos().y())
#中間變數pos_tmp提取當前點
pos_tmp = (event.pos().x(), event.pos().y())
#pos_tmp添加到self.pos_xy中
self.pos_xy.append(pos_tmp)
self.update()
def btn_learn_on_clicked(self):
'''
需要用到資料庫,因此在在子類中實現
'''
pass
def btn_recognize_on_clicked(self):
'''
需要用到資料庫,因此在在子類中實現
'''
pass
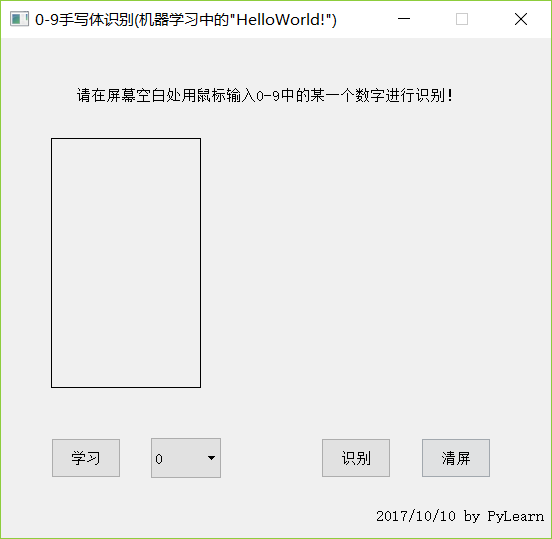
def btn_clear_on_clicked(self):
'''
按下清屏按鈕:
將列表賦值為空
將輸出識別結果的標簽賦值為空
然後刷新界面,重新繪畫即可清屏
'''
self.pos_xy = []
self.pos_x = []
self.pos_y = []
self.label_output.setText('')
self.update()
def get_pos_xy(self):
'''
將手寫體在平面上分為9個格子
計算每個格子里點的數量
然後點的數量轉化為占總點數的百分比
接著返回一個數組dim[9]
橫軸依次是min_x、min2_x、max2_x、max_x
縱軸依次是min_y、min2_y、max2_y、max_y
'''
if not self.pos_xy:
return None
pos_count = len(self.pos_x)
max_x = max(self.pos_x)
max_y = max(self.pos_y)
min_x = min(self.pos_x)
min_y = min(self.pos_y)
dim = [0, 0, 0, 0, 0, 0, 0, 0, 0]
dis_x = (max_x - min_x) // 3
dis_y = (max_y - min_y) // 3
min2_x = min_x + dis_x
min2_y = min_y + dis_y
max2_x = max_x - dis_x
max2_y = max_y - dis_y
for i in range(len(self.pos_x)):
if self.pos_y[i] >= min_y and self.pos_y[i] < min2_y:
if self.pos_x[i] >= min_x and self.pos_x[i] < min2_x:
dim[0] += 1
continue
if self.pos_x[i] >= min2_x and self.pos_x[i] < max2_x:
dim[1] += 1
continue
if self.pos_x[i] >= max2_x and self.pos_x[i] <= max_x:
dim[2] += 1
continue
elif self.pos_y[i] >= min2_y and self.pos_y[i] < max2_y:
if self.pos_x[i] >= min_x and self.pos_x[i] < min2_x:
dim[3] += 1
continue
if self.pos_x[i] >= min2_x and self.pos_x[i] < max2_x:
dim[4] += 1
continue
if self.pos_x[i] >= max2_x and self.pos_x[i] <= max_x:
dim[5] += 1
continue
elif self.pos_y[i] >= max2_y and self.pos_y[i] <= max_y:
if self.pos_x[i] >= min_x and self.pos_x[i] < min2_x:
dim[6] += 1
continue
if self.pos_x[i] >= min2_x and self.pos_x[i] < max2_x:
dim[7] += 1
continue
if self.pos_x[i] >= max2_x and self.pos_x[i] <= max_x:
dim[8] += 1
continue
else:
pos_count -= 1
continue
#將數量轉化為所占百分比
for num in dim:
num = num * 100 // pos_count
return dim4.UI與資料庫的交互
Learning.py程式如下:
'''
    Learning類
    功能:重寫LearningUI類中的兩個用到了資料庫的方法:
         類中添加一個LearningDB類對象的數據成員self.learn_db
    作者:PyLearn
    博客: http://www.cnblogs.com/PyLearn/
    最後修改日期: 2017/10/18
'''
from PyQt5.QtWidgets import QMessageBox
from LearningUI import LearningUI
from LearningDB import LearningDB

class Learning(LearningUI):
    '''
        Learning實現btn_learn_on_clicked和btn_recognize_on_clicked兩個方法
    '''
    def __init__(self):
        super(Learning, self).__init__()

        #學習函數learn_data(table, dim)和一個識別函數identify_data(test_data)
        self.learn_db = LearningDB()

    def btn_learn_on_clicked(self):
        if not self.pos_xy:
            QMessageBox.critical(self, "註意", "請先寫入您要學習的數字!")
            return None

        #獲取要學習的數字learn_num
        learn_num = self.combo_table.currentIndex()

        #彈出確認對話框
        qbox = QMessageBox()
        qbox.setIcon(QMessageBox.Information)
        qbox.setWindowTitle("請確認")
        qbox.setText("學習數字 %d ?" % learn_num)
        qbox.setStandardButtons(QMessageBox.Yes | QMessageBox.No)
        qbox.setDefaultButton(QMessageBox.No)
        qbox.button(QMessageBox.Yes).setText("是")
        qbox.button(QMessageBox.No).setText("否")
        reply = qbox.exec()

        #判斷對話框結果,執行程式
        if reply == QMessageBox.Yes:
            learn_result = False
            learn_dim = self.get_pos_xy()
            if learn_dim:
                learn_result = self.learn_db.learn_data(learn_num, learn_dim)
            else:
                print('get_pos_xy()函數返回空值')
                return None

            if learn_result:
                QMessageBox.about(self, "提示", "學習成功!")
            else:
                QMessageBox.about(self, "提示", "學習失敗!")
        else:
            return None

    def btn_recognize_on_clicked(self):
        #如果沒有進行繪畫,警告後退出
        if not self.pos_xy:
            QMessageBox.critical(self, "註意", "請先寫入您要識別的數字!")
            return None
        else:
            recognize_num = 0
            recognize_dim = self.get_pos_xy()
            if recognize_dim:
                recognize_num = self.learn_db.identify_data(recognize_dim)
            else:
                print('recognize_dim為空')
                return None
            self.label_output.setText('%d' % recognize_num)
5.最後的main主函數
'''
    主函數main
    功能:生成Learning對象,進入主迴圈
    作者:PyLearn
    博客: http://www.cnblogs.com/PyLearn/
    最後修改日期: 2017/10/18
'''
import sys
from PyQt5.QtWidgets import QApplication
from Learning import Learning

if __name__ == '__main__':
    app = QApplication(sys.argv)

    py_learning = Learning()
    py_learning.show()

    sys.exit(app.exec_())
將以上4個程式放在同一個目錄下,直接執行main.py就行了。
運行界面如下:
學習數字4:
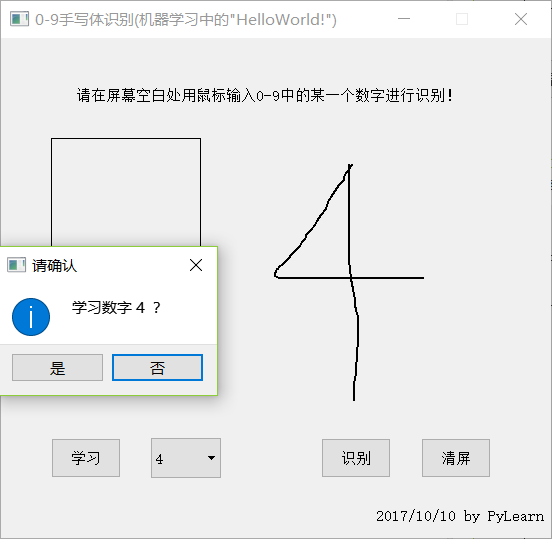
第一次運行需要全部學習至少一次才能有一點正確率。
識別3: