
本文地址:http://www.cnblogs.com/wuyudong/p/5943005.html,轉載請註明出處。 本文實現導航界面1的佈局的實現,效果如下圖所示: 首先分析所使用的佈局樣式: 對應的activity_setup1.xml佈局文件內容如下: 最後還剩下右下角的佈局還沒有實現,將 ...
本文地址:http://www.cnblogs.com/wuyudong/p/5943005.html,轉載請註明出處。
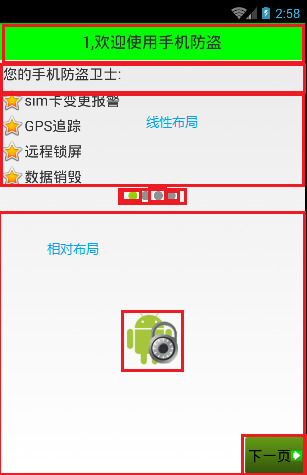
本文實現導航界面1的佈局的實現,效果如下圖所示:

首先分析所使用的佈局樣式:
對應的activity_setup1.xml佈局文件內容如下:
<?xml version="1.0" encoding="utf-8"?>
<LinearLayout xmlns:android="http://schemas.android.com/apk/res/android"
    android:orientation="vertical"
    android:layout_width="match_parent"
    android:layout_height="match_parent">
    <TextView
        style="@style/TitleStyle"
        android:text="1.歡迎使用手機防盜"
        />
    <TextView
        android:layout_width="wrap_content"
        android:layout_height="wrap_content"
        android:textColor="#000"
        android:textSize="18sp"
        android:layout_margin="5dp"
        android:text="您的手機防盜衛士"
        />
    <TextView
        android:layout_width="wrap_content"
        android:layout_height="wrap_content"
        android:drawableLeft="@android:drawable/star_big_on"
        android:gravity="center_vertical"
        android:textColor="#000"
        android:textSize="18sp"
        android:text="sim卡變更報警"
        />
    <TextView
        android:layout_width="wrap_content"
        android:layout_height="wrap_content"
        android:drawableLeft="@android:drawable/star_big_on"
        android:gravity="center_vertical"
        android:textColor="#000"
        android:textSize="18sp"
        android:text="GPS追蹤"
        />
    <TextView
        android:layout_width="wrap_content"
        android:layout_height="wrap_content"
        android:drawableLeft="@android:drawable/star_big_on"
        android:gravity="center_vertical"
        android:textColor="#000"
        android:textSize="18sp"
        android:text="遠程數據銷毀"
        />
    <TextView
        android:layout_width="wrap_content"
        android:layout_height="wrap_content"
        android:drawableLeft="@android:drawable/star_big_on"
        android:gravity="center_vertical"
        android:textColor="#000"
        android:textSize="18sp"
        android:text="遠程鎖屏"
        />
    <!-- 讓內部點的空間水平居中 -->
    <LinearLayout
        android:gravity="center_horizontal"
        android:layout_width="match_parent"
        android:layout_height="wrap_content">
        <ImageView
            android:layout_width="wrap_content"
            android:layout_height="wrap_content"
            android:background="@android:drawable/presence_online"
            />
        <ImageView
            android:layout_width="wrap_content"
            android:layout_height="wrap_content"
            android:background="@android:drawable/presence_invisible"
            />
        <ImageView
            android:layout_width="wrap_content"
            android:layout_height="wrap_content"
            android:background="@android:drawable/presence_invisible"
            />
        <ImageView
            android:layout_width="wrap_content"
            android:layout_height="wrap_content"
            android:background="@android:drawable/presence_invisible"
            />
    </LinearLayout>
    <RelativeLayout
        android:layout_width="match_parent"
        android:layout_height="match_parent">
        <ImageView
            android:background="@drawable/setup1"
            android:layout_centerInParent="true"
            android:layout_width="wrap_content"
            android:layout_height="wrap_content" />
        <!-- 圖片選擇器,在選中和未選中的過程中,切換展示圖片 -->
        <Button
            android:text="下一頁"

            android:layout_width="wrap_content"
            android:layout_height="wrap_content" />

    </RelativeLayout>

</LinearLayout>
最後還剩下右下角的佈局還沒有實現,將在下篇文章中單獨講解

