
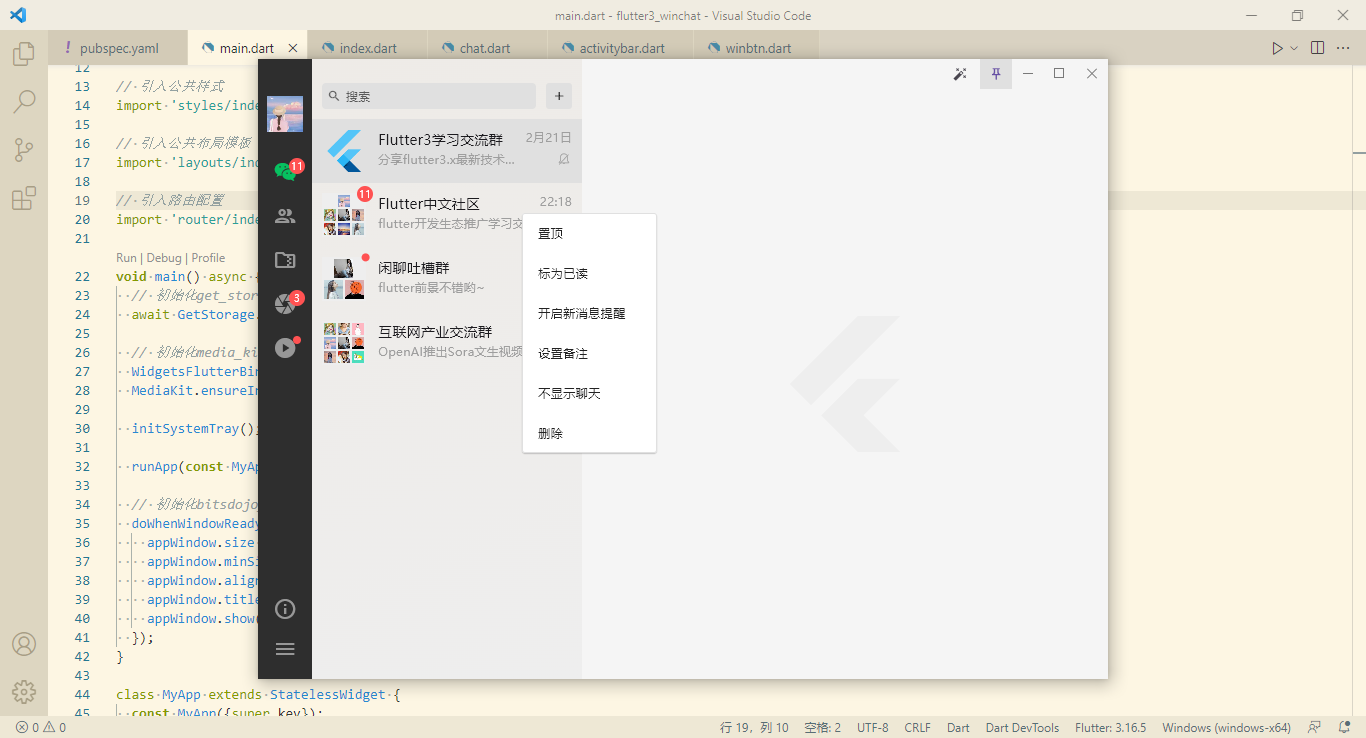
首發原創flutter3+bitsdojo_window+getx客戶端仿微信exe聊天Flutter-WinChat。 flutter3-dart3-winchat 基於flutter3+dart3+getx+bitsdojo_window+file_picker+media_kit等技術開發桌面 ...
首發原創flutter3+bitsdojo_window+getx客戶端仿微信exe聊天Flutter-WinChat。
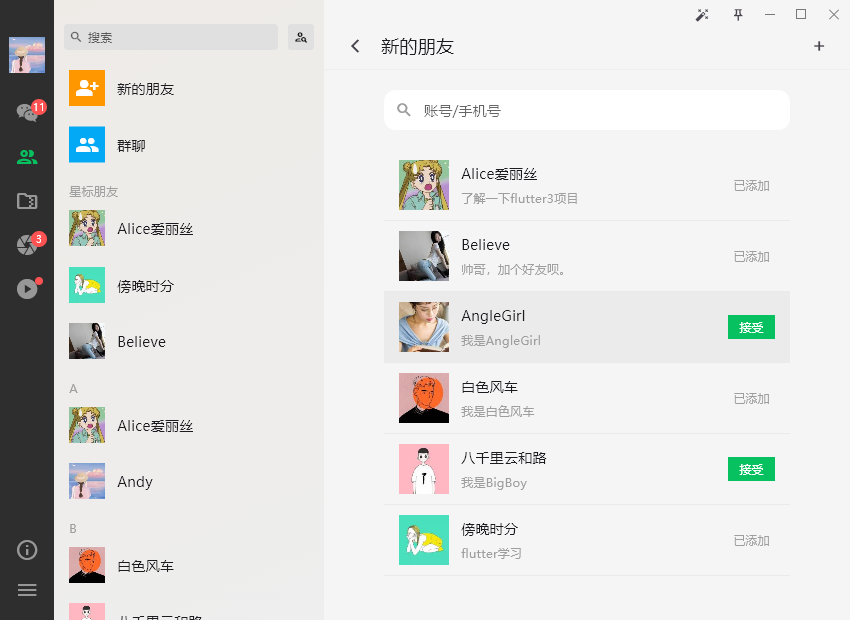
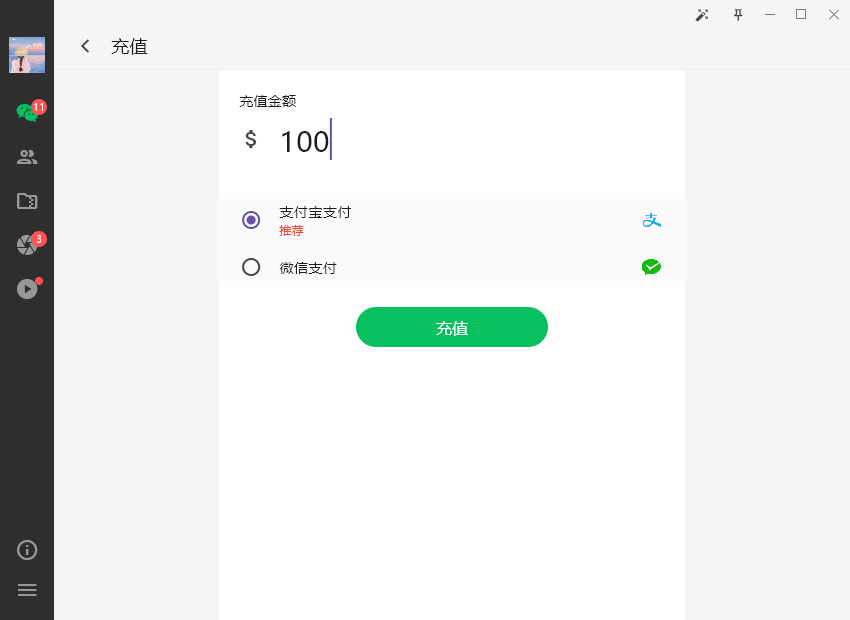
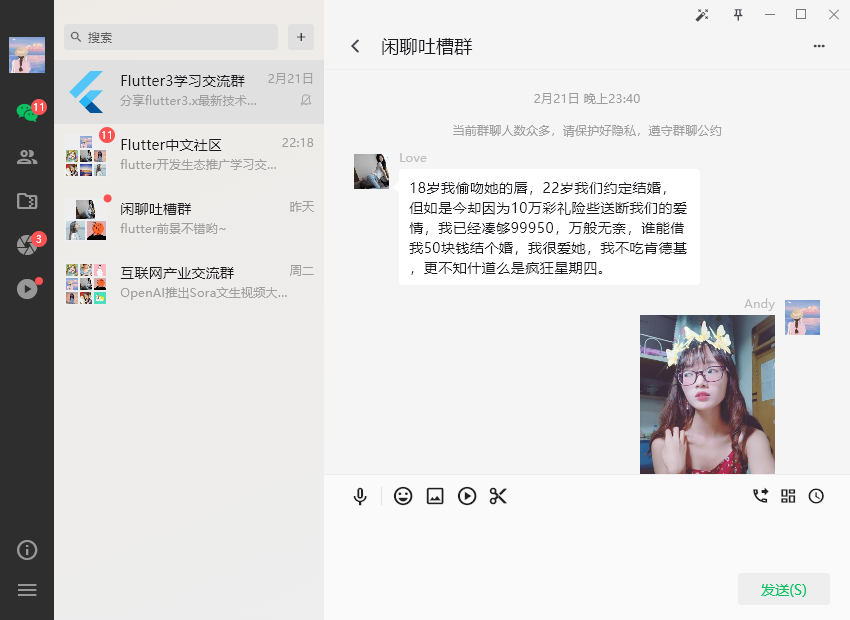
flutter3-dart3-winchat 基於flutter3+dart3+getx+bitsdojo_window+file_picker+media_kit等技術開發桌面端仿微信聊天exe實戰項目。實現了聊天消息、通訊錄、收藏、朋友圈、短視頻、我的等頁面模塊。
實現技術
- 編輯器:vscode
- 技術框架:flutter3.16.5+dart3.2.3
- 視窗管理:bitsdojo_window: ^0.1.6
- 托盤圖標:system_tray: ^2.0.3
- 路由/狀態管理:get: ^4.6.6
- 本地存儲:get_storage: ^2.1.1
- 圖片預覽插件:photo_view: ^0.14.0
- 網址預覽:url_launcher: ^6.2.4
- 視頻組件:media_kit: ^1.1.10+1
- 文件選擇器:file_picker: ^6.1.1

目前網上關於flutter3.x開發的桌面端項目並不多,希望有更多的開發者能加入flutter在window/macos客戶端的探索開發。
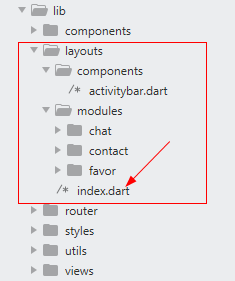
項目結構

如上圖:flutter構建的項目結構層級。

需要註意的是在開發之前需要自行配置好flutter sdk和dart sdk環境。

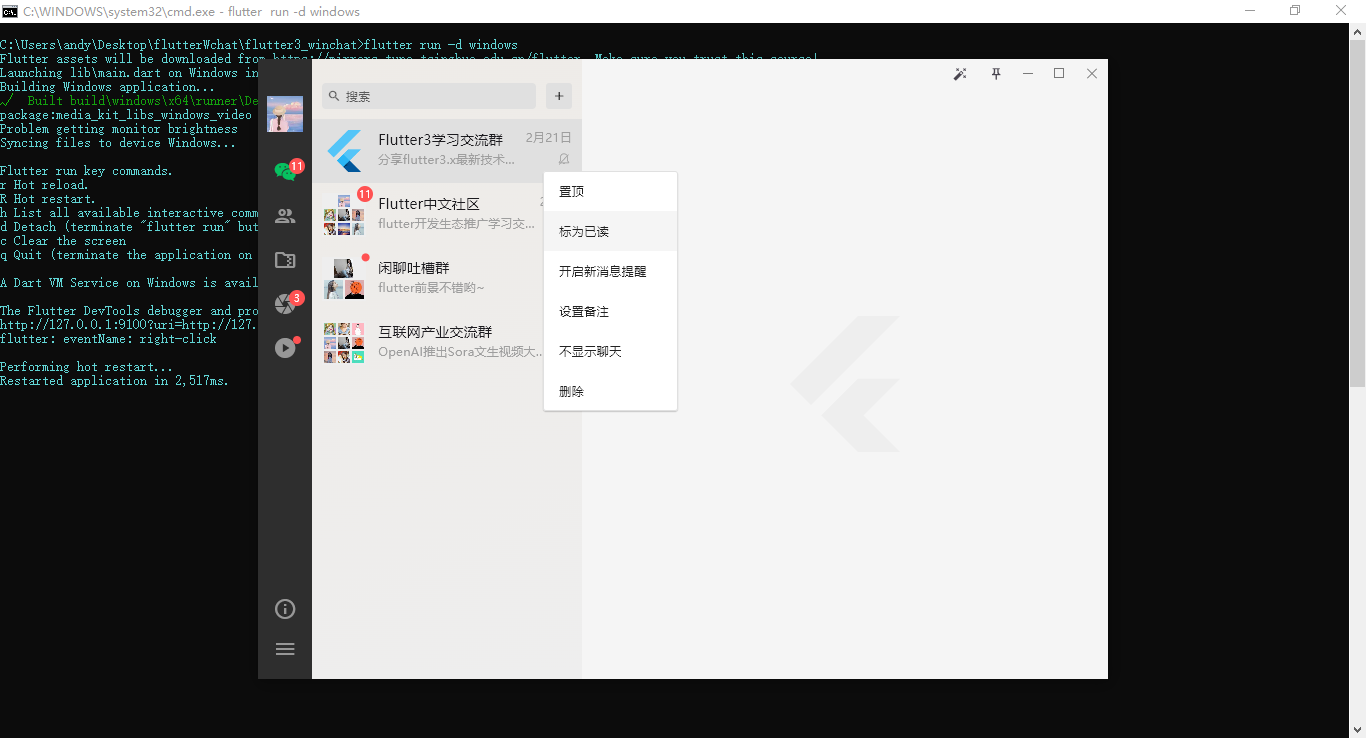


通過 flutter run -d windows 命令,運行到windows上。
主入口main.dart
import 'dart:io';
import 'package:flutter/material.dart';
import 'package:bitsdojo_window/bitsdojo_window.dart';
import 'package:get/get.dart';
import 'package:get_storage/get_storage.dart';
import 'package:media_kit/media_kit.dart';
import 'package:system_tray/system_tray.dart';

import 'utils/index.dart';

// 引入公共樣式
import 'styles/index.dart';

// 引入公共佈局模板
import 'layouts/index.dart';

// 引入路由配置
import 'router/index.dart';

void main() async {
  // 初始化get_storage存儲類
  await GetStorage.init();

  // 初始化media_kit視頻套件
  WidgetsFlutterBinding.ensureInitialized();
  MediaKit.ensureInitialized();

  initSystemTray();

  runApp(const MyApp());

  // 初始化bitsdojo_window視窗
  doWhenWindowReady(() {
    appWindow.size = const Size(850, 620);
    appWindow.minSize = const Size(700, 500);
    appWindow.alignment = Alignment.center;
    appWindow.title = 'Flutter3-WinChat';
    appWindow.show();
  });
}

class MyApp extends StatelessWidget {
  const MyApp({super.key});

  @override
  Widget build(BuildContext context) {
    return GetMaterialApp(
      title: 'FLUTTER3 WINCHAT',
      debugShowCheckedModeBanner: false,
      theme: ThemeData(
        primaryColor: FStyle.primaryColor,
        useMaterial3: true,
        // 修正windows端字體粗細不一致
        fontFamily: Platform.isWindows ? 'Microsoft YaHei' : null,
      ),
      home: const Layout(),
      // 初始路由
      initialRoute: Utils.isLogin() ? '/index' :'/login',
      // 路由頁面
      getPages: routes,
      onInit: () {},
      onReady: () {},
    );
  }
}

// 創建系統托盤圖標
Future<void> initSystemTray() async {
  String trayIco = 'assets/images/tray.ico';
  SystemTray systemTray = SystemTray();

  // 初始化系統托盤
  await systemTray.initSystemTray(
    title: 'system-tray',
    iconPath: trayIco,
  );

  // 右鍵菜單
  final Menu menu = Menu();
  await menu.buildFrom([
    MenuItemLabel(label: 'show', onClicked: (menuItem) => appWindow.show()),
    MenuItemLabel(label: 'hide', onClicked: (menuItem) => appWindow.hide()),
    MenuItemLabel(label: 'close', onClicked: (menuItem) => appWindow.close()),
  ]);
  await systemTray.setContextMenu(menu);

  // 右鍵事件
  systemTray.registerSystemTrayEventHandler((eventName) {
    debugPrint('eventName: $eventName');
    if (eventName == kSystemTrayEventClick) {
      Platform.isWindows ? appWindow.show() : systemTray.popUpContextMenu();
    } else if (eventName == kSystemTrayEventRightClick) {
      Platform.isWindows ? systemTray.popUpContextMenu() : appWindow.show();
    }
  });
}
整個項目採用 bitsdojo_window 插件進行視窗管理。支持無邊框視窗,視窗尺寸大小,自定義系統操作按鈕(最大化/最小化/關閉)。
https://pub-web.flutter-io.cn/packages/bitsdojo_window
flutter桌面端通過 system_tray 插件,生成系統托盤圖標。

https://pub-web.flutter-io.cn/packages/system_tray
Flutter路由管理

整個項目採用Getx作為路由和狀態管理。將MaterialApp替換為GetMaterialApp組件。
class MyApp extends StatelessWidget {
  const MyApp({super.key});

  @override
  Widget build(BuildContext context) {
    return GetMaterialApp(
      title: 'FLUTTER3 WINCHAT',
      debugShowCheckedModeBanner: false,
      theme: ThemeData(
        primaryColor: FStyle.primaryColor,
        useMaterial3: true,
      ),
      home: const Layout(),
      // 初始路由
      initialRoute: Utils.isLogin() ? '/index' :'/login',
      // 路由頁面
      getPages: routes,
    );
  }
}
新建router/index.dart路由管理文件。
import 'package:flutter/material.dart';
import 'package:get/get.dart';

// 引入工具類
import '../utils/index.dart';

/* 引入路由頁面 */
import '../views/auth/login.dart';
import '../views/auth/register.dart';
// 首頁
import '../views/index/index.dart';
// 通訊錄
import '../views/contact/index.dart';
import '../views/contact/addfriends.dart';
import '../views/contact/newfriends.dart';
import '../views/contact/uinfo.dart';
// 收藏
import '../views/favor/index.dart';
// 我的
import '../views/my/index.dart';
import '../views/my/setting.dart';
import '../views/my/recharge.dart';
import '../views/my/wallet.dart';
// 朋友圈
import '../views/fzone/index.dart';
import '../views/fzone/publish.dart';
// 短視頻
import '../views/fvideo/index.dart';
// 聊天
import '../views/chat/group-chat/chat.dart';

// 路由地址集合
final Map<String, Widget> routeMap = {
  '/index': const Index(),
  '/contact': const Contact(),
  '/addfriends': const AddFriends(),
  '/newfriends': const NewFriends(),
  '/uinfo': const Uinfo(),
  '/favor': const Favor(),
  '/my': const My(),
  '/setting': const Setting(),
  '/recharge': const Recharge(),
  '/wallet': const Wallet(),
  '/fzone': const Fzone(),
  '/publish': const PublishFzone(),
  '/fvideo': const Fvideo(),
  '/chat': const Chat(),
};

final List<GetPage> patchRoute = routeMap.entries.map((e) => GetPage(
  name: e.key, // 路由名稱
  page: () => e.value, // 路由頁面
  transition: Transition.noTransition, // 跳轉路由動畫
  middlewares: [AuthMiddleware()], // 路由中間件
)).toList();

final List<GetPage> routes = [
  GetPage(name: '/login', page: () => const Login()),
  GetPage(name: '/register', page: () => const Register()),
  ...patchRoute,
];
Getx提供了middlewares中間件進行路由攔截。
// 路由攔截
class AuthMiddleware extends GetMiddleware {
  @override
  RouteSettings? redirect(String? route) {
    return Utils.isLogin() ? null : const RouteSettings(name: '/login');
  }
}
Flutter3桌面端自定義最大化/最小化/關閉


flutter開發桌面端項目,為了達到桌面視窗高定製化效果,採用了bitsdojo_window插件。該插件支持去掉系統導航條,自定義視窗大小、右上角操作按鈕、拖拽視窗等功能。

@override
Widget build(BuildContext context){
  return Row(
    children: [
      Container(
        child: widget.leading,
      ),
      Visibility(
        visible: widget.minimizable,
        child: MouseRegion(
          cursor: SystemMouseCursors.click,
          child: SizedBox(
            width: 32.0,
            height: 36.0,
            child: MinimizeWindowButton(colors: buttonColors, onPressed: handleMinimize,),
          )
        ),
      ),
      Visibility(
        visible: widget.maximizable,
        child: MouseRegion(
          cursor: SystemMouseCursors.click,
          child: SizedBox(
            width: 32.0,
            height: 36.0,
            child: isMaximized ?
            RestoreWindowButton(colors: buttonColors, onPressed: handleMaxRestore,)
            :
            MaximizeWindowButton(colors: buttonColors, onPressed: handleMaxRestore,),
          ),
        ),
      ),
      Visibility(
        visible: widget.closable,
        child: MouseRegion(
          cursor: SystemMouseCursors.click,
          child: SizedBox(
            width: 32.0,
            height: 36.0,
            child: CloseWindowButton(colors: closeButtonColors, onPressed: handleExit,),
          ),
        ),
      ),
      Container(
        child: widget.trailing,
      ),
    ],
  );
}
自定義最大化/最小化/關閉功能。
// 最小化
void handleMinimize() {
  appWindow.minimize();
}
// 設置最大化/恢復
void handleMaxRestore() {
  appWindow.maximizeOrRestore();
}
// 關閉
void handleExit() {
  showDialog(
    context: context,
    builder: (context) {
      return AlertDialog(
        content: const Text('是否最小化至托盤,不退出程式?', style: TextStyle(fontSize: 16.0),),
        backgroundColor: Colors.white,
        surfaceTintColor: Colors.white,
        shape: RoundedRectangleBorder(borderRadius: BorderRadius.circular(3.0)),
        elevation: 3.0,
        actionsPadding: const EdgeInsets.all(15.0),
        actions: [
          TextButton(
            onPressed: () {
              Get.back();
              appWindow.close();
            },
            child: const Text('退出', style: TextStyle(color: Colors.red),)
          ),
          TextButton(
            onPressed: () {
              Get.back();
              appWindow.hide();
            },
            child: const Text('最小化至托盤', style: TextStyle(color: Colors.deepPurple),)
          ),
        ],
      );
    }
  );
}
flutter內置了滑鼠手勢組件MouseRegion。根據需求可以自定義設置不同的滑鼠樣式。
問:bitsdojo_window設置最大化/恢復不能實時監測視窗尺寸變化?
答:大家可以通過flutter內置的WidgetsBindingObserver來監測視窗變化。
class _WinbtnState extends State<Winbtn> with WidgetsBindingObserver {
  // 是否最大化
  bool isMaximized = false;

  @override
  void initState() {
    super.initState();
    WidgetsBinding.instance.addObserver(this);
  }

  @override
  void dispose() {
    WidgetsBinding.instance.removeObserver(this);
    super.dispose();
  }

  // 監聽視窗尺寸變化
  @override
  void didChangeMetrics() {
    super.didChangeMetrics();
    WidgetsBinding.instance.addPostFrameCallback((_) {
      setState(() {
        isMaximized = appWindow.isMaximized;
      });
    });
  }

  // ...
}
Flutter3公共佈局模板
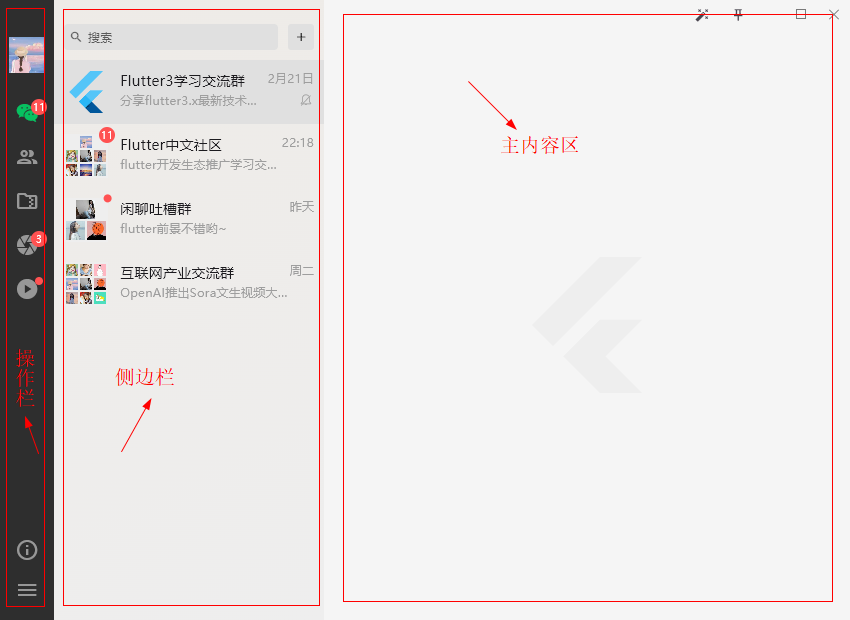
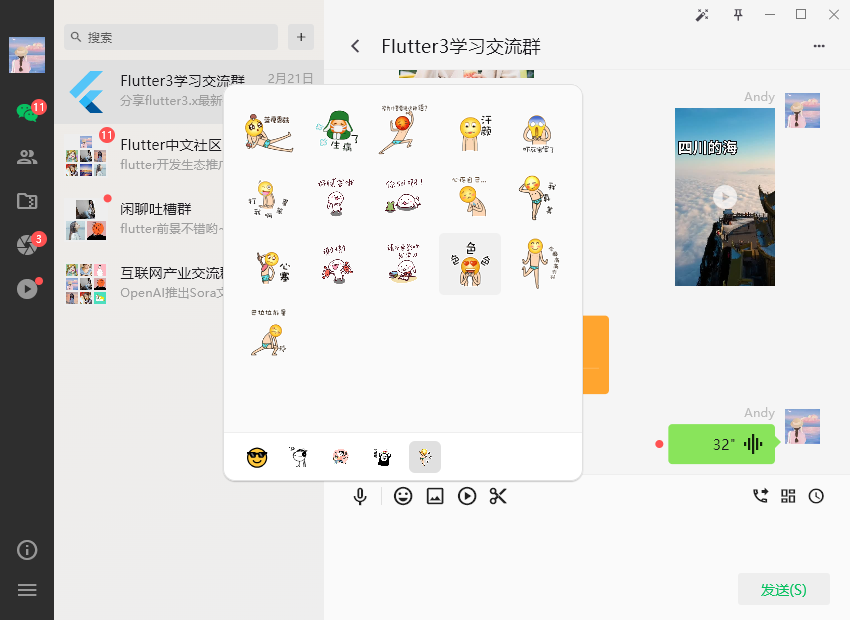
整體項目佈局參照了微信桌面端界面。分為左側操作欄+側邊欄+右側內容區三大模塊。
class Layout extends StatefulWidget {
  const Layout({
    super.key,
    this.activitybar = const Activitybar(),
    this.sidebar,
    this.workbench,
    this.showSidebar = true,
  });

  final Widget? activitybar; // 左側操作欄
  final Widget? sidebar; // 側邊欄
  final Widget? workbench; // 右側工作面板
  final bool showSidebar; // 是否顯示側邊欄

  @override
  State<Layout> createState() => _LayoutState();
}
左側操作欄無點擊事件區域支持拖拽視窗。
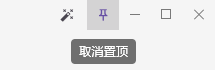
return Scaffold(
  backgroundColor: Colors.grey[100],
  body: Flex(
    direction: Axis.horizontal,
    children: [
      // 左側操作欄
      MoveWindow(
        child: widget.activitybar,
        onDoubleTap: () => {},
      ),
      // 側邊欄
      Visibility(
        visible: widget.showSidebar,
        child: SizedBox(
          width: 270.0,
          child: Container(
            decoration: const BoxDecoration(
              gradient: LinearGradient(
                begin: Alignment.topLeft,
                end: Alignment.bottomRight,
                colors: [
                  Color(0xFFEEEBE7), Color(0xFFEEEEEE)
                ]
              ),
            ),
            child: widget.sidebar,
          ),
        ),
      ),
      // 主體容器
      Expanded(
        child: Column(
          children: [
            WindowTitleBarBox(
              child: Row(
                children: [
                  Expanded(
                    child: MoveWindow(),
                  ),
                  // 右上角操作按鈕組
                  Winbtn(
                    leading: Row(
                      children: [
                        IconButton(onPressed: () {}, icon: const Icon(Icons.auto_fix_high), iconSize: 14.0,),
                        IconButton(
                          onPressed: () {
                            setState(() {
                              winTopMost = !winTopMost;
                            });
                          },
                          tooltip: winTopMost ? '取消置頂' : '置頂',
                          icon: const Icon(Icons.push_pin_outlined),
                          iconSize: 14.0,
                          highlightColor: Colors.transparent, // 點擊水波紋顏色
                          isSelected: winTopMost ? true : false, // 是否選中
                          style: ButtonStyle(
                            visualDensity: VisualDensity.compact,
                            backgroundColor: MaterialStateProperty.all(winTopMost ? Colors.grey[300] : Colors.transparent),
                            shape: MaterialStatePropertyAll(
                              RoundedRectangleBorder(borderRadius: BorderRadius.circular(0.0))
                            ),
                          ),
                        ),
                      ],
                    ),
                  ),
                ],
              ),
            ),
            // 右側工作面板
            Expanded(
              child: Container(
                child: widget.workbench,
              ),
            ),
          ],
        ),
      ),
    ],
  ),
);
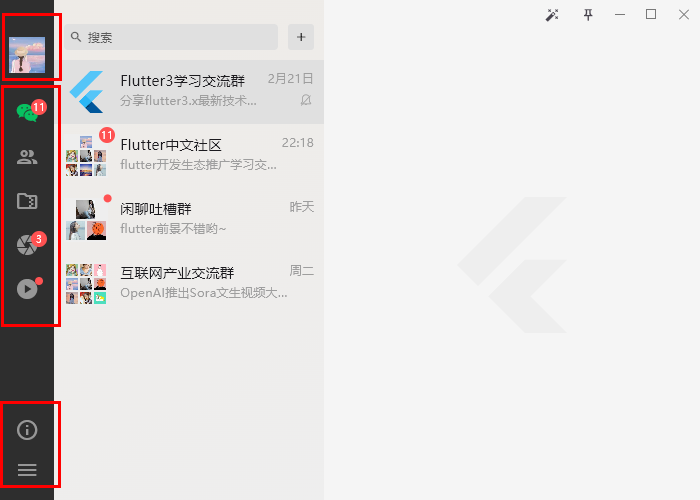
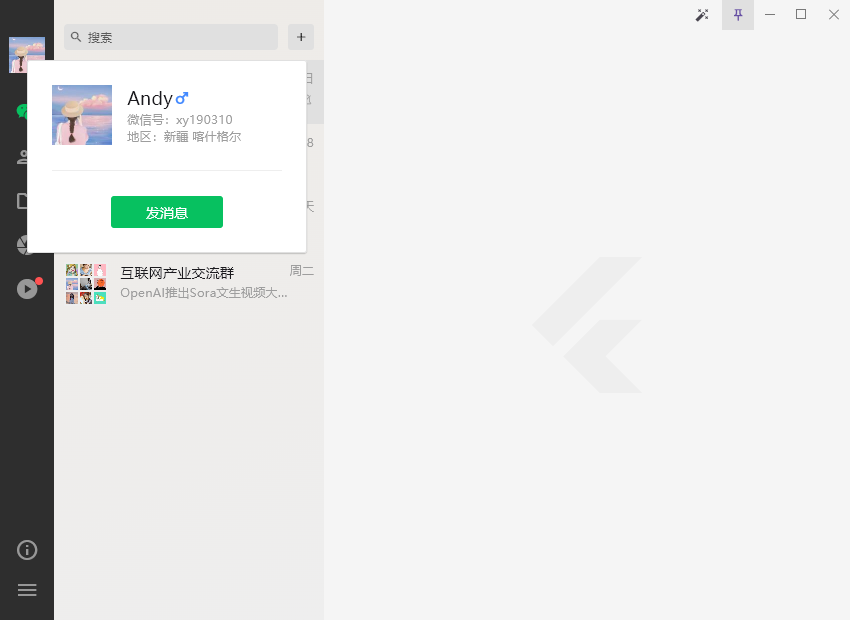
左側Tab切換操作欄,使用 NavigationRail 組件實現功能。該組件支持自定義頭部和尾部組件。
@override
Widget build(BuildContext context) {
  return Container(
    width: 54.0,
    decoration: const BoxDecoration(
      color: Color(0xFF2E2E2E),
    ),
    child: NavigationRail(
      backgroundColor: Colors.transparent,
      labelType: NavigationRailLabelType.none, // all 顯示圖標+標簽 selected 只顯示激活圖標+標簽 none 不顯示標簽
      indicatorColor: Colors.transparent, // 去掉選中橢圓背景
      indicatorShape: RoundedRectangleBorder(
        borderRadius: BorderRadius.circular(0.0),
      ),
      unselectedIconTheme: const IconThemeData(color: Color(0xFF979797), size: 24.0),
      selectedIconTheme: const IconThemeData(color: Color(0xFF07C160), size: 24.0,),
      unselectedLabelTextStyle: const TextStyle(color: Color(0xFF979797),),
      selectedLabelTextStyle: const TextStyle(color: Color(0xFF07C160),),
      // 頭部(圖像)
      leading: GestureDetector(
        onPanStart: (details) => {},
        child: Container(
          margin: const EdgeInsets.only(top: 30.0, bottom: 10.0),
          child: InkWell(
            child: Image.asset('assets/images/avatar/uimg1.jpg', height: 36.0, width: 36.0,),
            onTapDown: (TapDownDetails details) {
              cardDX = details.globalPosition.dx;
              cardDY = details.globalPosition.dy;
            },
            onTap: () {
              showCardDialog(context);
            },
          ),
        ),
      ),
      // 尾部(鏈接)
      trailing: Expanded(
        child: Container(
          margin: const EdgeInsets.only(bottom: 10.0),
          child: GestureDetector(
            onPanStart: (details) => {},
            child: Column(
              mainAxisAlignment: MainAxisAlignment.end,
              children: [
                IconButton(icon: Icon(Icons.info_outline, color: Color(0xFF979797), size: 24.0), onPressed:(){showAboutDialog(context);}),
                PopupMenuButton(
                  icon: const Icon(Icons.menu, color: Color(0xFF979797), size: 24.0,),
                  offset: const Offset(54.0, 0.0),
                  tooltip: '',
                  color: const Color(0xFF353535),
                  surfaceTintColor: Colors.transparent,
                  shape: RoundedRectangleBorder(borderRadius: BorderRadius.circular(0.0)),
                  padding: EdgeInsets.zero,
                  itemBuilder: (BuildContext context) {
                    return <PopupMenuItem>[
                      popupMenuItem('我的私密空間', 0),
                      popupMenuItem('鎖定', 1),
                      popupMenuItem('意見反饋', 2),
                      popupMenuItem('設置', 3),
                    ];
                  },
                  onSelected: (value) {
                    switch(value) {
                      case 0:
                        Get.toNamed('/my');
                        break;
                      case 3:
                        Get.toNamed('/setting');
                        break;
                    }
                  },
                ),
              ],
            ),
          ),
        ),
      ),
      selectedIndex: tabCur,
      destinations: [
        ...tabNavs
      ],
      onDestinationSelected: (index) {
        setState(() {
          tabCur = index;
          if(tabRoute[index] != null && tabRoute[index]?['path'] != null) {
            Get.toNamed(tabRoute[index]['path']);
          }
        });
      },
    ),
  );
}
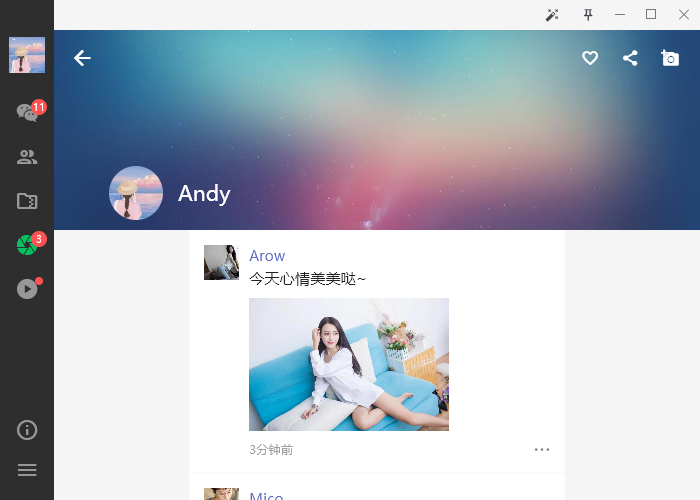
Flutter3朋友圈功能
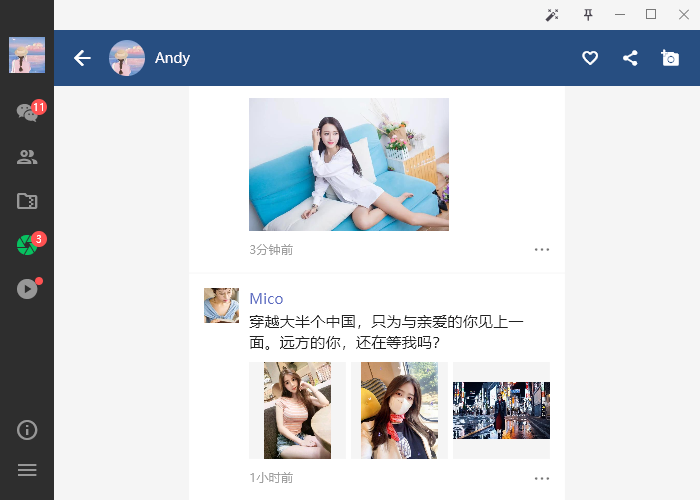
@override
Widget build(BuildContext context) {
  return Layout(
    showSidebar: false,
    workbench: CustomScrollView(
      slivers: [
        SliverAppBar(
          backgroundColor: const Color(0xFF224E7F),
          foregroundColor: Colors.white,
          pinned: true,
          elevation: 0.0,
          expandedHeight: 200.0,
          leading: IconButton(icon: const Icon(Icons.arrow_back,), onPressed: () {Navigator.pop(context);}),
          flexibleSpace: FlexibleSpaceBar(
            title: Row(
              children: <Widget>[
                ClipOval(child: Image.asset('assets/images/avatar/uimg1.jpg',height: 36.0,width: 36.0,fit: BoxFit.fill)),
                const SizedBox(width: 10.0),
                const Text('Andy', style: TextStyle(fontSize: 14.0)),
              ],
            ),
            titlePadding: const EdgeInsets.fromLTRB(55, 10, 10, 10),
            background: InkWell(
              child: Image.asset('assets/images/cover.jpg', fit: BoxFit.cover),
              onTap: () {changePhotoAlbum(context);},
            ),
          ),
          actions: <Widget>[
            IconButton(icon: const Icon(Icons.favorite_border, size: 18,), onPressed: () {}),
            IconButton(icon: const Icon(Icons.share, size: 18,), onPressed: () {}),
            IconButton(icon: const Icon(Icons.add_a_photo, size: 18,), onPressed: () {Get.toNamed('/publish');}),
            const SizedBox(width: 10.0,),
          ],
        ),
        SliverToBoxAdapter(
          child: UnconstrainedBox(
            child: Container(
              width: MediaQuery.of(context).size.height * 3 / 4,
              decoration: const BoxDecoration(
                color: Colors.white,
              ),
              child: Column(
                children: uzoneList.map((item) {
                  return Container(
                    padding: const EdgeInsets.all(15.0),
                    decoration: const BoxDecoration(
                      border: Border(bottom: BorderSide(color: Color(0xFFEEEEEE), width: .5)),
                    ),
                    child: Row(
                      crossAxisAlignment: CrossAxisAlignment.start,
                      children: <Widget>[
                        Image.asset(item['avatar'],height: 35.0,width: 35.0,fit: BoxFit.cover),
                        const SizedBox(width: 10.0),
                        Expanded(
                          child: Column(
                            crossAxisAlignment: CrossAxisAlignment.start,
                            children: <Widget>[
                              Text(item['author'], style: TextStyle(color: Colors.indigo[400])),
                              const SizedBox(height: 2.0),
                              Text(item['content'], style: const TextStyle(color: Colors.black87, fontSize: 15.0)),
                              const SizedBox(height: 10.0),
                              GroupZone(images: item['images']),
                              const SizedBox(height: 10.0),
                              Row(
                                children: <Widget>[
                                  Expanded(child: Text(item['time'], style: const TextStyle(color: Colors.grey, fontSize: 12.0)),),
                                  FStyle.iconfont(0xe653, color: Colors.black54, size: 16.0,),
                                ],
                              )
                            ],
                          ),
                        ),
                      ],
                    ),
                  );
                }).toList(),
              ),
            ),
          ),
        ),
      ],
    ),
  );
}
圖片排列類似微信朋友圈九宮格,支持點擊大圖預覽。

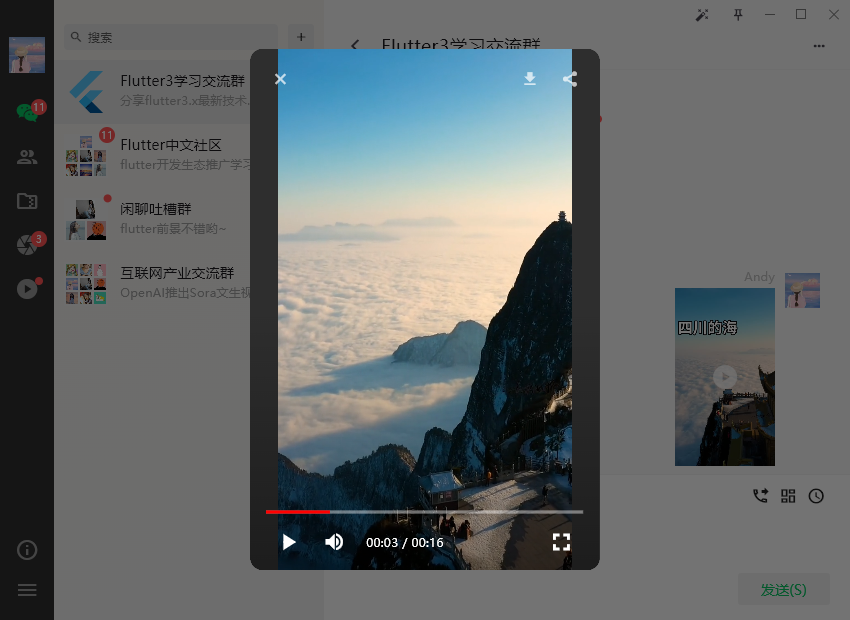
Flutter3短視頻模塊
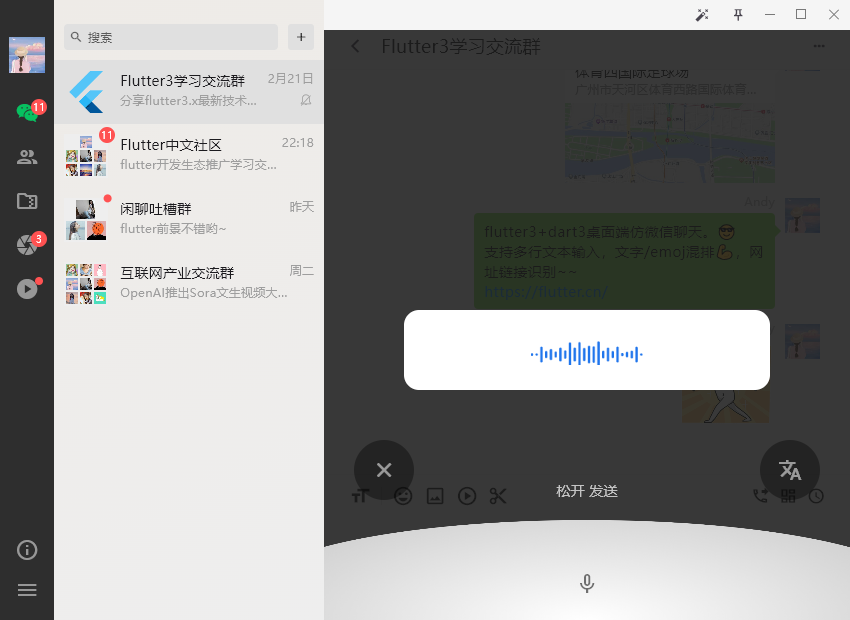
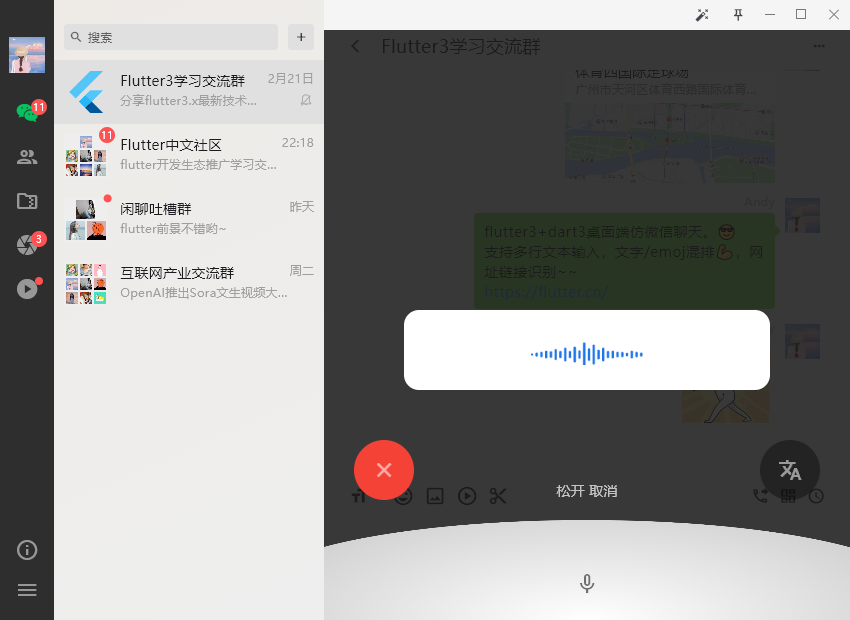
使用media_kit插件整合進了短視頻功能,支持點擊播放/暫停,上下滑動功能。
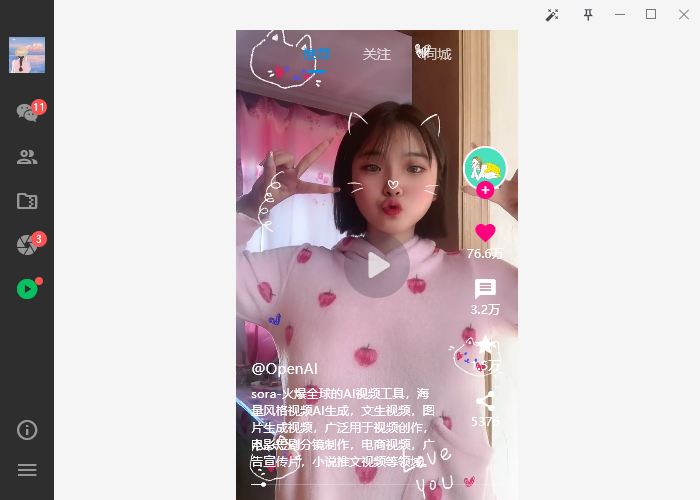
底部mini時間進度條是自定義組件實現功能效果。
// flutter3短視頻模板  Q:282310962

Container(
  width: MediaQuery.of(context).size.height * 9 / 16,
  decoration: const BoxDecoration(
    color: Colors.black,
  ),
  child: Stack(
    children: [
      // Swiper垂直滾動區域
      PageView(
        // 自定義滾動行為(支持桌面端滑動、去掉滾動條槽)
        scrollBehavior: SwiperScrollBehavior().copyWith(scrollbars: false),
        scrollDirection: Axis.vertical,
        controller: pageController,
        onPageChanged: (index) {
          // 暫停(垂直滑動)
          controller.player.pause();
        },
        children: [
          Stack(
            children: [
              // 視頻區域
              Positioned(
                top: 0,
                left: 0,
                right: 0,
                bottom: 0,
                child: GestureDetector(
                  child: Stack(
                    children: [
                      // 短視頻插件
                      Video(
                        controller: controller,
                        fit: BoxFit.cover,
                        // 無控制條
                        controls: NoVideoControls,
                      ),
                      // 播放/暫停按鈕
                      Center(
                        child: IconButton(
                          onPressed: () {
                            controller.player.playOrPause();
                          },
                          icon: StreamBuilder(
                            stream: controller.player.stream.playing,
                            builder: (context, playing) {
                              return Visibility(
                                visible: playing.data == false,
                                child: Icon(
                                  playing.data == true ? Icons.pause : Icons.play_arrow_rounded,
                                  color: Colors.white70,
                                  size: 50,
                                ),
                              );
                            },
                          ),
                        ),
                      ),
                    ],
                  ),
                  onTap: () {
                    controller.player.playOrPause();
                  },
                ),
              ),
              // 右側操作欄
              Positioned(
                bottom: 70.0,
                right: 10.0,
                child: Column(
                  children: [
                    // ...
                  ],
                ),
              ),
              // 底部信息區域
              Positioned(
                bottom: 30.0,
                left: 15.0,
                right: 80.0,
                child: Column(
                  crossAxisAlignment: CrossAxisAlignment.start,
                  children: [


