
背景 公司產品部收到了一些重要客戶的需求,他們希望能夠依賴獨立的資料庫存儲來支持他們的業務數據。與此同時,仍有許多中小客戶,可以繼續使用公共庫以滿足其需求。技術實現方面,此前持久層框架使用的Mybatis-plus,部分業務場景使用到了Sharding-JDBC用於分表,另外,我們的資料庫版本控制工 ...
背景
公司產品部收到了一些重要客戶的需求,他們希望能夠依賴獨立的資料庫存儲來支持他們的業務數據。與此同時,仍有許多中小客戶,可以繼續使用公共庫以滿足其需求。技術實現方面,此前持久層框架使用的Mybatis-plus,部分業務場景使用到了Sharding-JDBC用於分表,另外,我們的資料庫版本控制工具使用的是Flyway。
方案說明
這裡將方案進行簡要說明,配置統一通過Nacos管理(有需要的可以自行定義租戶配置頁面)。
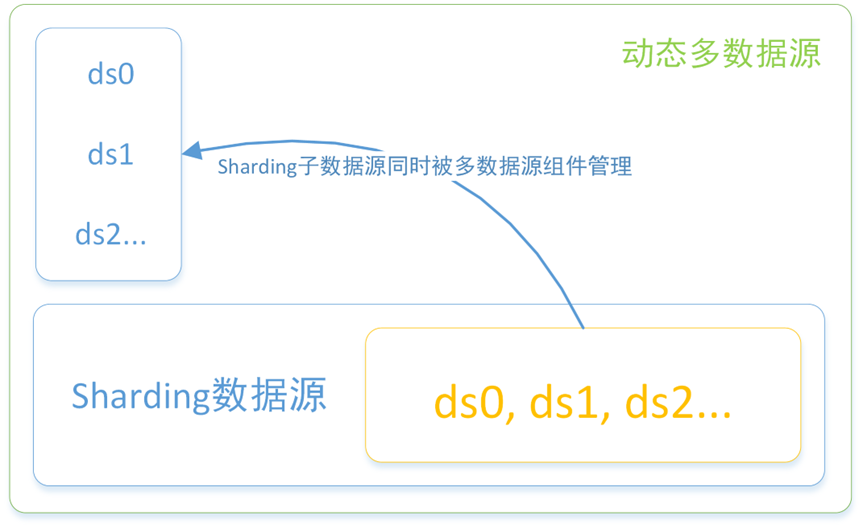
- 1.首先多數據源管理使用Mybatis-Plus官方推薦的dynamic-datasource-spring-boot-starter組件,需要註意的是構建動態多數據源時,我們要把Sharding-JDBC數據源也納入管理。因為我們的庫裡面畢竟只有部分表用到了Sharding-JDBC,這樣可以復用數據源。
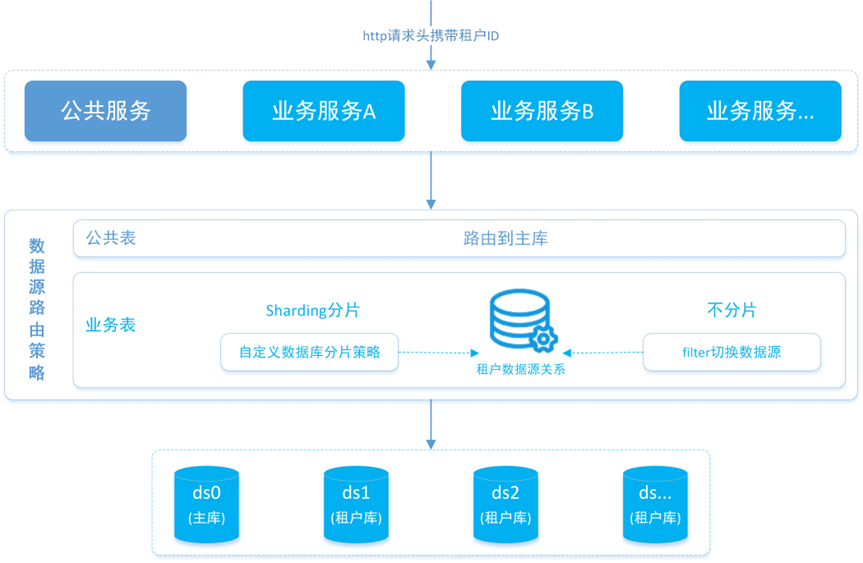
- 2.其次,租戶與數據源之間在Nacos建立關係配置,確保根據租戶ID能夠路由到唯一的租戶數據源。我們需要自定義Sharding分片策略和多數據源切換邏輯,根據http請求傳入的租戶ID,設置正確的數據源。
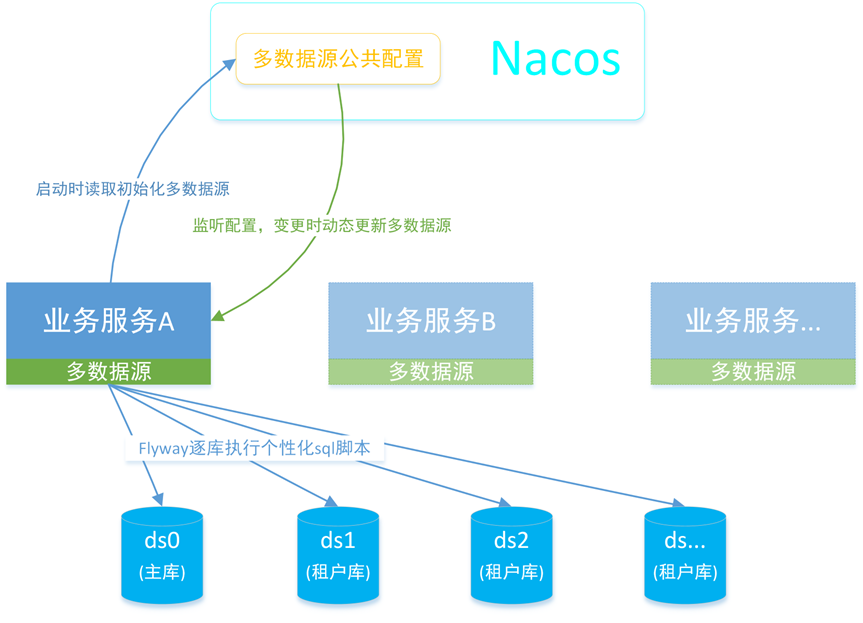
- 3.動態數據源與Sharding數據源配置做為公共配置在Nacos維護,在業務服務啟動時,讀取公共配置初始化多數據源,並添加對公共多數據源配置的監聽。當配置變更時,重新構造Sharding數據源,並並更新動態多數據源。另外資料庫腳本通過自定義flyway配置執行。
技術實現
前提
需要在Nacos提前維護租戶與數據源關係配置。
不使用Sharding-JDBC場景
- 1.引入相關組件依賴。
        <dependency>
            <groupId>com.alibaba.nacos</groupId>
            <artifactId>nacos-client</artifactId>
            <version>2.1.0</version>
        </dependency>
        <dependency>
            <groupId>org.flywaydb</groupId>
            <artifactId>flyway-core</artifactId>
            <version>7.15.0</version>
        </dependency>
        <dependency>
            <groupId>com.baomidou</groupId>
            <artifactId>mybatis-plus-boot-starter</artifactId>
            <version>3.4.1</version>
        </dependency>
        <dependency>
            <groupId>com.baomidou</groupId>
            <artifactId>dynamic-datasource-spring-boot-starter</artifactId>
            <version>3.4.1</version>
        </dependency>
        <dependency>
            <groupId>com.alibaba</groupId>
            <artifactId>druid</artifactId>
            <version>1.2.6</version>
        </dependency>
- 2.關閉Flyway自動配置和配置多數據源。
spring:
  flyway:
    #關閉flyway自動配置,自定義實現
    enabled: false
  datasource:
    dynamic:
      #預設數據源
      primary: ds0
      datasource:
        ds0:
          type: com.alibaba.druid.pool.DruidDataSource
          driverClassName: org.postgresql.Driver
          url: jdbc:postgresql://127.0.0.1:5432/ds0
          username: ds0
          password: ds0123
        ds1:
          type: com.alibaba.druid.pool.DruidDataSource
          driverClassName: org.postgresql.Driver
          url: jdbc:postgresql://127.0.0.1:5432/ds1
          username: ds1
          password: ds1123
- 3.自定義實現Flyway配置類,對應的flyway腳本目錄結構見下圖,主庫和租戶庫SQL腳本獨立維護。
Java
@Slf4j
@Configuration
@EnableTransactionManagement
public class FlywayConfig {
    @Value("${spring.application.name}")
    private String appName;
    @Autowired
    private DataSource dataSource;

    @Bean
    public void migrate() {
        log.info("flyway開始逐數據源執行腳本");
        DynamicRoutingDataSource ds = (DynamicRoutingDataSource) dataSource;
        Map<String, DataSource> dataSources = ds.getDataSources();
        dataSources.forEach((k, v) -> {
            if (!"sharding".equals(k)) {
						    // Flyway相關參數建議通過配置管理,以下代碼僅供參考
                Flyway flyway = Flyway.configure()
                        .dataSource(v)
                        .table("t_" + k + "_" + appName + "_version")
                        .baselineOnMigrate(true)
                        .outOfOrder(true)
                        .baselineVersion("1.0.0")
                        .baselineDescription(k + "初始化")
                        .locations(CommonConstant.SQL_BASE_LOCATION + (CommonConstant.DEFAULT_DS_NAME.equals(k) ? CommonConstant.MASTER_DB : CommonConstant.TENANT_DB))
                        .load();
                flyway.migrate();
                log.info("flyway在 {} 數據源執行腳本成功", k);
            }
        });
    }
}

- 4.自定義實現數據源切換Filter類。
@Slf4j
@Component
@WebFilter(filterName = "dynamicDatasourceFilter", urlPatterns = {"/*"})
public class DynamicDatasourceFilter implements Filter {
    // 構建演示用租戶與數據源關係配置
		private static Map<String, String> tenantDsMap = new HashMap<>();
    static {
        tenantDsMap.put("tenant123", "ds0");
        tenantDsMap.put("tenant456", "ds0");
				tenantDsMap.put("tenant789", "ds1");
    }

    @Override
    public void doFilter(ServletRequest request, ServletResponse response, FilterChain chain) throws IOException, ServletException {
        HttpServletRequest httpRequest = (HttpServletRequest) request;
        // 從請求頭獲取租戶ID
        String tenantId = httpRequest.getHeader(CommonConstant.TENANT_HEADER);
        try {
            // 設置數據源
            if (tenantDsMap.get(tenantId) == null) {
                // 如果根據租戶ID未找到租戶數據源配置,預設走主庫
                DynamicDataSourceContextHolder.push(CommonConstant.DEFAULT_DS_NAME);
            } else {
                //註意,如果是分片表,那麼需要在分片表Service類或方法上加@DS("sharding")註解,最終由sharding的庫分片策略決定SQL在哪個庫執行。而這裡的設置將會被@DS註解配置覆蓋
                DynamicDataSourceContextHolder.push(tenantDsMap.get(tenantId));
            }
            // 執行
            chain.doFilter(request, response);
        } catch (Exception e) {
            log.error("切換數據源失敗,tenantId={},請求介面uri={},異常原因:{}", tenantId, httpRequest.getRequestURI(), ExceptionUtils.getStackTrace(e));
        } finally {
            // 清空當前線程數據源
            DynamicDataSourceContextHolder.poll();
        }
    }

使用Sharding-JDBC
如果微服務還需要使用Sharding分片,那麼還需要引入sharding-jdbc組件依賴,並配置sharding數據源和分片規則。如果是多個服務共用資料庫,那麼建議將Sharding數據源配置做為公共配置在Nacos管理,而Sharding分片規則則做為服務個性化配置單獨維護(分片規則基本不需要動態變更),這樣當有新租戶需要申請開通獨立租戶庫的時候,直接變更Sharding數據源公共配置,服務在監聽到公共配置變更後,即可重新構建新的Sharding數據源實例和動態數據源更新,無需重啟服務。
- 1.引入sharding-jdbc組件依賴。
        <dependency>
            <groupId>org.apache.shardingsphere</groupId>
            <artifactId>sharding-jdbc-core</artifactId>
            <version>4.1.1</version>
        </dependency>
- 2.配置Sharding數據源和分片規則。
# sharding數據源配置
dataSources:
  ds0: !!com.alibaba.druid.pool.DruidDataSource
    driverClassName: org.postgresql.Driver
    url: jdbc:postgresql://127.0.0.1:5432/ds0
    username: ds0
    password: ds0123
  ds1: !!com.alibaba.druid.pool.DruidDataSource
    driverClassName: org.postgresql.Driver
    url: jdbc:postgresql://127.0.0.1:5432/ds1
    username: ds1
    password: ds1123
  ds2: !!com.alibaba.druid.pool.DruidDataSource
    driverClassName: org.postgresql.Driver
    url: jdbc:postgresql://127.0.0.1:5432/ds2
    username: ds2
    password: ds2123
# sharding分片規則配置
shardingRule:
  tables:
    t_order:
      actualDataNodes: ds$->{0..2}.t_order$->{0..1}
      tableStrategy:
        inline:
          shardingColumn: order_no
          algorithmExpression: t_order$->{order_no.toBigInteger() % 2}
  defaultDataSourceName: ds0
  # 預設庫分片策略
  defaultDatabaseStrategy:
    standard:
      shardingColumn: tenant_id
			# 自定義精確分片策略
      preciseAlgorithmClassName: cn.xtstu.demo.config.CustomDataSourcePreciseShardingAlgorithm
    #hint:
		    #
    #  algorithmClassName: cn.xtstu.demo.config.CustomHintShardingAlgorithm
  defaultTableStrategy:
    none:
props:
  sql.show: true
- 3.自定義精確分片策略。
public class CustomDataSourcePreciseShardingAlgorithm implements PreciseShardingAlgorithm<String> {

    // 構建演示用租戶與數據源關係配置
		private static Map<String, String> tenantDsMap = new HashMap<>();
    static {
        tenantDsMap.put("tenant123", "ds0");
        tenantDsMap.put("tenant456", "ds0");
				tenantDsMap.put("tenant789", "ds1");
    }

    @Override
    public String doSharding(Collection<String> dataSourceNames, PreciseShardingValue<String> shardingValue) {
		    // 庫分片策略配置的分片鍵是欄位tenant_id,根據分片鍵查詢配置的數據源
		    String dsName = tenantDsMap.get(shardingValue.getValue());
        // 如果如前文所屬,Sharding子數據源key與dynamic數據源key保持一致的話,這裡直接返回就行了
				return dsName;
        // TODO 需要處理未匹配到數據源的情況
    }
}
- 4.自定義Hint分片策略(可選),適用於分片鍵與SQL無關的場景。
public class CustomHintShardingAlgorithm implements HintShardingAlgorithm<Integer> {

    // 構建演示用租戶與數據源關係配置
		private static Map<String, String> tenantDsMap = new HashMap<>();
    static {
        tenantDsMap.put("tenant123", "ds0");
        tenantDsMap.put("tenant456", "ds0");
				tenantDsMap.put("tenant789", "ds1");
    }

    @Override
    public Collection<String> doSharding(Collection<String> collection, HintShardingValue<Integer> hintShardingValue) {
        Collection<String> result = new ArrayList<>();
        // 從請求頭取到當前租戶ID
				HttpServletRequest request = ((ServletRequestAttributes) RequestContextHolder.getRequestAttributes()).getRequest();
        result.add(tenantDsMap.get(request.getHeader("tenantId")));
				// TODO  需要處理未匹配到數據源的情況
        return result;
    }
}
- 5.自定義動態數據源配置(核心就是將sharding數據源及其子數據源添加到動態數據源一起管理)。
@Slf4j
@Configuration
public class CustomDynamicDataSourceConfig {
    @Value("${spring.cloud.nacos.config.extension-configs[0].data-id}")
    private String dataId;
    @Value("${spring.cloud.nacos.config.group:DEFAULT_GROUP}")
    private String group;
    @Resource
    private DynamicDataSourceProperties properties;
    @Resource
    private NacosHelper nacosHelper;

    /**
     * 啟動時通過查詢Nacos上sharding數據源及分片規則yaml配置初始化sharding-jdbc數據源
     *
     * @return
     */
    @Bean
    public ShardingDataSource shardingDataSource() {
        ConfigService configService = nacosHelper.getConfigService();
        if (configService == null) {
            log.error("連接nacos失敗");
        }
        String configInfo = null;
        try {
            configInfo = configService.getConfig(dataId, group, 5000);
        } catch (NacosException e) {
            log.error("獲取{}配置失敗,異常原因:{}", dataId, ExceptionUtils.getStackTrace(e));
        }
        if (StringUtils.isBlank(configInfo)) {
            log.error("{}配置為空,啟動失敗", dataId);
            throw new NullPointerException(dataId + "配置為空");
        }
        try {
            // 通過工廠類和yaml配置創建Sharding數據源
            return (ShardingDataSource) YamlShardingDataSourceFactory.createDataSource(configInfo.getBytes(StandardCharsets.UTF_8));
        } catch (Exception e) {
            log.error("創建sharding-jdbc數據源異常:{}", ExceptionUtils.getStackTrace(e));
            throw new NullPointerException("sharding-jdbc數據源為空");
        }
    }

    /**
     * 將動態數據源設置為首選的
     * 當spring存在多個數據源時, 自動註入的是首選的對象
     * 設置為主要的數據源之後,就可以支持shardingJdbc原生的配置方式了
     */
    @Primary
    @Bean
    public DataSource dataSource() {
        DynamicRoutingDataSource dataSource = new DynamicRoutingDataSource();
        dataSource.setPrimary(properties.getPrimary());
        dataSource.setStrict(properties.getStrict());
        dataSource.setStrategy(properties.getStrategy());
        dataSource.setP6spy(properties.getP6spy());
        dataSource.setSeata(properties.getSeata());
        return dataSource;
    }

    /**
     * 初始化動態數據源
     *
     * @return
     */
    @Bean
    public DynamicDataSourceProvider dynamicDataSourceProvider(ShardingDataSource shardingDataSource) {
        return new AbstractDataSourceProvider() {
            @Override
            public Map<String, DataSource> loadDataSources() {
                Map<String, DataSource> dataSourceMap = new HashMap<>();
                // 將sharding數據源整體添加到動態數據源里
                dataSourceMap.put(CommonConstant.SHARDING_DS_NAME, shardingDataSource);
                // 同時把sharding內部管理的子數據源也添加到動態數據源里
                Map<String, DataSource> shardingInnerDataSources = shardingDataSource.getDataSourceMap();
                dataSourceMap.putAll(shardingInnerDataSources);
                return dataSourceMap;
            }
        };
    }
}
- 6.最後給出一份通過監聽Nacos配置變更動態更新數據源的示例代碼。註意:這份示例代碼中只給出了Sharding配置變更時的處理邏輯,如果是dynamic數據源配置的話,有需要的可以參考著自行實現。
@Slf4j
@Configuration
public class NacosShardingConfigListener {
    @Value("${spring.cloud.nacos.config.extension-configs[0].data-id}")
    private String dataId;
    @Value("${spring.cloud.nacos.config.group:DEFAULT_GROUP}")
    private String group;
    @Value("${spring.application.name}")
    private String appName;
    @Autowired
    private DataSource dataSource;
    @Autowired
    private NacosHelper nacosHelper;

    @PostConstruct
    public void shardingConfigListener() throws Exception {
        ConfigService configService = nacosHelper.getConfigService();
        if (configService == null) {
            return;
        }
        configService.addListener(dataId, group, new Listener() {
            @Override
            public Executor getExecutor() {
                return null;
            }

            @Override
            public void receiveConfigInfo(String configInfo) {
                log.info("configInfo:\n{}", configInfo);
                if (StringUtils.isBlank(configInfo)) {
                    log.warn("sharding-jdbc配置為空,不會刷新數據源");
                    return;
                }
                try {
                    if (StringUtils.isNotBlank(configInfo)) {
                        // 通過yaml配置創建sharding數據源(註意:如果分片規則是獨立配置文件,那麼需要提前合併數據源和分片規則配置)
                        ShardingDataSource shardingDataSource = (ShardingDataSource) YamlShardingDataSourceFactory.createDataSource(configInfo.getBytes(StandardCharsets.UTF_8));
                        Map<String, DataSource> shardingInnerDataSources = shardingDataSource.getDataSourceMap();
                        DynamicRoutingDataSource ds = (DynamicRoutingDataSource) dataSource;
                        // 遍歷sharding子數據源
                        for (String poolName : shardingInnerDataSources.keySet()) {
                            // TODO 這裡還有個細節,如果yaml配置刪減了數據源,對應數據源應該要從ds中remove掉,且主數據源不能被remove。另外其實只有新增的數據源才需要執行flyway腳本
                            // 將sharding子數據源逐個添加到動態數據源
                            ds.addDataSource(poolName, shardingInnerDataSources.get(poolName));
                            // 通過代碼完成數據源Flyway配置,並執行遷移操作
														Flyway flyway = Flyway.configure()
                                    .dataSource(dataSource)
                                    .table("t_" + poolName + "_" + appName + "_version")
                                    .baselineOnMigrate(true)
                                    .outOfOrder(true)
                                    .baselineVersion("1.0.0")
                                    .baselineDescription(poolName + "初始化")
                                    .locations(CommonConstant.SQL_BASE_LOCATION + CommonConstant.TENANT_DB)
                                    .load();
                            flyway.migrate();
                        }
                        // 將sharding數據源自身也添加到動態數據源
                        ds.addDataSource(CommonConstant.SHARDING_DS_NAME, shardingDataSource);
                        log.info("動態數據源刷新完成,現有數據源:{}", JSONUtil.toJsonStr(ds.getDataSources().keySet()));
                    }
                } catch (Exception e) {
                    log.error("創建sharding-jdbc數據源異常:{}", ExceptionUtils.getStackTrace(e));
                }
            }
        });
    }
}


