
前言 最近為一個公眾號h5商城接入了微信支付功能,查找資料過程中踩了很多坑,以此文章記錄一下和大家分享 前期準備 公眾號認證 微信支付功能需要開通企業號併進行資質認證,費用一年300,且需企業營業執照等信息,對公賬戶打款驗證 登錄微信公眾平臺https://mp.weixin.qq.com/,創建服 ...
前言
最近為一個公眾號h5商城接入了微信支付功能,查找資料過程中踩了很多坑,以此文章記錄一下和大家分享
前期準備
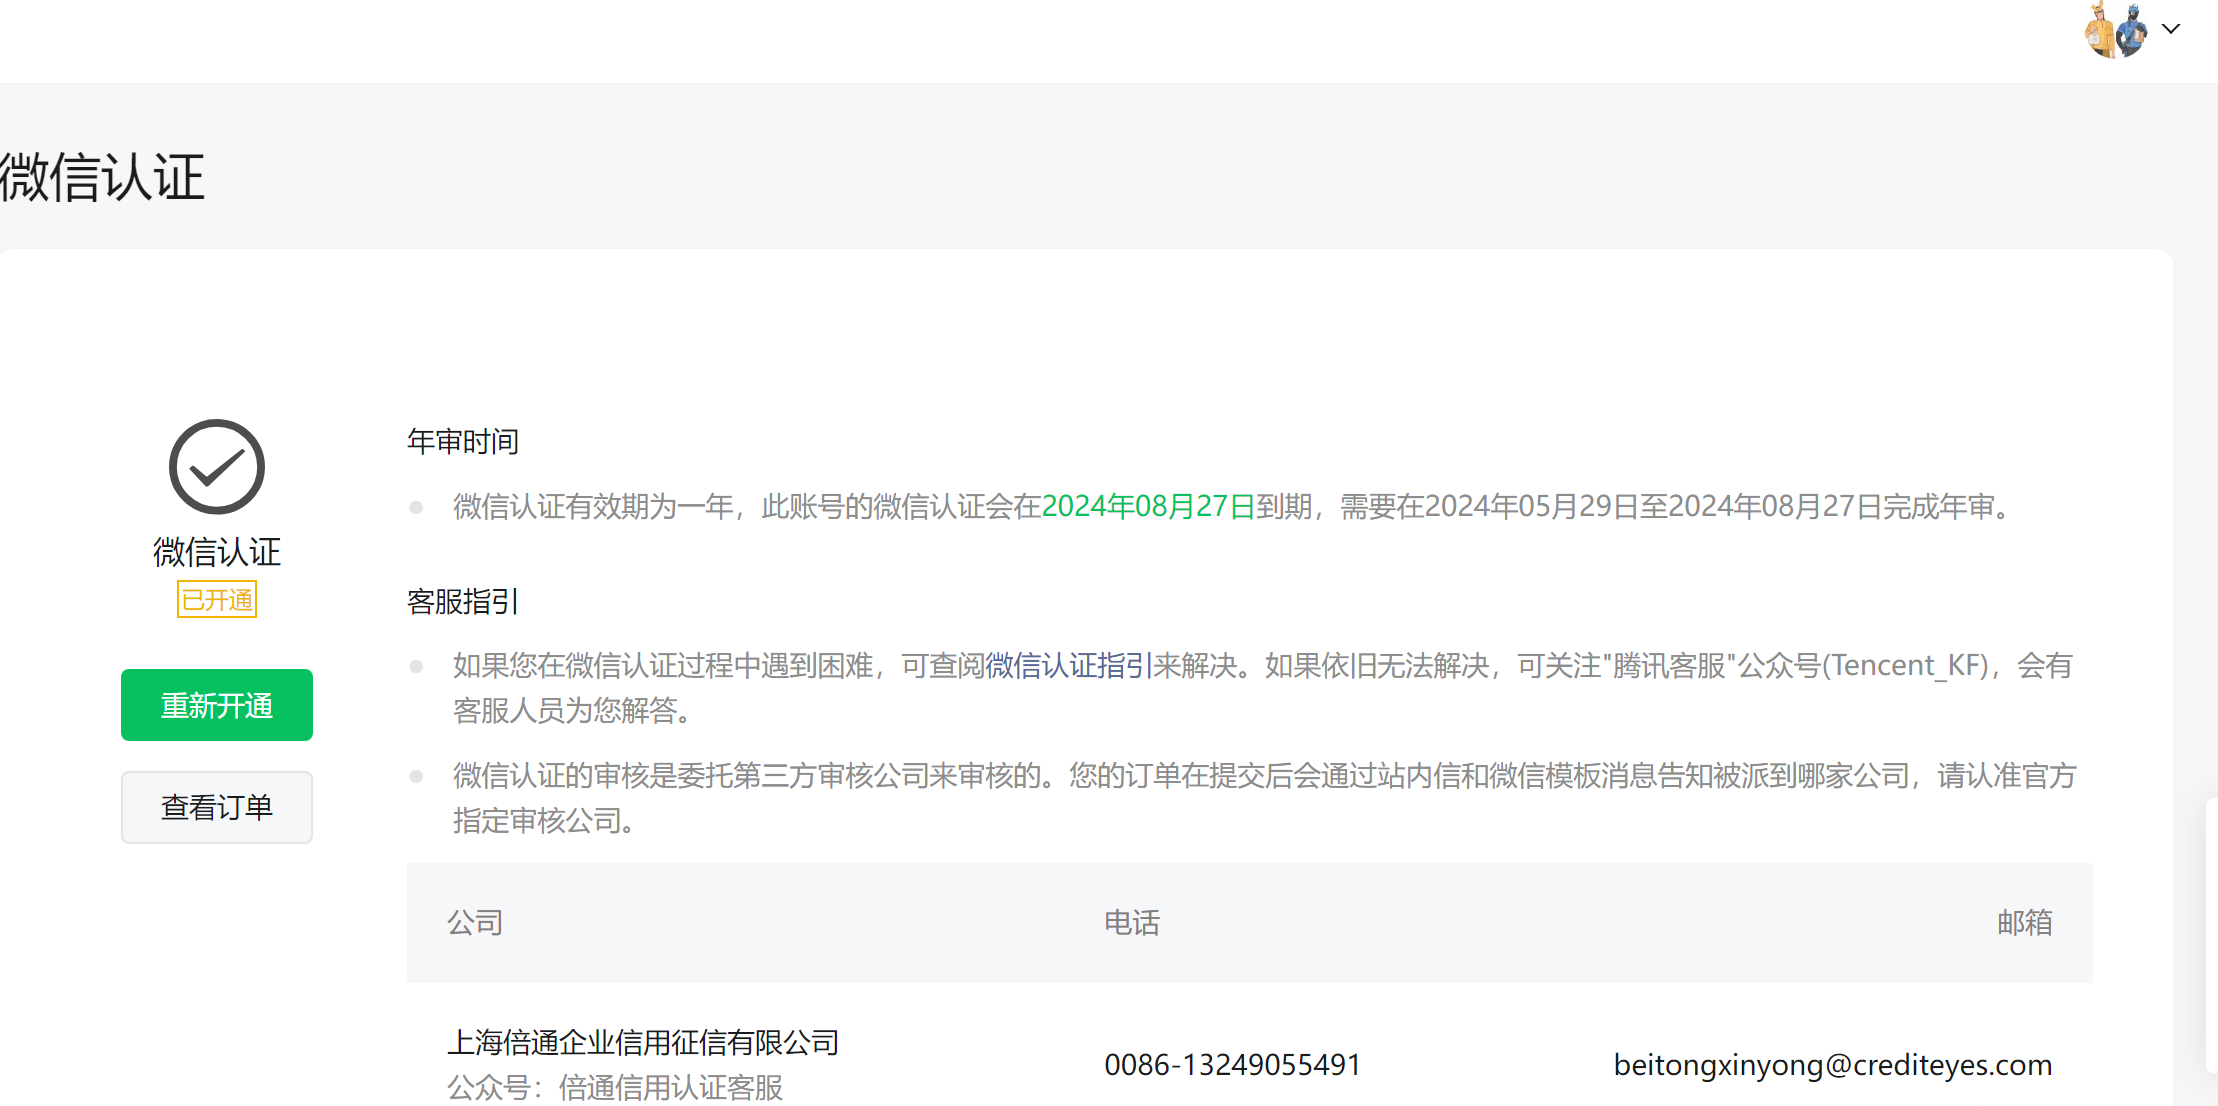
公眾號認證
微信支付功能需要開通企業號併進行資質認證,費用一年300,且需企業營業執照等信息,對公賬戶打款驗證
登錄微信公眾平臺https://mp.weixin.qq.com/,創建服務號
如果已有服務號掃碼登錄後點擊公眾號頭像選擇認證詳情菜單
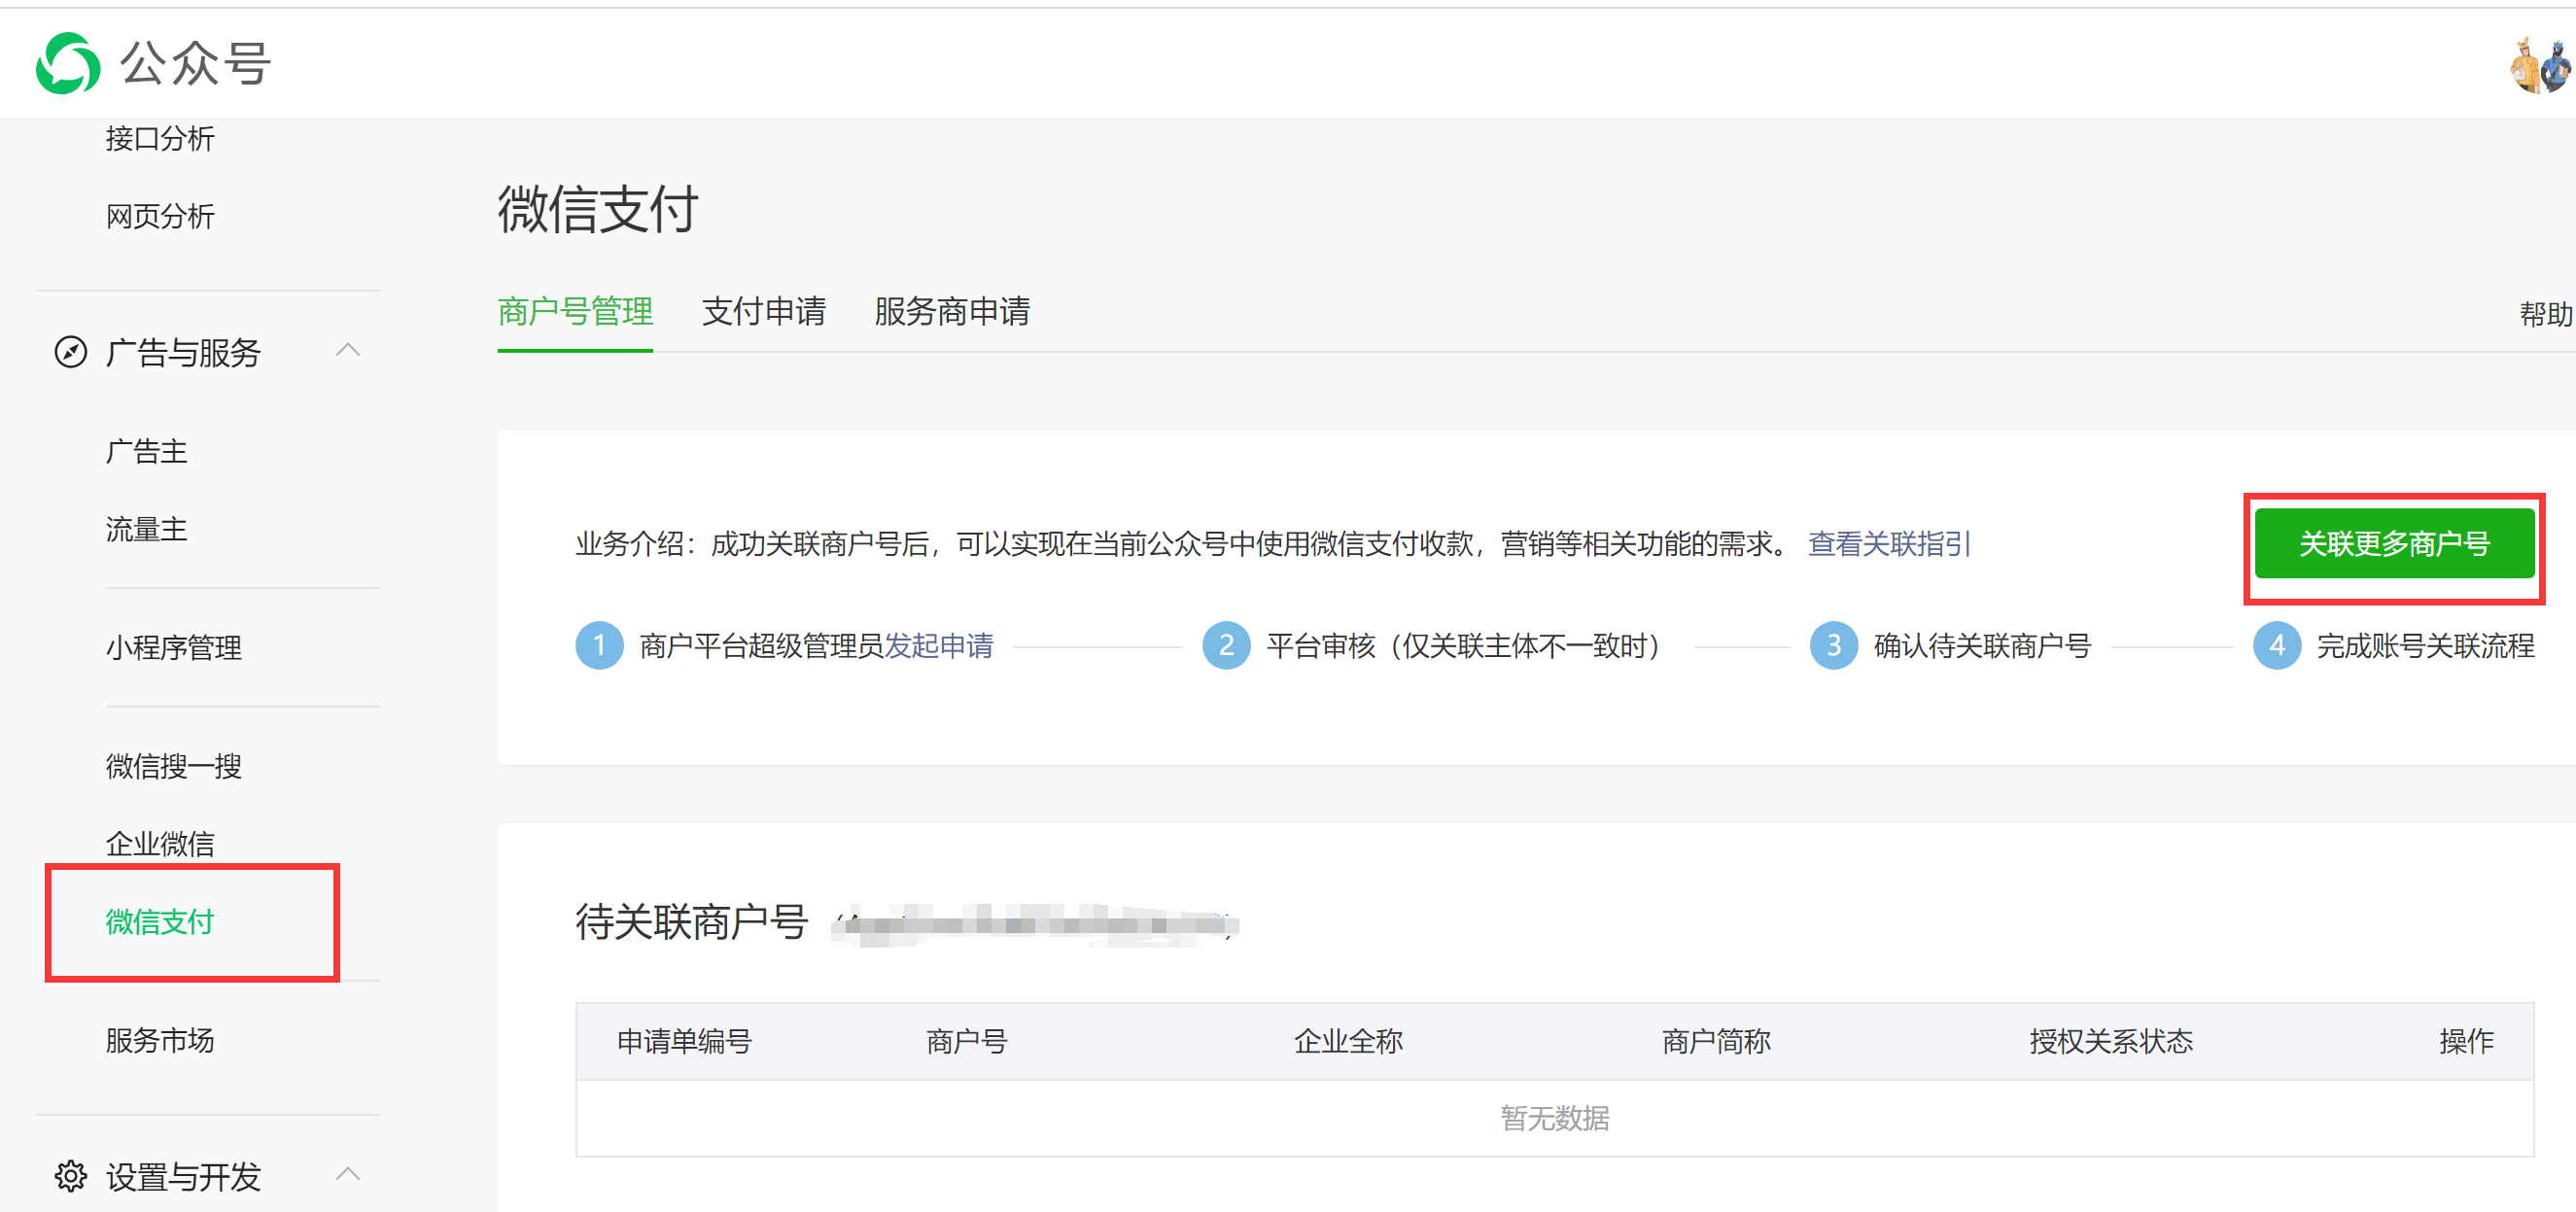
商戶開通
點擊公眾號左側微信支付菜單,選擇右側關聯商戶按鈕,如果沒有商戶按指引申請
參數獲取
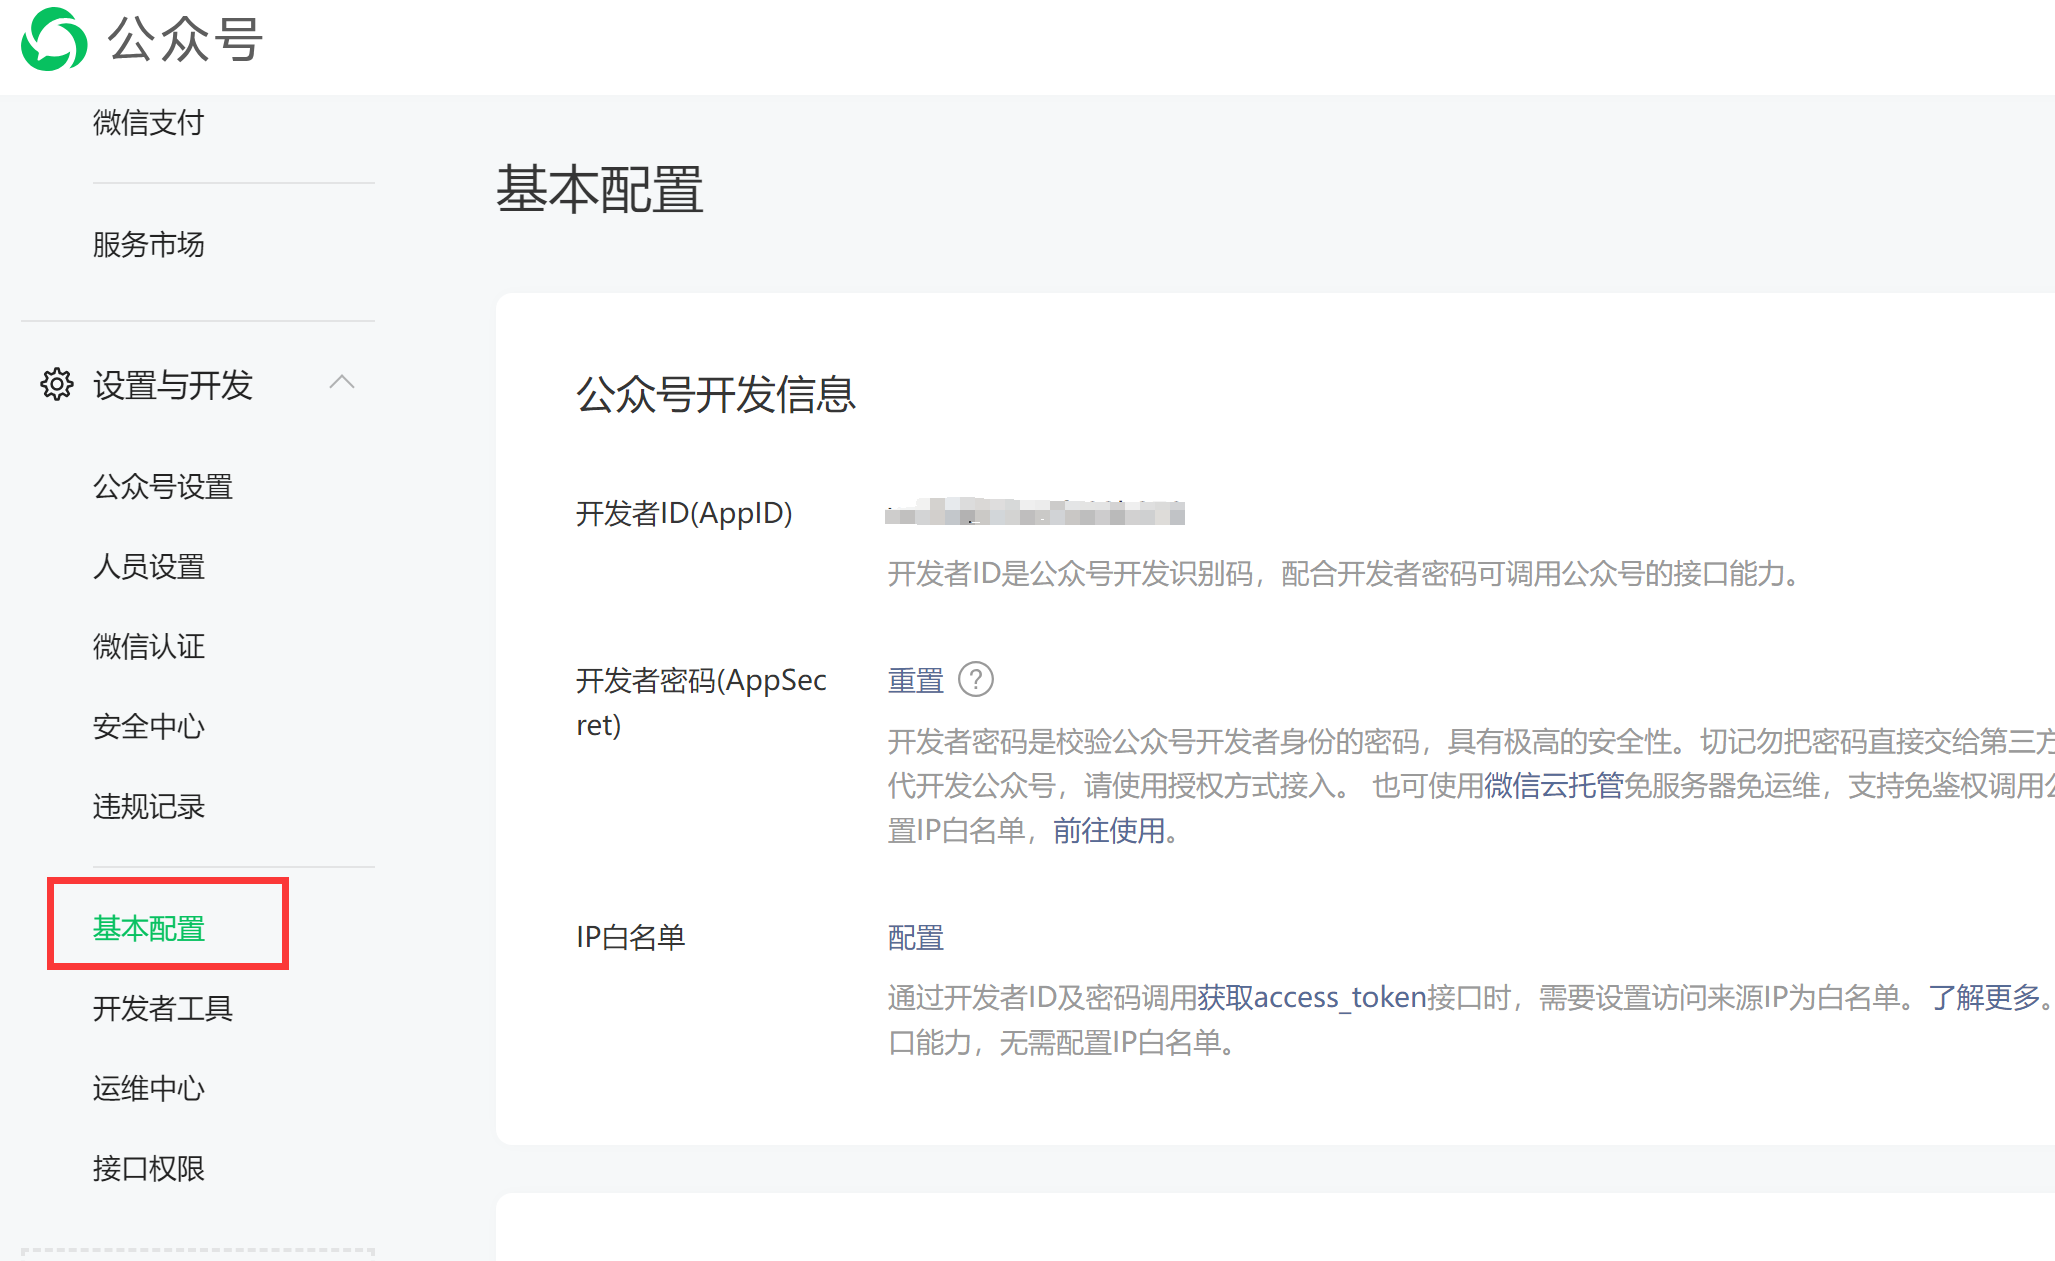
公眾號參數
點擊左側基本配置菜單,記錄右側的應用ID(appid)
商戶參數
點擊公眾號左側微信支付菜單,滑動到已關聯商戶號,點擊查看按鈕
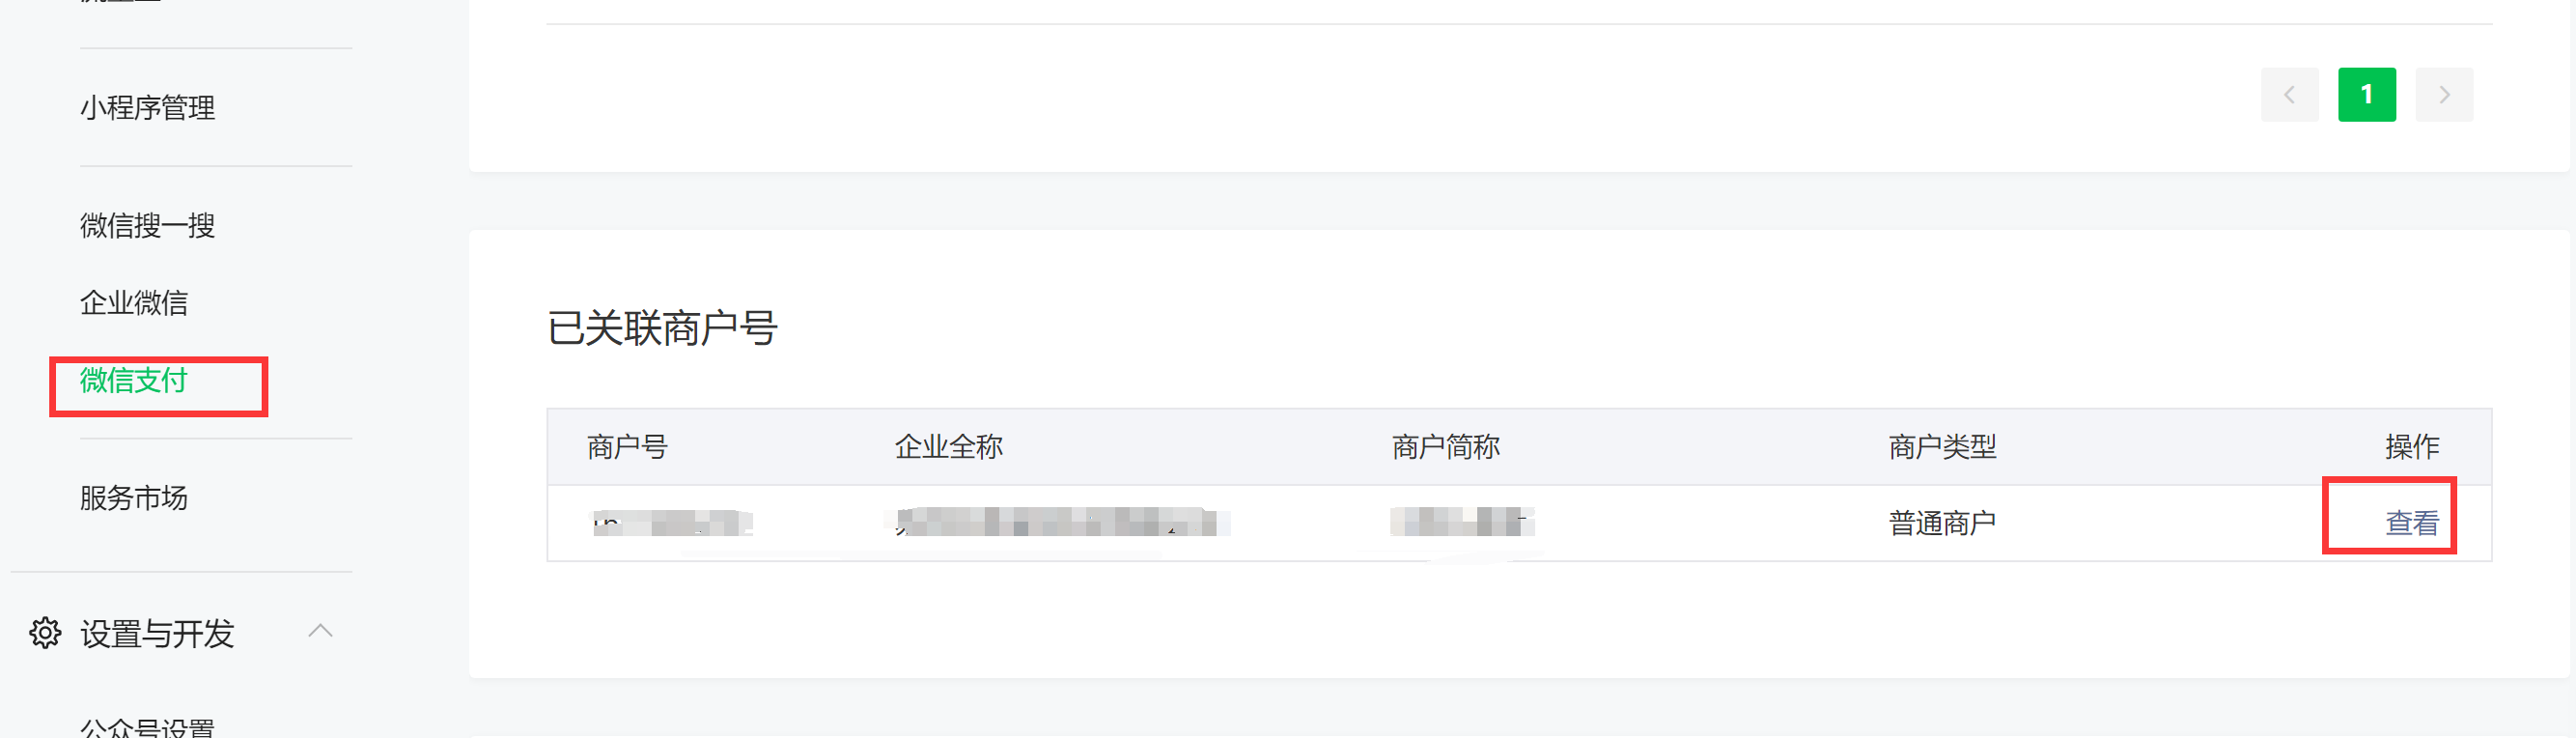
進入商戶後,選擇產品中心,左側開發配置,記錄商戶號(mchId)

進入商戶後,選擇賬戶中心,左側API安全,按照指引獲取APIV3密鑰(apiV3Key),API證書的序列號(merchantSerialNumber)和私鑰文件apiclient_key.pem

參數配置
外網映射
在微信支付本地調試時需要用到外網映射工具,這裡推薦NATAPP:https://natapp.cn/(非廣)
一個月帶備案功能變數名稱的映射隧道12元,我們需要兩個,一個映射公眾號菜單頁面,一個映射後端介面
公眾號參數
進入公眾點擊左側自定義菜單,右側點擊添加菜單,輸入外網映射後的菜單地址

如果你是新手,需要進行網頁授權認證獲取用戶openid,那你還需要進行網頁授權功能變數名稱的設置
點左側介面許可權菜單,修改右側的網頁授權用戶信息獲取
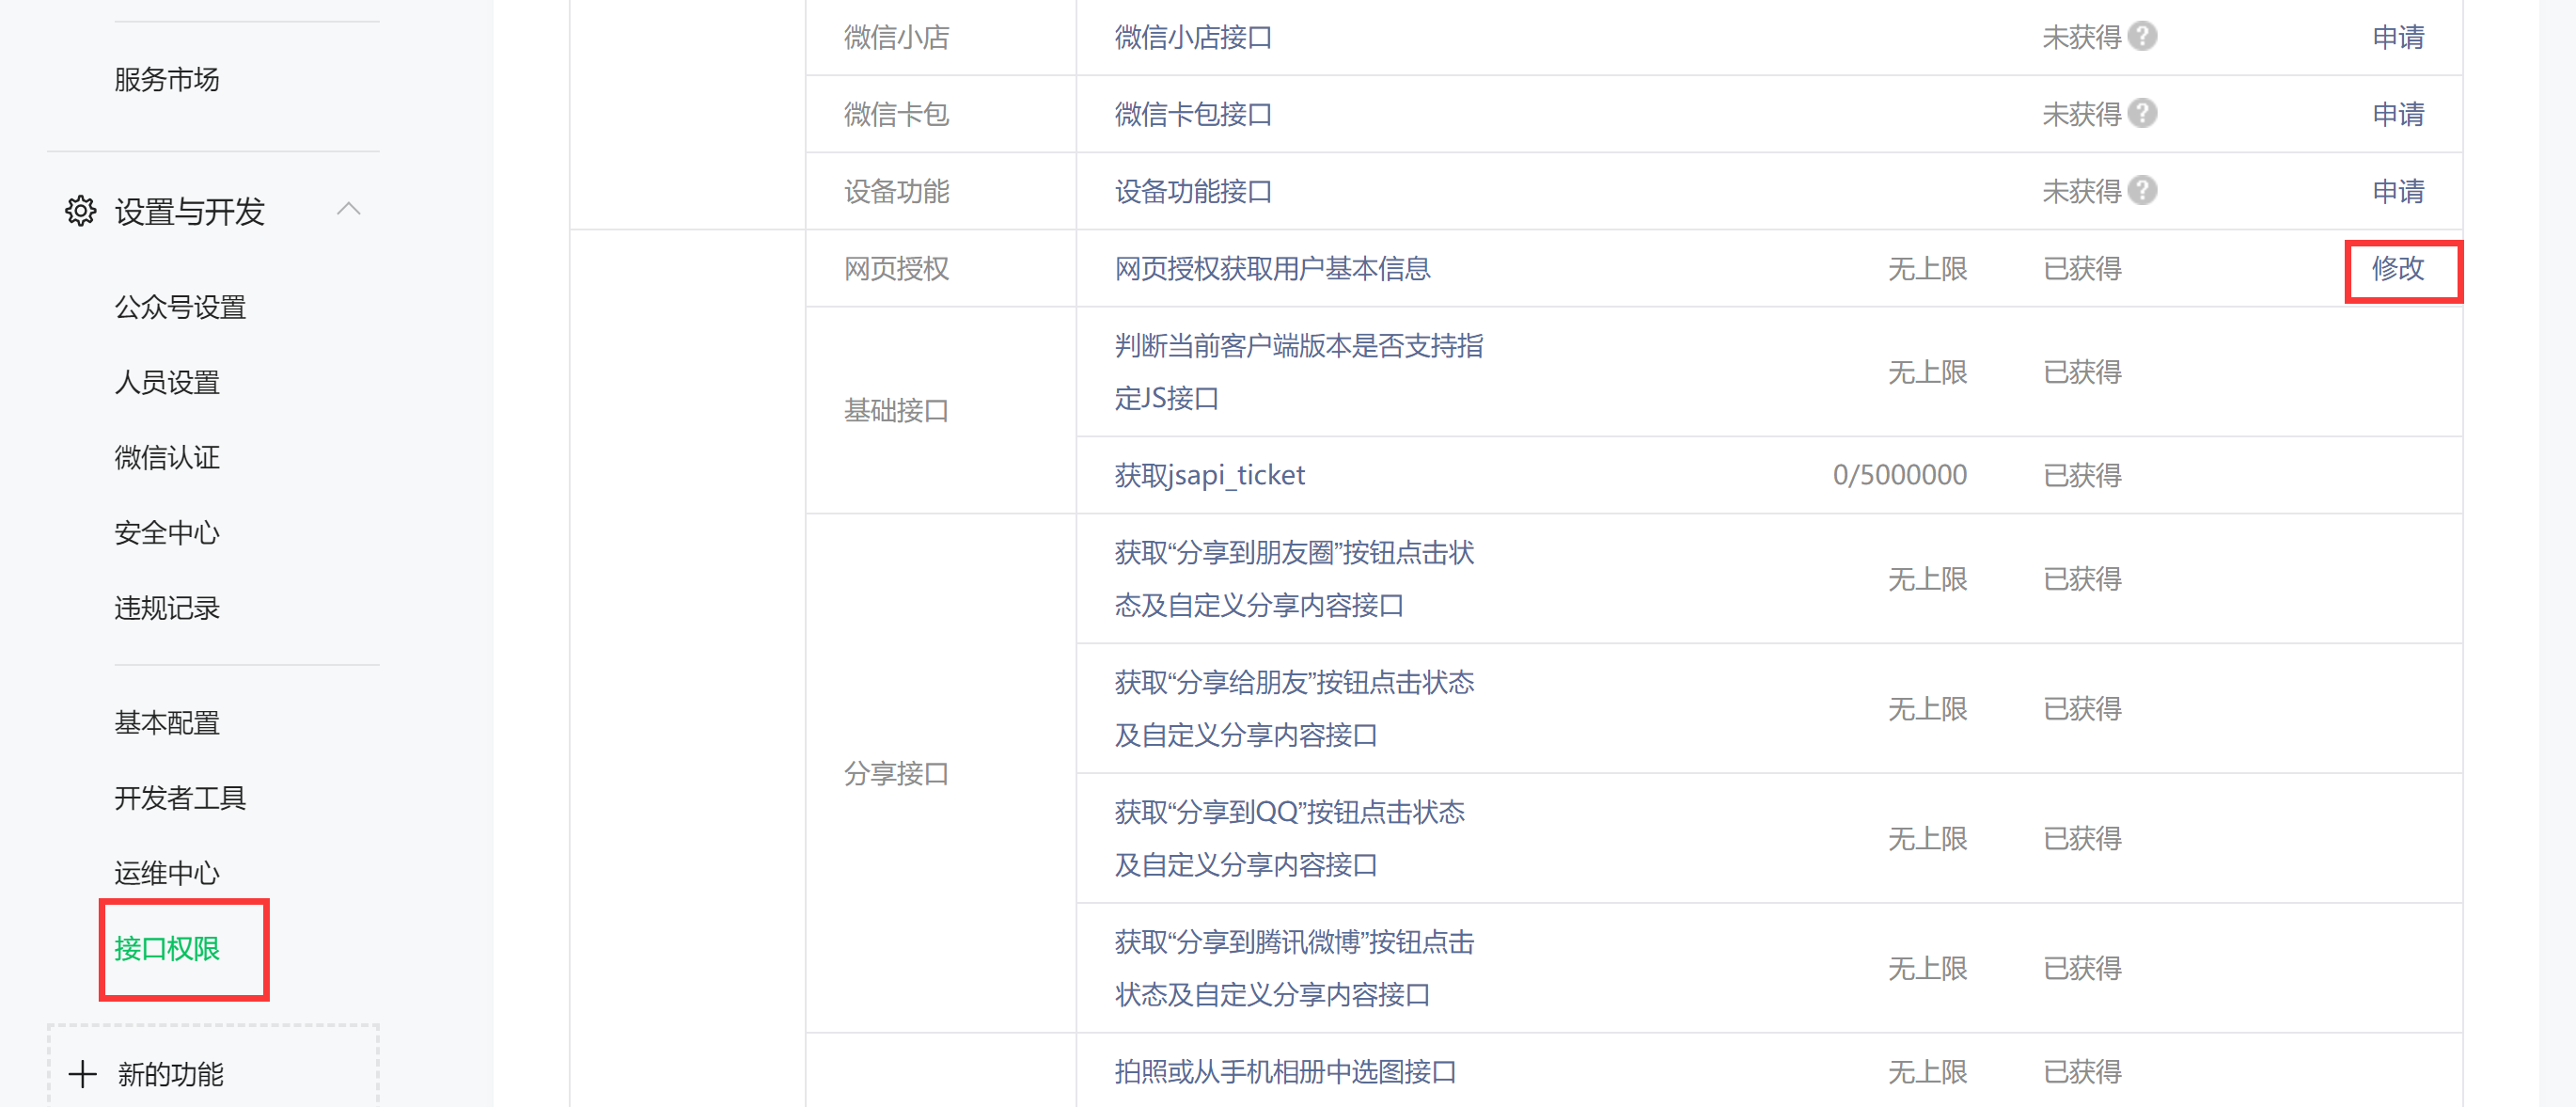
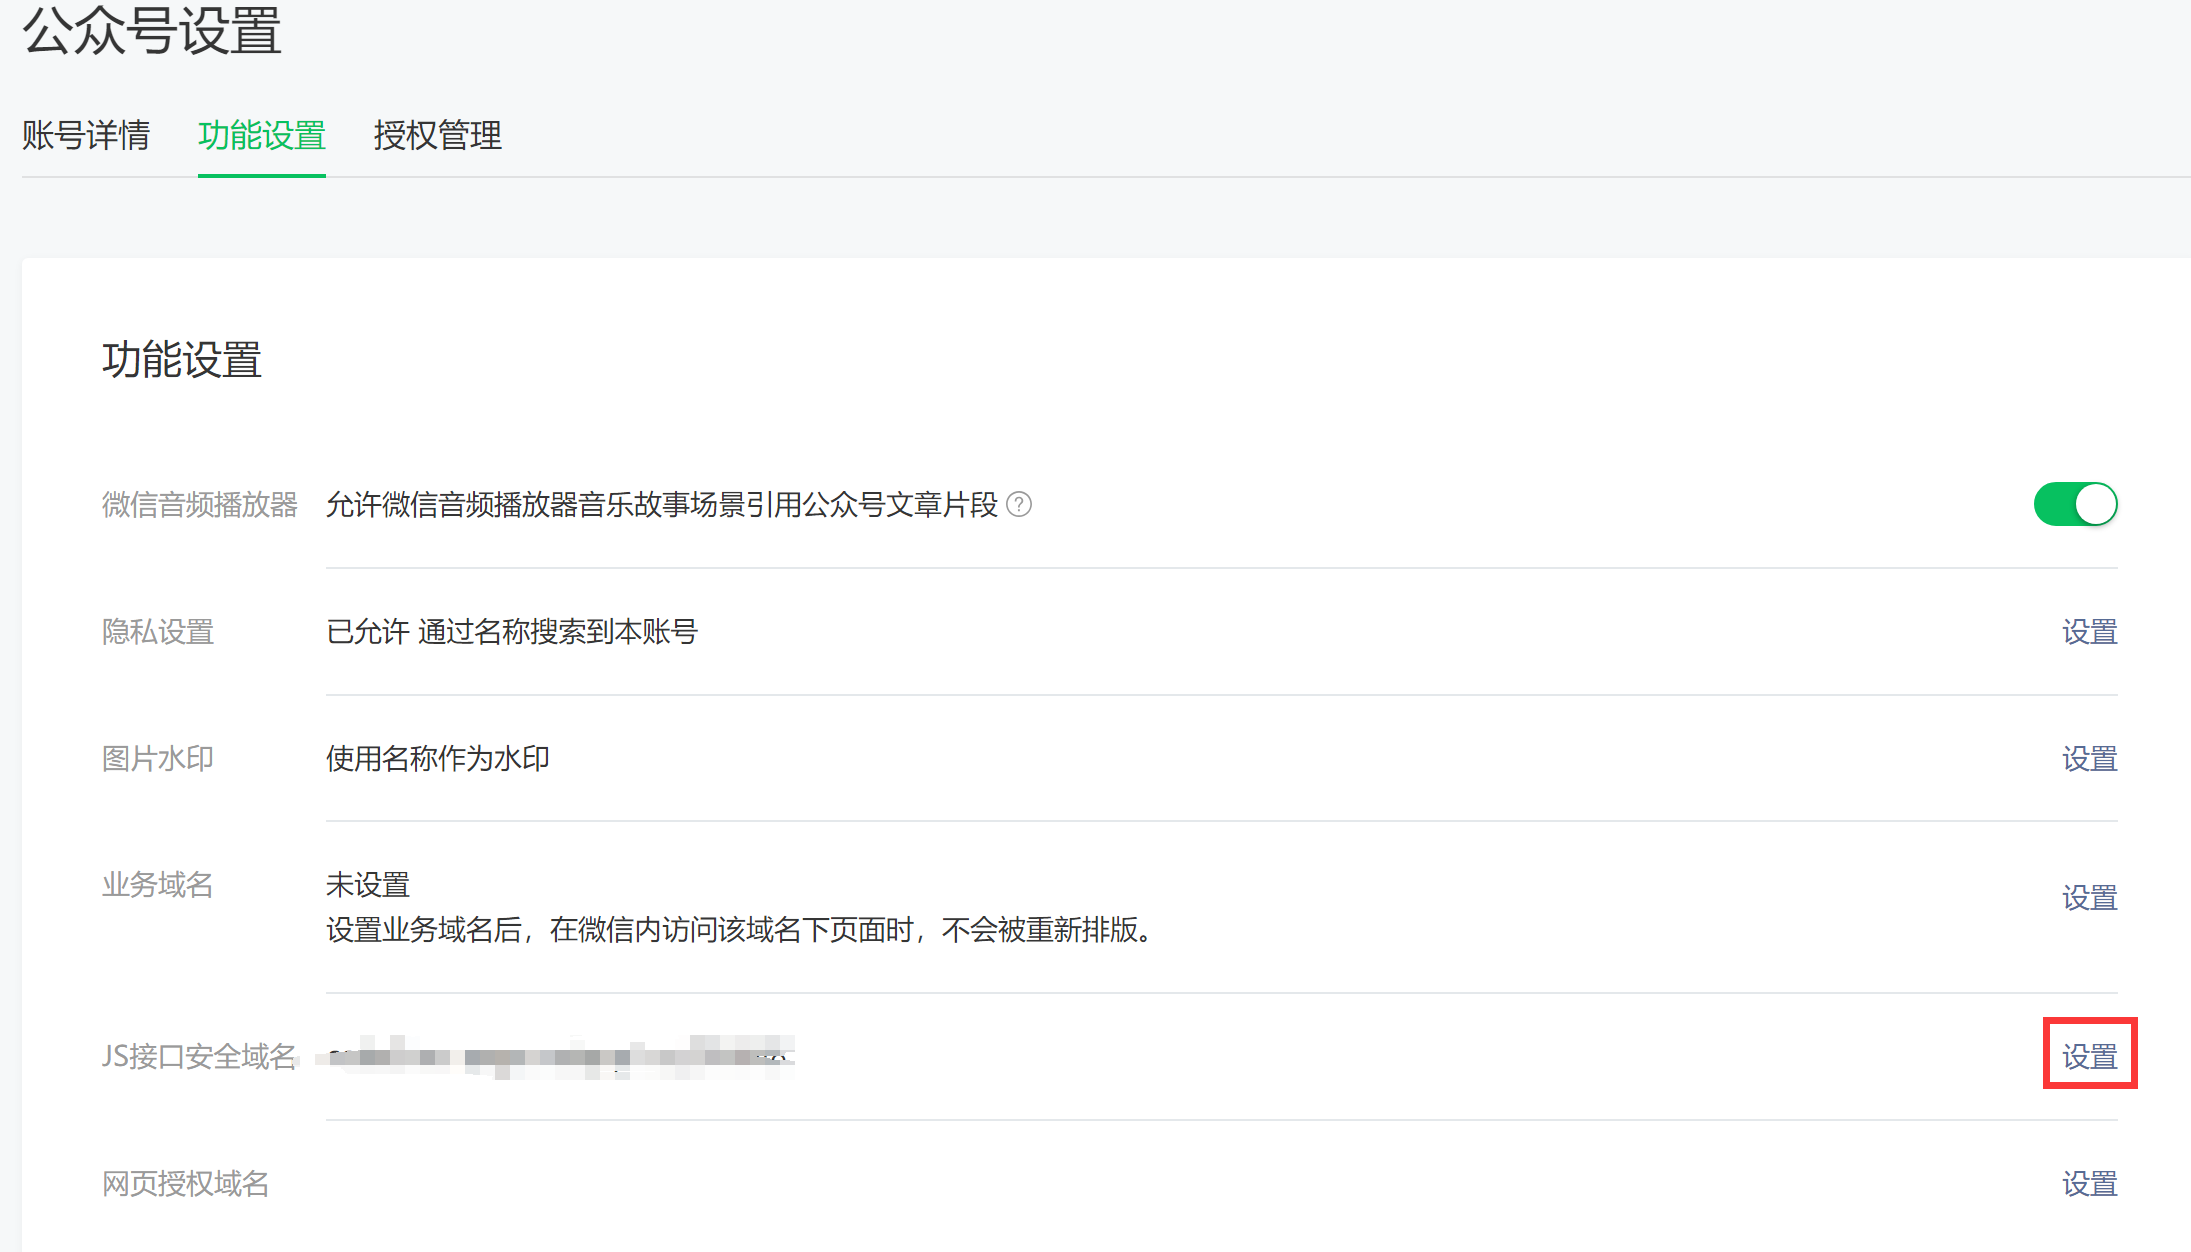
進入後設置JS介面安全功能變數名稱,會需要將一個txt認證文件放置到你的靜態頁面目錄,參照指引即可
商戶參數
進入商戶後,選擇產品中心,左側我的產品,進入JSAPI支付
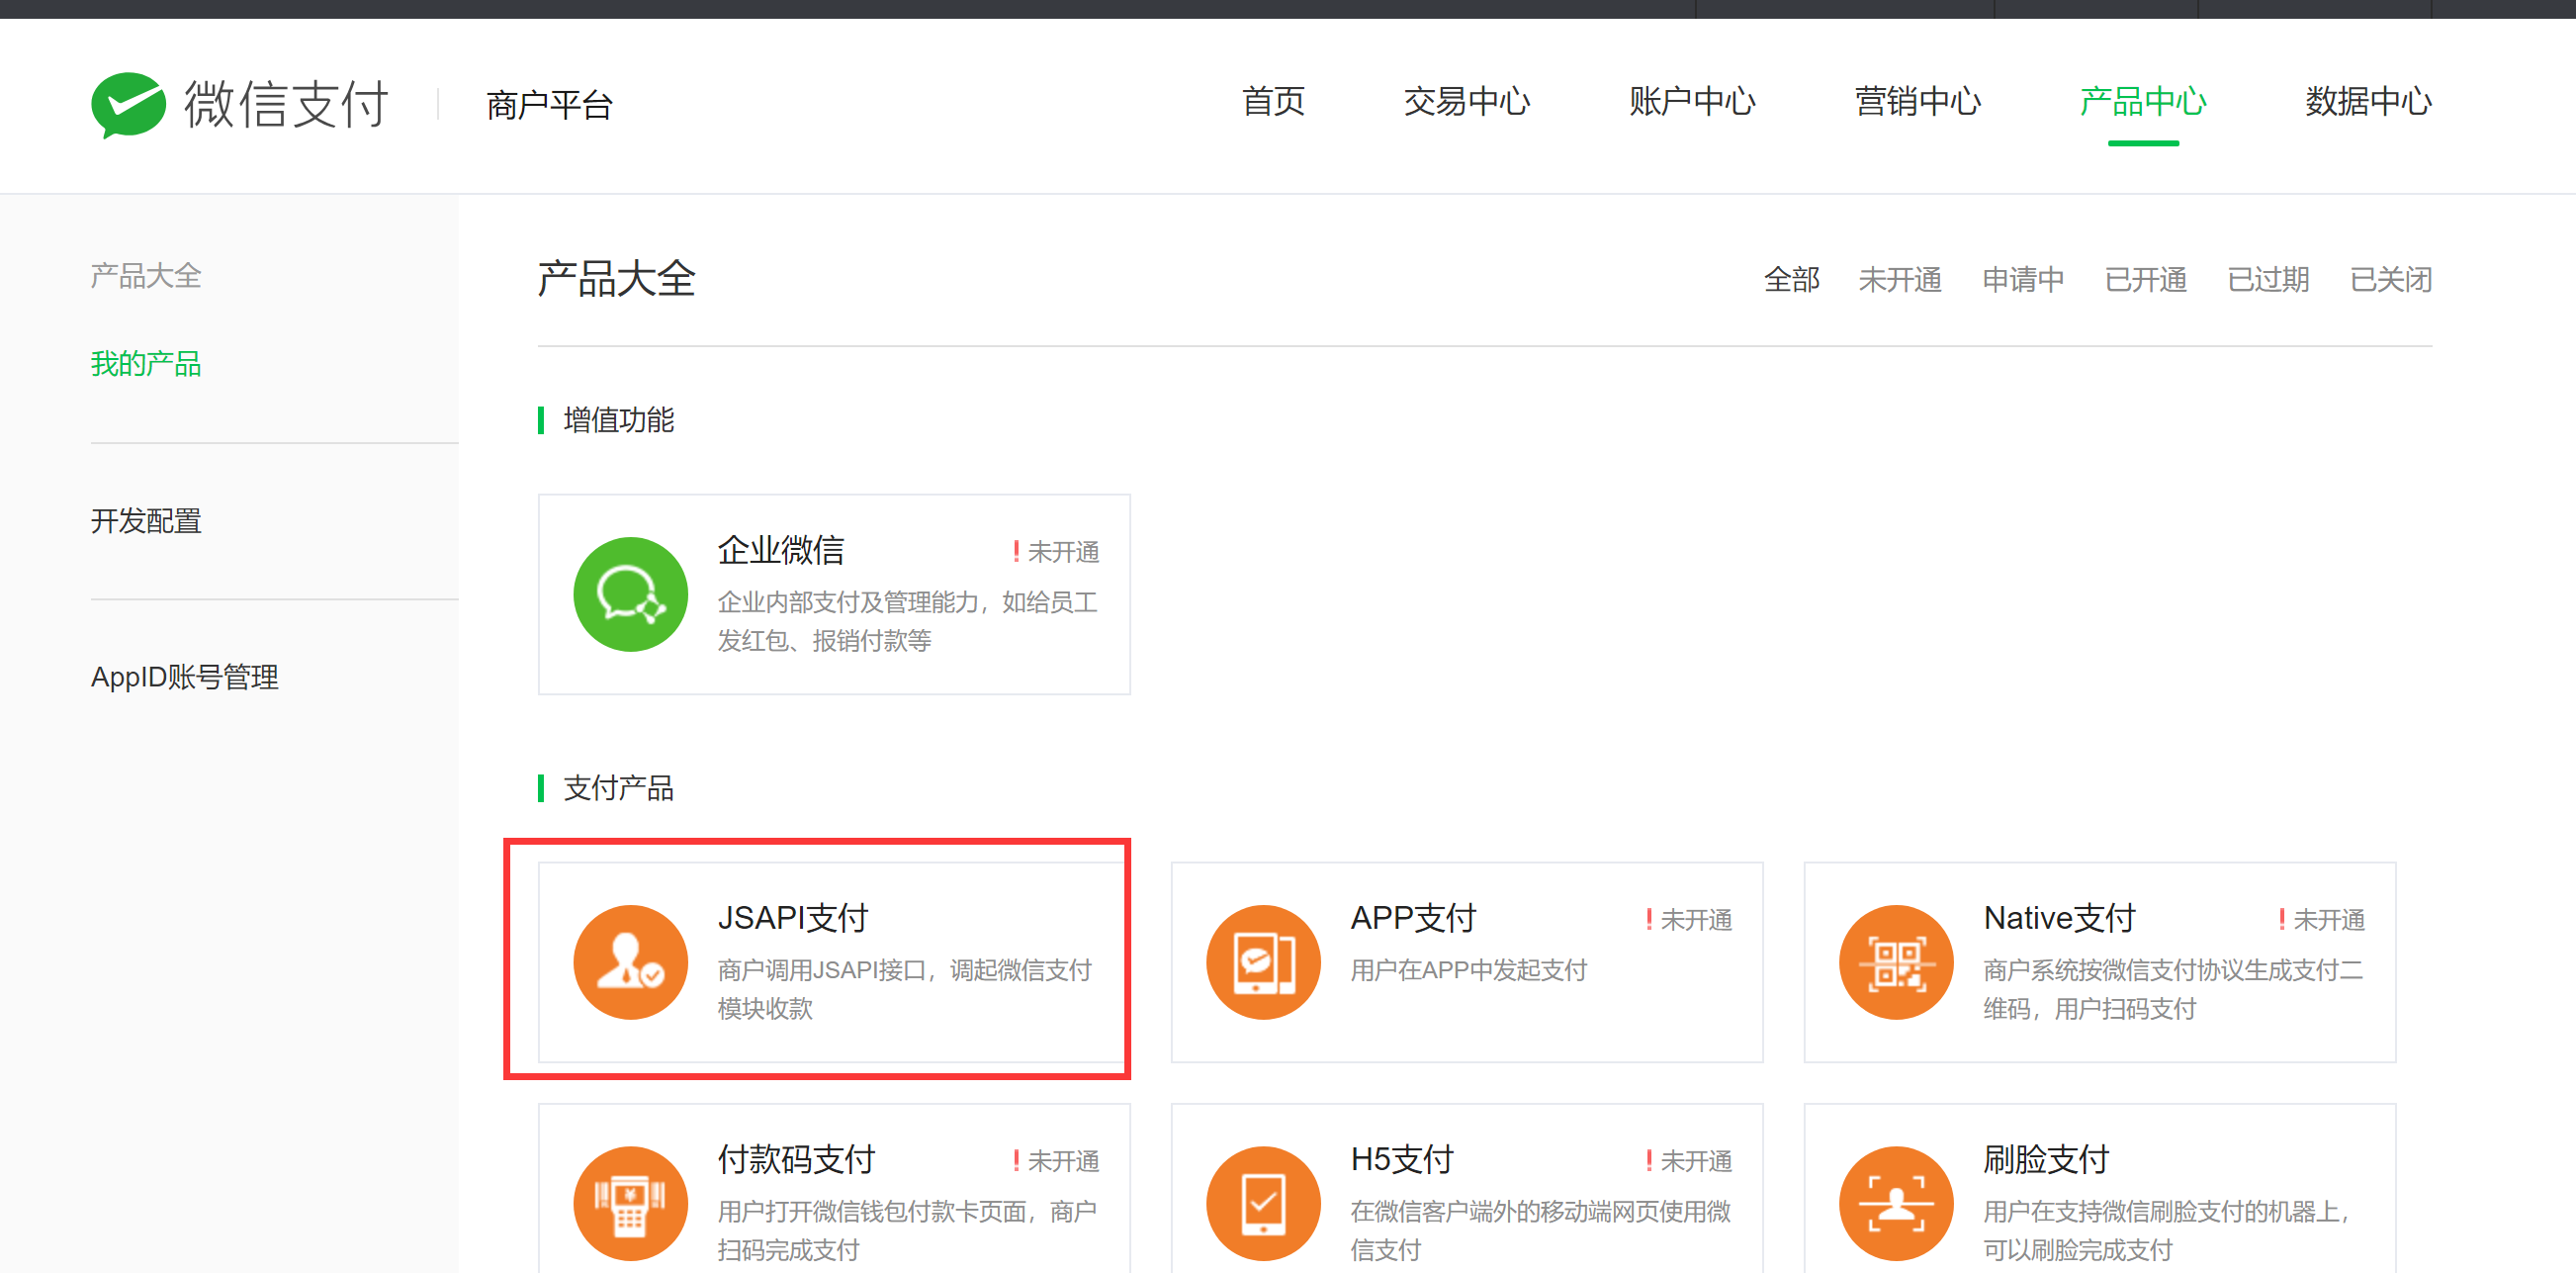
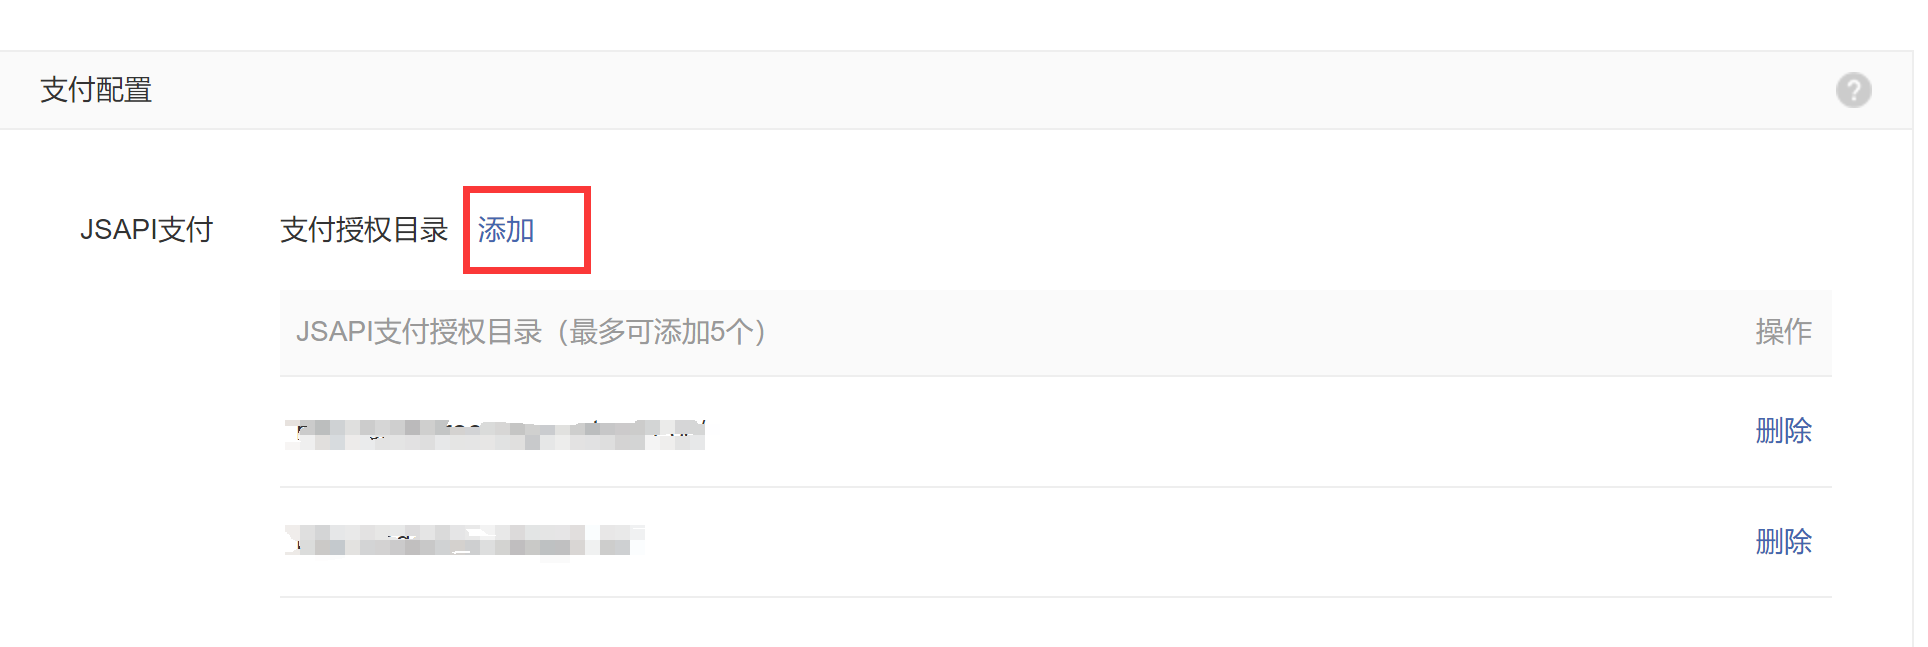
點擊產品設置,在支付配置模塊,添加支付授權目錄(後端介面和前端網頁都添加)
支付對接
參數聲明
wechartpay:
  # 公眾號id
  appId: xxx
  # 公眾號中微信支付綁定的商戶的商戶號
  mchId: xxxx
  # 商戶apiV3Keyz密鑰
  apiV3Key: xxxx
  #商戶證書序列號
  merchantSerialNumber: xxxx
  # 支付回調地址
  v3PayNotifyUrl: http://xxxxxx/wechatpay/pay_notify
  # 退款回調地址
  v3BackNotifyUrl: http://xxxxx/wechatpay/back_notify
	@Value("${wechartpay.appId}")
    private String appId;
    @Value("${wechartpay.mchId}")
    private String mchId;
    @Value("${wechartpay.apiV3Key}")
    private String apiV3Key;
    @Value("${wechartpay.merchantSerialNumber}")
    private String merchantSerialNumber;
    @Value("${wechartpay.v3PayNotifyUrl}")
    private String v3PayNotifyUrl;
    @Value("${wechartpay.v3BackNotifyUrl}")
    private String v3BackNotifyUrl;

	public static RSAAutoCertificateConfig config = null;
    public static JsapiServiceExtension service = null;
    public static RefundService backService = null;

	private void initPayConfig() {
        initConfig();
        // 構建service
        if (service == null) {
            service = new JsapiServiceExtension.Builder().config(config).build();
        }
    }

    private void initBackConfig() {
        initConfig();
        // 構建service
        if (backService == null) {
            backService = new RefundService.Builder().config(config).build();
        }
    }

    private void initConfig() {
        String filePath = getFilePath("apiclient_key.pem");
        if (config == null) {
            config = new RSAAutoCertificateConfig.Builder()
                    .merchantId(mchId)
                    .privateKeyFromPath(filePath)
                    .merchantSerialNumber(merchantSerialNumber)
                    .apiV3Key(apiV3Key)
                    .build();
        }
    }

    public RSAAutoCertificateConfig getConfig() {
        initConfig();
        return config;
    }

    public static String getFilePath(String classFilePath) {
        String filePath = "";
        try {
            String templateFilePath = "tempfiles/classpathfile/";
            File tempDir = new File(templateFilePath);
            if (!tempDir.exists()) {
                tempDir.mkdirs();
            }
            String[] filePathList = classFilePath.split("/");
            String checkFilePath = "tempfiles/classpathfile";
            for (String item : filePathList) {
                checkFilePath += "/" + item;
            }
            File tempFile = new File(checkFilePath);
            if (tempFile.exists()) {
                filePath = checkFilePath;
            } else {
                //解析
                ClassPathResource classPathResource = new ClassPathResource(classFilePath);
                InputStream inputStream = classPathResource.getInputStream();
                checkFilePath = "tempfiles/classpathfile";
                for (int i = 0; i < filePathList.length; i++) {
                    checkFilePath += "/" + filePathList[i];
                    if (i == filePathList.length - 1) {
                        //文件
                        File file = new File(checkFilePath);
                        if (!file.exists()) {
                            FileUtils.copyInputStreamToFile(inputStream, file);
                        }
                    } else {
                        //目錄
                        tempDir = new File(checkFilePath);
                        if (!tempDir.exists()) {
                            tempDir.mkdirs();
                        }
                    }
                }
                inputStream.close();
                filePath = checkFilePath;
            }

        } catch (Exception e) {
            e.printStackTrace();
        }
        return filePath;
    }
將apiclient_key.pem私鑰文件拷貝到resources文件夾根目錄
Maven引用
        <dependency>
            <groupId>com.github.wechatpay-apiv3</groupId>
            <artifactId>wechatpay-java</artifactId>
            <version>0.2.11</version>
        </dependency>
        <dependency>
            <groupId>commons-io</groupId>
            <artifactId>commons-io</artifactId>
            <version>2.8.0</version>
        </dependency>
用戶授權
為了測試流程的完整性,這裡簡單描述下如何通過網頁授權獲取用戶的openid,幾個參數定義如下
var appid = "xxxx";
var appsecret = "xxxx";
redirect_uri = encodeURIComponent("http://xxxx/xxx.html");
response_type = "code";
scope = "snsapi_userinfo";
-
發起授權請求
function getCodeUrl() {
    var url = "https://open.weixin.qq.com/connect/oauth2/authorize?appid=" + appid + "&redirect_uri=" + redirect_uri + "&response_type=" + response_type + "&scope=" + scope + "#wechat_redirect";
    return url
}
跳轉到開始授權頁面,會跳轉到redirect_uri這個頁面,url參數攜帶授權code
-
用戶同意授權
function getAuthUrl(code) {
    var url = "https://api.weixin.qq.com/sns/oauth2/access_token?appid=" + appid + "&secret=" + appsecret + "&code=" + code + "&grant_type=authorization_code";
    return url
}
根據code生成正式授權url,需要用戶手動點擊同意,使用get方式請求該url成功後會返回openid
var url = getAuthUrl(code);
$.get(url, function (data, status) {
   var result = JSON.parse(data)
   if (!result.errcode) {
       var openid = result.openid;
    }
});
不使用用戶授權流程也能簡單的獲取到用戶openid進行測試,如果該用戶關註了公眾號,選擇公眾號左側的用戶管理菜單,點擊用戶跳轉到與該用戶的聊天界面,url參數中的tofakeid就是用戶的openid
支付準備
根據用戶的openid,訂單號,訂單金額,訂單說明四個參數進行支付前的參數準備,會返回如下參數
公眾號ID(appId)
時間戳(timeStamp)
隨機串(nonceStr)
打包值(packageVal)
微信簽名方式(signType)
微信簽名(paySign)
這裡的orderID指業務中生成的訂單號,最大32位,由數字和字母組成,支付金額最終要轉轉換成已分為單位
    @PostMapping("/prepay")
    public Object prepay(@RequestBody Map<String, Object> params) throws Exception {
        String openId = "xxxx";
        String orderID = String.valueOf(params.get("orderID"));
        BigDecimal payAmount = new BigDecimal(String.valueOf(params.get("payAmount")));
        String payDes = "支付測試";
        return paySDK.getPreparePayInfo(openId,orderID,payAmount,payDes);
    }
	//支付前的準備參數,供前端調用
    public PrepayWithRequestPaymentResponse getPreparePayInfo(String openid, String orderID, BigDecimal payAmount, String payDes) {
        initPayConfig();
        //元轉換為分
        Integer amountInteger = (payAmount.multiply(new BigDecimal(100))).intValue();
        //組裝預約支付的實體
        // request.setXxx(val)設置所需參數,具體參數可見Request定義
        PrepayRequest request = new PrepayRequest();
        //計算金額
        Amount amount = new Amount();
        amount.setTotal(amountInteger);
        amount.setCurrency("CNY");
        request.setAmount(amount);
        //公眾號appId
        request.setAppid(appId);
        //商戶號
        request.setMchid(mchId);
        //支付者信息
        Payer payer = new Payer();
        payer.setOpenid(openid);
        request.setPayer(payer);
        //描述
        request.setDescription(payDes);
        //微信回調地址,需要是https://開頭的,必須外網可以正常訪問
        //本地測試可以使用內網穿透工具,網上很多的
        request.setNotifyUrl(v3PayNotifyUrl);
        //訂單號
        request.setOutTradeNo(orderID);
        // 加密
        PrepayWithRequestPaymentResponse payment = service.prepayWithRequestPayment(request);
        //預設加密類型為RSA
        payment.setSignType("MD5");
        payment.setAppId(appId);
        return payment;
    }
支付拉起
在微信環境調用支付準備介面獲取參數後,使用WeixinJSBridge.invoke方法發起微信支付
function submitWeChatPay(orderID,payAmount,callback) {
    if (typeof WeixinJSBridge != "undefined") {
        var param = {
            orderID:orderID,
            payAmount:payAmount
        }
        httpPost(JSON.stringify(param),"http://xxxx/wechatpay/prepay",function (data, status) {
            var param = {
                "appId": data.appId,
                "timeStamp": data.timeStamp,
                "nonceStr": data.nonceStr,
                "package": data.packageVal,
                "signType": data.signType,
                "paySign": data.paySign
            }
            WeixinJSBridge.invoke(
                'getBrandWCPayRequest', param,callback);
        })
    } else {
        alert("非微信環境")
    }
}
支付回調
支付回調地址是在支付準備階段傳遞的,在用戶付款完成後會自動調用該介面,傳遞支付訂單的相關信息
    @PostMapping("/pay_notify")
    public void pay_notify(HttpServletRequest request, HttpServletResponse response) throws Exception {
        //獲取報文
        String body = getRequestBody(request);
        //隨機串
        String nonceStr = request.getHeader("Wechatpay-Nonce");
        //微信傳遞過來的簽名
        String signature = request.getHeader("Wechatpay-Signature");
        //證書序列號(微信平臺)
        String serialNo = request.getHeader("Wechatpay-Serial");
        //時間戳
        String timestamp = request.getHeader("Wechatpay-Timestamp");
        InputStream is = null;
        try {
            is = request.getInputStream();
            // 構造 RequestParam
            com.wechat.pay.java.core.notification.RequestParam requestParam = new com.wechat.pay.java.core.notification.RequestParam.Builder()
                    .serialNumber(serialNo)
                    .nonce(nonceStr)
                    .signature(signature)
                    .timestamp(timestamp)
                    .body(body)
                    .build();
            // 如果已經初始化了 RSAAutoCertificateConfig,可以直接使用  config
            // 初始化 NotificationParser
            NotificationParser parser = new NotificationParser(paySDK.getConfig());
            // 驗簽、解密並轉換成 Transaction
            Transaction transaction = parser.parse(requestParam, Transaction.class);
            //記錄日誌信息
            Transaction.TradeStateEnum state = transaction.getTradeState();
            String orderNo = transaction.getOutTradeNo();
            System.out.println("訂單號:" + orderNo);
            if (state == Transaction.TradeStateEnum.SUCCESS) {
                System.out.println("支付成功");
                //TODO------
                //根據自己的需求處理相應的業務邏輯,非同步

                //通知微信回調成功
                response.getWriter().write("<xml><return_code><![CDATA[SUCCESS]]></return_code></xml>");
            } else {
                System.out.println("微信回調失敗,JsapiPayController.payNotify.transaction:" + transaction.toString());
                //通知微信回調失敗
                response.getWriter().write("<xml><return_code><![CDATA[FAIL]]></return_code></xml>");
            }
        } catch (Exception e) {
            e.printStackTrace();
        } finally {
            is.close();
        }
    }
訂單查詢
除了支付回調的非同步通知,我們還需要通過定時任務主動去查詢支付信息來保證業務訂單支付狀態的正確
    @PostMapping("/pay_check")
    public Object pay_check(@RequestBody Map<String, Object> params) throws Exception {
        String orderID = String.valueOf(params.get("orderID"));
        com.wechat.pay.java.service.payments.model.Transaction transaction = paySDK.getPayOrderInfo(orderID);
        com.wechat.pay.java.service.payments.model.Transaction.TradeStateEnum state = transaction.getTradeState();
        if (state == com.wechat.pay.java.service.payments.model.Transaction.TradeStateEnum.SUCCESS) {
            return Result.okResult().add("obj", transaction);
        } else {
            return Result.errorResult().add("obj", transaction);
        }
    }
    //獲取訂單支付結果信息
    public com.wechat.pay.java.service.payments.model.Transaction getPayOrderInfo(String orderID) {
        initPayConfig();
        QueryOrderByOutTradeNoRequest request = new QueryOrderByOutTradeNoRequest();
        request.setMchid(mchId);
        request.setOutTradeNo(orderID);
        com.wechat.pay.java.service.payments.model.Transaction transaction = service.queryOrderByOutTradeNo(request);
        return transaction;
    }
退款申請
退款申請需要業務訂單號和微信支付號,所以我們這裡先通過查詢訂單信息得到transactionId,你也可以冗餘記錄在表中
退款支持全款退款和部分退款,部分退款對應的場景就是同一個訂單買了多個商品,只退款了其中一個
這裡只發起退款申請,具體的退款處理進度通知由退款回調完成
    @PostMapping("/back")
    public Object back(@RequestBody Map<String, Object> params) throws Exception {
        String orderID = String.valueOf(params.get("orderID"));
        String backID = String.valueOf(params.get("backID"));
        BigDecimal backAmount = new BigDecimal(String.valueOf(params.get("backAmount")));
        paySDK.applyRefund(orderID,backID,backAmount);
        return Result.okResult();
    }
    //申請退款
    public void applyRefund(String orderID, String backID,BigDecimal backAmount) {
        initPayConfig();
        initBackConfig();
        QueryOrderByOutTradeNoRequest payRequest = new QueryOrderByOutTradeNoRequest();
        payRequest.setMchid(mchId);
        payRequest.setOutTradeNo(orderID);
        com.wechat.pay.java.service.payments.model.Transaction transaction = service.queryOrderByOutTradeNo(payRequest);


        CreateRequest request = new CreateRequest();
        request.setTransactionId(transaction.getTransactionId());
        request.setNotifyUrl(v3BackNotifyUrl);
        request.setOutTradeNo(transaction.getOutTradeNo());
        request.setOutRefundNo(backID);
        request.setReason("測試退款");
        AmountReq amountReq = new AmountReq();
        amountReq.setCurrency(transaction.getAmount().getCurrency());
        amountReq.setTotal(Long.parseLong((transaction.getAmount().getTotal().toString())));
        amountReq.setRefund( (backAmount.multiply(new BigDecimal(100))).longValue());
        request.setAmount(amountReq);
        backService.create(request);
    }
退款回調
退款回調在申請退款後自動調用該介面,由於退款需要一定的處理時間,所以回調通知一般顯示的狀態為處理中(PROCESSING)可以在此回調更新訂單退款的處理狀態
    @PostMapping("/back_notify")
    public void back_notify(HttpServletRequest request, HttpServletResponse response) throws Exception {
        //獲取報文
        String body = getRequestBody(request);
        //隨機串
        String nonceStr = request.getHeader("Wechatpay-Nonce");
        //微信傳遞過來的簽名
        String signature = request.getHeader("Wechatpay-Signature");
        //證書序列號(微信平臺)
        String serialNo = request.getHeader("Wechatpay-Serial");
        //時間戳
        String timestamp = request.getHeader("Wechatpay-Timestamp");
        InputStream is = null;
        try {
            is = request.getInputStream();
            // 構造 RequestParam
            com.wechat.pay.java.core.notification.RequestParam requestParam = new com.wechat.pay.java.core.notification.RequestParam.Builder()
                    .serialNumber(serialNo)
                    .nonce(nonceStr)
                    .signature(signature)
                    .timestamp(timestamp)
                    .body(body)
                    .build();
            // 如果已經初始化了 RSAAutoCertificateConfig,可以直接使用  config
            // 初始化 NotificationParser
            NotificationParser parser = new NotificationParser(paySDK.getConfig());
            // 驗簽、解密並轉換成 Transaction
            Refund refund = parser.parse(requestParam, Refund.class);
            //記錄日誌信息
            Status state = refund.getStatus();
            String orderID = refund.getOutTradeNo();
            String backID = refund.getOutRefundNo();
            System.out.println("訂單ID:" + orderID);
            System.out.println("退款ID:" + backID);
            if (state == Status.PROCESSING) {
                //TODO------
                //根據自己的需求處理相應的業務邏輯,非同步

                //通知微信回調成功
                response.getWriter().write("<xml><return_code><![CDATA[SUCCESS]]></return_code></xml>");
                System.out.println("退款處理中");
            } else if (state == Status.SUCCESS) {
                //TODO------
                //根據自己的需求處理相應的業務邏輯,非同步

                //通知微信回調成功
                response.getWriter().write("<xml><return_code><![CDATA[SUCCESS]]></return_code></xml>");
                System.out.println("退款完成");
            } else {
                System.out.println("微信回調失敗,JsapiPayController.Refund:" + state.toString());
                //通知微信回調失敗
                response.getWriter().write("<xml><return_code><![CDATA[FAIL]]></return_code></xml>");
            }

        } catch (Exception e) {
            e.printStackTrace();
        } finally {
            is.close();
        }
    }
退款查詢
除了退款回調的非同步通知,我們還需要通過定時任務主動去查詢退款信息來保證業務訂單退款狀態的正確
 @PostMapping("/back_check")
    public Object back_check(@RequestBody Map<String, Object> params) throws Exception {
        String backID = String.valueOf(params.get("backID"));
        Refund refund = paySDK.getRefundOrderInfo(backID);
        if (refund.getStatus() == Status.SUCCESS) {
            return Result.okResult().add("obj", refund);
        }if (refund.getStatus() == Status.PROCESSING) {
            return Result.okResult().setCode(2).setMsg("退款處理中").add("obj", refund);
        } else {
            return Result.errorResult().add("obj", refund);
        }
    }
    //獲取訂單退款結果信息
    public Refund getRefundOrderInfo(String backID){
        initBackConfig();
        QueryByOutRefundNoRequest request = new QueryByOutRefundNoRequest();
        request.setOutRefundNo(backID);
        return backService.queryByOutRefundNo(request);
    }


