好家伙, 1.<template>去哪了 在正式內容之前,我們來思考一個問題, 當我們使用vue開發頁面時,<tamplete>中的內容是如何變成我們網頁中的內容的? 它會經歷四步: 解析模板:Vue會解析<template>中的內容,識別出其中的指令、插值表達式({{}}),以及其他元素和屬性。 ...
好家伙,
1.<template>去哪了
在正式內容之前,我們來思考一個問題,
當我們使用vue開發頁面時,<tamplete>中的內容是如何變成我們網頁中的內容的?
它會經歷四步:
-
解析模板:Vue會解析
<template>中的內容,識別出其中的指令、插值表達式({{}}),以及其他元素和屬性。 -
生成AST:解析模板後,Vue會生成一個對應的AST(Abstract Syntax Tree,抽象語法樹),用於表示模板的結構、指令、屬性等信息。
-
生成渲染函數:根據生成的AST,Vue會生成渲染函數。渲染函數是一個函數,接收一些數據作為參數,並返回一個虛擬DOM(Virtual DOM)。
-
渲染到真實DOM:Vue執行渲染函數,將虛擬DOM轉換為真實的DOM,並將其插入到頁面中的指定位置。在這個過程中,Vue會根據數據的變化重新執行渲染函數,更新頁面上的內容。
所以,步驟如下:模板解析 =》AST =》生成渲染函數 =》渲染到真實DOM
2.ast語法樹是什麼?
抽象語法樹(abstract syntax code,AST)是源代碼的抽象語法結構的樹狀表示,樹上的每個節點都表示源代碼中的一種結構,之所以說是抽象的,抽象表示把js代碼進行了結構化的轉化,轉化為一種數據結構。
這種數據結構其實就是一個大的json對象,json我們都熟悉,他就像一顆枝繁葉茂的樹。有樹根,有樹幹,有樹枝,有樹葉,無論多小多大,都是一棵完整的樹。
簡單理解,就是把我們寫的代碼按照一定的規則轉換成一種樹形結構。
舉個簡單的例子:
假設代碼如下:
<div id="app">Hello</div>
隨後我們將其轉換為ast語法樹(簡單版本):
 {
     tag:'div'    //節點類型
     attrs:[{id:"app"}]    //屬性
     children:[{tag:null,text:Hello},{xxx}]   //子節點
 }
當然,實際情況複雜得多,但總體結構不變
{
  "type": "Program",
  "start": 0,
  "end": 32,
  "body": [
    {
      "type": "ExpressionStatement",
      "expression": {
        "type": "JSXElement",
        "openingElement": {
          "type": "JSXOpeningElement",
          "name": {
            "type": "JSXIdentifier",
            "name": "div"
          },
          "attributes": [
            {
              "type": "JSXAttribute",
              "name": {
                "type": "JSXIdentifier",
                "name": "id"
              },
              "value": {
                "type": "Literal",
                "value": "app"
              }
            }
          ],
          "selfClosing": false
        },
        "closingElement": {
          "type": "JSXClosingElement",
          "name": {
            "type": "JSXIdentifier",
            "name": "div"
          }
        },
        "children": [
          {
            "type": "JSXText",
            "value": "Hello"
          },
          {
            "type": "JSXExpressionContainer",
            "expression": {
              "type": "Identifier",
              "name": "msg"
            }
          }
        ],
        "selfClosing": false
      }
    }
  ],
  "sourceType": "module"
}
2.模板解析
來看這個例子
<div id="app">Hello{{msg}}</div>
這無非就是一個簡單的<div>標簽,它由三個部分組成
開始標簽:
<div id="app">
文本:
Hello{{msg}}
結束標簽:
</div>
似乎只要用正則表達式來匹配就可以了,(事實上也確實是這麼實現的)
//從源碼處偷過來的正則表達式
const attribute =
    /^\s*([^\s"'<>\/=]+)(?:\s*(=)\s*(?:"([^"]*)"+|'([^']*)'+|([^\s"'=<>`]+)))?/
//屬性 例如:  {id=app}
const ncname = `[a-zA-Z_][\\-\\.0-9_a-zA-Z]*`; //標簽名稱
const qnameCapture = `((?:${ncname}\\:)?${ncname})` //<span:xx>
const startTagOpen = new RegExp(`^<${qnameCapture}`) //標簽開頭
const startTagClose = /^\s*(\/?)>/ //匹配結束標簽 的 >
const endTag = new RegExp(`^<\\/${qnameCapture}[^>]*>`) //結束標簽 例如</div>
const defaultTagRE = /\{\{((?:.|\r?\n)+?)\}\}/g
2.1.試驗實例
我們來舉一個實例看看:
代碼已開源https://github.com/Fattiger4399/analytic-vue.git
(關鍵的部分已使用綠色熒光標出,沒有耐心看完整代碼的話,只看有綠色熒游標記的部分就好)
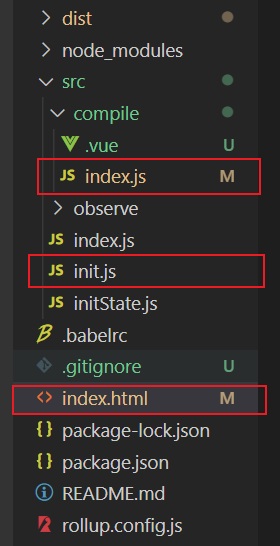
項目目錄如下:

首先來到index.html我們人為的製造一些假數據
註意:此處的vue是我們自己寫的實驗品,並非大尤的Vue
index.html
<!DOCTYPE html>
<html lang="en">

<head>
    <meta charset="UTF-8">
    <meta name="viewport" content="width=device-width, initial-scale=1.0">
    <title>Document</title>
</head>

<body>
    <div id="app">Hello{{msg}}</div>
    <script src="dist/vue.js"></script>
    <script>
        //umd Vue
        // console.log(Vue)
        //響應式 Vue
        let vm = new Vue({
            el: '#app', //編譯模板
        })

    </script>
</body>

</html>
入口文件index.js
import {initMixin} from "./init"

function Vue(options) {
    // console.log(options)
    //初始化
    this._init(options)
}
initMixin(Vue)
export default Vue
初始化腳本init.js
import { compileToFunction } from "./compile/index.js";

export function initMixin(Vue) {
    Vue.prototype._init = function (options) {
        // console.log(options)
        let vm = this
        //options為
        vm.$options = options
        //初始化狀態
        initState(vm)

        // 渲染模板 el
        if (vm.$options.el) {
            vm.$mount(vm.$options.el)
        }
    }
    //創建 $mount

    Vue.prototype.$mount = function (el) {
        // console.log(el)
        //el template render
        let vm = this
        el = document.querySelector(el) //獲取元素
        let options = vm.$options
        if (!options.render) { //沒有
            let template = options.template
            if (!template && el) {
                //獲取html
                el = el.outerHTML
                console.log(el,'this is init.js attrs:el')
                //<div id="app">Hello</div>
                //變成ast語法樹
                let ast = compileToFunction(el)
                console.log(ast,'this is ast')
                //render()
            }
        }
    }

}
來到我們的核心部分/compile/index.js中的parseHTML()方法和parseStartTag()方法
function start(tag, attrs) { //開始標簽
    console.log(tag, attrs, '開始的標簽')
}

function charts(text) { //獲取文本
    console.log(text, '文本')
}

function end(tag) { //結束的標簽
    console.log(tag, '結束標簽')
}
function parseHTML(html) {
    while (html) { //html 為空時,結束
        //判斷標簽 <>
        let textEnd = html.indexOf('<') //0
        console.log(html,textEnd,'this is textEnd')
        if (textEnd === 0) { //標簽
            // (1) 開始標簽
            const startTagMatch = parseStartTag() //開始標簽的內容{}
            if (startTagMatch) {
                start(startTagMatch.tagName, startTagMatch.attrs);
                continue;
            }
            // console.log(endTagMatch, '結束標簽')
            //結束標簽
            let endTagMatch = html.match(endTag)
            if (endTagMatch) {
                advance(endTagMatch[0].length)
                end(endTagMatch[1])
                continue;
            }
        }
        let text
        //文本
        if (textEnd > 0) {
            // console.log(textEnd)
            //獲取文本內容
            text = html.substring(0, textEnd)
            // console.log(text)
        }
        if (text) {
            advance(text.length)
            charts(text)
            // console.log(html)
        }
    }
    function parseStartTag() {
        //
        const start = html.match(startTagOpen) // 1結果 2false
        console.log(start,'this is start')
        // match() 方法檢索字元串與正則表達式進行匹配的結果
        // console.log(start)
        //創建ast 語法樹
        if (start) {
            let match = {
                tagName: start[1],
                attrs: []
            }
            console.log(match,'match match')
            //刪除 開始標簽
            advance(start[0].length)
            //屬性
            //註意 多個 遍歷
            //註意>
            let attr //屬性
            let end //結束標簽
            //attr=html.match(attribute)用於匹配
            //非結束位'>',且有屬性存在
            while (!(end = html.match(startTagClose)) && (attr = html.match(attribute))) {
                // console.log(attr,'attr attr'); //{}
                // console.log(end,'end end')
                match.attrs.push({
                    name: attr[1],
                    value: attr[3] || attr[4] || attr[5]
                })
                advance(attr[0].length)
                //匹配完後,就進行刪除操作
            }
            //end裡面有東西了(只能是有">"),那麼將其刪除
            if (end) {
                // console.log(end)
                advance(end[0].length)
                return match
            }
        }
    }
    function advance(n) {
        // console.log(html)
        // console.log(n)
        html = html.substring(n)
        // substring() 方法返回一個字元串在開始索引到結束索引之間的一個子集,
        // 或從開始索引直到字元串的末尾的一個子集。
        // console.log(html)
    }
    console.log(root)
    return root
}
export function compileToFunction(el) {
    // console.log(el)
    let ast = parseHTML(el)
    console.log(ast,'ast ast')
}
註釋已經非常詳細了,實在看不懂的話,上機調試一遍吧
代碼已開源https://github.com/Fattiger4399/analytic-vue.git
tips:
(1)parseHTML中拿到的參數html為 " el = el.outerHTML " 獲取的元素
即' <div id="app">Hello{{msg}}</div> '
(2)attr = html.match(attribute)匹配後得到的數據長這樣:

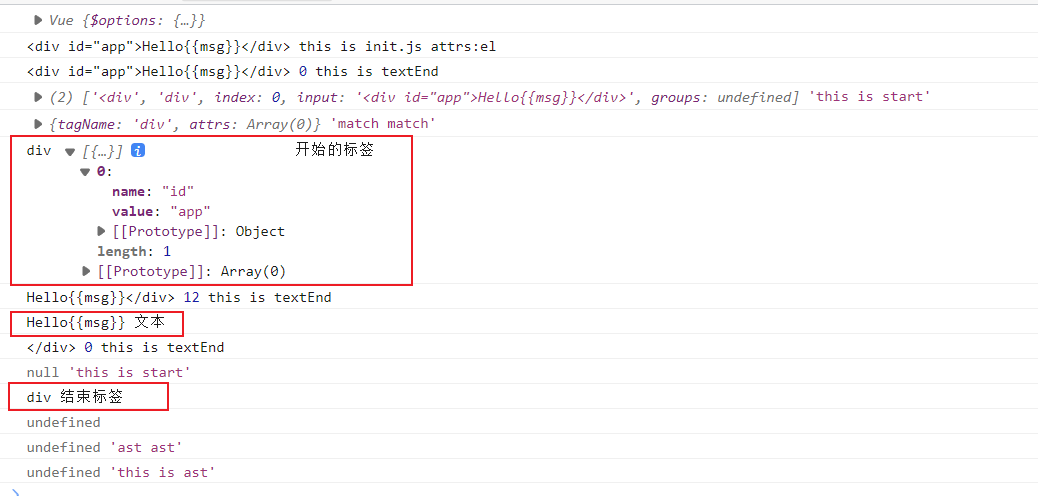
來看看看輸出結果

成功地將我們需要的三樣東西分出來了


