## 引言 今天在做一個設置文件夾路徑的功能,就是一個文本框,加個按鈕,點擊按鈕,彈出 `FolderBrowserDialog` 再選擇文件夾路徑,簡單做法,可以直接 `StackPanel` 橫向放置一個 `TextBox` 和一個 `Image Button`,然後點擊按鈕在 後臺代碼中給 ` ...
引言
今天在做一個設置文件夾路徑的功能,就是一個文本框,加個按鈕,點擊按鈕,彈出 FolderBrowserDialog 再選擇文件夾路徑,簡單做法,可以直接 StackPanel 橫向放置一個 TextBox 和一個 Image Button,然後點擊按鈕在 後臺代碼中給 ViewModel 的 FilePath賦值。但是這樣屬實不夠優雅,UI 不夠優雅,代碼實現也可謂是強耦合,那接下來我分享一下我的實現方案。
目標
做這個設置文件夾路徑的功能,我的目標是點擊任何地方都可以打開 FolderBrowserDialog,那就需要把文本框,按鈕作為一個整體控制項,且選擇完文件夾路徑後就給綁定的 ViewModel 的 FilePath 賦值。
準備工作
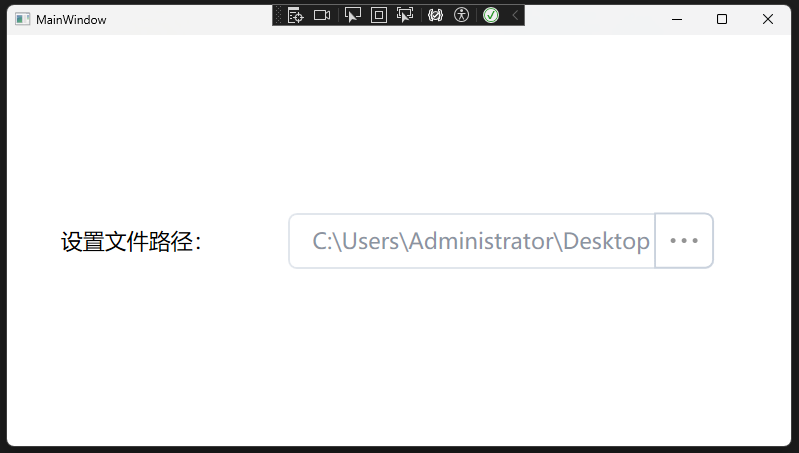
首先,既然要設計一個整體控制項,那麼 UI 如下:

接下來創建這個整體的控制項,不使用 Button ,直接使用 Control,來創建自定義控制項 OpenFolderBrowserControl :
Code Behind 代碼如下:
public class OpenFolderBrowserControl : Control,
{
    static OpenFolderBrowserControl()
    {
        DefaultStyleKeyProperty.OverrideMetadata(typeof(OpenFolderBrowserControl), new FrameworkPropertyMetadata(typeof(OpenFolderBrowserControl)));
    }

    public static readonly DependencyProperty FilePathProperty = DependencyProperty.Register("FilePath", typeof(string), typeof(OpenFolderBrowserControl));

    [Description("文件路徑")]
    public string FilePath
    {
        get => (string)GetValue(FilePathProperty);
        set => SetValue(FilePathProperty, value);
    }
}
Themes/Generic.xaml 中的設計代碼如下:
<Style TargetType="{x:Type local:OpenFolderBrowserControl}">
<Setter Property="Template">
<Setter.Value>
<ControlTemplate TargetType="{x:Type local:OpenFolderBrowserControl}">
<Border
Background="{TemplateBinding Background}"
BorderBrush="{TemplateBinding BorderBrush}"
BorderThickness="{TemplateBinding BorderThickness}">
<StackPanel Orientation="Horizontal">
<TextBox
Width="{TemplateBinding Width}"
Height="56"
Padding="0,0,60,0"
IsEnabled="False"
IsReadOnly="True"
Text="{Binding FilePath, RelativeSource={RelativeSource Mode=TemplatedParent}}">
<TextBox.Style>
<Style TargetType="{x:Type TextBox}">
<Setter Property="Background" Value="White" />
<Setter Property="BorderBrush" Value="#CAD2DD" />
<Setter Property="Foreground" Value="#313F56" />
<Setter Property="BorderThickness" Value="2" />
<Setter Property="KeyboardNavigation.TabNavigation" Value="None" />
<Setter Property="HorizontalContentAlignment" Value="Left" />
<Setter Property="FocusVisualStyle" Value="{x:Null}" />
<Setter Property="AllowDrop" Value="False" />
<Setter Property="FontSize" Value="22" />
<Setter Property="ScrollViewer.PanningMode" Value="VerticalFirst" />
<Setter Property="Stylus.IsFlicksEnabled" Value="False" />
<Setter Property="HorizontalAlignment" Value="Left" />
<Setter Property="VerticalAlignment" Value="Center" />
<Setter Property="Margin" Value="20,0,0,0" />
<Setter Property="Template">
<Setter.Value>
<ControlTemplate TargetType="{x:Type TextBox}">
<Border
x:Name="border"
Background="{TemplateBinding Background}"
BorderBrush="{TemplateBinding BorderBrush}"
BorderThickness="{TemplateBinding BorderThickness}"
CornerRadius="8"
SnapsToDevicePixels="True">
<Grid>
<ScrollViewer
x:Name="PART_ContentHost"
Margin="20,0,0,0"
VerticalAlignment="{TemplateBinding VerticalAlignment}"
VerticalContentAlignment="Center"
Focusable="False"
FontFamily="{TemplateBinding FontFamily}"
FontSize="{TemplateBinding FontSize}"
HorizontalScrollBarVisibility="Hidden"
VerticalScrollBarVisibility="Hidden" />
<TextBlock
x:Name="WARKTEXT"
Margin="20,0,0,0"
HorizontalAlignment="Left"
VerticalAlignment="Center"
FontFamily="{TemplateBinding FontFamily}"
FontSize="{TemplateBinding FontSize}"
Foreground="#A0ADBE"
Text="{TemplateBinding Tag}"
Visibility="Collapsed" />
</Grid>
</Border>
<ControlTemplate.Triggers>
<Trigger Property="IsEnabled" Value="False">
<Setter TargetName="border" Property="Opacity" Value="0.56" />
</Trigger>
<Trigger Property="IsMouseOver" Value="True">
<Setter TargetName="border" Property="BorderBrush" Value="#CAD2DD" />
</Trigger>
<Trigger Property="IsKeyboardFocused" Value="True">
<Setter TargetName="border" Property="BorderBrush" Value="#CAD2DD" />
</Trigger>
<MultiTrigger>
<MultiTrigger.Conditions>
<Condition Property="Text" Value="" />
<!--<Condition Property="IsFocused" Value="False"/>-->
</MultiTrigger.Conditions>
<Setter TargetName="WARKTEXT" Property="Visibility" Value="Visible" />
</MultiTrigger>
</ControlTemplate.Triggers>
</ControlTemplate>
</Setter.Value>
</Setter>
</Style>
</TextBox.Style>
</TextBox>
<Border
Height="56"
Margin="-60,0,0,0"
Background="White"
BorderBrush="#CAD2DD"
BorderThickness="2"
CornerRadius="0,8,8,0">
<StackPanel
HorizontalAlignment="Center"
VerticalAlignment="Center"
Orientation="Horizontal">
<Ellipse
Width="5"
Height="5"
Margin="3"
Fill="#949494" />
<Ellipse
Width="5"
Height="5"
Margin="3"
Fill="#949494" />
<Ellipse
Width="5"
Height="5"
Margin="3"
Fill="#949494" />
</StackPanel>
</Border>
</StackPanel>
</Border>
</ControlTemplate>
</Setter.Value>
</Setter>
</Style>
這樣創建的控制項實際上是沒有點擊功能的。
那麼接下來看一下點擊功能方案實現。
點擊功能方案實現
因為有 MVVM 的存在,所以在 WPF 中 Button 點擊功能有兩種方案,
- 第一種是直接註冊點擊事件,比如
Click="OpenFolderBrowserControl_Click" - 第二種是綁定Command、CommandParameter、CommandTarget,比如
Command="{Binding ClickCommand}" CommandParameter="" CommandTarget=""。
但是上文中我們定義的是一個 Control ,它既沒有 Click 也沒有 Command,所以,我們需要給 OpenFolderBrowserControl 定義Click 和 Command。
定義點擊事件
定義點擊事件比較簡單,直接聲明一個 RoutedEventHandler ,命名為 Click 就可以了。
public event RoutedEventHandler? Click;
定義Command
定義 Command 就需要 ICommandSource 介面,重點介紹一下 ICommandSource 介面。
ICommandSource 介面用於指示控制項可以生成和執行命令。該介面定義了三個成員
- 定義了一個
ICommand類型的屬性Command, - 定義了一個表示與控制項關聯的,
IInputElement類型的CommandTarget - 定義了一個表示命令參數,
object類型的屬性CommandParameter
上述兩段的定義如下:
public class OpenFolderBrowserControl : Control, ICommandSource
{
    //上文中已有代碼此處省略...

    #region 定義點擊事件

    public event RoutedEventHandler? Click;

    #endregion


    #region 定義command

    public static readonly DependencyProperty CommandProperty =
        DependencyProperty.Register("Command", typeof(ICommand), typeof(OpenFolderBrowserControl), new UIPropertyMetadata(null))
    public ICommand Command
    {
        get { return (ICommand)GetValue(CommandProperty); }
        set { SetValue(CommandProperty, value); }
    }
    public object CommandParameter
    {
        get { return (object)GetValue(CommandParameterProperty); }
        set { SetValue(CommandParameterProperty, value); }
    }

    public static readonly DependencyProperty CommandParameterProperty =
        DependencyProperty.Register("CommandParameter", typeof(object), typeof(OpenFolderBrowserControl));

    public IInputElement CommandTarget
    {
        get { return (IInputElement)GetValue(CommandTargetProperty); }
        set { SetValue(CommandTargetProperty, value); }
    }

    public static readonly DependencyProperty CommandTargetProperty =
        DependencyProperty.Register("CommandTarget", typeof(IInputElement), typeof(OpenFolderBrowserControl));
實現點擊功能
好了,到此為止我僅定義好了點擊事件和 Command,但是並沒有能夠觸發這兩個功能的地方。
既然是要實現點擊功能,那最直觀的方法就是 OnMouseLeftButtonUp,該方法是 WPF 核心基類 UIElement的虛方法,我們可以直接重寫。如下代碼:
public class OpenFolderBrowserControl : Control, ICommandSource
{
    //上文中已有代碼此處省略...

    protected override void OnMouseLeftButtonUp(MouseButtonEventArgs e)
    {

        base.OnMouseLeftButtonUp(e);
        //調用點擊事件
        Click?.Invoke(e.Source, e);
        //調用Command
        ICommand command = Command;
        object parameter = CommandParameter;
        IInputElement target = CommandTarget;

        RoutedCommand routedCmd = command as RoutedCommand;
        if (routedCmd != null && routedCmd.CanExecute(parameter, target))
        {
            routedCmd.Execute(parameter, target);
        }
        else if (command != null && command.CanExecute(parameter))
        {
            command.Execute(parameter);
        }
    }
}
到此位置,我們的非Button自定義控制項實現點擊的需求就完成了,接下來測試一下。
測試
準備測試窗體和 ViewModel,這裡為了不引入依賴包,也算是複習一下 MVVM 的實現,就手動實現 ICommand 和 INotifyPropertyChanged。
ICommand 實現:
public class RelayCommand : ICommand
{
    private readonly Action? _execute;

    public RelayCommand(Action? execute)
    {
        _execute = execute;
    }

    public bool CanExecute(object? parameter)
    {
        return true;
    }

    public void Execute(object? parameter)
    {
        _execute?.Invoke();
    }

    public event EventHandler? CanExecuteChanged;
}
TestViewModel 實現:
這裡的 ClickCommand 觸發之後,我輸出了當前 FilePath的值。
public class TestViewModel : INotifyPropertyChanged
{

    public TestViewModel()
    {
        FilePath = Environment.GetFolderPath(Environment.SpecialFolder.Desktop);
    }

    public event PropertyChangedEventHandler? PropertyChanged;

    protected virtual void OnPropertyChanged(string propertyName)
    {
        PropertyChanged?.Invoke(this, new PropertyChangedEventArgs(propertyName));
    }

    private string filePath = string.Empty;
    /// <summary>
    /// 文件路徑
    /// </summary>
    public string FilePath
    {
        get { return filePath; }
        set { filePath = value; OnPropertyChanged(nameof(FilePath)); }
    }


    private ICommand clickCommand = null;
    /// <summary>
    /// 點擊事件
    /// </summary>
    public ICommand ClickCommand
    {
        get { return clickCommand ??= new RelayCommand(Click); }
        set { clickCommand = value; }
    }

    private void Click()
    {
        MessageBox.Show($"ViewModel Clicked!The value of FilePath is {FilePath}");
    }
}
窗體UI代碼:
<Grid>
    <Grid.ColumnDefinitions>
        <ColumnDefinition Width="1*" />
        <ColumnDefinition Width="2*" />
    </Grid.ColumnDefinitions>

    <TextBlock
        HorizontalAlignment="Center"
        VerticalAlignment="Center"
        FontSize="22"
        Text="設置文件路徑:" />

    <local:OpenFolderBrowserControl
        Grid.Column="1"
        HorizontalAlignment="Left"
        Click="OpenFolderBrowserControl_Click"
        Command="{Binding ClickCommand}"
        FilePath="{Binding FilePath, Mode=TwoWay}" />
</Grid>
窗體 Code Behind 代碼
public partial class MainWindow : Window
{
    public MainWindow()
    {
        InitializeComponent();
        DataContext = new TestViewModel();
    }

    private void OpenFolderBrowserControl_Click(object sender, RoutedEventArgs e)
    {
        FolderBrowserDialog folderBrowserDialog = new FolderBrowserDialog();

        DialogResult result = folderBrowserDialog.ShowDialog();

        if (result == System.Windows.Forms.DialogResult.OK)
        {
            string selectedFolderPath = folderBrowserDialog.SelectedPath;

            var Target = sender as OpenFolderBrowserControl;

            if (Target != null)
            {
                Target.FilePath = selectedFolderPath;
            }
        }
    }
}
測試結果
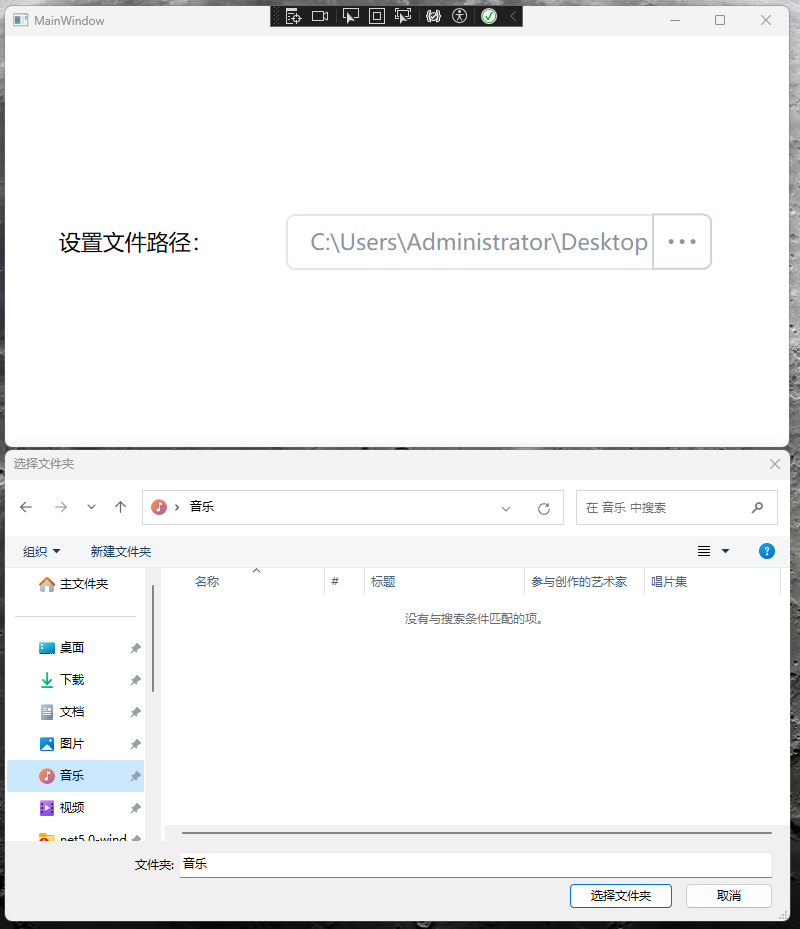
我點擊整個控制項的任意地方,都能打開文件夾瀏覽器。

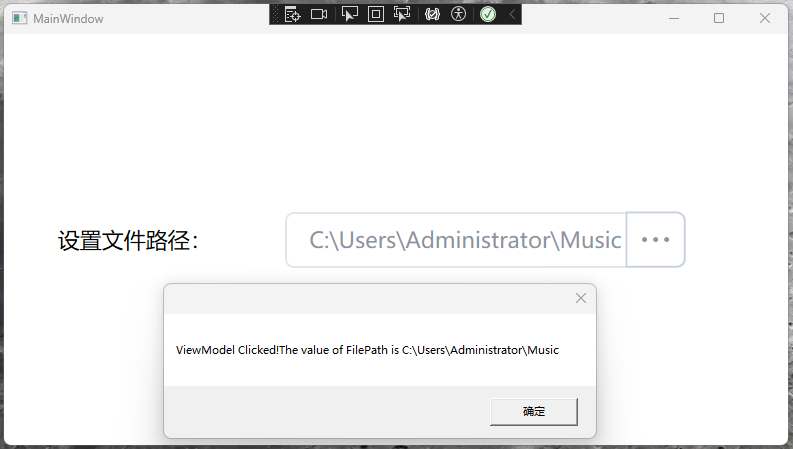
選擇音樂文件夾後,彈窗提示 ViewModel Clicked!The value of FilePath is C:\Users\Administrator\Music

結論
從測試結果中可以看出,在 UI 註冊的 Click 和 Command 均觸發。這個方案僅僅是拋磚引玉,只要任意控制項(非button)需要實現點擊功能,都可以這樣去實現。
實現核心就是兩個方案:
- 直接定義點擊事件。
- 實現ICommandSource。
然後再重寫各種滑鼠事件,滑鼠按下,滑鼠抬起,雙擊等都可以實現。
上述方案既保證了 UI 的優雅也保證了 MVVM 架構的前後分離特性。
如果大家有更好更優雅的方案,歡迎留言討論。
作者: Niuery Daily
出處: https://www.cnblogs.com/pandefu/>
關於作者:.Net Framework,.Net Core ,WindowsForm,WPF ,控制項庫,多線程
本文版權歸作者所有,歡迎轉載,但未經作者同意必須保留此段聲明,且在文章頁面明顯位置給出 原文鏈接,否則保留追究法律責任的權利。 如有問題, 可郵件咨詢。


