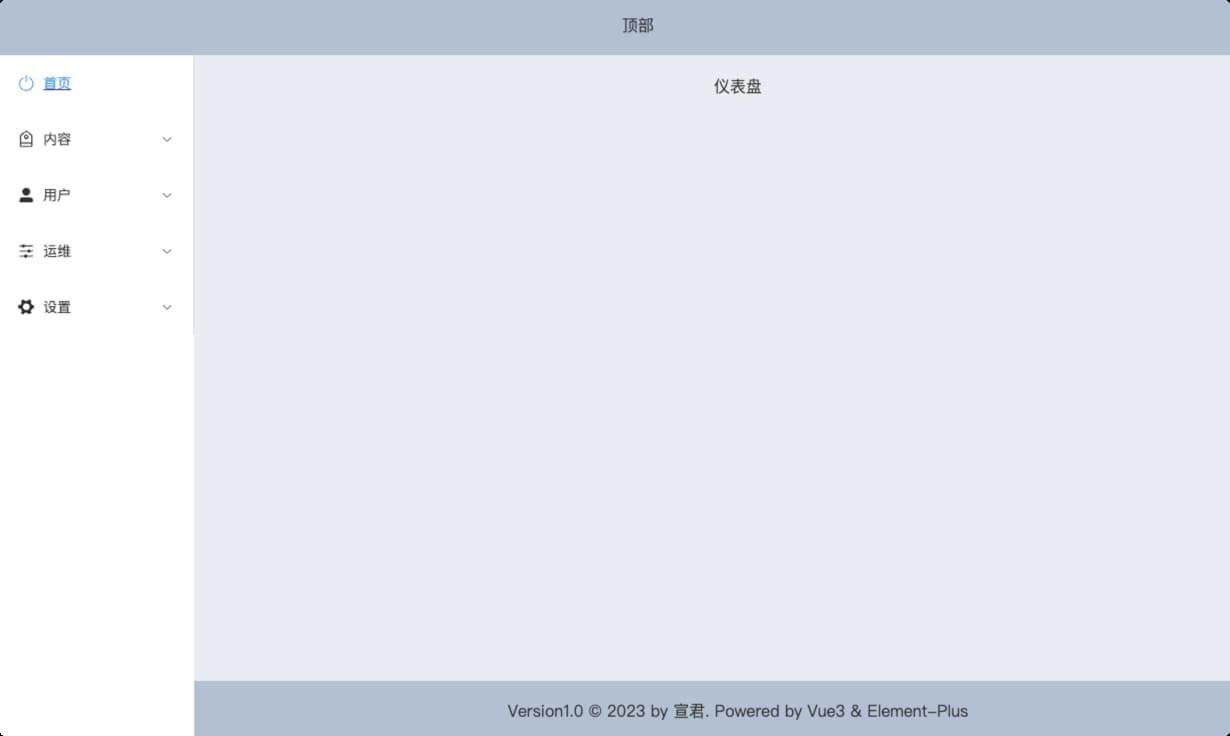
先看效果,整體界面結構如下  點擊左側菜單欄,右側切換顯示不同頁面內容。 [Vue3使用路由–南河小站](https://www. ...
先看效果,整體界面結構如下

點擊左側菜單欄,右側切換顯示不同頁面內容。
1 路由配置
路由配置如下:
const routes = [
  {
    path: "",
    component: () => import("@/layout/baseView.vue"),
    redirect: "/index",
    children: [
      {
        path: "/index",
        name: "首頁",
        icon: "SwitchButton",
        hidden: false,
        component: () => import("@/page/dashboard/dashboard.vue"),
      },
      {
        path: "/content",
        name: "內容",
        icon: "Discount",
        hidden: false,
        component: () => import("@/layout/rightView.vue"),
        children: [
          {
            path: "manage-comment",
            icon: "MessageBox",
            name: "管理評論",
            hidden: false,
            component: () => import("@/page/content/manageComment.vue"),
          },
          {
            path: "manage-image",
            icon: "Odometer",
            name: "管理圖片",
            hidden: false,
            component: () => import("@/page/content/manageImage.vue"),
          },
        ],
      },
      {
        path: "/user",
        icon: "UserFilled",
        name: "用戶",
        hidden: false,
        component: () => import("@/layout/rightView.vue"),
        children: [
          {
            path: "list",
            icon: "User",
            name: "用戶列表",
            hidden: false,
            component: () => import("@/page/user/list.vue"),
          },
          {
            path: "reset-pwd",
            icon: "Unlock",
            name: "重置密碼",
            hidden: false,
            component: () => import("@/page/user/resetPwd.vue"),
          },
         // ....
        ],
      },
      {
        path: "/operation",
        icon: "Operation",
        name: "運維",
        hidden: false,
        component: () => import("@/layout/rightView.vue"),
        children: [
          {
            path: "mange-category",
            icon: "Edit",
            hidden: false,
            name: "管理分類",
            component: () => import("@/page/operation/manageCategory.vue"),
          },
          {
            path: "mange-carousel",
            icon: "Crop",
            name: "管理輪播圖",
            hidden: false,
            component: () => import("@/page/operation/manageCarousel.vue"),
          },
        ],
      },

    ],
  },
  {
    path: "/login",
    hidden: true,
    component: () => import("@/page/login/login.vue"),
  },
];
說明:
@/layout/baseView.vue是整體頁面結構
@/layout/rightView.vue是公共頁面用於顯示數據內容。
@/page/login/login.vue是登陸頁面
2 頁面結構
右側數據內容視圖是動態的,其它整個頁面結構是固定的,因此提取baseView.vue作為頁面基本結構。
登錄界面是另一個頁面整體,因此login.vue和基本結構頁面baseView.vue都在App.vue頁面中通過路由進行切換,因此App.vue中添加router-view進行動態路由渲染。
<template>
  <div id="app">
    <router-view></router-view>
  </div>
</template>
左側菜單導航,菜單是根據路由進行動態渲染的,所以將路由生成菜單抽取為獨立組組件leftMenuBar.vue。在mounted()中獲取路由配置
export default {
  data() {
    return {
      menuList: [],
    };
  },
  mounted() {
    let routes = router.options.routes;
    this.menuList = routes[0].children;
    console.log(this.menuList);
  },
};
⚠️Vue3通過router.options.routes 獲取配置的路由
在右側數據視圖頁面rightView.vue添加router-view標簽
<template>
  <div class="right-view">
    <div class="header"></div>
    <div class="content">
      <router-view></router-view>
    </div>
  </div>
</template>
3 結合Element-plus 生成菜單導航
遍歷路由通過element-plus的Menu組件生成菜單導航,完整的代碼如下:
<template>
  <div>
    <el-menu
      default-active="0"
      :unique-opened="true"
      class="el-menu-vertical-demo"
    >
      <template v-for="(item, index) in menuList" :key="index">
        <router-link :to="item.path" v-if="!item.children" :key="index">
          <el-menu-item :index="index + ''">
            <el-icon><component :is="item.icon"></component></el-icon>
            <span>{{ item.name }}</span>
          </el-menu-item>
        </router-link>

        <el-sub-menu :index="index + ''" v-else>
          <template #title>
            <el-icon><component :is="item.icon"></component></el-icon>
            <span>{{ item.name }}</span>
          </template>
          <router-link
            :to="item.path + '/' + sub.path"
            v-for="(sub, subIndex) in item.children"
            :key="subIndex"
          >
            <el-menu-item :index="index + '-' + subIndex">
              <el-icon><component :is="sub.icon"></component></el-icon>
              <span>{{ sub.name }}</span>
            </el-menu-item>
          </router-link>
        </el-sub-menu>
      </template>
    </el-menu>
  </div>
</template>
4 設置菜單圖標
由於element-plus使用svg 圖標,複製的代碼是<el-icon><Search /></el-icon>這樣的,因此在遍歷路由時,就不能通過<i :calss = "xxxx"></i>設置了,要通過<el-icon><component :is="xxxx"></component></el-icon>來設置,:is綁定的是icon的名稱
<el-icon><component :is="item.icon"></component></el-icon>

⚠️這個地方element不同,element使用的是font-class的圖標,可用 直接綁定
本文來自博客園,作者:宣君{https://www.nhit.icu/},轉載請註明原文鏈接:https://www.cnblogs.com/ycit/p/17624261.html


