
vue3引入了Composition API,使開發者能夠更靈活組織和重用組件邏輯。採用了基於Proxy的響應式系統,對虛擬DOM進行了優化等,提升了開發體驗和性能。 ...
一、Vue基本概念
1.1-Vue3的優點
- Vue3支持Vue2額大多數特性。
- 更好的支持TypeScript。
- 打包大小減少41%。
- 初次渲染快55%,更新渲染快133%。
- 記憶體減少54%。
- 使用proxy代替defineProperty實現數據響應式。
- 重寫虛擬DOM的實現和Tree-Shaking。
二、API
2.1-setup
我們可以跟以前定義data和methods,但是vue3中我們更推薦使用setup函數。
- setup是一個函數。只在初始化時執行一次。以後大部分代碼都是在setup中寫。
- 返回一個對象,對象中的屬性或方法,模板中可以直接使用。
- setup返回的數據會和data和methods進行合併,setup優先順序更高。
- setup函數中沒有this。 以後開發都不使用this了
- setup不要寫async函數。
因為async函數必須返回一個json對象供模板使用,如果setup是一個async函數,返回的將是一個promise對象。
如果setup是一個async函數,那該組件就成了一個非同步函數,需要配合Suspense組件才能使用。
2.2-ref
讓數據變成響應式。
(1)先引用ref
import {ref} from 'vue';

(2)將數據變成響應式的。
let data1=ref(12);

(3)操作數據
data1.value = 123;
2.3-reactive
作用:定義對象格式的響應式數據
如果用ref定義對象/數組,內部會自動將對象/數組轉換為reactive代理器對象。
- const proxy=reactive(obj):接收一個普通對象然後返回該普通對象的響應式代理器對象。
- js中修改告訴不需要.value。
- 一般用來定義一個引用類型的響應數據。
2.4-toRefs
將響應式對象中所有屬性包裝為ref對象,並返回包含這些ref對象的普通對象。
應用:對trsctive定義的對象進行toRefs包裝,包裝之後的對象中每個屬性都是響應式的。
2.5-響應式原理
通過proxy(代理):攔截對對象本身的操作,包括屬性的讀寫、刪除等操作。
通過Reflect(反射):動態對被代理對象的響應式屬性進行特定的操作。
2.6-watch和watchEffect
watch - 指定監聽數據:
- 監聽指定的一個或多個響應式數據,一旦發生變化,就會自動執行監視回調。
- 如果是監聽reactive對象中的屬性,必須通過函數來指定。
- 監聽多個數據,使用數組來指定。
- 預設初始時不指定回調,但是通弄過配置immediate為true,來指定初始時立即執行第一次。
- 通過配置deep為true,來指定深度監視。
watchEffect - 不指定監聽數據:
- 不用直接指定啦監視的數據,回調函數中使用的哪些響應式數據就監聽哪些響應式數據。
- 預設初始就會執行一次。
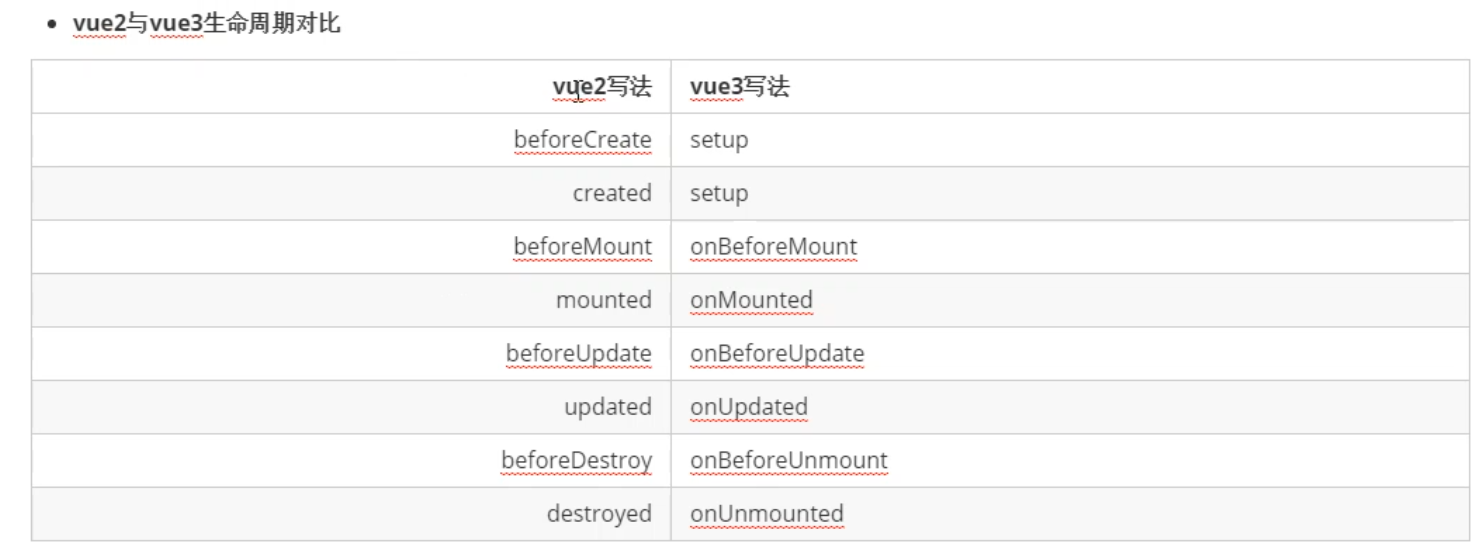
2.7-生命周期
vue2中的生命周期鉤子函數依舊可以使用,不過建議使用vue3的鉤子函數
2.8-ref獲取元素
vue2中是用thisref.xxx來獲取元素或組件,但是vue3中沒有this的概念。
vue3通過ref創建響應式數據的api來獲取元素。
1.使用ref創建響應式數據,假設叫x
2.模板中綁定ref屬性,值為上面的x
註意不能使用v-bind動態綁定。
這是x就是一個dom元素或組件了。
2.9-自定義hook函數
hook函數翻譯成中文就是鉤子函數(註意並不是生命周期的鉤子函數)
比如ref,reactive,computed,watch,onBeforeMount等都是hook函數,只不過他們都是vue內部hook函數。
1.創建一個函數,函數名稱必須以"use"開頭
2.函數必須return一些數據。
2.10-shallowReactive與shallowRef
他們都表示淺響應式。
- shallowReactive:只處理了對象第一層屬性的響應式(值響應第一層)
- shallowRef:只有重新複製時才是響應式(不響應內部數據,只響應整體。)
2.11-readonly與shallowReadonly
- 他們表示只讀代理對象
- readonly
- 深度只讀
- 設置readonly後,修改響應式數據會報錯。
- shalloReadonly
- 淺只讀
- 設置shalloReadonly後,修改響應式數據的第一層數據會報錯。
- 應用場景:
- 在某些特定情況下,我們可能不希望對數據進行更新的操作,那就可以包裝成一個只讀代理對象,而不能修改或刪除。
2.12-toRaw與markRaw
- toRaw
- 返回reactive或readonly對象的原始數據
- 這是一個還原方法,可用於臨時讀取,得到的數據不具有響應式。
- markRow:
- 標記一個對象,使其不具有響應式
- 應用場景:
- 有些只不應被設置為響應式的,例如複雜的第三方實例或Vue組件對象。
- 當渲染具有不可變數據源的大列表時,跳過代理轉換可以提高性能。
2.13-toRef
- 為響應式對象上的某個屬性創建一個ref引用,更新是應用對象會同步更新。
- 與ref的區別:ref是拷貝了一份新的數據指單獨操作,更新時相互不影響。
2.14-customRef
- 用於自定義一個ref,可以顯示的控制依賴追蹤和觸發相應。
- 接受一個工廠函數,兩個參數分別用於追蹤的track與用於觸發相應的trigger,並方法一個帶有get和set屬性的對象。
- 需求:使用customRef實現防抖函數
2.15-provide與inject
- provide和inject提供依賴註入,功能類似2.0的provide/inject
- 實現跨層級組件(祖孫)間通信。
2.16-響應式數據的判斷
- isRef:檢查一個值是否為一個ref對象。
- isReactive:檢查一個對象是否否是由reactive對象的響應式代理。
- isReadonly:檢查一個對象是否由readonly創建的只讀代理。
- isProxy:檢查一個對象是否是由reactive或者readonly方法創建的代理。
2.17-Fragment(片段)
- 在vue2中:組件中必須有一個跟標簽
- 在vue3中:組價可以沒有跟標簽,內部會將多個標簽包含在一個Fragment虛擬標簽中。
- 好處:減少標簽層級,減小記憶體占用
2.18-Teleport(瞬移)
- Teleport提供了一種乾凈的方法,讓組件的html在父組件界面外的特定標簽(很可能是body)下插入顯示。
2.19-Suspense(不確定的)
Supense組件是配合一部組件使用的,它可以讓一部組件返回數據前渲染一些後背內容。
那我們首先要學會一個非同步組件。
- 在setup函數總返回一個promise,就是一個非同步組件。
- setup函數攜程async函數,也是一個非同步組件。
2.20-其他新的API
- 全新的全局API:
- createApp()
- defineProperty()
- defineComponent()
- nextTick()
- 將原來的全局API轉移到應用對象:
- app.component()
- app.config()
- app.directive()
- app.mount()
- app.umount()
- app.use()
2.21-useSlots和useAttrs
useSlots 和 useAttrs 是真實的運行時函數,它會返回與 setupContext.slots 和 setupContext.attrs 等價的值,同樣也能在普通的組合式 API 中使用。
使用場景:父組件使用子組件的插槽
1.父組件
<template>
  <h1>這是父組件</h1>

  <p>插槽上面1</p>
  <slots-attrs msg="我是props的msg" heihei="我是attr">
    <template #header >
      <div style="width:100%;height:100px;border:1px solid green;">我是父組件插槽--插入的內容。。。</div>
    </template>
  </slots-attrs>
  <p>插槽下麵2</p>

</template>

<script lang="ts" setup>
import SlotsAttrs from '@/components/04/SlotsAttrs.vue'

</script>
2.子組件
<template>
  <Child ref="child"/>

  {{msg}}
</template>


<script lang="ts" setup>
import { ref,onMounted } from 'vue';
import Child from '@/components/03/Child.vue'


const child = ref(null);
const msg=ref('')


onMounted(()=>{
  console.log("進來了")
  console.log(child.value.msg)
  msg.value = child.value.msg;
})

</script>
三、路由
(1)userRout:獲得當前路由對象。
(2)useRouter:獲得路由實例,可以進行路由跳轉。
import {useRoute,useRouter} from "vue-router"
四、Vue3+TS實戰知識點
1.1-引入ElementPlus
(1)輸入命令安裝(全局引入)。
npm install element-plus --save
(2)【main.ts】文件中配置
import ElementPlus from 'element-plus'
import 'element-plus/dist/index.css'

const app = createApp(App)
app.use(ElementPlus)
1.2-引入axios
(1)輸入命令安裝。
npm install axios
(2)新建一個【http.ts】文件,寫一個簡單的請求封裝。
//導入axios
import axios from "axios"

//axios.create創建一個axios實例
//我們給這個實例編寫配置,後端所有通過這個實例發送請求,都受這個配置約束。
const $http=axios.create({
    baseURL:"http://jsonplaceholder.typicode.com/",
    timeout:1000
});


// 添加請求攔截器
$http.interceptors.request.use(function (config) {
    // 在發送請求之前做些什麼
    return config;
  }, function (error) {
    // 對請求錯誤做些什麼
    return Promise.reject(error);
  });


// 添加響應攔截器
$http.interceptors.response.use(function (response) {
    // 對響應數據做點什麼
    return response.data;
  }, function (error) {
    // 對響應錯誤做點什麼
    return Promise.reject(error);
  });

export default $http;
(3)新建一個【test.ts】文件進行二次封裝。
import $http from "./http"

export const getData=$http.get("/posts");
(3)使用。
<script lang="ts">
import { defineComponent } from 'vue';
import {getData} from "@/apis/test"

export default defineComponent({
  name: 'Home',
  setup(){
      //請求介面
      getData.then((data:any)=>{
        console.log(data);
      })

      return{

      }
    }
});
</script>
1.3-引入vuex
(1)輸入命令安裝vuex
npm install vuex
(2)在【main.ts】中引入。
import { createApp } from 'vue'
import App from './App.vue'
import store from './store'

createApp(App).use(store).mount('#app')
(3)在src文件夾下新建一個【store/index.ts】文件
import { createStore } from 'vuex'
import app from "./modules/app"
import settings from "./modules/settings"
import user from "./modules/user"

export default createStore({
  // 導入模塊
  modules: {
    app,
    settings,
    user
  }
})
(4)【app.ts】格式如下。
//【應用程式模塊】
const app={
  //單一狀態樹,UI可通過this.$store.state.app.*獲得數據
  state: {

  },
  //對state數據進行過濾後返回(可以認為是 store 的計算屬性)
  getters:{

  },
  // 唯一擁有更改記憶體數據的介面,不可進行非同步操作
  mutations: {

  },
  // 與mutation通訊,UI層寫入記憶體數據的介面,可非同步操作
  actions: {

  }
}
export default app;
1.4-引入.env
(1)創建文件xxx.env文件。
----------------【.env.development】---------------
#以下的值webpack會根據不同的環境取得不同的值,使用方法:process.env.*
#設定一個標題,代表這個環境是development
NODE_ENV = 'development'

# Base URL
BASE_URL = 'http://xxx:7881'

# Base API
VUE_APP_BASE_API = 'http://xxx:7881'


----------------【.env.production】---------------
#以下的值webpack會根據不同的環境取得不同的值,使用方法:process.env.*
#設定一個標題,代表這個環境是production
NODE_ENV = 'production'

# Base URL
BASE_URL = 'http://xxx:7881'

# Base API
VUE_APP_BASE_API = 'http://xxx:7881'


----------------【.env.staging】---------------
#以下的值webpack會根據不同的環境取得不同的值,使用方法:process.env.*
#設定一個標題,代表這個環境是development
NODE_ENV = 'development'

# Base URL
BASE_URL = 'http://xxx:7881'

# Base API
VUE_APP_BASE_API = 'http://xxx:7881'
(2)使用。
process.env.VUE_APP_BASE_API

1.5-引入cookie
(1)安裝。
npm install vue-cookies --save
1.6-引入nprogress
(1)安裝。
npm install nprogress -S
npm i @types/nprogress-D
(2) 現在我們對NProgress進行一下簡單的封裝,首先我們在【common/utils/nporgress.ts】目錄下創建文件,然後引入NProgress和CSS樣式文件 。
(3)內容如下。
import NProgress from 'nprogress' // 進度條
import 'nprogress/nprogress.css' // 進度條樣

//全局進度條的配置
NProgress.configure({
  easing: 'ease', // 動畫方式
  speed: 1000, // 遞增進度條的速度
  showSpinner: false, // 是否顯示載入ico
  trickleSpeed: 200, // 自動遞增間隔
  minimum: 0.3, // 更改啟動時使用的最小百分比
  parent: 'body', //指定進度條的父容器
})

//打開進度條
export const start =()=>{
  NProgress.start();
}

//關閉進度條
export const close =()=>{
  NProgress.done();
}
(4)在【router/index.ts】文件中使用
--引入文件
import { close, start } from '@/common/utils/nprogress'//進度條

--使用
const router = createRouter({
  routes,
  history: createWebHistory(),
})

router.beforeEach((pre, next) => {
  start()
})

router.afterEach(() => {
  close()
})
1.7-引入Element Plus(按需自動引入)

(1)輸入命令安裝
npm install element-plus
npm install -D unplugin-vue-components unplugin-auto-import
(2)在【vue.config.ts】中配置。
const AutoImport = require('unplugin-auto-import/webpack')
const Components = require('unplugin-vue-components/webpack')
const { ElementPlusResolver } = require('unplugin-vue-components/resolvers')


// 【每次修改,都需要重新build】
// 插件(module.exports={configureWebpack:[]})
    plugins: [
      AutoImport({
        resolvers: [ElementPlusResolver()]
      }),
      Components({
        resolvers: [ElementPlusResolver()]
      })
    ],
(3)然後執行【npm run dev】報錯了(如果報node-sass將這個卸載,安裝sass即可)。

解決: 卸載nodev12,更新到nodev16在重新構建一下項目成功解決 了。
命令:
npm uninstall node-sass --dev-S
npm install sass --dev-S
1.8-引入sross-env環境變數配置
(1)安裝。
npm i --save-dev cross-env
npm install dotenv-cli --dev-s
(2)創建文件。
--【.env.dev.build】
#以下的值webpack會根據不同的環境取得不同的值,使用方法:process.env.*
#設定一個標題,代表這個環境是development
NODE_ENV = production

# Base URL
BASE_URL = 'http://xxx.xxx.xxx:7881'

# Base API
VUE_APP_BASE_API = 'http://xxx.xxx.xxx:7990'

# 統一認證中心配置
VUE_APP_AUTH_BASEURL = 'http://xxx.xxx.xxx:5021'
VUE_APP_AUTH_LOGIN_RRDIRECTURL = 'http://xxx.xxx.xxx:7881/callback'
VUE_APP_AUTH_LOGOUT_RRDIRECTURL = 'http://xxx.xxx.xxx:7881'


--【.env.dev.serve】
#以下的值webpack會根據不同的環境取得不同的值,使用方法:process.env.*
#設定一個標題,代表這個環境是development
NODE_ENV = development

# Base URL
BASE_URL = 'http://xxx.xxx.xxx:7881'

# Base API
VUE_APP_BASE_API = 'http://xxx.xxx.xxx:7990'

# 統一認證中心配置
VUE_APP_AUTH_BASEURL = 'http://xxx.xxx.xxx:5021'
VUE_APP_AUTH_LOGIN_RRDIRECTURL = 'http://localhost:7881/callback'
VUE_APP_AUTH_LOGOUT_RRDIRECTURL = 'http://localhost:7881'
(3) 【package.json】中的配置
 "scripts": {
    "dev": "npm run serve:dev",
    "start": "npm run serve:dev",
    "server": "npm run serve:dev",
    "build": "npm run build:dev",
    "serve:dev": "cross-env NODE_ENV=development dotenv -e .env.dev.serve vue-cli-service serve",
    "build:dev": "cross-env NODE_ENV=production  dotenv -e .env.dev.build vue-cli-service build",
    "serve:test": "cross-env NODE_ENV=development dotenv -e .env.test.serve vue-cli-service serve",
    "build:test": "cross-env NODE_ENV=production  dotenv -e .env.test.build vue-cli-service build",
    "serve:prod": "cross-env NODE_ENV=development dotenv -e .env.prod.serve vue-cli-service serve",
    "build:prod": "cross-env NODE_ENV=production  dotenv -e .env.prod.build vue-cli-service build",
    "lint": "vue-cli-service lint"
  },
1.9-引入js-cookie
(1)安裝
npm install js-cookie -s
npm install @types/js-cookie --dev-s
(2)封裝單獨的ts文件。
import Cookies from 'js-cookie'

/*
封裝操作Cookie本地存儲的方法:
說明:主要用途有保存登錄信息。
存儲大小:4KB
*/
const cookies = {
  /**
   *設置Cookies
   * @param {String} key 鍵
   * @param {Object} value 值:存儲的值可能是數組/對象,不能直接存儲,需要轉換 JSON.stringify()
   * @param {Int} expiresTime 過期時間(單位:秒)
   */
  set(key: string, value: any, expiresTime: number) {
    expiresTime=arguments[2] ? arguments[2] : (60*60)*24;//預設值為:24小時
    let expires = new Date(new Date().getTime() * 1 + expiresTime * 1000);
    return Cookies.set(key, value, {
      expires: expires
    });
  },

  /**
   * 獲得Cookies
   * @param {String} key 鍵
   * @return {Object} 根據鍵取對應的值
   */
  get(key: string) {
    return Cookies.get(key);
  },

  /**
   * 刪除Cookies
   * @param {String} key 鍵
   */
  remove(key: string) {
    return Cookies.remove(key);
  }
};

export default cookies;
1.10-引入el-plus麵包屑導航
(1)安裝
npm install path-to-regexp -s
(2)寫代碼。
<template>
  <el-breadcrumb class="app_breadcrumb" separator="/">
    <transition-group name="breadcrumb">
      <el-breadcrumb-item v-for="(item,index) in breadcrumbs" :key="item.path">
        <span v-if="
          item.path === ' ' ||
          item.path === '/' ||
          item.path === '-' ||
          item.redirect === 'noredirect' ||
          index == breadcrumbs.length - 1" class="no_redirect">
          {{item.meta.title}}
        </span>
        <a v-else @click.prevent="handleLink(item)">{{item.meta.title}}</a>
      </el-breadcrumb-item>
    </transition-group>
  </el-breadcrumb>
</template>

<script lang="ts" setup>
import { compile } from 'path-to-regexp'
import { useRouter, useRoute, RouteLocationMatched } from 'vue-router'
import { onBeforeMount, reactive, toRefs, watch } from 'vue'

const route = useRoute();
const router = useRouter();

const pathCompile = (path: string) => {
  const { params } = route;
  const toPath = compile(path);
  return toPath(params);
}

const state = reactive({
  // 麵包屑路由
  breadcrumbs: [] as Array<RouteLocationMatched>,

  // 獲得麵包屑路由
  getBreadcrumb: () => {
    let matched = route.matched.filter((item: RouteLocationMatched) => {
      return item.meta && item.meta.title;
    });
    const first = matched[0];
    if (!state.isIndex(first)) {
        matched = [{ path: '/index', meta: { title: '首頁' } } as any].concat(matched);
    }
    state.breadcrumbs = matched.filter(
      (item) => item.meta && item.meta.title
    );
  },

  // 判斷是不是首頁
  isIndex: (route: RouteLocationMatched):boolean => {
    const name = route && route.name;
    if (!name) {
      return false;
    }
    return (
      name.toString().trim().toLocaleLowerCase() === "Index".toLocaleLowerCase()
    );
  },

  // 跳轉路由
  handleLink(item: any){
    const { redirect, path } = item;
    if (redirect) {
      router.push(redirect).catch((err) => {
        console.warn(err);
      })
      return
    }
    router.push(pathCompile(path)).catch((err) => {
      console.warn(err);
    })
  }
});

// 載入
onBeforeMount(() => {
  state.getBreadcrumb();
})

// 監聽路由變化
watch(() => route.path, (path: string) => {
  if (path.startsWith('/redirect/')) {
    return;
  }
  state.getBreadcrumb();
})

const { breadcrumbs, handleLink } = toRefs(state);
</script>

<style lang="scss" scoped>
.app_breadcrumb.el-breadcrumb{
  font-size: 14px;
  line-height: 42px;
  height:42px;

  .el-breadcrumb__inner,
  .el-breadcrumb__inner a {
    font-weight: 400 !important;
  }

  .no_redirect{
    color: #c0c4cc;
    cursor: text;
  }
}
</style>
(3)引入組件。
<breadcrumb class="breadcrumb_container" />
1.11-封裝http請求【axios-mapper】
(1)安裝需要的依賴
npm install @types/qs
npm install qs
(2)創建【types.ts】
// 請求內容類型
export enum ContentType {
  form = 'application/x-www-form-urlencoded',
  json = 'application/json; charset=utf-8',
  multipart = 'multipart/form-data'
}

// 請求方式
export enum Method {
  GET = 'GET',
  POST = 'POST',
  PUT = 'PUT',
  PATCH = 'PATCH',
  DELETE = 'DELETE'
}

// 網路請求參數
export interface RequestParams {
  [key: string]: any
}
(3)創建【convert-model.ts】文件。
// Json-Model相互轉換
export class ConvertModel {
  /**
   * @description:  json轉model
   * @param {string} json
   * @return {*}
   */
  public static jsonToModel<T>(json: string): T {
    return JSON.parse(json) as T;
  }

  /**
   * @description: model轉json
   * @param {any} model
   * @return {*}
   */
  public static modelToJson(model: any): string {
    return JSON.stringify(model);
  }
}
(4)創建【index.ts】文件
import { RequestParams, Method, ContentType } from './types';
import axios, { AxiosInstance, AxiosRequestConfig } from 'axios';
import { ConvertModel } from './convert-model';

// 導出所有的類型
export * from './types';

export interface HttpClientConfig extends AxiosRequestConfig {
  defaultParams?: RequestParams;
}

// 導出預設請求
export default class HttpClient {
  private _defaultConfig: HttpClientConfig;
  public httpClient: AxiosInstance;

  // 構造函數
  constructor(options: HttpClientConfig = {}){
    this.httpClient = axios.create(options);
    this._defaultConfig = options;
  }

  /**
   * @description: 封裝請求類
   * @param {string} path 請求路徑
   * @param {Method} method 請求方式(預設:GET)
   * @param {RequestParams} params 參數
   * @param {ContentType} contentType http配置
   * @param {HttpClientConfig} optionsSource
   * @return {*}
   */
  async request<T>(
    path: string = '',
    method: Method = Method.GET,
    params?: RequestParams,
    contentType: ContentType = ContentType.json,
    optionsSource?: HttpClientConfig
  ):Promise<T> {
    const options: any = Object.assign(
      {},
      this._defaultConfig,
      optionsSource
    );

    const { headers } = options;
    headers['content-type'] = contentType;

    const allParams = Object.assign(
      {},
      this._defaultConfig.defaultParams,
      params
    );

    // 發送請求
    const requestConfig: HttpClientConfig = {
      url: `${path}`,
      method,
      headers,
    };

    if(contentType === ContentType.form) {
      requestConfig.params = allParams;
    } else {
      requestConfig.data =  ConvertModel.modelToJson(allParams);
    }

    return this.httpClient.request(requestConfig)
    .then(res => {
      const data: string = ConvertModel.modelToJson(res.data);
      if (res.status >= 200 && res.status < 300) {
        return ConvertModel.jsonToModel(data) as T;
      } else {
        return Promise.reject(data);
      }
    })
    .catch(async error => {
      return Promise.reject(error);
    })
  };

  // GET請求
  get(url: string, params?: any) {
    return this.httpClient.request({
      url: url,
      method: Method.GET,
      params
    });
  };

  // POST請求
  post(url: string, data?: any) {
    return this.httpClient.request({
      url: url,
      method: Method.POST,
      data
    });
  };

  // PUT請求
  put(url: string, data?: any) {
    return this.httpClient.request({
      url: url,
      method: Method.PUT,
      data
    });
  };

  // Delete請求
  del (url: string, params?: any) {
    return this.httpClient.request({
      url: url,
      method: Method.DELETE,
      params
    });
  };

  // Delete批量請求(Post方式傳參)
  del_batch(url: string, data?: any) {
    return this.httpClient.request({
      url: url,
      method: Method.DELETE,
      data
    });
  }
}
(5)使用,封裝【https.ts】請求。
import HttpClient, { HttpClientConfig } from '../kimi-axios/index';
import { ElMessage } from 'element-plus';
import { getApiUrl, getToken } from './utils';

const config: HttpClientConfig = {
  baseURL: getApiUrl(),
  headers: {
    'Content-Type': 'application/json;charset=utf-8'
  },
  timeout: 60 * 1000 // 請求超時時間(預設:60秒)
};

const https = new HttpClient(config);
// 請求攔截器
https.httpClient.interceptors.request.use(
  config => {
    // 在發送請求之前做些什麼...
    console.log('https:請求攔截器...');

    // // 如果存在Token,讓請求攜帶令牌。
    // var curTime = new Date()
    // var expiretime = new Date(Date.parse(storeTemp.state.user.tokenExpire))
    // // 判斷是否存在token,如果存在的話,則每個http header都加上token
    // if (storeTemp.state.user.token && (curTime < expiretime && storeTemp.state.user.tokenExpire)) {
    //   //['Authorization']是一個自定義頭密鑰,請根據實際情況進行修改。
    //   config.headers['Authorization'] = 'Bearer ' + storeTemp.state.user.token;
    // }

    // ['Authorization']是一個自定義頭密鑰,請根據實際情況進行修改。
    // config.headers['Authorization'] = 'Bearer ' + store.state.user.kimiToken;
    config.headers = {
      Authorization: `Bearer ${getToken()}`
    };

    return config;
  },
  error => {
    // 處理請求錯誤...
    return Promise.reject(error);
  }
);

// 響應攔截器
https.httpClient.interceptors.response.use(
  /**
 * 如果您想獲取http信息,如標題或狀態
 * 請返回response=>response
 */
  /**
 * 通過自定義代碼確定請求狀態
 * 這裡只是一個例子
 * 您還可以通過HTTP狀態代碼來判斷狀態
 */
  response => {
    // 自定義錯誤
    // if(!response.data.success){
    //   Message({
    //     message: response.data.error.message,
    //     type: 'error',
    //     duration: 2 * 1000
    //   })
    // }

    console.log('https:響應攔截器...');
    const res = response;
    return res;
  },
  error => {
    let statusCode = 0;
    try {
      statusCode = error.response.status;
    } catch (e) {
      // 網路請求錯誤
      if (error.toString().indexOf('Error: Network Error') !== -1) {
        ElMessage({
          message: '您的請求網路發生錯誤,請稍後重試!',
          type: 'error',
          duration: 2 * 1000
        });
        return Promise.reject(error);
      }
    }

    // 超時請求處理
    var originalRequest = error.config;
    if (error.code === 'ECONNABORTED' && error.message.indexOf('timeout') !== -1 && !originalRequest._retry) {
      ElMessage({
        message: '您的請求超時,請稍後重試!',
        type: 'error',
        duration: 2 * 1000
      });
      originalRequest._retry = true;
      return Promise.reject(error);
    }

    // 根據狀態碼處理
    if (statusCode) {
      if (statusCode === 401) {
        // 401:未登錄
        ElMessage({
          message: '您當前未登錄,請先登錄!',
          type: 'error',
          duration: 2 * 1000
        });
      } else if (statusCode === 403) {
        // 403:無許可權
        ElMessage({
          message: '您訪問的許可權等級不夠,拒絕訪問!',
          type: 'error',
          duration: 2 * 1000
        });
      } else if (statusCode === 429) {
        // 429:IP限流
        ElMessage({
          message: '您刷新次數過多,請稍後重試!',
          type: 'error',
          duration: 2 * 1000
        });
      } else if (statusCode === 500) {
        // 500:自動錯誤&&系統自定義錯誤
        if (!error.response.data.success && error.response.data.result === 'error_constom') {
          ElMessage({
            message: error.response.data.error.message,
            type: 'error',
            duration: 2 * 1000
          });
        } else {
          ElMessage({
            message: '對不起,在處理您的請求期間,產生了一個伺服器內部錯誤!',
            type: 'error',
            duration: 2 * 1000
          });
        }
      } else {
        // 其他
        let errorMsg = '';
        switch (statusCode) {
        case 400:
          errorMsg = '請求報文中存在語法錯誤!';
          break;
        case 404:
          errorMsg = '伺服器找不到請求的介面!';
          break;
        case 405:
          errorMsg = '請求類型出錯!';
          break;
        case 408:
          errorMsg = '請求超時!';
          break;
        case 415:
          errorMsg = '請重新登錄!';
          break;
        case 501:
          errorMsg = '服務未實現!';
          break;
        case 502:
          errorMsg = '伺服器作為網關或代理,從上游伺服器收到無效響應!';
          break;
        case 503:
          errorMsg = '服務不可用!';
          break;
        case 504:
          errorMsg = '伺服器連接超時!';
          break;
        case 505:
          errorMsg = 'HTTP版本不受支持!';
          break;
        default:
          errorMsg = '其他錯誤!';
        }
        ElMessage({
          message: errorMsg,
          type: 'error',
          duration: 3 * 1000
        });
      }
    } else {
      ElMessage({
        message: '您的介面請求失敗,請稍後重試!',
        type: 'error',
        duration: 2 * 1000
      });
    }
    return Promise.reject(error);
  }
);

export default https;
1.12-引入全局loading
(1)element-plus需要在【main.ts】中先單獨引入loading樣式。
// 引入loading樣式
import 'element-plus/theme-chalk/el-loading.css';
(2)新建【loading.ts】文件全局使用。
// 【全局 Loading】:以服務的方式調用的全屏 Loading 是單例的。
import { ElLoading } from 'element-plus'

export default function() {
  const loading = (title: string) => {
    const loadingInstance = ElLoading.service({
      lock: true,
      text: title,
      background: 'rgba(0, 0, 0, 0.7)',
    });
    return loadingInstance;
  };

  return {
    loading
  }
}
(3)使用。
// 導入
import Loading from '@/utils/loading';

//啟用
const loadingInstance = loading('登錄中...');

//關閉
loadingInstance.close();
原創地址:https://www.cnblogs.com/kimiliucn/p/17605624.html


