# rsync教程、rsync+inotify實時同步 ## rsync介紹 英文全稱為Remote synchronization服務軟體 rsync是一個linux應用程式,可以實現**全量**以及**增量**的**本地**或者是**遠程**的**數據同步(拷貝)備份** 使用快速增量備份工具` ...
rsync教程、rsync+inotify實時同步
rsync介紹
英文全稱為Remote synchronization服務軟體
rsync是一個linux應用程式,可以實現全量以及增量的本地或者是遠程的數據同步(拷貝)備份
使用快速增量備份工具Remote Sync可以遠程同步,支持本地複製,或者與其他SSH、rsync主機同步
rsync與scp:rsync可以增量複製
安裝
yum -y install rsync
rsync使用
語法格式:
//Rsync的命令格式常用的有以下三種:
    rsync [OPTION]... SRC DEST
    rsync [OPTION]... SRC [USER@]HOST:DEST
    rsync [OPTION]... [USER@]HOST:SRC DEST

常用參數:
-a, --archive: 歸檔模式,表示以遞歸方式複製文件,並保持文件的所有屬性,包括許可權、時間戳等。
-v, --verbose: 顯示詳細輸出,即顯示文件傳輸的進度和其他信息。
-z, --compress: 在傳輸時進行壓縮,可以減少網路帶寬的使用。
-r, --recursive: 遞歸複製文件夾及其內容。
-u, --update: 只複製源文件中新於目標文件的文件。
-c, --checksum: 使用校驗和比較文件內容,而不是僅僅比較時間和大小。
-h, --human-readable: 以人類可讀的格式顯示輸出信息,例如文件大小以K、M、G等單位顯示。
-P, --progress: 顯示傳輸進度。
--delete: 刪除目標目錄中不存在於源目錄中的文件。
--exclude: 排除指定的文件或目錄。
--include:包括指定的文件或目錄,即使在排除列表中。
--exclude-from:從指定文件中讀取排除列表。
--include-from:從指定文件中讀取包含列表。

常用命令:
1.將本地文件複製到遠程主機:
rsync [選項] 源文件/目錄 遠程主機:目標路徑

2.將遠程主機文件複製到本地:
rsync [選項] 遠程主機:源文件/目錄 目標路徑

3.同步本地兩個目錄:
rsync [選項] 源目錄/ 目標目錄/

4.僅複製新文件或有變化的文件:
rsync -u 源目錄/ 目標目錄/

5.遞歸複製整個目錄樹:
rsync -r 源目錄/ 目標目錄/

6.刪除目標目錄中不存在於源目錄中的文件:
rsync -r --delete 源目錄/ 目標目錄/

7.顯示詳細信息:
rsync -av 源目錄/ 目標目錄/

8.使用 SSH 連接遠程主機:
rsync -avz -e ssh 源目錄/ 遠程主機:目標路徑

9.源文件中有刪除時,同步刪除以後的文件
rsync -av --delete 源目錄/ 目標目錄/
rsync定時同步(ssh方式)
可以通過crontab定時使用rsync命令
例如:定時備份機器2中的數據
準備1:機器2(25)/tmp/rsync/中需要定時備份的數據 同步到機器1(28)中/tmp/backup/目錄下
[ root@localhost test]# tree /tmp/rsync/
/tmp/rsync/
└── test
    ├── test2.txt
    └── test.txt
1 directory, 2 files

準備2:
因為rsync從遠程主機上同步數據需要ssh密碼驗證,所需要先ssh-keygen
ssh-keygen 一路回車 有y 填y
ssh-copy-id [email protected]
測試一下 ssh [email protected] 可以發現直接連接上不需要密碼驗證

開始實驗
創建crontab定時任務
crontab -e
* * * * * rsync -av [email protected]:/tmp/rsync/ /tmp/backup &>/dev/null

一分鐘後 可以發現文件都同步過來了
[root@localhost tmp]# tree backup/
backup/
└── test
    ├── test2.txt
    └── test.txt
1 directory, 2 files
rsync+inotify實時同步
原理介紹
1.實時同步的方法
- inotify rsync方法實現數據同步
- sersync 在inotify軟體基礎上進行開發的,功能更強大
2.工作原理
- 要利用監控服務,監控同步數據伺服器目錄中信息的變化
- 發現目錄中數據產生變化,就利用rsync服務推送到備份伺服器上
inotify:
非同步的文件系統監控機制,利用事件驅動機制,而無須通過諸如cron等輪詢機制來獲取時間。
linux內核從2.6.13起支持inotify,通過inotify可以監控文件系統中添加、刪除、修改、移動等各種事件。
grep -i inotify /boot/config-3.10.0-1160.el7.x86_64
CONFIG_INOTIFY_USER=y
實現inotify軟體:
- inotify-tools
- sersync
- lrsyncd
inotify+rsync使用方式
- inotify 對同步數據目錄信息的監控
- rsync 完成對數據的同步
- 利用腳本進行結合
inotify
內核是否支持inotify
列出下麵文件,說明伺服器內核支持inotify
[root@localhost ~]# ls -l /proc/sys/fs/inotify/
total 0
-rw-r--r-- 1 root root 0 Jul 29 11:05 max_queued_events
-rw-r--r-- 1 root root 0 Jul 29 11:05 max_user_instances
-rw-r--r-- 1 root root 0 Jul 29 11:05 max_user_watches

[root@localhost ~]# cat /proc/sys/fs/inotify/max_queued_events
16384
[root@localhost ~]# cat /proc/sys/fs/inotify/max_user_instances
128
[root@localhost ~]# cat /proc/sys/fs/inotify/max_user_watches
8192
inotify內核參數說明:
- max_queued_events:inotify事件隊列最大長度,如值太小會出現Event Queue Overflow錯誤,預設值:16384,生產環境建議調大,比如:327679
- max_user_instances:每個用戶創建inotify實例最大值,預設值:128
- max_user_watches:可以監視的文件總數量(inotifywait 單進程),預設值:8192,建議調大
範例:
在/etc/sysctl.conf最下麵添加
[root@localhost ~]# vim /etc/sysctl.conf
fs.inotify.max_queued_events=327679
fs.inotify.max_user_watches=100000

[root@localhost ~]# sysctl -p
fs.inotify.max_queued_events = 327679
fs.inotify.max_user_watches = 100000
inotify-tools工具
安裝inotify-tools:基於epel源
yum install inotify-tools -y
inotify-tools包主要工具:
- inotifywait:在被監控的文件或目錄上等待特定文件系統事件(open,close,delete等)發生,常用於實時同步的目錄監控
- inotifywatch:收集被監控的文件系統使用的統計數據,指文件系統事件發生的次數統計
inotifywait命令
inotifywait [options] file1 [file2] [file3] [...]
常用參數
-m –monitor 始終保持監聽狀態,預設觸發事件即退出
-r –recursive 遞歸查詢目錄
-d –daemon 跟–monitor一樣,除了是在後臺運行,需要指定–outfile把事情輸出到一個文件。也意味著使用了–syslog。
-q –quiet 減少不必要的輸出(只列印事件信息)
-s –syslog 輸出錯誤信息到系統日誌
-e –event 定義監控的事件,可用參數:
    open   打開文件
    access 訪問文件
    modify 修改文件
    delete 刪除文件
    create 新建文件
    attrib 屬性變更
--timefmt 時間格式
    %y年 %m月 %d日 %H小時 %M分鐘
--format 輸出格式
    %w 表示發生事件的目錄
    %f 表示發生事件的文件
    %e 表示發生的事件
    %Xe 事件以“X”分隔
    %T 使用由–timefmt定義的時間格式
--exclude <pattern> 指定要排除監控的文件/目錄
可監控事件
access	訪問,讀取文件。
modify	修改,文件內容被修改。
attrib	屬性,文件元數據被修改。
move	移動,對文件進行移動操作。
create	創建,生成新文件
open	打開,對文件進行打開操作。
close	關閉,對文件進行關閉操作。
delete	刪除,文件被刪除。
示例
[root@localhost yum.repos.d]# inotifywait -mr --timefmt "%Y-%m-%d %H:%M:%S" --format "%T %w%f event: %;e" /tmp/rsync/
Setting up watches.  Beware: since -r was given, this may take a while!
Watches established.
2023-07-29 14:12:01 /tmp/rsync/ event: OPEN;ISDIR
2023-07-29 14:12:01 /tmp/rsync/ event: CLOSE_NOWRITE;CLOSE;ISDIR

篩選一些事件,對於"打開" "查看"一些事件不監控
[root@localhost yum.repos.d]# inotifywait -mrq --timefmt "%Y-%m-%d %H:%M:%S" --format "%T %w%f event: %;e" -e create,delete,move,modify,attrib /tmp/rsync/
2023-07-29 14:18:01 /tmp/rsync/test/test2.txt event: DELETE
rsync
開始提到的rsync是使用一個遠程shell程式(如rsh、ssh)來實現將本地機器的內容拷貝到遠程機器。
與上述rsync不同這裡不是走ssh,而是rsync獨立的服務 rsync-daemon。
兩台機器都需要安裝rsync。
準備:
在28機器上安裝rsync服務(之前是在25機器上) 執行以下命令即可 再查看以下873埠是否開啟
[root@localhost etc]# rsync --daemon

[root@localhost etc]# netstat -tunlp
tcp        0      0 0.0.0.0:873             0.0.0.0:*               LISTEN      3599/rsync

再寫配置rsyncd.conf文件
vim /etc/rsyncd.conf
在最下麵添加
[backup]
path = /tmp/backup/
read only = no
格式:
rsync daemon:
pull:
rsync [OPTION]... [USER@]HOST::SRC DEST

push:
rsync [OPTION...] SRC... [USER@]HOST::[DEST]
測試:
[root@localhost yum.repos.d]# rsync /etc/networks [email protected]::backup
rsync: mkstemp "/.networks.hTs4QS" (in backup) failed: Permission denied (13)
rsync error: some files/attrs were not transferred (see previous errors) (code 23) at main.c(1179) [sender=3.1.2]

報錯了,需要在28機器上指定目錄給nobody許可權,預設用戶以nobody訪問此目錄
setfacl -m u:nobody:rwx /tmp/backup

再次在25機器上執行
rsync /etc/networks [email protected]::backup
可以發現成功了 在28機器上查看
[root@localhost backup]# ll
total 4
-rw-r--r-- 1 nobody nobody 58 Jul 29 16:18 networks
drwxr-xr-x 2 root   root   22 Jul 29 14:18 test
其實我們在這裡可以發現這種沒有密碼驗證的方式傳輸文件是不安全的,我們可以把rsyncd.conf文件以標準的形式編寫
vim /etc/rsyncd.conf
motd file = /etc/rsyncd.motd
transfer logging = yes
log file =/var/log/rsyncd.log
pid file =/var/run/rsyncd.pid
lock file =/var/run/rsync.lock
port = 873
uid = root
gid = root
reverse lookup = no
ignore errors
use chroot = no
max connections = 10

[backup]
comment = backup dir #描述
path = /tmp/backup
read only = no
auth users = root,zhangsan #只有這些賬號能訪問backup目錄
secrets file = /etc/rsyncd.password #這些賬號的密碼
#hosts allow=192.168.0.0/255.255.255.0
#hosts deny=*
list= false
編寫rsyncd.password 這個文件名需要跟上述配置文件secrets file = /etc/rsyncd.password 一致!
vim rsyncd.password
root:123456
zhangsan:123456
修改屬性 600 除了root其他人不能查看
chmod 600 /etc/rsyncd.password
再測試:
[root@localhost rsync]# rsync -av /etc/group [email protected]::backup
Password:
輸入root密碼即可
使用--password-file=FILE 命令 可以以非交互的方式
註意:此步驟是在25機器上創建,之前幾個步驟都是在28機器上 (1.內容取決於你等下要用哪個用戶的密碼 2.路徑可以不一致)
echo "123456" > /etc/rsyncd.password
測試:
[root@localhost rsync]# rsync -av --password-file=/etc/rsyncd.password /etc/passwd [email protected]::backup
sending incremental file list
passwd

sent 642 bytes  received 35 bytes  1,354.00 bytes/sec
total size is 552  speedup is 0.82
可以看到不用互動式輸入密碼即可完成文件傳輸
rsync+inotify+shell 腳本實現實時數據同步
先要確保兩主機初始數據處於同步狀態(需要被同步數據的機器裝好inotify rsync [25機器],同步數據的機器裝好rsync並配置好文件 [28機器]),此腳本實現後續的數據同步
#!/bin/bash
SRC='/tmp/backup'
DEST='[email protected]::backup'
inotifywait -mrq --exclude=".*\.swp" --timefmt '%Y-%m-%d %H:%M:%S' --format '%T %w %f' -e create,delete,moved_to,close_write,attrib ${SRC} | while read DATE TIME DIR FILE;do
        FILEPATH=${DIR}${FILE}
        rsync -az --delete --password-file=/etc/rsyncd.password $SRC $DEST && echo "At ${TIME} on ${DATE},file $FILEPATH was backuped up via rsync" >> /var/log/changelist.log
done
sersync
上述rsync+inotify腳本形式實時同步的缺陷是:利用inotify監控,有時會產生重覆事件,或者同一個目錄下多個文件的操作會產生多個事件,導致重覆調用rsync命令。另外比如:vim文件時,inotify會監控到臨時文件的事件,但這些事件相對於rsync來說是不應該被監控的。
下載後移動到linux環境下 然後解壓
tar xf sersync2.5.4_64bit_binary_stable_final.tar.gz
解壓好之後把文件移動到/usr/local/ (這裡我下載在opt目錄下)
[root@localhost opt]# mv GNU-Linux-x86/ /usr/local/sersync
[root@localhost opt]# ln -s /usr/local/sersync/sersync2 /usr/bin/

查看幫助文檔
[root@localhost bin]# sersync2 -help
set the system param
execute:echo 50000000 > /proc/sys/fs/inotify/max_user_watches
execute:echo 327679 > /proc/sys/fs/inotify/max_queued_events
parse the command param
_______________________________________________________
參數-d:啟用守護進程模式
參數-r:在監控前,將監控目錄與遠程主機用rsync命令推送一遍
c參數-n: 指定開啟守護線程的數量,預設為10個
參數-o:指定配置文件,預設使用confxml.xml文件
參數-m:單獨啟用其他模塊,使用 -m refreshCDN 開啟刷新CDN模塊
參數-m:單獨啟用其他模塊,使用 -m socket 開啟socket模塊
參數-m:單獨啟用其他模塊,使用 -m http 開啟http模塊
不加-m參數,則預設執行同步程式
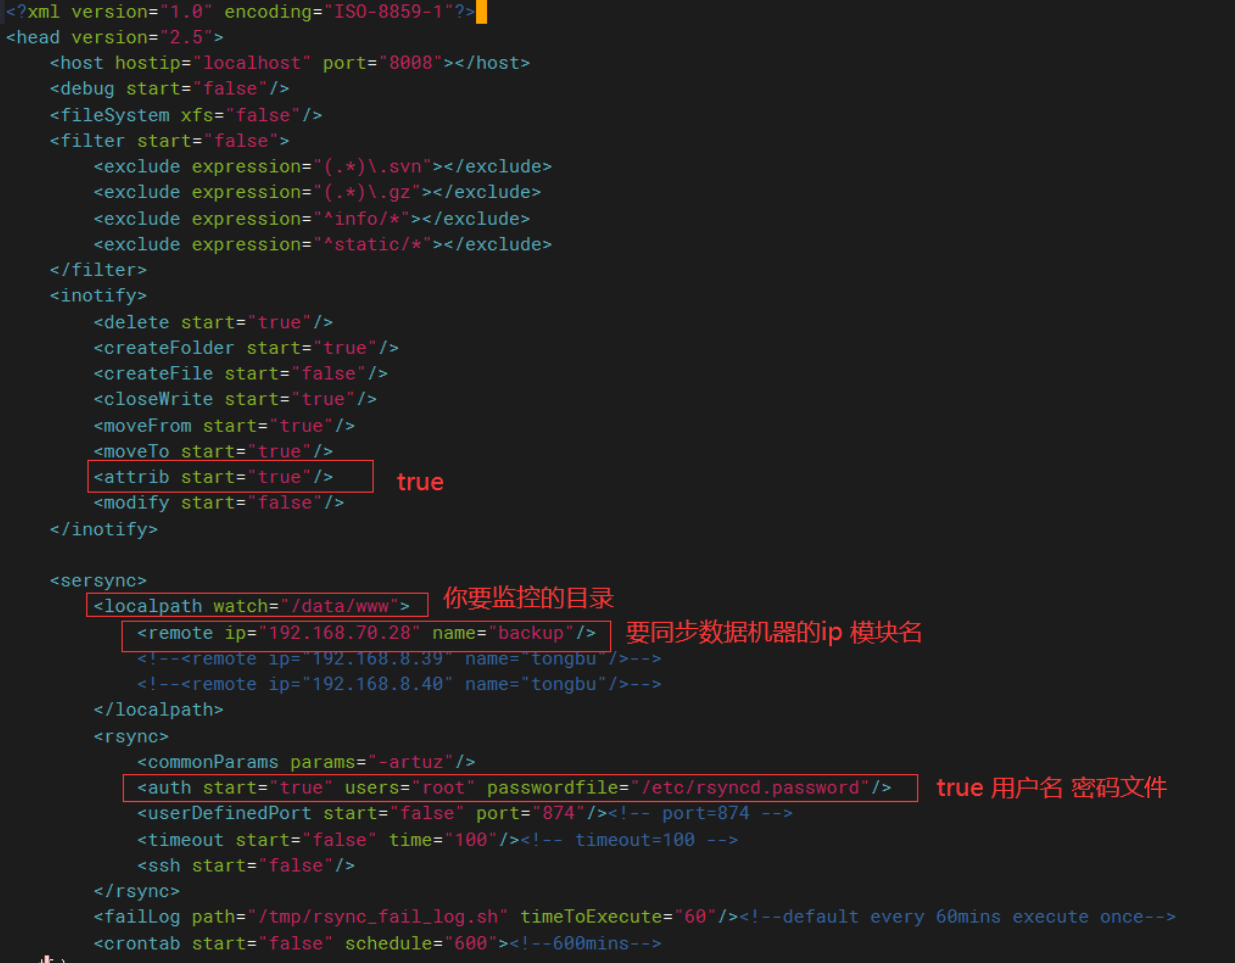
修改xml文件
vim /usr/local/sersync/confxml.xml

如果監控目錄沒有需要創建以下
mkdir /data/www
25機器上執行
[root@localhost sersync]# sersync2 -dro /usr/local/sersync/confxml.xml
set the system param
execute:echo 50000000 > /proc/sys/fs/inotify/max_user_watches
execute:echo 327679 > /proc/sys/fs/inotify/max_queued_events
parse the command param
option: -d      run as a daemon
option: -r      rsync all the local files to the remote servers before the sersync work
option: -o      config xml name:  /usr/local/sersync/confxml.xml
daemon thread num: 10
parse xml config file
host ip : localhost     host port: 8008
daemon start,sersync run behind the console
use rsync password-file :
user is root
passwordfile is         /etc/rsyncd.password
config xml parse success
please set /etc/rsyncd.conf max connections=0 Manually
sersync working thread 12  = 1(primary thread) + 1(fail retry thread) + 10(daemon sub threads)
Max threads numbers is: 22 = 12(Thread pool nums) + 10(Sub threads)
please according your cpu ,use -n param to adjust the cpu rate
------------------------------------------
rsync the directory recursivly to the remote servers once
working please wait...
execute command: cd /data/www && rsync -artuz -R --delete ./ [email protected]::backup --password-file=/etc/rsyncd.password >/dev/null 2>&1
測試
[root@localhost www]# ls
[root@localhost www]# echo "111" >test.txt

回到28機器上
[root@localhost backup]# ls
test.txt
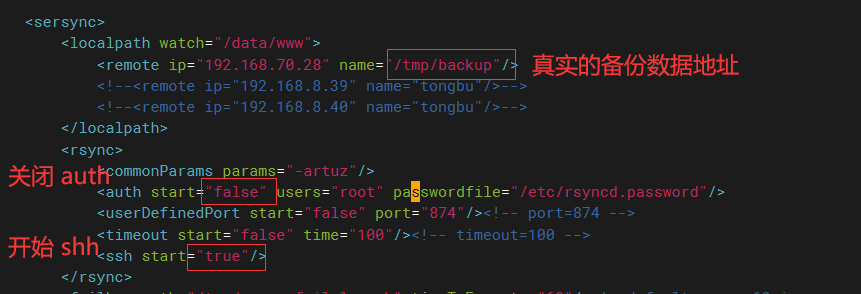
我們還可以不用rsync --daemon 守護進程的方式,直接使用ssh方式,這樣可以不設置rsync一系列配置文件,只需將設置好ssh-keygen免密登錄即可。
修改xml文件

設置ssh免密:
ssh-keygen
ssh-copy-id [email protected]
關閉之前開啟的守護進程
[root@localhost www]# pkill sersync2
[root@localhost www]# ps -ef | grep rsync
root      11823   1297  0 01:10 pts/0    00:00:00 grep --color=auto rsync

28機器關閉rsync服務
[root@localhost ~]# pkill rsync
測試:
[root@localhost www]# sersync2 -dro /usr/local/sersync/confxml.xml


