摘要:在本篇文章中,我們將深入探討Spring框架中的重要組件——BeanPostProcessor。首先,我們將瞭解其設計理念和目標,然後通過實際的例子學習如何基礎使用它,如何通過BeanPostProcessor改變Bean的初始化結果以及如何利用它修改Bean的屬性。 本文分享自華為雲社區《S ...
摘要:在本篇文章中,我們將深入探討Spring框架中的重要組件——BeanPostProcessor。首先,我們將瞭解其設計理念和目標,然後通過實際的例子學習如何基礎使用它,如何通過BeanPostProcessor改變Bean的初始化結果以及如何利用它修改Bean的屬性。
本文分享自華為雲社區《Spring高手之路6——Bean生命周期的擴展點:BeanPostProcessor》,作者:磚業洋__ 。
1. 探索Spring的後置處理器(BeanPostProcessor)
1.1 BeanPostProcessor的設計理念
BeanPostProcessor的設計目標主要是提供一種擴展機制,讓開發者可以在Spring Bean的初始化階段進行自定義操作。這種設計理念主要體現了Spring的一種重要原則,即“開放封閉原則”。開放封閉原則強調軟體實體(類、模塊、函數等等)應該對於擴展是開放的,對於修改是封閉的。在這裡,Spring容器對於Bean的創建、初始化、銷毀等生命周期進行了管理,但同時開放了BeanPostProcessor這種擴展點,讓開發者可以在不修改Spring源碼的情況下,實現對Spring Bean生命周期的自定義操作,這種設計理念大大提升了Spring的靈活性和可擴展性。
BeanPostProcessor不是Spring Bean生命周期的一部分,但它是在Spring Bean生命周期中起重要作用的組件。
1.2 BeanPostProcessor的文檔說明
我們來看看這個方法的文檔註釋,從圖中可以看到,BeanPostProcessor 介面定義了兩個方法,postProcessBeforeInitialization和postProcessAfterInitialization
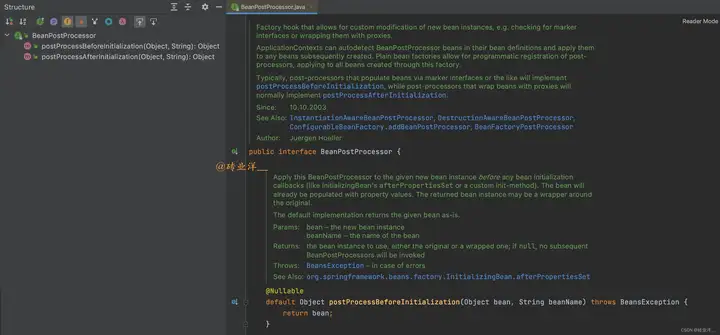
postProcessBeforeInitialization方法會在任何bean初始化回調(如InitializingBean的afterPropertiesSet方法或者自定義的init-method)之前被調用。也就是說,這個方法會在bean的屬性已經設置完畢,但還未進行初始化時被調用。
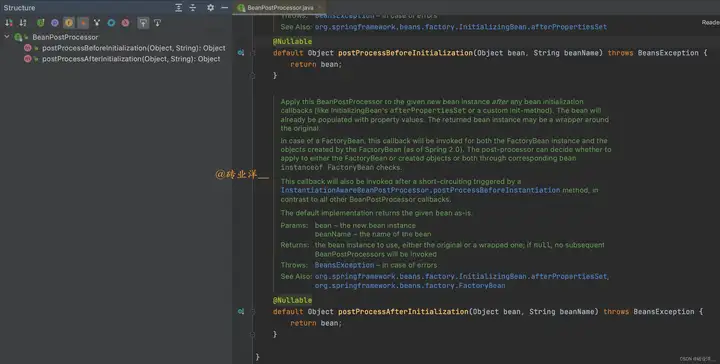
postProcessAfterInitialization方法在任何bean初始化回調(比如InitializingBean的afterPropertiesSet或者自定義的初始化方法)之後被調用。這個時候,bean的屬性值已經被填充完畢。返回的bean實例可能是原始bean的一個包裝。
2. BeanPostProcessor的使用
2.1 BeanPostProcessor的基礎使用示例
全部代碼如下:
首先定義兩個簡單的Bean:Lion和Elephant
Lion.java
package com.example.demo.bean;
public class Lion {
 private String name;
 public String getName() {
 return name;
 }
 public void setName(String name) {
 this.name = name;
 }
}
Elephant.java
package com.example.demo.bean;
public class Elephant {
 private String name;
 public String getName() {
 return name;
 }
 public void setName(String name) {
 this.name = name;
 }
}
然後定義一個簡單的BeanPostProcessor,它只是列印出被處理的Bean的名字:
package com.example.demo.processor;
import org.springframework.beans.BeansException;
import org.springframework.beans.factory.config.BeanPostProcessor;
public class MyBeanPostProcessor implements BeanPostProcessor {
 @Override
 public Object postProcessBeforeInitialization(Object bean, String beanName) throws BeansException {
 System.out.println("Before initialization: " + beanName);
 return bean;
 }
 @Override
 public Object postProcessAfterInitialization(Object bean, String beanName) throws BeansException {
 System.out.println("After initialization: " + beanName);
 return bean;
 }
}
接著我們定義一個配置類,其中包含對Lion、Elephant類和MyBeanPostProcessor類的Bean定義:
package com.example.demo.configuration;
import com.example.demo.bean.Elephant;
import com.example.demo.bean.Lion;
import com.example.demo.processor.MyBeanPostProcessor;
import org.springframework.context.annotation.Bean;
import org.springframework.context.annotation.Configuration;
@Configuration
public class AnimalConfig {
 @Bean
 public Lion lion() {
 return new Lion();
 }
 @Bean
 public Elephant elephant() {
 return new Elephant();
 }
 @Bean
 public MyBeanPostProcessor myBeanPostProcessor() {
 return new MyBeanPostProcessor();
 }
}
最後,我們在主程式中創建ApplicationContext對象:
import org.springframework.context.ApplicationContext;
import org.springframework.context.annotation.AnnotationConfigApplicationContext;
public class Main {
 public static void main(String[] args) {
 ApplicationContext context = new AnnotationConfigApplicationContext(AnimalConfig.class);
 ((AnnotationConfigApplicationContext)context).close();
 }
}
運行結果:
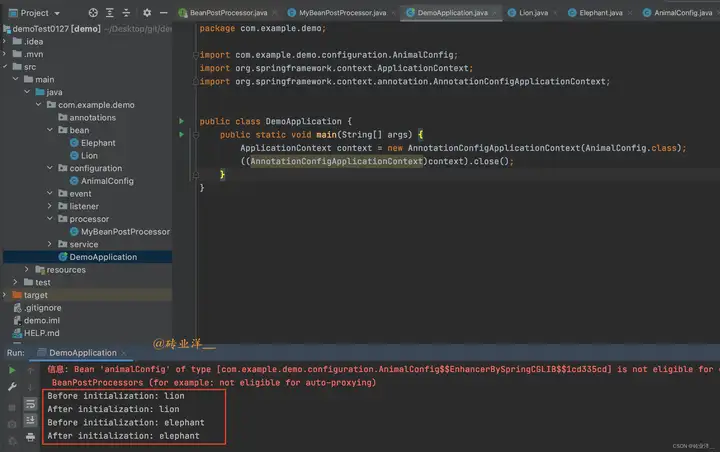
以上代碼在執行時,將先創建Lion和Elephant對象,然後在初始化過程中和初始化後調用postProcessBeforeInitialization和postProcessAfterInitialization方法,列印出被處理的Bean的名字。
細心的小伙伴可能觀察到這裡有紅色日誌
信息: Bean 'animalConfig' of type [com.example.demo.configuration.AnimalConfig$$EnhancerBySpringCGLIB$$ee4adc7e] is not eligible for getting processed by all BeanPostProcessors (for example: not eligible for auto-proxying)
在Spring中,BeanPostProcessor是被特殊處理的,它們會在其他普通Bean之前被實例化和初始化,這樣設計的原因是BeanPostProcessor的存在可以影響其他Bean的創建和初始化過程。 Spring應用上下文中可以存在多個BeanPostProcessor,Spring本身就提供了很多內置的BeanPostProcessor。
但是,如果在初始化BeanPostProcessor的過程中需要依賴其他的Bean,那麼這些被依賴的Bean會先於後置處理器進行初始化。然而,由於這些被依賴的Bean是在該BeanPostProcessor初始化完成之前就已經進行了初始化,它們就會錯過這個BeanPostProcessor的處理。在這個例子中,MyBeanPostProcessor就是這樣的一個BeanPostProcessor,而"animalConfig"是它所依賴的Bean。所以這個日誌信息就是說,'animalConfig'這個Bean在初始化的時候,沒有被所有的BeanPostProcessor處理,這裡它無法得到MyBeanPostProcessor的處理。
我們只需要把實例化過程直接交給Spring容器來管理,而不是在配置類中手動進行實例化,就可以消除這個提示信息,也就是在MyBeanPostProcessor上加@Component即可。
在第3節的例子中就使用了@Component處理這個MyBeanPostProcessor,這個提示就消失了。
2.2 利用BeanPostProcessor修改Bean的初始化結果的返回值
還是上面的例子,我們只修改一下MyBeanPostProcessor 類的方法後再次運行
package com.example.demo.processor;
import com.example.demo.bean.Elephant;
import com.example.demo.bean.Lion;
import org.springframework.beans.BeansException;
import org.springframework.beans.factory.config.BeanPostProcessor;
public class MyBeanPostProcessor implements BeanPostProcessor {
 @Override
 public Object postProcessBeforeInitialization(Object bean, String beanName) throws BeansException {
 System.out.println("Before initialization: " + bean);
 if (bean instanceof Lion) {
 return new Elephant();
 }
 return bean;
 }
 @Override
 public Object postProcessAfterInitialization(Object bean, String beanName) throws BeansException {
 System.out.println("After initialization: " + bean);
 return bean;
 }
}
運行結果:
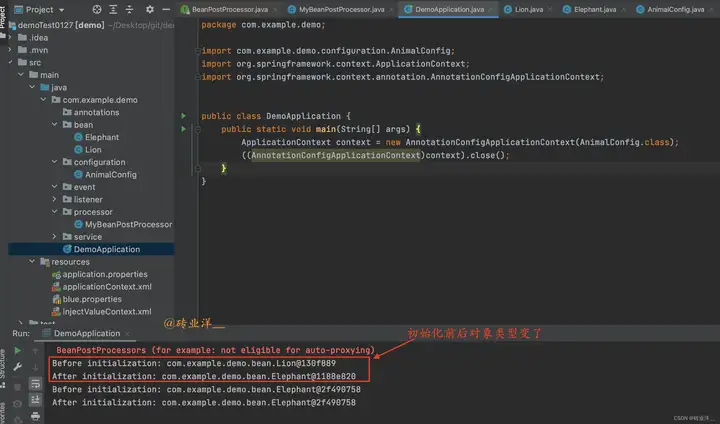
BeanPostProcessor的兩個方法都可以返回任意的Object,這意味著我們可以在這兩個方法中更改返回的bean。例如,如果我們讓postProcessBeforeInitialization方法在接收到Lion實例時返回一個新的Elephant實例,那麼我們將會看到Lion實例變成了Elephant實例。
那既然BeanPostProcessor的兩個方法都可以返回任意的Object,那我搞點破壞返回null會怎麼樣,會不會因為初始化bean為null而導致異常呢?
答案是不會的,我們來看一下:
package com.example.demo.processor;
import org.springframework.beans.BeansException;
import org.springframework.beans.factory.config.BeanPostProcessor;
public class MyBeanPostProcessor implements BeanPostProcessor {
 @Override
 public Object postProcessBeforeInitialization(Object bean, String beanName) throws BeansException {
 System.out.println("Before initialization: " + bean);
 return null;
 }
 @Override
 public Object postProcessAfterInitialization(Object bean, String beanName) throws BeansException {
 System.out.println("After initialization: " + bean);
 return bean;
 }
}
我們運行看結果
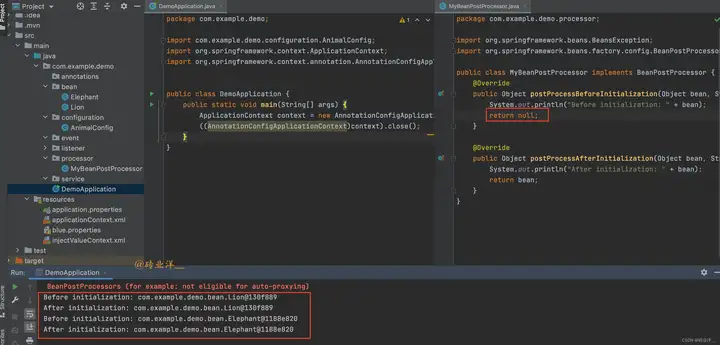
結果發現還是正常初始化的bean類型,不會有任何改變,我們繼續調試看看是為什麼
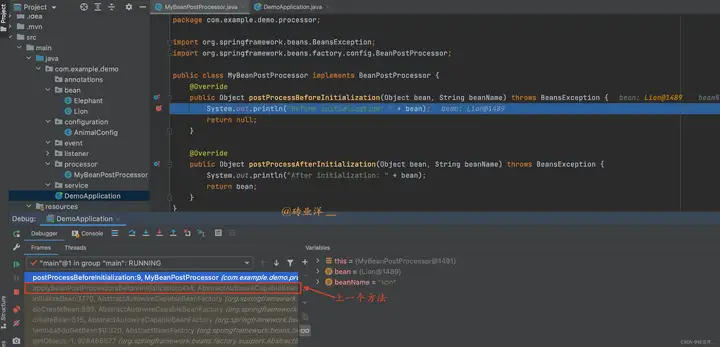
我們通過堆棧幀看到調用postProcessBeforeInitialization方法的上一個方法是applyBeanPostProcessorsBeforeInitialization,雙擊點開看一看這個方法
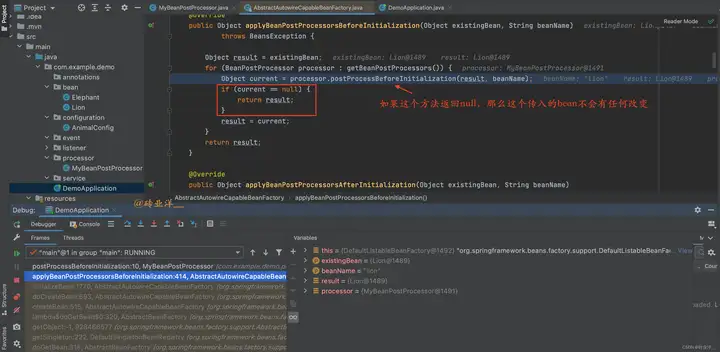
從我這個調試圖中可以看到,如果postProcessBeforeInitialization返回null,Spring仍然用原始的bean進行後續的處理,同樣的邏輯在postProcessAfterInitialization也是一樣。這就是為什麼我們在BeanPostProcessor類的方法中返回null,原始bean實例還是存在的原因。
2.3 通過BeanPostProcessor實現Bean屬性的動態修改
來看看是怎麼攔截 bean 的初始化的
全部代碼如下:
首先,我們定義一個Lion類:
public class Lion {
 private String name;
 public Lion() {
 this.name = "Default Lion";
 }
 public Lion(String name) {
 this.name = name;
 }
 public String getName() {
 return name;
 }
 public void setName(String name) {
 this.name = name;
 }
 @Override
 public String toString() {
 return "Lion{" + "name='" + name + '\'' + '}';
 }
}
接下來,我們定義一個BeanPostProcessor,我們稱之為MyBeanPostProcessor :
package com.example.demo.processor;
import com.example.demo.bean.Lion;
import org.springframework.beans.BeansException;
import org.springframework.beans.factory.config.BeanPostProcessor;
public class MyBeanPostProcessor implements BeanPostProcessor {
 @Override
 public Object postProcessBeforeInitialization(Object bean, String beanName) throws BeansException {
 System.out.println("Bean的初始化之前:" + bean);
 return bean;
 }
 @Override
 public Object postProcessAfterInitialization(Object bean, String beanName) throws BeansException {
 System.out.println("Bean的初始化之後:" + bean);
 if (bean instanceof Lion) {
 ((Lion) bean).setName("Simba");
 }
 return bean;
 }
}
然後我們定義一個配置類,其中包含對Lion類的Bean定義和對MyBeanPostProcessor 類的Bean定義:
package com.example.demo.configuration;
import com.example.demo.bean.Lion;
import com.example.demo.processor.MyBeanPostProcessor;
import org.springframework.context.annotation.Bean;
import org.springframework.context.annotation.Configuration;
@Configuration
public class AnimalConfig {
 @Bean
 public Lion lion() {
 return new Lion();
 }
 @Bean
 public MyBeanPostProcessor myBeanPostProcessor() {
 return new MyBeanPostProcessor();
 }
}
最後,我們在主程式中創建ApplicationContext對象,並獲取Lion對象:
package com.example.demo;
import com.example.demo.bean.Lion;
import com.example.demo.configuration.AnimalConfig;
import org.springframework.context.ApplicationContext;
import org.springframework.context.annotation.AnnotationConfigApplicationContext;
public class DemoApplication {
 public static void main(String[] args) {
 ApplicationContext context = new AnnotationConfigApplicationContext(AnimalConfig.class);
 Lion lion = context.getBean("lion", Lion.class);
 System.out.println(lion);
 ((AnnotationConfigApplicationContext)context).close();
 }
}
運行結果:
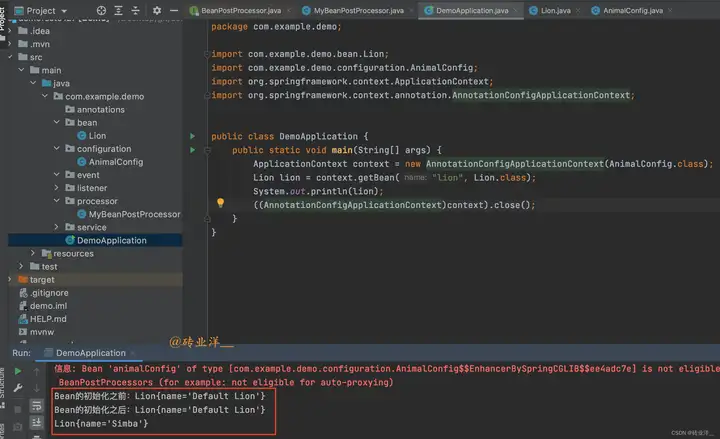
上面代碼在執行時,先創建一個Lion對象,然後在初始化過程中和初始化後調用postProcessBeforeInitialization和postProcessAfterInitialization方法,修改Lion的名字為"Simba",最後在主程式中輸出Lion對象,顯示其名字為"Simba"。
3. 深度剖析BeanPostProcessor的執行時機
3.1 後置處理器在Bean生命周期中的作用及執行時機
在這個例子中,我們將創建一個名為Lion和Elephant 的Bean,它會展示屬性賦值和生命周期的各個步驟的執行順序。同時,我們還將創建一個BeanPostProcessor來列印消息並顯示它的執行時機。
全部代碼如下:
首先,我們定義我們的Lion:
package com.example.demo.bean;
import org.springframework.beans.factory.DisposableBean;
import org.springframework.beans.factory.InitializingBean;
import javax.annotation.PostConstruct;
import javax.annotation.PreDestroy;
import javax.annotation.Resource;
public class Lion implements InitializingBean, DisposableBean {
 private String name;
 private Elephant elephant;
 public Lion() {
 System.out.println("1. Bean Constructor Method Invoked!");
 }
 public String getName() {
 return name;
 }
 public void setName(String name) {
 this.name = name;
 System.out.println("2. Bean Setter Method Invoked! name: " + name);
 }
 /**
     * setter註入
     * @param elephant
     */
 @Resource
 public void setElephant(Elephant elephant) {
 this.elephant = elephant;
 System.out.println("2. Bean Setter Method Invoked! elephant: " + elephant);
 }
 @PostConstruct
 public void postConstruct() {
 System.out.println("4. @PostConstruct Method Invoked!");
 }
 @Override
 public void afterPropertiesSet() throws Exception {
 System.out.println("5. afterPropertiesSet Method Invoked!");
 }
 public void customInitMethod() {
 System.out.println("6. customInitMethod Method Invoked!");
 }
 @PreDestroy
 public void preDestroy() {
 System.out.println("8. @PreDestroy Method Invoked!");
 }
 @Override
 public void destroy() throws Exception {
 System.out.println("9. destroy Method Invoked!");
 }
 public void customDestroyMethod() {
 System.out.println("10. customDestroyMethod Method Invoked!");
 }
}
創建Lion所依賴的Elephant
package com.example.demo.bean;
import org.springframework.stereotype.Component;
@Component
public class Elephant {
 private String name;
 public String getName() {
 return name;
 }
 public void setName(String name) {
 this.name = name;
 }
}
然後,我們定義一個簡單的BeanPostProcessor:
package com.example.demo.processor;
import com.example.demo.bean.Lion;
import org.springframework.beans.BeansException;
import org.springframework.beans.factory.config.BeanPostProcessor;
import org.springframework.stereotype.Component;
@Component
public class MyBeanPostProcessor implements BeanPostProcessor {
 @Override
 public Object postProcessBeforeInitialization(Object bean, String beanName) throws BeansException {
 if(bean instanceof Lion) {
 System.out.println("3. postProcessBeforeInitialization Method Invoked!");
 }
 return bean;
 }
 @Override
 public Object postProcessAfterInitialization(Object bean, String beanName) throws BeansException {
 if(bean instanceof Lion) {
 System.out.println("7. postProcessAfterInitialization Method Invoked!");
 }
 return bean;
 }
}
創建一個配置類AnimalConfig
package com.example.demo.configuration;
import com.example.demo.bean.Lion;
import org.springframework.context.annotation.Bean;
import org.springframework.context.annotation.Configuration;
@Configuration
public class AnimalConfig {
 @Bean(initMethod = "customInitMethod", destroyMethod = "customDestroyMethod")
 public Lion lion() {
 Lion lion = new Lion();
 lion.setName("my lion");
 return lion;
 }
}
主程式:
package com.example.demo;
import com.example.demo.bean.Lion;
import org.springframework.context.annotation.AnnotationConfigApplicationContext;
public class DemoApplication {
 public static void main(String[] args) {
 System.out.println("容器初始化之前...");
 AnnotationConfigApplicationContext context = new AnnotationConfigApplicationContext("com.example");
 System.out.println("容器初始化完成");
 Lion bean = context.getBean(Lion.class);
 bean.setName("oh!!! My Bean set new name");
 System.out.println("容器準備關閉...");
 context.close();
 System.out.println("容器已經關閉");
 }
}
控制臺上看到所有的方法調用都按照預期的順序進行,這可以更好地理解Bean屬性賦值和生命周期以及BeanPostProcessor的作用。
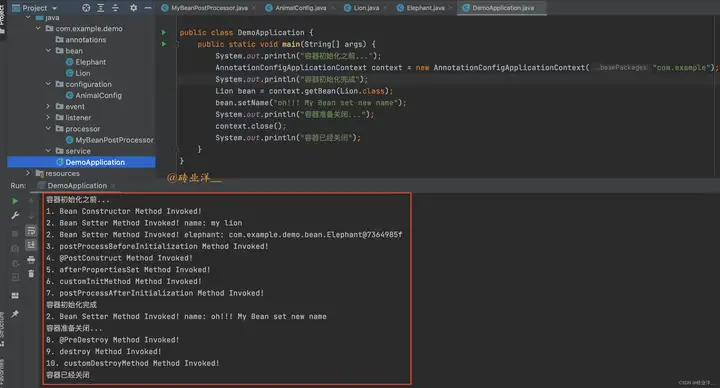
根據列印日誌我們可以分析出
- 首先,Bean Constructor Method Invoked! 表明 Lion 的構造器被調用,創建了一個新的 Lion 實例。
- 接著,Bean Setter Method Invoked! name: my lion 和 Bean Setter Method Invoked! elephant: com.example.demo.bean.Elephant@7364985f 說明 Spring 對 Lion 實例的依賴註入。在這一步,Spring 調用了 Lion 的 setter 方法,為 name 屬性設置了值 “my lion”,同時為 elephant 屬性註入了一個 Elephant 實例。
- 然後,postProcessBeforeInitialization Method Invoked! 說明 MyBeanPostProcessor 的 postProcessBeforeInitialization 方法被調用,這是在初始化 Lion 實例之前。
- @PostConstruct Method Invoked! 說明 @PostConstruct 註解的方法被調用,這是在 Bean 初始化之後,但是在 Spring 執行任何進一步初始化之前。
- afterPropertiesSet Method Invoked! 說明 Spring 調用了 InitializingBean 的 afterPropertiesSet 方法
- customInitMethod Method Invoked! 表示調用了 Lion 實例的 init-method 方法。
- postProcessAfterInitialization Method Invoked! 說明 MyBeanPostProcessor 的 postProcessAfterInitialization 方法被調用,這是在初始化 Lion 實例之後。
然後 Spring 完成了整個初始化過程。 - 主程式中手動調用了 Lion 實例的 setter 方法,因此在 Bean Setter Method Invoked! name: oh!!! My Bean set new name 可見,name 屬性被設置了新的值 "oh!!! My Bean set new name"。
當容器準備關閉時: - @PreDestroy Method Invoked! 說明 @PreDestroy 註解的方法被調用,這是在 Bean 銷毀之前。
- destroy Method Invoked! 表示 Lion 實例開始銷毀。在這一步,Spring 調用了 DisposableBean 的 destroy 方法。
- customDestroyMethod Method Invoked! 表示 Lion 實例開始銷毀,調用了Lion 實例的 destroy-method 方法。
最後,Spring 完成了整個銷毀過程,容器關閉。
這個日誌提供了 Spring Bean 生命周期的完整視圖,顯示了從創建到銷毀過程中的所有步驟。
註意:DisposableBean 的 destroy 方法和 destroy-method 方法調用,這個銷毀過程不意味著bean實例就被立即從記憶體中刪除了,Java的垃圾收集機制決定了對象什麼時候被從記憶體中刪除。Spring容器無法強制進行這個操作,比如解除bean之間的關聯和清理緩存,這並不是Spring在銷毀bean時會做的,而是由Java的垃圾回收器在一個對象不再被引用時做的事情。
BeanPostProcessor 的執行順序是在 Spring Bean 的生命周期中非常重要的一部分。例如,如果一個 Bean 實現了 InitializingBean 介面,那麼 afterPropertiesSet 方法會在所有的 BeanPostProcessor 的 postProcessBeforeInitialization 方法之後調用,以確保所有的前置處理都完成了。同樣,BeanPostProcessor 的 postProcessAfterInitialization 方法會在所有的初始化回調方法之後調用,以確保 Bean 已經完全初始化了。
我們可以註冊多個 BeanPostProcessor。在這種情況下,Spring 會按照它們的 Ordered 介面或者 @Order 註解指定的順序來調用這些後置處理器。如果沒有指定順序,那麼它們的執行順序是不確定的。
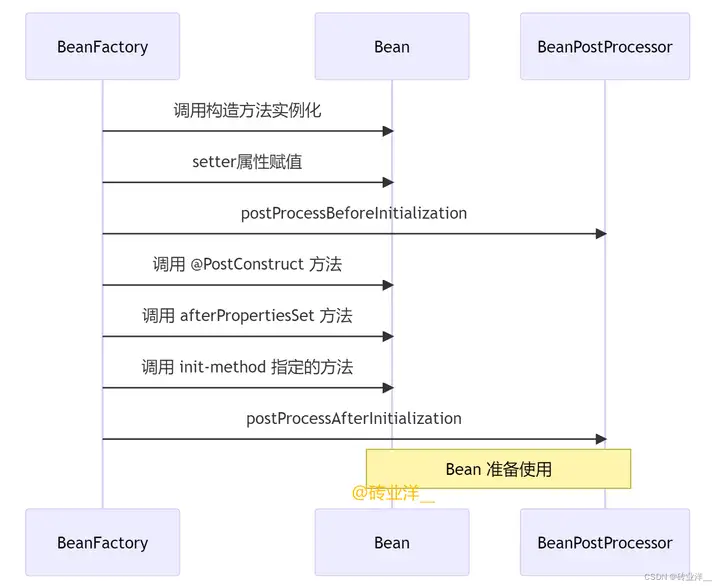
3.2 圖解:Bean生命周期與後置處理器的交互時序
綜合上面的執行結果,我們來總結一下,下麵是Spring Bean生命周期的時序圖,它詳細地描繪了Spring Bean從實例化到準備使用的整個過程,包括Bean的實例化、屬性賦值、生命周期方法的執行和後置處理器的調用。
