本篇博文對接上篇末尾處WPF常用佈局控制項的綜合應用,為[痕跡g](https://www.cnblogs.com/zh7791/p/11369020.html)佈局控制項介紹課後作業的一種思路方法。 ...
本篇博文對接上篇末尾處WPF常用佈局控制項的綜合應用,為痕跡g佈局控制項介紹課後作業的一個思路方法。
前言
首先來談一談佈局原則:
WPF視窗只能包含一個元素(Window元素屬於內容控制項,內容控制項只允許有一個子元素),所以我們得在視窗中放置一個容器,才能使我們的視窗放置更多的內容。
所以在WPF中,佈局由容器決定,使用容器佈局需要註意以下幾點:
- 不要顯示設置元素的尺寸:可以通過設置最大和最小尺寸來限定範圍。
- 不要使用屏幕坐標來指定元素位置:根據元素在那種容器中,來合理安排元素的位置。如需要元素之間留白,可以使用Margin設置邊距。
- 可以嵌套佈局容器:新建
WPF程式會預設提供一個Grid容器,但是我們仍可在Grid中添加容器來安排我們的佈局。
一般的佈局流程可以概括為以下幾步:
- 確定佈局需求:根據
UI設計和功能需求,確定所需的佈局方式和控制項組織結構。 - 選擇合適的佈局容器:根據佈局需求選擇適合的佈局容器,如
Grid、StackPanel、WrapPanel等。 - 設置佈局屬性:使用佈局屬性控制控制項在容器中的位置、大小、對齊方式等。
- 嵌套佈局容器:根據需要,嵌套多個佈局容器以實現複雜的佈局效果。
- 調試和優化佈局:使用佈局調試工具,如佈局邊框和佈局分隔器,對佈局進行調試和優化,確保佈局效果符合預期。
常用佈局面板回顧:
| Name | Description |
|---|---|
Grid |
根據一個不可見的表格在行和列中安排元素,最靈活容器之一。 |
StackPanel |
在水平或垂直的堆棧中放置元素,多用於複雜視窗中的一些小區域。 |
WrapPanel |
自適應款高度並自動換行 |
DockPanel |
根據容器的整個邊界調整元素 |
Uniform |
Grid 簡化版,強制所有單元格具有相同尺寸。 |
Canvas |
最基本的面板,只是一個存儲控制項的容器,使用固定的坐標絕對定位元素 |
常用佈局屬性:
| Property | Description |
|---|---|
HorizontalAlignment |
用於設置子元素在容器中的水平位置 - Center、Left、Right、Stretch |
VerticalAlignment |
用於設置子元素在容器中的垂直位置 - Center、Top、Bottom、Stretch |
Margin |
用於指定元素與其父級或同級之間的距離 - 4個方向的邊距(左、上、右、下)使用,可以同時設置4個相同邊距、也可以單獨設置每條邊的邊距 |
Padding |
用於指定元素與其子級之間的距離 - 4個方向的邊距(左、上、右、下)使用,可以同時設置4個相同邊距、也可以單獨設置每條邊的邊距 |
佈局詳解
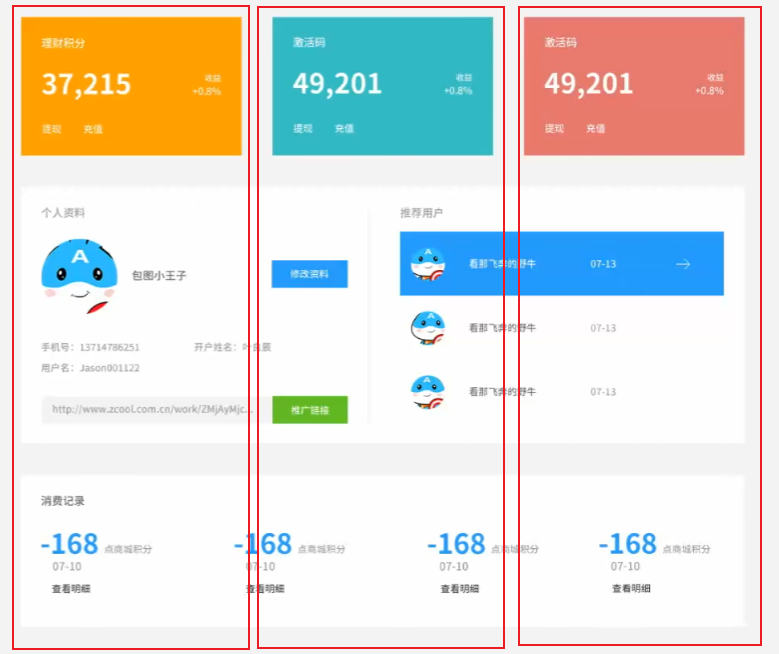
作業頁面佈局如下:
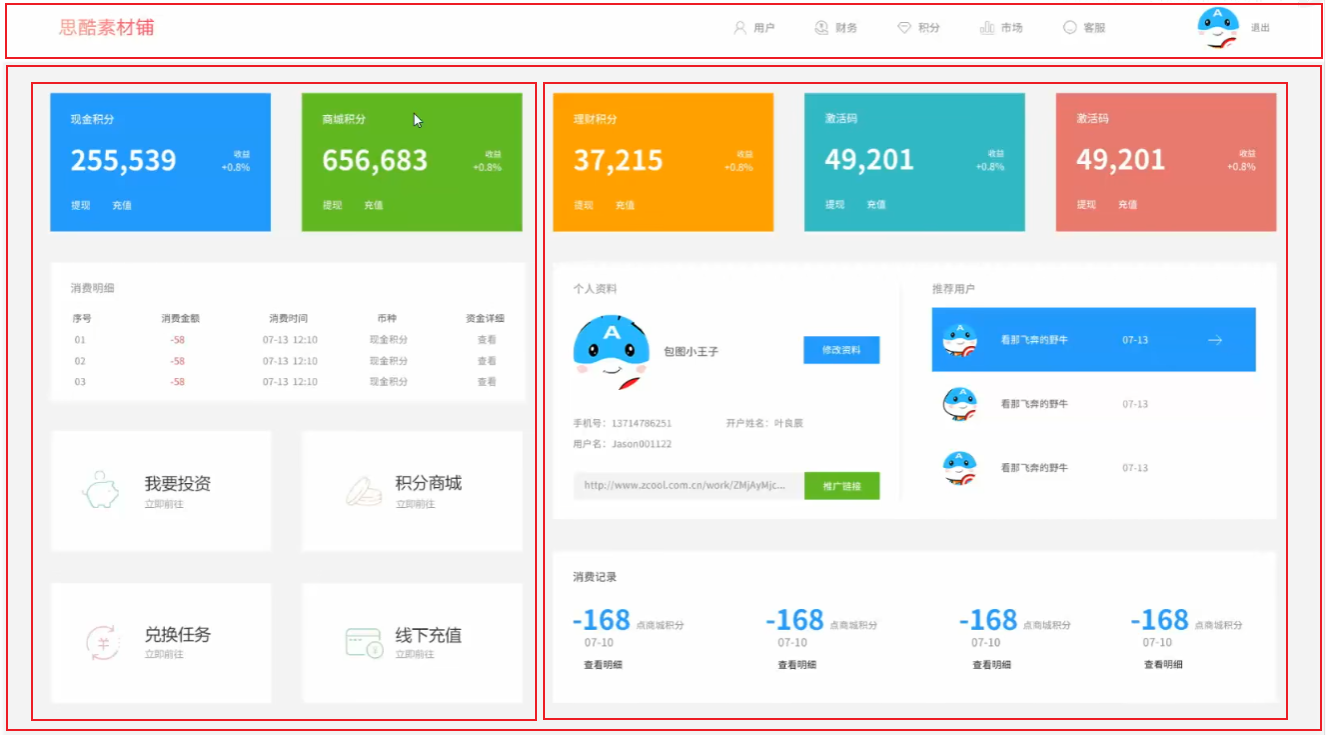
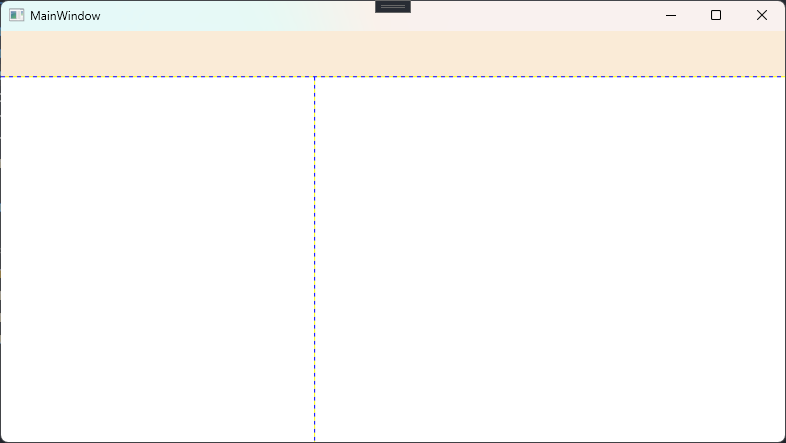
大致上可以劃分為圖示中的兩行一列的佈局,然後再細化(這裡為了方便查看,我把表格線顯示了出來):
<Window x:Class="HELLOWPF.MainWindow"
        xmlns="http://schemas.microsoft.com/winfx/2006/xaml/presentation"
        xmlns:x="http://schemas.microsoft.com/winfx/2006/xaml"
        xmlns:d="http://schemas.microsoft.com/expression/blend/2008"
        xmlns:mc="http://schemas.openxmlformats.org/markup-compatibility/2006"
        xmlns:local="clr-namespace:HELLOWPF"
        mc:Ignorable="d"
        Title="MainWindow" Height="450" Width="800">
    <Grid ShowGridLines="True">
        <Grid.RowDefinitions>
            <RowDefinition Height="*"/>
            <RowDefinition Height="8*"/>
        </Grid.RowDefinitions>

        <Border Background="AntiqueWhite"/>

        <Grid Grid.Row="1" ShowGridLines="True">
            <Grid.ColumnDefinitions>
                <ColumnDefinition Width="4*"/>
                <ColumnDefinition Width="6*"/>
            </Grid.ColumnDefinitions>
        </Grid>
    </Grid>
</Window>
然後完成子元素的佈局,左邊是個四行兩列的佈局:
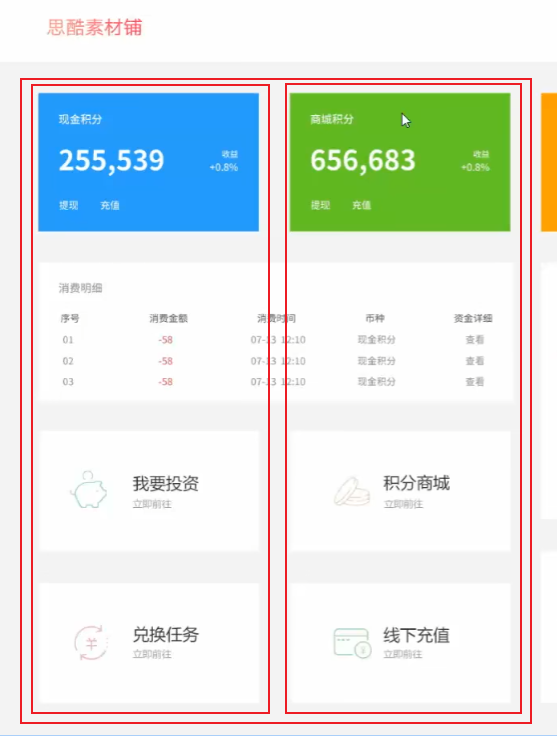
<Grid Grid.Column="0" ShowGridLines="True">
    <Grid.RowDefinitions>
        <RowDefinition/>
        <RowDefinition/>
        <RowDefinition/>
        <RowDefinition/>
    </Grid.RowDefinitions>
    <Grid.ColumnDefinitions>
        <ColumnDefinition/>
        <ColumnDefinition/>
    </Grid.ColumnDefinitions>

    <Border Margin="10" Background="#219afd"/>
    <Border Margin="10" Background="#61b721" Grid.Row="0" Grid.Column="1"/>
    <Border Margin="10" Background="AntiqueWhite" Grid.Row="1" Grid.ColumnSpan="2"/>
    <Border Margin="10" Background="AntiqueWhite" Grid.Row="2" Grid.Column="0"/>
    <Border Margin="10" Background="AntiqueWhite" Grid.Row="2" Grid.Column="1"/>
    <Border Margin="10" Background="AntiqueWhite" Grid.Row="3" Grid.Column="0"/>
    <Border Margin="10" Background="AntiqueWhite" Grid.Row="3" Grid.Column="1"/>
</Grid>
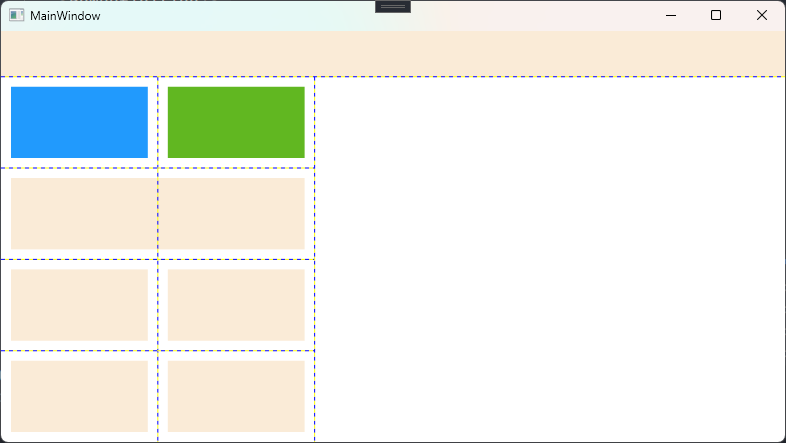
右邊是個四行三列的佈局,也可以通過設置行高的比例設計為三行三列的佈局:
<Grid Grid.Row="1" Grid.Column="1" ShowGridLines="True">
    <Grid.RowDefinitions>
        <RowDefinition Height="*"/>
        <RowDefinition Height="2*"/>
        <RowDefinition Height="*"/>
    </Grid.RowDefinitions>

    <Grid.ColumnDefinitions>
        <ColumnDefinition/>
        <ColumnDefinition/>
        <ColumnDefinition/>
    </Grid.ColumnDefinitions>
    <Border Margin="10" Background="#ffa000"/>
    <Border Margin="10" Background="#30b8c4" Grid.Column="1"/>
    <Border Margin="10" Background="#e87a6e" Grid.Column="2"/>
    <Border Margin="10" Background="AntiqueWhite" Grid.Row="1" Grid.ColumnSpan="3"/>
    <Border Margin="10" Background="AntiqueWhite" Grid.Row="2" Grid.Column="0"/>
    <Border Margin="10" Background="AntiqueWhite" Grid.Row="2" Grid.Column="1"/>
    <Border Margin="10" Background="AntiqueWhite" Grid.Row="2" Grid.Column="2"/>
</Grid>
這樣就初步完成了這個頁面的佈局:
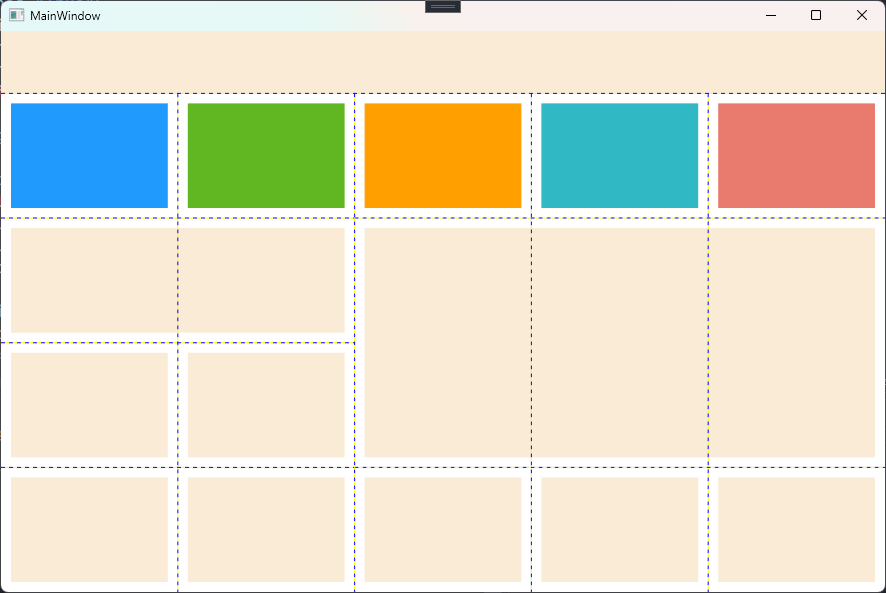
<Window x:Class="HELLOWPF.MainWindow"
        xmlns="http://schemas.microsoft.com/winfx/2006/xaml/presentation"
        xmlns:x="http://schemas.microsoft.com/winfx/2006/xaml"
        xmlns:d="http://schemas.microsoft.com/expression/blend/2008"
        xmlns:mc="http://schemas.openxmlformats.org/markup-compatibility/2006"
        xmlns:local="clr-namespace:HELLOWPF"
        mc:Ignorable="d"
        Title="MainWindow" Height="600" Width="900">
    <Grid ShowGridLines="True">
        <Grid.RowDefinitions>
            <RowDefinition Height="*"/>
            <RowDefinition Height="8*"/>
        </Grid.RowDefinitions>

        <Border Background="AntiqueWhite"/>

        <Grid Grid.Row="1" ShowGridLines="True">
            <Grid.ColumnDefinitions>
                <ColumnDefinition Width="4*"/>
                <ColumnDefinition Width="6*"/>
            </Grid.ColumnDefinitions>

            <Grid Grid.Column="0" ShowGridLines="True">
                <Grid.RowDefinitions>
                    <RowDefinition/>
                    <RowDefinition/>
                    <RowDefinition/>
                    <RowDefinition/>
                </Grid.RowDefinitions>
                <Grid.ColumnDefinitions>
                    <ColumnDefinition/>
                    <ColumnDefinition/>
                </Grid.ColumnDefinitions>

                <Border Margin="10" Background="#219afd"/>
                <Border Margin="10" Background="#61b721" Grid.Row="0" Grid.Column="1"/>
                <Border Margin="10" Background="AntiqueWhite" Grid.Row="1" Grid.ColumnSpan="2"/>
                <Border Margin="10" Background="AntiqueWhite" Grid.Row="2" Grid.Column="0"/>
                <Border Margin="10" Background="AntiqueWhite" Grid.Row="2" Grid.Column="1"/>
                <Border Margin="10" Background="AntiqueWhite" Grid.Row="3" Grid.Column="0"/>
                <Border Margin="10" Background="AntiqueWhite" Grid.Row="3" Grid.Column="1"/>

            </Grid>
            <Grid Grid.Row="1" Grid.Column="1" ShowGridLines="True">
                <Grid.RowDefinitions>
                    <RowDefinition Height="*"/>
                    <RowDefinition Height="2*"/>
                    <RowDefinition Height="*"/>
                </Grid.RowDefinitions>

                <Grid.ColumnDefinitions>
                    <ColumnDefinition/>
                    <ColumnDefinition/>
                    <ColumnDefinition/>
                </Grid.ColumnDefinitions>
                <Border Margin="10" Background="#ffa000"/>
                <Border Margin="10" Background="#30b8c4" Grid.Column="1"/>
                <Border Margin="10" Background="#e87a6e" Grid.Column="2"/>
                <Border Margin="10" Background="AntiqueWhite" Grid.Row="1" Grid.ColumnSpan="3"/>
                <Border Margin="10" Background="AntiqueWhite" Grid.Row="2" Grid.Column="0"/>
                <Border Margin="10" Background="AntiqueWhite" Grid.Row="2" Grid.Column="1"/>
                <Border Margin="10" Background="AntiqueWhite" Grid.Row="2" Grid.Column="2"/>
            </Grid>
        </Grid>
    </Grid>
</Window>


