
Docker 是一個開源的應用容器引擎,可以讓開發者將應用程式打包成一個容器,並通過容器來部署、運行和管理應用程式。Docker 的核心概念包括容器和鏡像。容器是鏡像的可運行實例,可以通過 Docker API 或 CLI 來創建、啟動、停止、移動或刪除容器。鏡像是一個只讀模板,包含了創建 Dock... ...
註: 該章節主要為原創內容,為後續的Spring MVC內容做一個先行鋪墊
1.Servlet的構建使用
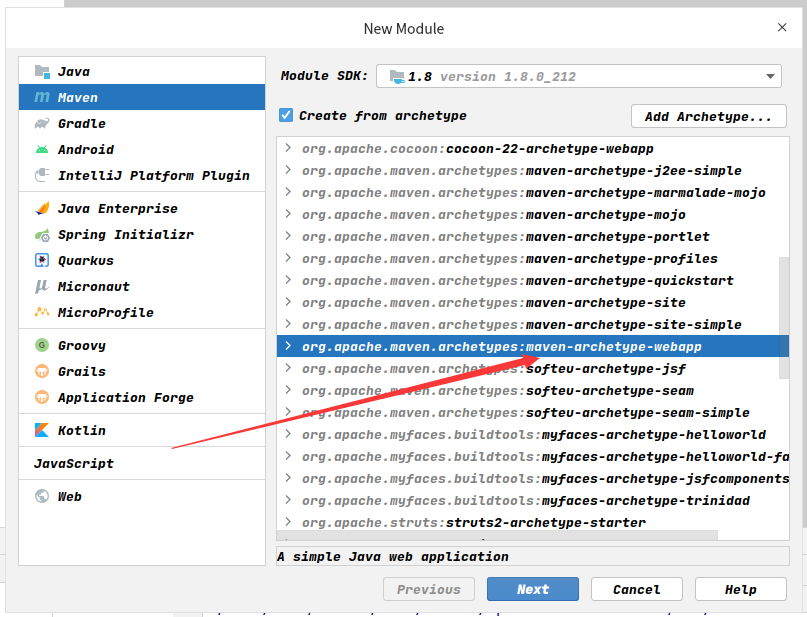
(1) 選擇Maven -> webapp來構建一個web應用
(2) 構建好後,打開pom.xml文件,一要註意打包方式為war包,二導入servlet依賴,如下
<!-- 打war包 -->
<packaging>war</packaging>

<!-- 導入servlet依賴 -->
<dependencies>
  <dependency>
    <groupId>javax.servlet</groupId>
    <artifactId>javax.servlet-api</artifactId>
    <version>3.1.0</version>
    <scope>provided</scope>
  </dependency>
</dependencies>
(3) 替換webapp/WEB-INF/web.xml文件為如下內容,採用Servlet 3.1版本
<?xml version="1.0" encoding="UTF-8"?>
<web-app xmlns="http://xmlns.jcp.org/xml/ns/javaee"
         xmlns:xsi="http://www.w3.org/2001/XMLSchema-instance"
         xsi:schemaLocation="http://xmlns.jcp.org/xml/ns/javaee
                             http://xmlns.jcp.org/xml/ns/javaee/web-app_3_1.xsd"
         version="3.1">

</web-app>
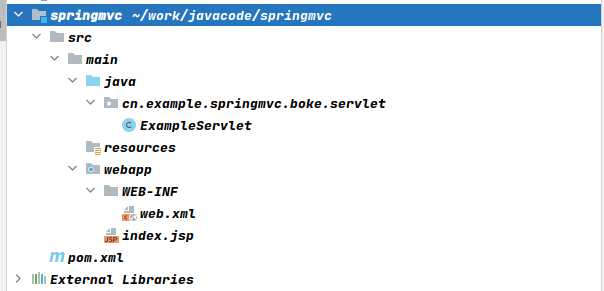
(4) 在main目錄下,新建java目錄和resources目錄,併在java目錄下新建包,最終項目目錄結構如下
(5) 編寫一個簡單的servlet如下
@WebServlet("/example")
public class ExampleServlet extends HttpServlet {

    @Override
    protected void doGet(HttpServletRequest req, HttpServletResponse resp) throws ServletException, IOException {
        resp.getWriter().write("example...");
    }
}
(6) 有了servlet後,我們得讓伺服器知道哪個請求要交給哪個servlet處理,因此還需要配置web.xml如下
<!-- web.xml中 -->
<web-app ...>
    <!-- 配置servlet,給指定的servlet取一個名字 -->
    <servlet>
        <servlet-name>exampleServlet</servlet-name>
        <servlet-class>cn.example.springmvc.boke.servlet.ExampleServlet</servlet-class>
    </servlet>

    <!-- 配置哪個請求交由哪個servlet來進行處理,這裡為了方便使用 / ,即攔截所有的請求都交由exampleServlet來處理 -->
    <servlet-mapping>
        <servlet-name>exampleServlet</servlet-name>
        <url-pattern>/</url-pattern>
    </servlet-mapping>
</web-app>
(7) 然後,為了能夠在網頁上訪問,我們得把這個項目部署到tomcat伺服器中
首先,在URL欄中,添加上項目名稱,此處為springmvc

然後,在Deployment中添加我們的項目
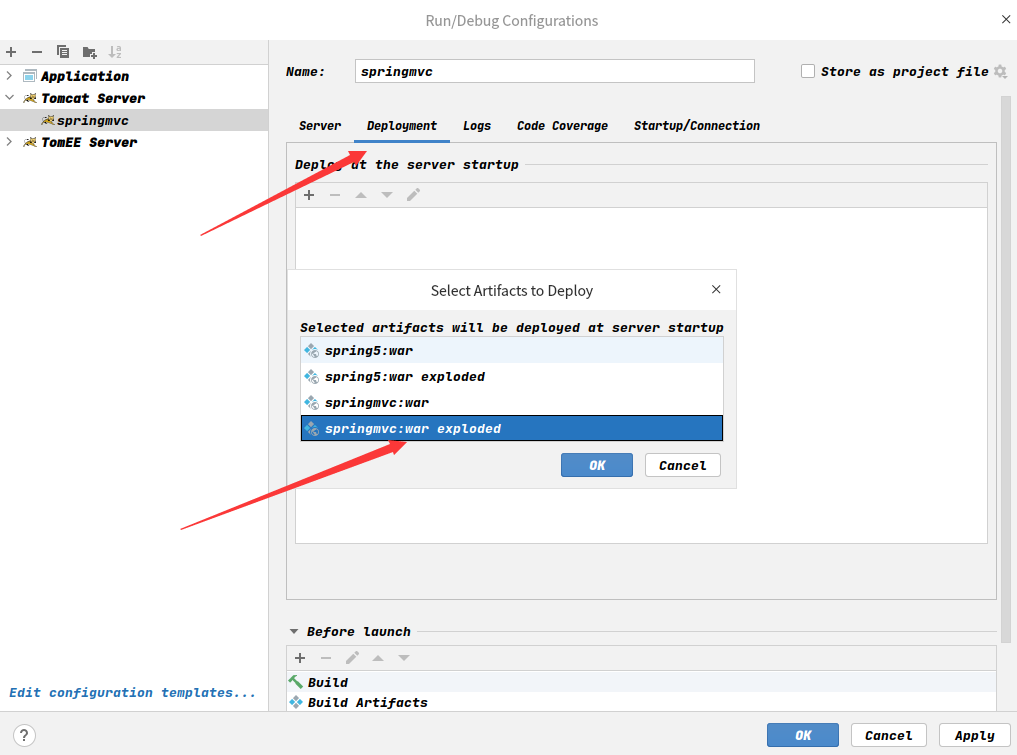
最後,註意 Application Context 中的值,應與前面在URL欄中添加的項目名稱相同,此處均為springmvc

(8) 最後,啟動tomcat伺服器,在瀏覽器上輸入 http://localhost:8080/springmvc/example ,如果能看到 example... 字元串,則說明項目配置成功
2.基於web.xml,整合Spring與Servlet
(1) 現在,web應用已經搭建好了,但是我們希望能夠在該應用中使用Spring容器,該怎麼辦呢? 在之前的非web環境中,我們都是在main方法中創建ioc容器(如 new ClassPathXmlApplicationContext()),然後直接使用的,但是現在沒有了main方法,該由誰來創建ioc容器呢? 答案就是由我們的web容器,可以在web應用初始化的時候來幫助我們創建,但創建好之後,我們該怎麼獲取到ioc容器呢? Servlet規定了4大作用域,分別為page域(PageContext),當前頁面有效; request域(HttpServletContext),一次請求內有效; session域(HttpSession),一次會話內有效; application域(ServletContext),在當前整個web應用內有效,因此我們可以將創建好的ioc容器直接放到application域中,這樣在任何位置,我們都能拿到ioc容器進行使用,具體示例如下
首先導入相關的Spring依賴包
<dependencies>
  <dependency>
    <groupId>org.springframework</groupId>
    <artifactId>spring-context</artifactId>
    <version>5.2.22.RELEASE</version>
  </dependency>

  <dependency>
    <groupId>org.springframework</groupId>
    <artifactId>spring-web</artifactId>
    <version>5.2.22.RELEASE</version>
  </dependency>
</dependencies>
接著,修改我們的代碼,配置一個普通的bean
//創建一個普通的java類
public class ExampleService {
    public String get() {
        return "user";
    }
}

//然後,在resources目錄下新建一個springmvc.xml,並將上面的ExampleService註冊為一個bean
<beans ....>
    <bean class="cn.example.springmvc.boke.service.ExampleService"></bean>
</beans>
接下來,我們就得讓web容器來為我們創建ioc容器了,具體由誰來創建呢? Servlet有三大核心組件,即Servlet,用於處理請求;Filter,過濾器,用來攔截或修改請求;Listener,監聽器,用於監聽某個事件。顯然,這裡使用Listener最合適,那就由Listener來為我們創建ioc容器
<!-- web.xml中 -->
<!-- 當然,具體的Listener實現類代碼是不需要由我們來寫的,因為Spring早已內置了一個監聽器(ContextLoaderListener),就是用於在基於web.xml的配置中來初始化ioc容器 -->
<web-app ....>
   <!-- ContextLoaderListener實現了ServletContextListener,而這個ServletContextListener就是用於監聽web應用的生命周期的,當web容器啟動或終止web應用的時候,會觸發ServletContextEvent事件,而該事件就會由ServletContextListener來處理,因此ContextLoaderListener就會在web應用啟動的同時創建ioc容器,載入配置文件,具體可詳見源碼 -->
    <listener>
        <listener-class>org.springframework.web.context.ContextLoaderListener</listener-class>
    </listener>

    <!-- 註意:如果未指定配置文件的路徑,那麼預設會尋找/WEB-INF/applicationContext.xml配置文件,如果這個配置文件找不到,啟動時就會報錯
    基於web.xml的配置所創建的ioc容器是基於xml配置的ioc容器(XmlWebApplicationContext),它會在容器啟動的時候讀取載入配置文件 -->
    <context-param>
        <param-name>contextConfigLocation</param-name>
        <param-value>classpath:springmvc.xml</param-value>
    </context-param>

    <servlet>
        <servlet-name>exampleServlet</servlet-name>
        <servlet-class>cn.example.springmvc.boke.servlet.ExampleServlet</servlet-class>
    </servlet>

    <servlet-mapping>
        <servlet-name>exampleServlet</servlet-name>
        <url-pattern>/</url-pattern>
    </servlet-mapping>
</web-app>
現在ioc容器有了,而且被Spring以WebApplicationContext.ROOT_WEB_APPLICATION_CONTEXT_ATTRIBUTE為key放到了application域中,現在我們可以在任何地方被獲取到它,如下所示
@WebServlet("/example")
public class ExampleServlet extends HttpServlet {

    @Override
    protected void doGet(HttpServletRequest req, HttpServletResponse resp) throws ServletException, IOException {
        //獲取application域中的ROOT_WEB_APPLICATION_CONTEXT_ATTRIBUTE屬性值,即我們的ioc容器
        XmlWebApplicationContext ctx = (XmlWebApplicationContext) this.getServletContext().getAttribute(WebApplicationContext.ROOT_WEB_APPLICATION_CONTEXT_ATTRIBUTE);
        //或者也可以使用Spring提供的工具類WebApplicationContextUtils來獲取ioc容器,如下
        //XmlWebApplicationContext ctx = (XmlWebApplicationContext) WebApplicationContextUtils.getWebApplicationContext(this.getServletContext());
        //使用ioc容器,獲取其中的bean
        ExampleService exampleService = ctx.getBean(ExampleService.class);
        resp.getWriter().write(exampleService.get());
    }
}

//最後,重新啟動容器,訪問 http://localhost:8080/springmvc/example,會發現頁面上出現 user 字元串
當然,向上面這樣每次都通過get方法獲取,很麻煩,我們可以藉助Spring提供的工具類,在Servlet初始化的時候對Servlet進行依賴註入,如下
@WebServlet(urlPatterns = "/example")
public class ExampleServlet extends HttpServlet {

    //使用@Autowired註解標註需要進行依賴註入的bean
    @Autowired
    private ExampleService exampleService;

    //Servlet初始化方法
    @Override
    public void init(ServletConfig config) throws ServletException {
        super.init(config);
        //獲取application域
        ServletContext servletContext = config.getServletContext();
        //使用Spring提供的自動註入工具類SpringBeanAutowiringSupport,直接進行依賴註入
        SpringBeanAutowiringSupport.processInjectionBasedOnServletContext(this, servletContext);
    }

    @Override
    protected void doGet(HttpServletRequest req, HttpServletResponse resp) throws ServletException, IOException {
        resp.getWriter().println(exampleService.get());
    }
}
3.基於Servlet擴展介面,整合Spring與Servlet
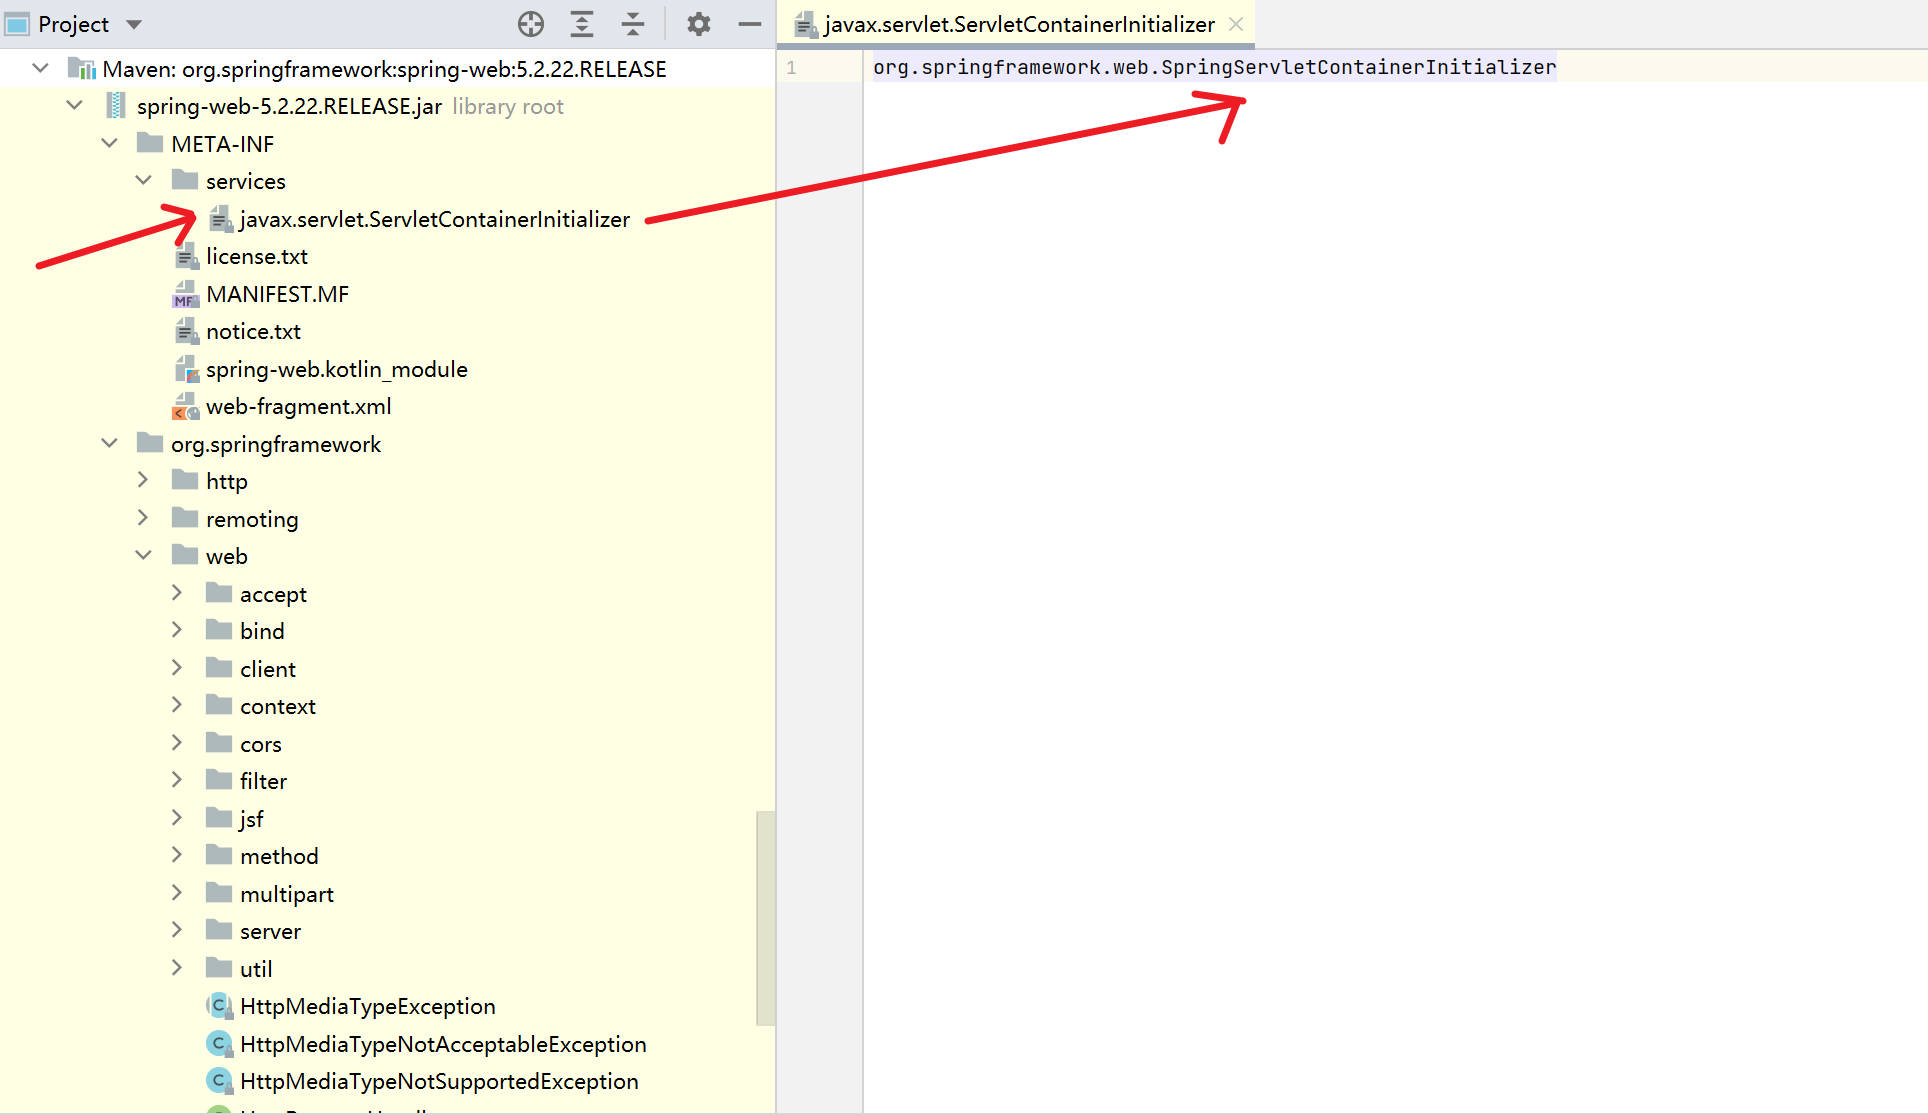
(1) 在上一節中,我們將ioc的創建配置於web.xml中,但此外我們還可以利用java代碼的方式來創建ioc容器,可通過Servlet 3.0提供的ServletContainerInitializer介面,來在web容器啟動的時候為第三方組件提供初始化的機會(例如註冊Servlet等),如果要使用ServletContainerInitializer介面,那麼就必須要在項目或所其依賴的jar包中的/META-INF/services目錄下創建一個名稱為javax.servlet.ServletContainerInitializer 的文件,而這個文件的具體內容,就是ServletContainerInitializer實現類的全限定類名稱,然後,藉助java的SPI技術,web容器便會載入這些實現類,通常情況下,ServletContainerInitializer這個介面通常會配合@HandlesTypes註解一起使用,而這個@HandlesTypes註解的作用就是讓web容器收集我們項目中所有所指定的類,然後將這些類作為ServletContainerInitializer的onStartup方法參數傳入,這樣,在web容器啟動的時候,我們就可以拿到這些我們所需的類然後創建它們
當然,同上面web.xml中的ContextLoaderListener,Spring也提供了一個ServletContainerInitializer介面的實現類SpringServletContainerInitializer,來創建幫助我們簡化ioc容器的創建,首先在spring-mvc jar包中,就定義了一個/META-INF/services/javax.servlet.ServletContainerInitializer文件,然後,在啟動時,web容器便會載入這個文件,讀取裡面的內容,為SpringServletContainerInitializer這個類
由於在SpringServletContainerInitializer上有註解@HandlesTypes標註,而這個註解的值為WebApplicationInitializer,因此,在創建SpringServletContainerInitializer對象前,web容器會收集應用內所有WebApplicationInitializer介面的實現類,並將它們作為參數傳遞給onStartup方法中的webAppInitializerClasses,這樣,在web容器啟動時,我們就能初始化我們所指定的對象
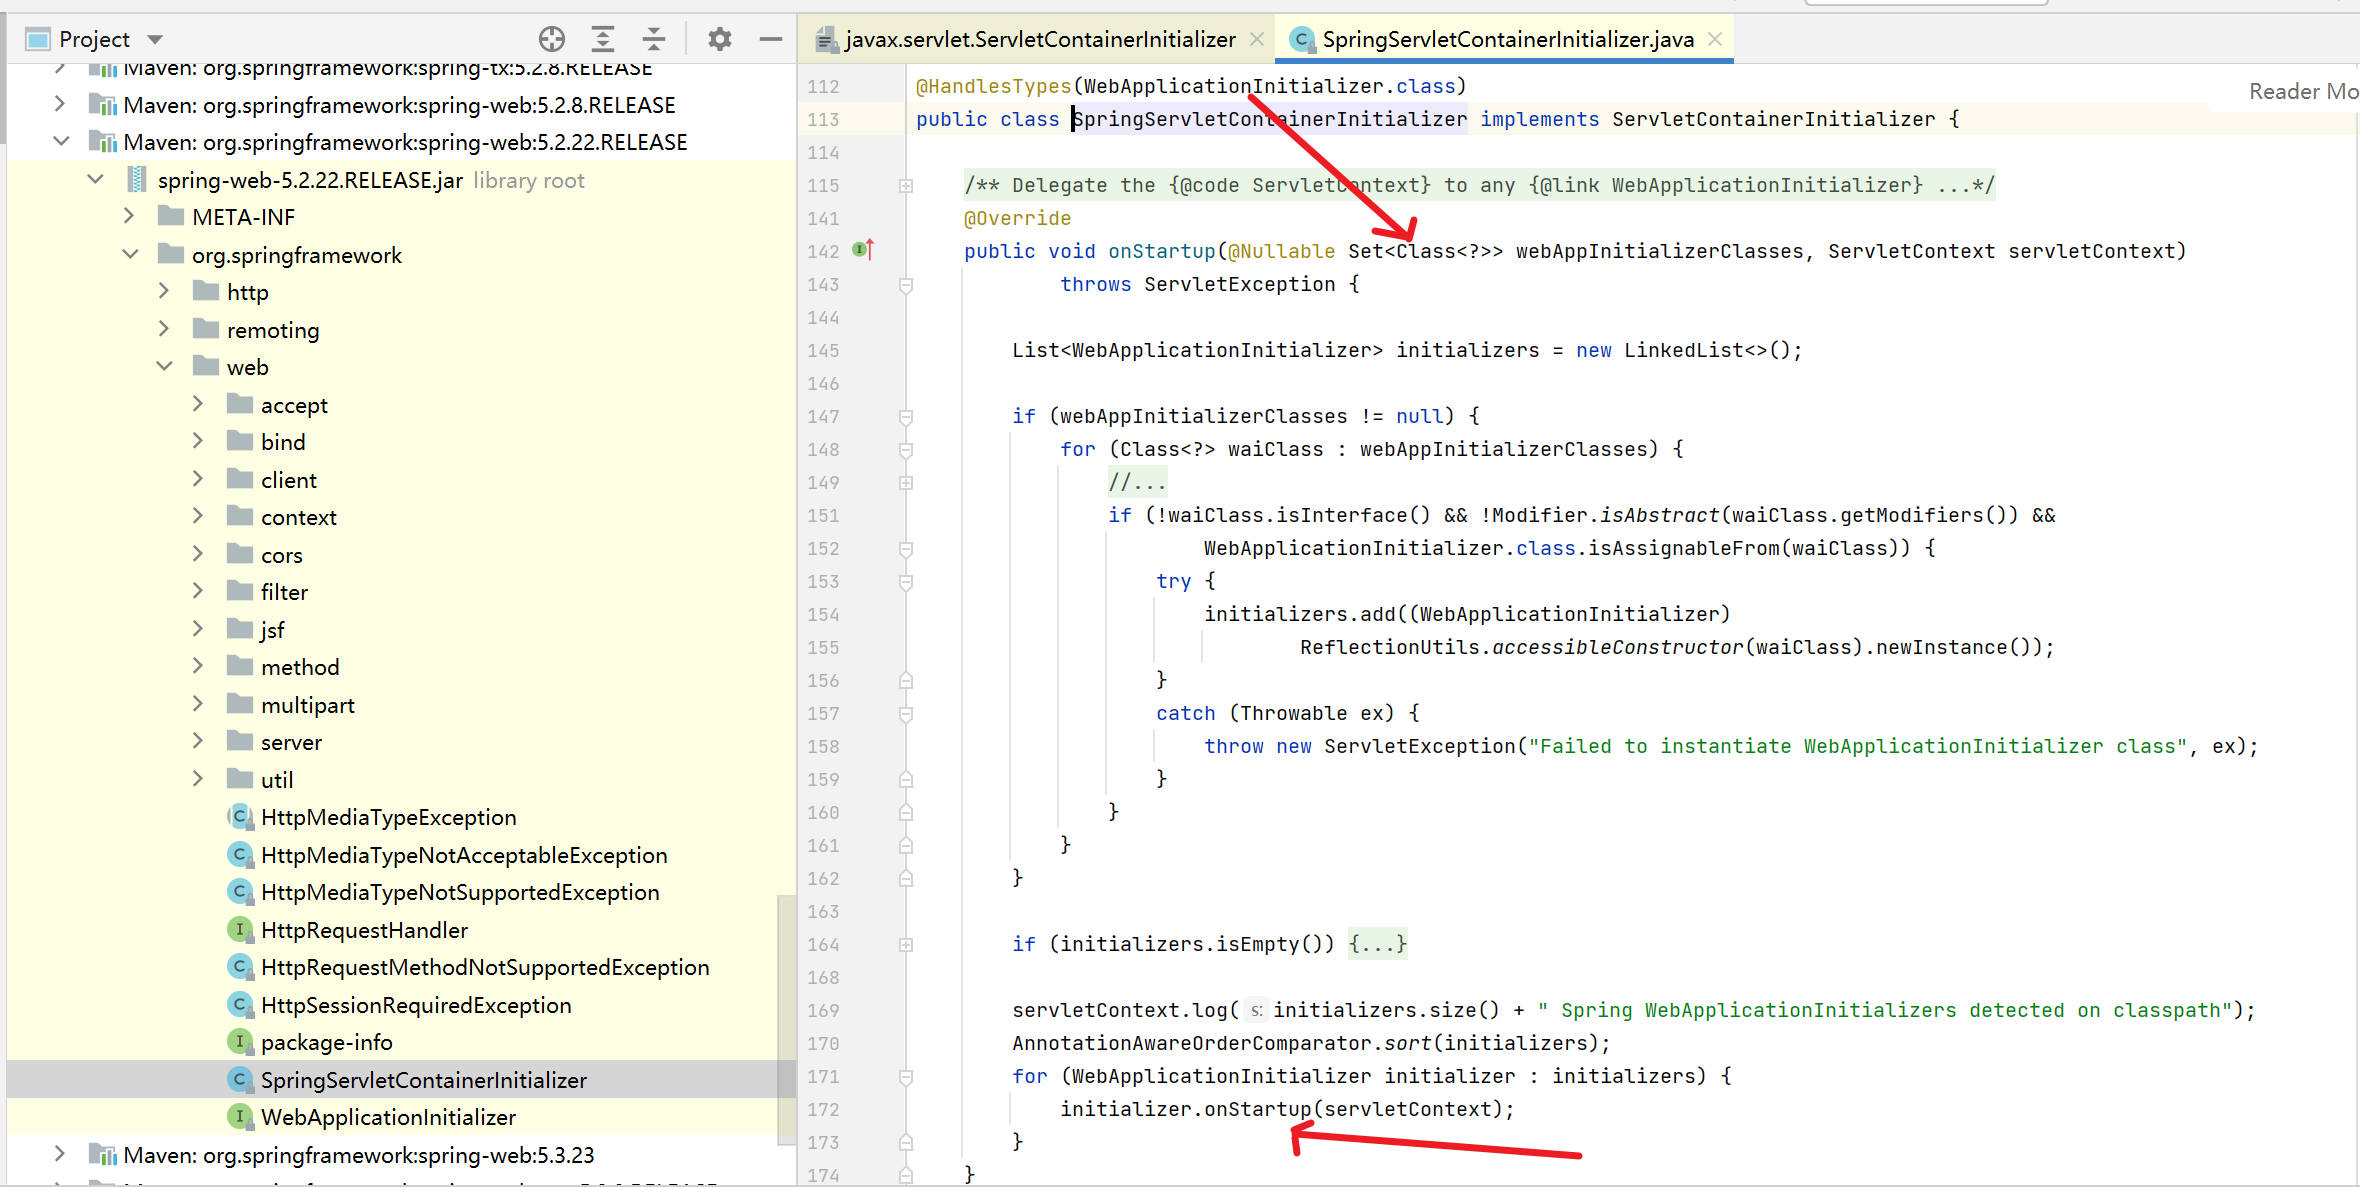
總而言之,在應用啟動時,web容器會調用ServletContainerInitializer實現類(這裡為SpringServletContainerInitializer)中的onStartup方法,而這個onStartup方法中又調用了@HandlesTypes註解所指定的類或介面(此處為WebApplicationInitializer)的實現類中的onStartup方法,因此,我們可以編寫一個WebApplicationInitializer的實現類,來創建ioc容器,不過,Spring已經為我們提供了一個實現了WebApplicationInitializer介面的抽象類AbstractContextLoaderInitializer,它裡面已經封裝好了大部分的邏輯(比如將ioc容器置於application域中等),而我們所需要做的僅僅就是創建一下ioc容器而已,如下
public class IocInit extends AbstractContextLoaderInitializer {
    @Override
    protected WebApplicationContext createRootApplicationContext() {
        XmlWebApplicationContext ctx = new XmlWebApplicationContext();
        ctx.setConfigLocation("classpath:springmvc.xml");
        return ctx;
    }
}
此外,不要忘了註釋掉web.xml中關於Spring的相關內容,否則會產生產生兩個ioc容器
<web-app ....>
<!-- <!– ContextLoaderListener實現了ServletContextListener,而這個ServletContextListener就是用於監聽web應用的生命周期的,當web容器啟動或終止web應用的時候,會觸發ServletContextEvent事件,而該事件就會由ServletContextListener來處理,因此ContextLoaderListener就會在web應用啟動的同時會創建ioc容器,載入配置文件,具體可詳見源碼 –>-->
<!-- <listener>-->
<!-- <listener-class>org.springframework.web.context.ContextLoaderListener</listener-class>-->
<!-- </listener>-->
<!-- <!– 註意:如果未指定配置文件的路徑,那麼預設會尋找/WEB-INF/applicationContext.xml配置文件,如果這個配置文件找不到,啟動時就會報錯-->
<!-- 基於web.xml的配置所創建的ioc容器是基於xml配置的ioc容器(XmlWebApplicationContext),它會在容器啟動的時候讀取載入配置文件 –>-->
<!-- <context-param>-->
<!-- <param-name>contextConfigLocation</param-name>-->
<!-- <param-value>classpath:springmvc.xml</param-value>-->
<!-- </context-param>-->
<servlet>
<servlet-name>exampleServlet</servlet-name>
<servlet-class>cn.example.springmvc.boke.servlet.ExampleServlet</servlet-class>
</servlet>
<servlet-mapping>
<servlet-name>exampleServlet</servlet-name>
<url-pattern>/</url-pattern>
</servlet-mapping>
</web-app>
最後,重啟項目,輸入http://localhost:8080/springmvc/example,看見user字元串則說明成功
4.Spring MVC
現在,我們將Servlet與Spring ioc容器整合到了一起,但如果我們需要處理新的請求的話,我們還得繼承HttpServlet來編寫新的Servlet,並將其配置到web.xml中,非常麻煩,因此,Spring變為我們提供了一個全新的框架 - Spring MVC來幫助我們進行開發


