分析SpringBoot底層機制 Tomcat啟動分析,Spring容器初始化,Tomcat如何關聯Spring容器? 1.創建SpringBoot環境 (1)創建Maven程式,創建SpringBoot環境 (2)pom.xml導入SpringBoot的父工程和依賴 <!--導入SpringBoo ...
分析SpringBoot底層機制
Tomcat啟動分析,Spring容器初始化,Tomcat如何關聯Spring容器?
1.創建SpringBoot環境
(1)創建Maven程式,創建SpringBoot環境
(2)pom.xml導入SpringBoot的父工程和依賴
<!--導入SpringBoot父工程-規定寫法-->
<parent>
    <artifactId>spring-boot-starter-parent</artifactId>
    <groupId>org.springframework.boot</groupId>
    <version>2.5.3</version>
</parent>
<dependencies>
    <!--導入web項目場景啟動器:會自動導入和web開發相關的所有依賴[jar包]-->
    <dependency>
        <groupId>org.springframework.boot</groupId>
        <artifactId>spring-boot-starter-web</artifactId>
    </dependency>
</dependencies>
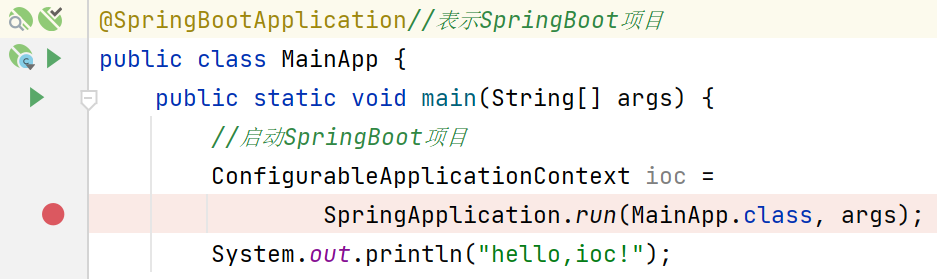
(3)創建主程式MainApp.java
package com.li.springboot;

import org.springframework.boot.SpringApplication;
import org.springframework.boot.autoconfigure.SpringBootApplication;
import org.springframework.context.ConfigurableApplicationContext;

/**
 * @author 李
 * @version 1.0
 */
@SpringBootApplication//表示SpringBoot項目
public class MainApp {
    public static void main(String[] args) {
        //啟動SpringBoot項目
        ConfigurableApplicationContext ioc =
                SpringApplication.run(MainApp.class, args);
    }
}
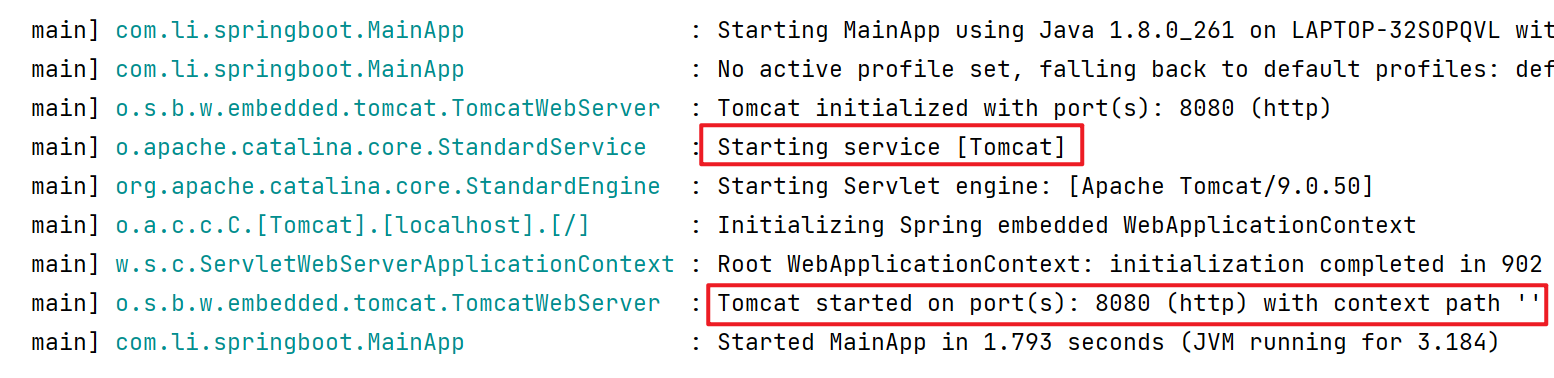
(4)啟動項目,我們可以註意到Tomcat也隨之啟動了。
問題一:當我們執行run方法時,為什麼會啟動我們內置的tomcat?它的底層是如何實現的?
2.Spring容器初始化(@Configuration+@Bean)
我們知道,如果在一個類上添加了註解@Configuration,那麼這個類就會變成配置類;配置類中通過@Bean註解,可以將方法中 new 出來的Bean對象註入到容器中,該bean對象的id預設為方法名。
配置類本身也會作為bean註入到容器中


容器初始化的底層機制仍然是我們之前分析的Spring容器的機制(IO/文件掃描+註解+反射+集合+映射)
對比:
- Spring通過@ComponentScan,指定要掃描的包;而SpringBoot預設從主程式所在的包開始掃描,同時也可以指定要掃描的包(scanBasePackages = {"xxx.xx"})。
- Spring通過xml或者註解,指定要註入的bean;SpringBoot通過掃描配置類(對應spring的xml)的@Bean或者註解,指定註入bean
3.SpringBoot怎樣啟動Tomcat,並能支持訪問@Controller?
由前面的例子1中可以看到,當啟動SpringBoot時,tomcat也會隨之啟動。那麼問題來了:
- SpringBoot是怎麼內嵌Tomcat,並啟動Tomcat的?
- 而且底層是怎樣讓@Controller修飾的控制器也可以被訪問的?
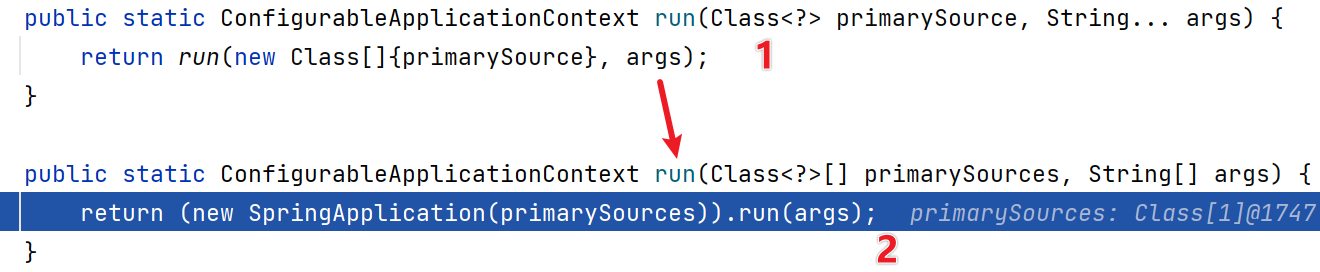
3.1源碼分析SpringApplication.run()
SpringApplication.run()方法會完成兩個重要任務:
- 創建容器
- 容器的刷新:包括參數的刷新+啟動Tomcat
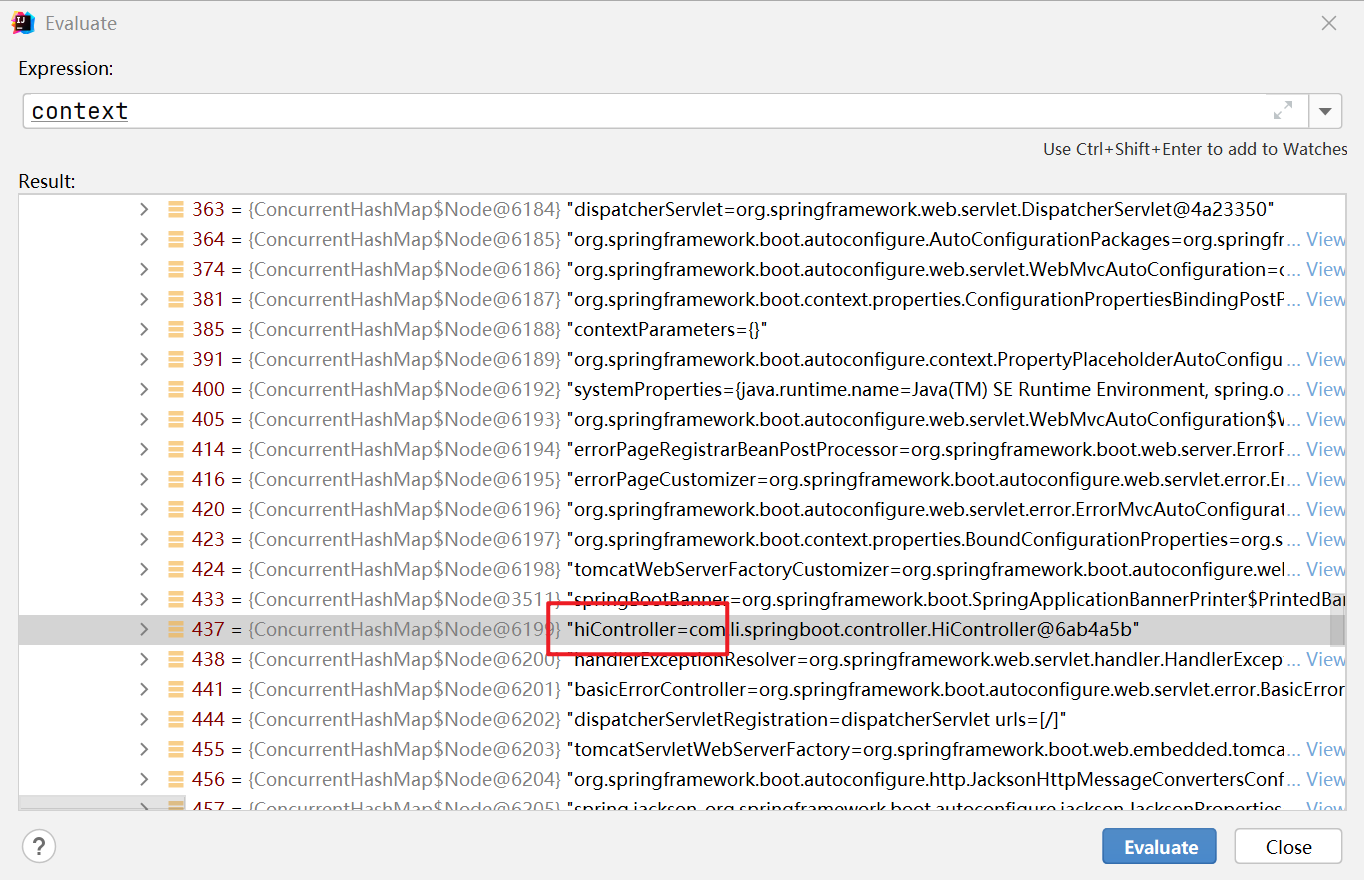
(1)創建一個控制器
package com.li.springboot.controller;

import org.springframework.web.bind.annotation.RequestMapping;
import org.springframework.web.bind.annotation.RestController;

/**
 * @author 李
 * @version 1.0
 * HiController被標註後,作為一個控制器註入容器中
 */
@RestController//相當於@Controller+@ResponseBody
public class HiController {

    @RequestMapping("/hi")
    public String hi() {
        return "hi,HiController";
    }
}
(2)啟動主程式MainApp.java,進行debug
(3)首先進入SpringApplication.java的run方法
(4)點擊step into,進入如下方法
public ConfigurableApplicationContext run(String... args) {
    ...
    try {
        ...
        context = this.createApplicationContext();//嚴重分析,創建容器
        context.setApplicationStartup(this.applicationStartup);
        this.prepareContext(bootstrapContext, context, environment, listeners, applicationArguments, printedBanner);
        this.refreshContext(context);//刷新應用上下文,比如初始化預設設置/註入相關bean/啟動Tomcat
        this.afterRefresh(context, applicationArguments);
        stopWatch.stop();
        ...

    } catch (Throwable var10) {...}
    ...
}
(5)分別對 **createApplicationContext() **和 refreshContext(context) 方法進行分析:
(5.1)step into 進入 **createApplicationContext() ** 方法中:
//springApplication.java
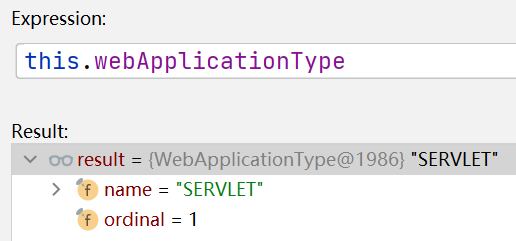
//容器類型很多,會根據你的this.webApplicationType創建對應的容器,預設this.webApplicationType
//的類型為SERVLET,也就是web容器(可以處理servlet)
protected ConfigurableApplicationContext createApplicationContext() {
return this.applicationContextFactory.create(this.webApplicationType);
}
(5.2)點擊進入下一層
//介面 ApplicationContextFactory.java

//該方法根據webApplicationType創建不同的容器
ApplicationContextFactory DEFAULT = (webApplicationType) -> {
    try {
        switch(webApplicationType) {
        case SERVLET://預設進入這一分支,返回
                //AnnotationConfigServletWebServerApplicationContext容器
            return new AnnotationConfigServletWebServerApplicationContext();
        case REACTIVE:
            return new AnnotationConfigReactiveWebServerApplicationContext();
        default:
            return new AnnotationConfigApplicationContext();
        }
    } catch (Exception var2) {
        throw new IllegalStateException("Unable create a default ApplicationContext instance, you may need a custom ApplicationContextFactory", var2);
    }
};
總結:createApplicationContext()方法中創建了容器,但是還沒有將bean註入到容器中。
(5.3)step into 進入 refreshContext(context) 方法中:
//springApplication.java
private void refreshContext(ConfigurableApplicationContext context) {
    if (this.registerShutdownHook) {
        shutdownHook.registerApplicationContext(context);
    }

    this.refresh(context);//核心,真正執行相關任務
}
(5.4)在this.refresh(context);這一步進入下一層:
//springApplication.java
protected void refresh(ConfigurableApplicationContext applicationContext) {
    applicationContext.refresh();
}
(5.5)繼續進入下一層:
protected void refresh(ConfigurableApplicationContext applicationContext) {
    applicationContext.refresh();
}
(5.6)繼續進入下一層:
//ServletWebServerApplicationContext.java
public final void refresh() throws BeansException, IllegalStateException {
    try {
        super.refresh();
    } catch (RuntimeException var3) {
        WebServer webServer = this.webServer;
        if (webServer != null) {
            webServer.stop();
        }

        throw var3;
    }
}
(5.7)在super.refresh();這一步進入下一層:
//AbstractApplicationContext.java

@Override
public void refresh() throws BeansException, IllegalStateException {
   synchronized (this.startupShutdownMonitor) {
      StartupStep contextRefresh = this.applicationStartup.start("spring.context.refresh");
     ...
      try {
        ...
         // Initialize other special beans in specific context subclasses.
         //在上下文的子類初始化指定的bean
         onRefresh(); //當父類完成通用的工作後,再重新用動態綁定機制回到子類
        ...
      }

      catch (BeansException ex) {...}

      finally {...}
   }
}
(5.8)在onRefresh();這一步step into,會重新返回上一層:
//ServletWebServerApplicationContext.java
protected void onRefresh() {
    super.onRefresh();

    try {
        this.createWebServer();//創建一個webserver,可以理解成創建我們指定的web服務-Tomcat
    } catch (Throwable var2) {
        throw new ApplicationContextException("Unable to start web server", var2);
    }
}
(5.9)在this.createWebServer();這一步step into:
//ServletWebServerApplicationContext.java
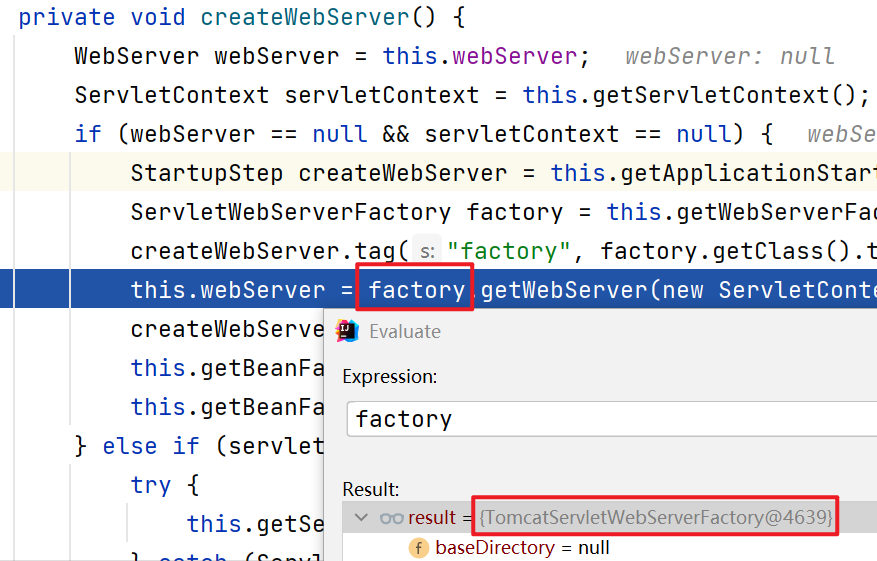
private void createWebServer() {
WebServer webServer = this.webServer;
ServletContext servletContext = this.getServletContext();
if (webServer == null && servletContext == null) {
StartupStep createWebServer = this.getApplicationStartup().start("spring.boot.webserver.create");
ServletWebServerFactory factory = this.getWebServerFactory();
createWebServer.tag("factory", factory.getClass().toString());
this.webServer = factory.getWebServer(new ServletContextInitializer[]{this.getSelfInitializer()});//使用TomcatServletWebServerFactory創建一個TomcatWebServer
createWebServer.end();
this.getBeanFactory().registerSingleton("webServerGracefulShutdown", new WebServerGracefulShutdownLifecycle(this.webServer));
this.getBeanFactory().registerSingleton("webServerStartStop", new WebServerStartStopLifecycle(this, this.webServer));
} else if (servletContext != null) {
try {
this.getSelfInitializer().onStartup(servletContext);
} catch (ServletException var5) {
throw new ApplicationContextException("Cannot initialize servlet context", var5);
}
}
this.initPropertySources();
}
(5.10)在this.webServer = factory.getWebServer(new ServletContextInitializer[]{this.getSelfInitializer()});這一步step into:
//TomcatServletWebServerFactory.java會創建Tomcat,並啟動Tomcat

public WebServer getWebServer(ServletContextInitializer... initializers) {
    if (this.disableMBeanRegistry) {
        Registry.disableRegistry();
    }

    Tomcat tomcat = new Tomcat();//創建了Tomcat對象,下麵是一系列的初始化任務
    File baseDir = this.baseDirectory != null ? this.baseDirectory : this.createTempDir("tomcat");
    tomcat.setBaseDir(baseDir.getAbsolutePath());
    Connector connector = new Connector(this.protocol);
    connector.setThrowOnFailure(true);
    tomcat.getService().addConnector(connector);
    this.customizeConnector(connector);
    tomcat.setConnector(connector);
    tomcat.getHost().setAutoDeploy(false);
    this.configureEngine(tomcat.getEngine());
    Iterator var5 = this.additionalTomcatConnectors.iterator();

    while(var5.hasNext()) {
        Connector additionalConnector = (Connector)var5.next();
        tomcat.getService().addConnector(additionalConnector);
    }

    this.prepareContext(tomcat.getHost(), initializers);
    return this.getTomcatWebServer(tomcat);
}
(5.11)在return this.getTomcatWebServer(tomcat);這一步step into:
//TomcatServletWebServerFactory.java

//這裡做了埠校驗,創建了TomcatWebServer
protected TomcatWebServer getTomcatWebServer(Tomcat tomcat) {
    return new TomcatWebServer(tomcat, this.getPort() >= 0, this.getShutdown());
}
(5.12)繼續step into進入下一層
//TomcatServletWebServerFactory.java

public TomcatWebServer(Tomcat tomcat, boolean autoStart, Shutdown shutdown) {
    this.monitor = new Object();
    this.serviceConnectors = new HashMap();
    Assert.notNull(tomcat, "Tomcat Server must not be null");
    this.tomcat = tomcat;
    this.autoStart = autoStart;
    this.gracefulShutdown = shutdown == Shutdown.GRACEFUL ? new GracefulShutdown(tomcat) : null;
    this.initialize();//進行初始化,並啟動tomcat
}
(5.13)this.initialize();繼續step into:
//TomcatServletWebServerFactory.java

private void initialize() throws WebServerException {
    logger.info("Tomcat initialized with port(s): " + this.getPortsDescription(false));
    synchronized(this.monitor) {
        try {
            this.addInstanceIdToEngineName();
            Context context = this.findContext();
            context.addLifecycleListener((event) -> {
                if (context.equals(event.getSource()) && "start".equals(event.getType())) {
                    this.removeServiceConnectors();
                }

            });
            this.tomcat.start();//啟動Tomcat!
            this.rethrowDeferredStartupExceptions();

            try {
                ContextBindings.bindClassLoader(context, context.getNamingToken(), this.getClass().getClassLoader());
            } catch (NamingException var5) {
            }

            this.startDaemonAwaitThread();
        } catch (Exception var6) {
            this.stopSilently();
            this.destroySilently();
            throw new WebServerException("Unable to start embedded Tomcat", var6);
        }

    }
}
(6)一路返回上層,然後終於執行完refreshContext(context)方法,此時context為已經註入了bean