這裡給大家分享我在網上總結出來的一些知識,希望對大家有所幫助 最近公司出了一個新的功能模塊(如下圖),大提上可以描述為實現拍照完上傳圖片,拖動四方框拍照完成上傳功能,大體樣子如下圖。但是我找遍了 dcloud 插件市場,找到的插件都是移動背景圖片來實現裁剪的,跟京東的功能是相反的,沒辦法只能自己來實 ...
這裡給大家分享我在網上總結出來的一些知識,希望對大家有所幫助
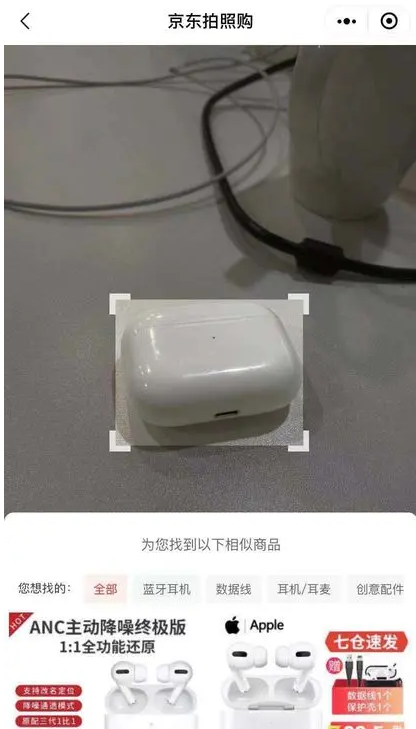
最近公司出了一個新的功能模塊(如下圖),大提上可以描述為實現拍照完上傳圖片,拖動四方框拍照完成上傳功能,大體樣子如下圖。但是我找遍了 dcloud 插件市場,找到的插件都是移動背景圖片來實現裁剪的,跟京東的功能是相反的,沒辦法只能自己來實現這麼一個插件。

第一步
首先就需要實現一個四方框的功能了。從上圖可知,四方框有一下幾個特點
- 四個角粘連外框,隨著框的大小和移動範圍緊縛移動
- 四方框可隨意四個方向拖動
- 方框外區域陰影不影響方框內
那麼我們根據這個特性來實現下這個功能,對於 css 規範的話使用 bem 規範
<div class="clip__content">
  <div v-for="(item, index) in 4" :key="index" class="clip__edge"></div>
</div>
/more
$edge-border-width: 6rpx;
.clip {
  &__content {
    position: fixed;
    width: 400rpx;
    height: 400rpx;
    left: 0;
    top: 0;
    border: 1px solid red;
    z-index: 4;
    overflow: hidden;
    box-shadow: rgba(0, 0, 0, 0.5) 0 0 0 200vh;
  }
  &__edge {
    position: absolute;
    width: 34rpx;
    height: 34rpx;
    border: 10rpx solid red;
    pointer-events: auto;
    z-index: 2;
    &::before {
      content: "";
      position: absolute;
      z-index: 2;
      width: 40rpx;
      height: 40rpx;
      background-color: transparent;
    }
    &:nth-child(1) {
      left: $edge-border-width;
      top: $edge-border-width;
      border-bottom-width: 0 !important;
      border-right-width: 0 !important;
      &:before {
        top: -50%;
        left: -50%;
      }
    }
    &:nth-child(2) {
      right: $edge-border-width;
      top: $edge-border-width;
      border-bottom-width: 0 !important;
      border-left-width: 0 !important;
      &:before {
        top: -50%;
        left: 50%;
      }
    }
    &:nth-child(3) {
      left: $edge-border-width;
      bottom: $edge-border-width;
      border-top-width: 0 !important;
      border-right-width: 0 !important;
      &:before {
        bottom: -50%;
        left: -50%;
      }
    }
    &:nth-child(4) {
      right: $edge-border-width;
      bottom: $edge-border-width;
      border-top-width: 0 !important;
      border-left-width: 0 !important;
      &:before {
        bottom: -50%;
        left: 50%;
      }
    }
  }
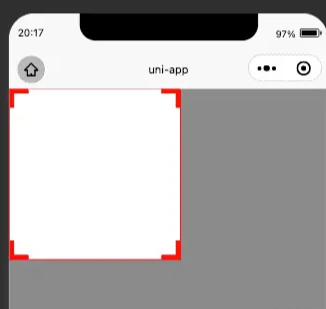
根據上面的 html 和 css 出來的樣式大概如下圖 外部的陰影效果我們用: box-shadow: rgba(0, 0, 0, 0.5) 0 0 0 200vh 來達成

第二步
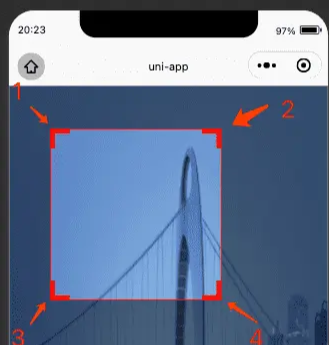
第二步的話就要實現移動功能了,這裡是一個比較考驗耐心的地方,因為涉及到多個方向的變化,需要不斷地進行調試,在此之前需要先分析下四個角變化的特性,下麵先看 4 個角的移動特性(以 H5 思維)
- 第一個角的移動會改變方框的 left,top,width,right4 個值
- 第二個角的移動會改變方框的 top,with,height3 個值
- 第三個角的移動會改變方框的 left, width,height3 個值
- 第四個角的移動會改變方框的 width,height2 個值
- 四個角的移動都不能小於 4 個角的寬高,四個角的移動都不能超過屏幕,相應的邏輯需要做一下限制

首先需要獲取下屏幕寬度,區域高度(因為頭部可能會有導航欄目占位,所以不拿屏幕高度),四方框初始寬高,
uni.getSystemInfo({
  success: res => {
    console.log(res)
    this.systemInfo = res
  }
})
uni
  .createSelectorQuery()
  .select('.clip__content')
  .fields({ size: true }, data => {
    this.width = data.width
    this.height = data.height
  })
  .exec()
uni
  .createSelectorQuery()
  .select('.clip')
  .fields({ size: true }, data => {
    this.screenHeight = data.height
  })
  .exec()
後續的話就可以進行四個角拖拽了,這裡用到了 touchStart 和 touchMove,動態地為方框綁定樣式
<div
  v-for="(item, index) in 4"
  class="clip__edge"
  @touchstart.stop.prevent="edgeTouchStart"
  @touchmove.stop.prevent="e => edgeTouchMove(e, index)"
  @touchend.stop.prevent="edgeTouchEnd"
></div>
接下來開始寫邏輯
edgeTouchStart(e) {
  // 記錄坐標xy初始位置
  this.clientX = e.changedTouches[0].clientX;
  this.clientY = e.changedTouches[0].clientY;
},
edgeTouchMove(e, index) {
  const currX = e.changedTouches[0].clientX;
  const currY = e.changedTouches[0].clientY;
  // 記錄坐標差
  const moveX = currX - this.clientX;
  const moveY = currY - this.clientY;
  // 更新坐標位置
  this.clientX = currX;
  this.clientY = currY;
  const { width, height, left, top, screenHeight } = this;
  const { screenWidth } = this.systemInfo;
  // 初始化最大寬高
  let maxWidth = 0,
    maxHeight = 0,
    maxTop = top + moveY < 0 ? 0 : top + moveY,
    maxLeft = left + moveX < 0 ? 0 : left + moveX;
  // 四個角的寬高限制
  if (index % 2 === 0) {
    maxWidth = width - moveX > screenWidth ? screenWidth : width - moveX;
  } else {
    maxWidth = width + moveX > screenWidth ? screenWidth : width + moveX;
  }
  if (index < 2) {
    maxHeight =
      height - moveY > screenHeight ? screenHeight : height - moveY;
  } else {
    maxHeight =
      height + moveY > screenHeight ? screenHeight : height + moveY;
  }

  // 四個角的規則計算邏輯 四邊方框暫定40 更詳細的要用.createSelectorQuery()去拿
  if (index === 0) {
    if (width - moveX <= 40 || height - moveY <= 40) return;
    console.log(maxLeft);
    this.clipStyle = {
      width: maxWidth,
      height: maxHeight,
      left: maxLeft,
      top: maxTop,
    };
    this.width = maxWidth;
    this.height = maxHeight;
    this.top = maxTop;
    this.left = maxLeft;
    // 右上角
  } else if (index === 1) {
    if (width + moveX <= 40 || height - moveY <= 40) return;
    this.clipStyle = {
      width: maxWidth,
      height: maxHeight,
      left,
      top: maxTop,
    };

    this.width = maxWidth;
    this.height = maxHeight;
    this.top = maxTop;
  } else if (index === 2) {
    if (width - moveX <= 40 || height + moveY <= 40) return;
    this.clipStyle = {
      width: maxWidth,
      height: maxHeight,
      left: maxLeft,
      top,
    };

    this.width = maxWidth;
    this.height = maxHeight;
    this.left = maxLeft;
  } else if (index === 3) {
    if (width + moveX <= 40 || height + moveY <= 40) return;
    this.clipStyle = {
      width: maxWidth,
      height: maxHeight,
      left,
      top,
    };

    this.width = maxWidth;
    this.height = maxHeight;
  }
}
效果如下圖
第三步
四個角拖拽邏輯完善之後,下一步目標就是做四方框的拖拽,這邊需要對四方框的拖拽做一次限制
<div
  class="clip__content"
  :style="style"
  @touchstart.stop.prevent="clipTouchStart"
  @touchmove.stop.prevent="clipTouchMove"
>
  ...
</div>
clipTouchStart(e) {
  this.touchX = e.changedTouches[0].pageX;
  this.touchY = e.changedTouches[0].pageY;
},
clipTouchMove(e) {
  const { screenWidth } = this.systemInfo;
  const currX = e.changedTouches[0].pageX;
  const currY = e.changedTouches[0].pageY;
  const moveX = currX - this.touchX;
  const moveY = currY - this.touchY;
  this.touchX = currX;
  this.touchY = currY;
  // 邊框限制邏輯
  if (this.left + moveX < 0) {
    this.left = 0;
  } else if (this.left + moveX > screenWidth - this.width) {
    this.left = screenWidth - this.width;
  } else {
    this.left = this.left + moveX;
  }
  if (this.top + moveY < 0) {
    this.top = 0;
  } else if (this.top + moveY > this.screenHeight - this.height) {
    this.top = this.screenHeight - this.height;
  } else {
    this.top = this.top + moveY;
  }
  this.clipStyle = {
    ...this.clipStyle,
    left: this.left,
    top: this.top,
  };
},
效果如下圖:
第四步就是做我們的截圖了,這裡用到了 canvas
<div class="clip__content">
  ...
  <canvas class="clip-canvas" canvas-id="clip-canvas"></canvas>
</div>
邏輯的話目前這個例子是使用了網路的 url 圖片 所以要進行 download,如果是不用網路圖片,那麼這一句可以刪除換成其他的獲取圖片 api
initCanvas() {
  uni.showLoading({
    title: "載入中...",
  });
  uni
    .createSelectorQuery()
    .select(".clip__content")
    .fields(
      {
        size: true,
        scrollOffset: true,
        rect: true,
        context: true,
        computedStyle: ["transform", "translateX"],
        scrollOffset: true,
      },
      (data) => {
        uni.downloadFile({
          url: this.imageUrl,
          success: (res) => {
            this.canvasInstance = uni.createCanvasContext(
              "clip-canvas",
              this
            );
            this.canvasInstance.drawImage(
              res.tempFilePath,
              -data.left,
              -data.top,
              this.systemInfo.screenWidth,
              this.screenHeight,
              0,
              0
            );
            this.canvasInstance.draw(
              false,
              (() => {
                setTimeout(() => {
                  uni.canvasToTempFilePath(
                    {
                      x: 0,
                      y: 0,
                      width: data.width,
                      height: data.height,
                      dWidth: data.width,
                      dHeight: data.height,
                      fileType: "jpg",
                      canvasId: "clip-canvas",
                      success: (data) => {
                        uni.hideLoading();

                        this.url = data.tempFilePath;
                        // this.canvasInstance.save();
                      },
                    },
                    this
                  );
                }, 500);
              })()
            );
          },
        });
      }
    )
    .exec();
},
效果如圖所示:


