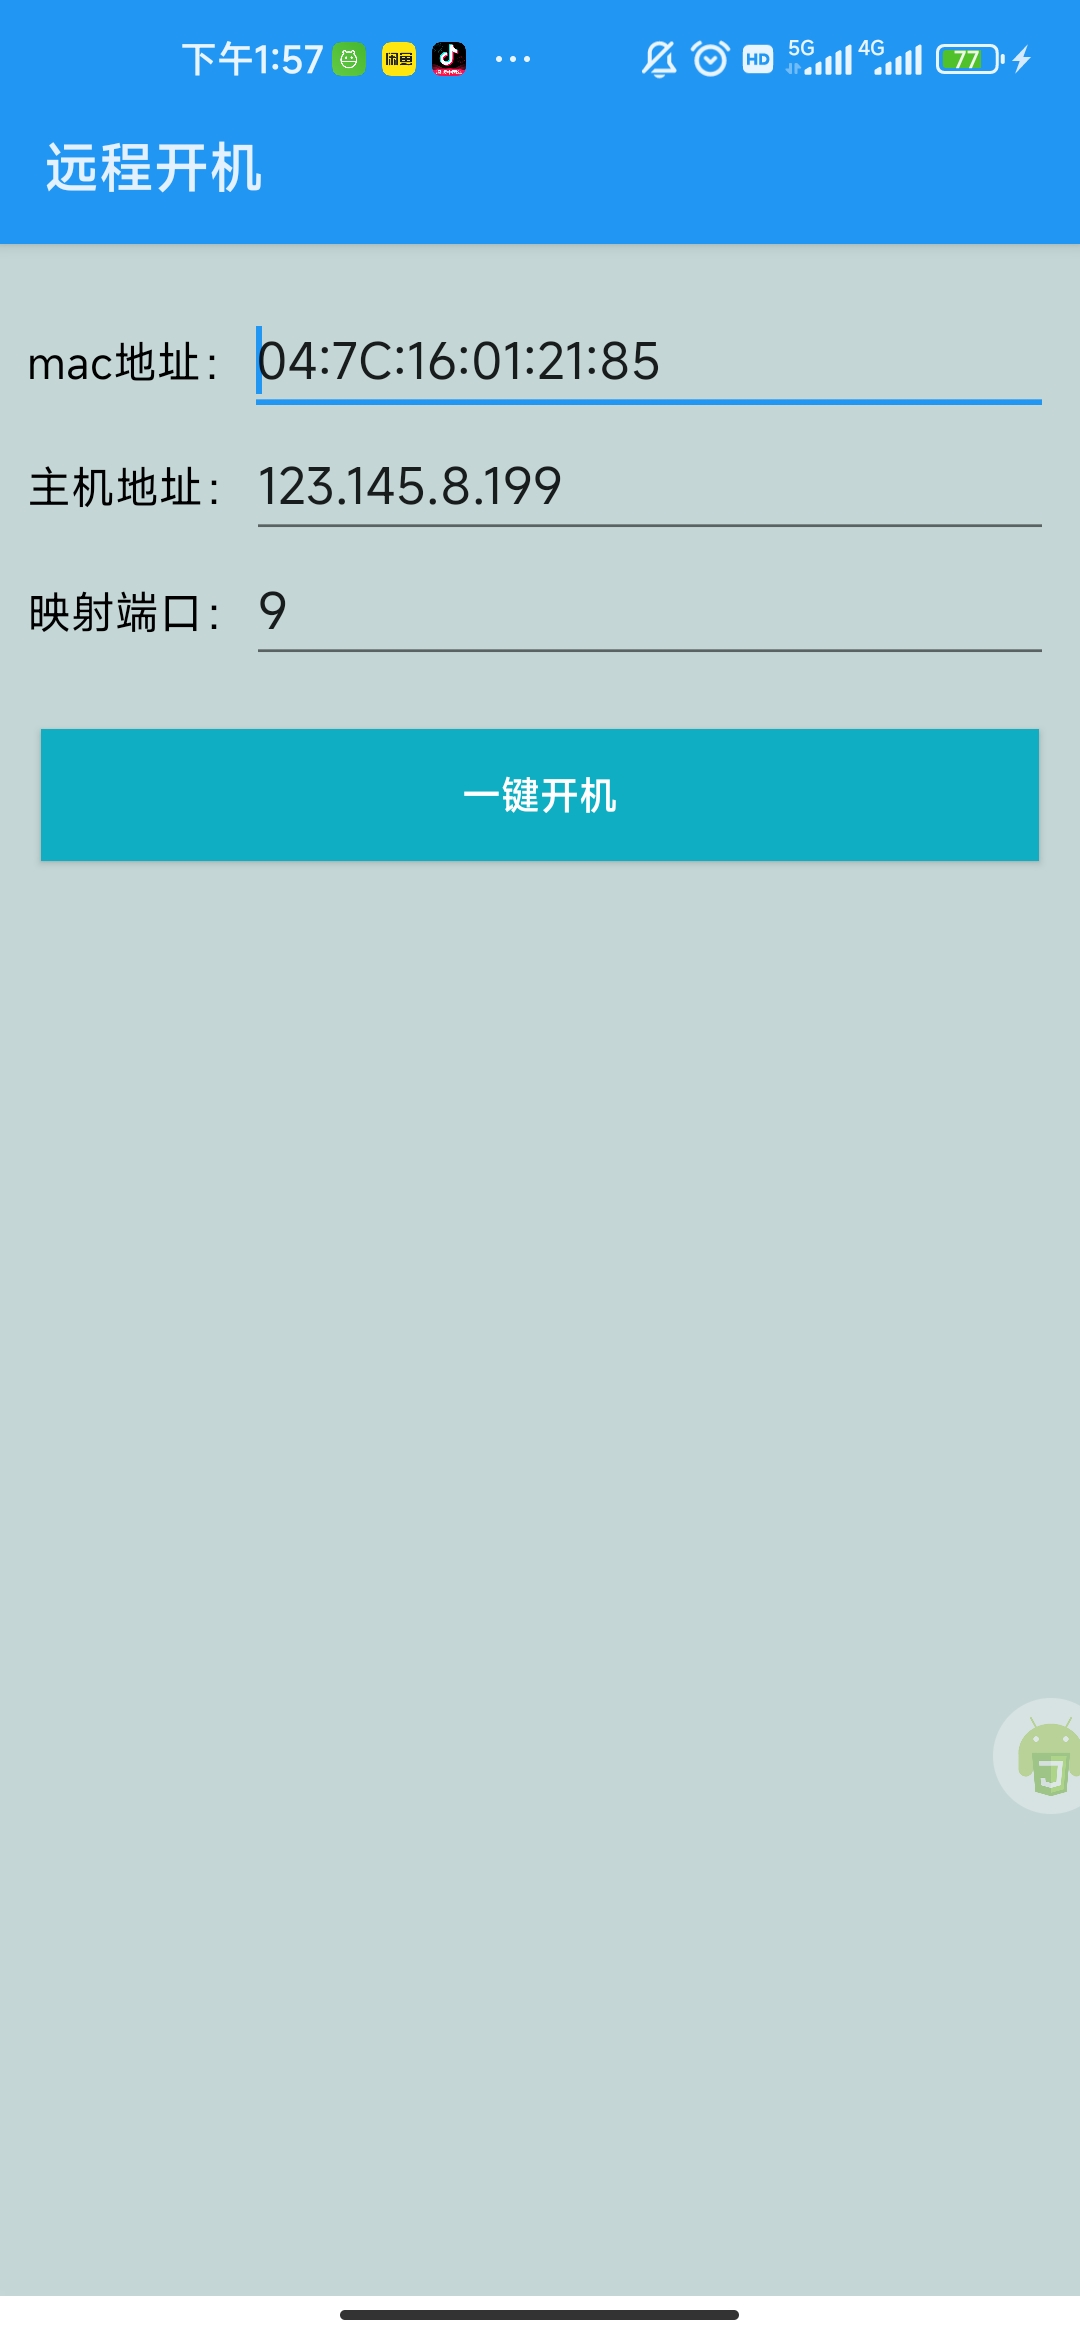
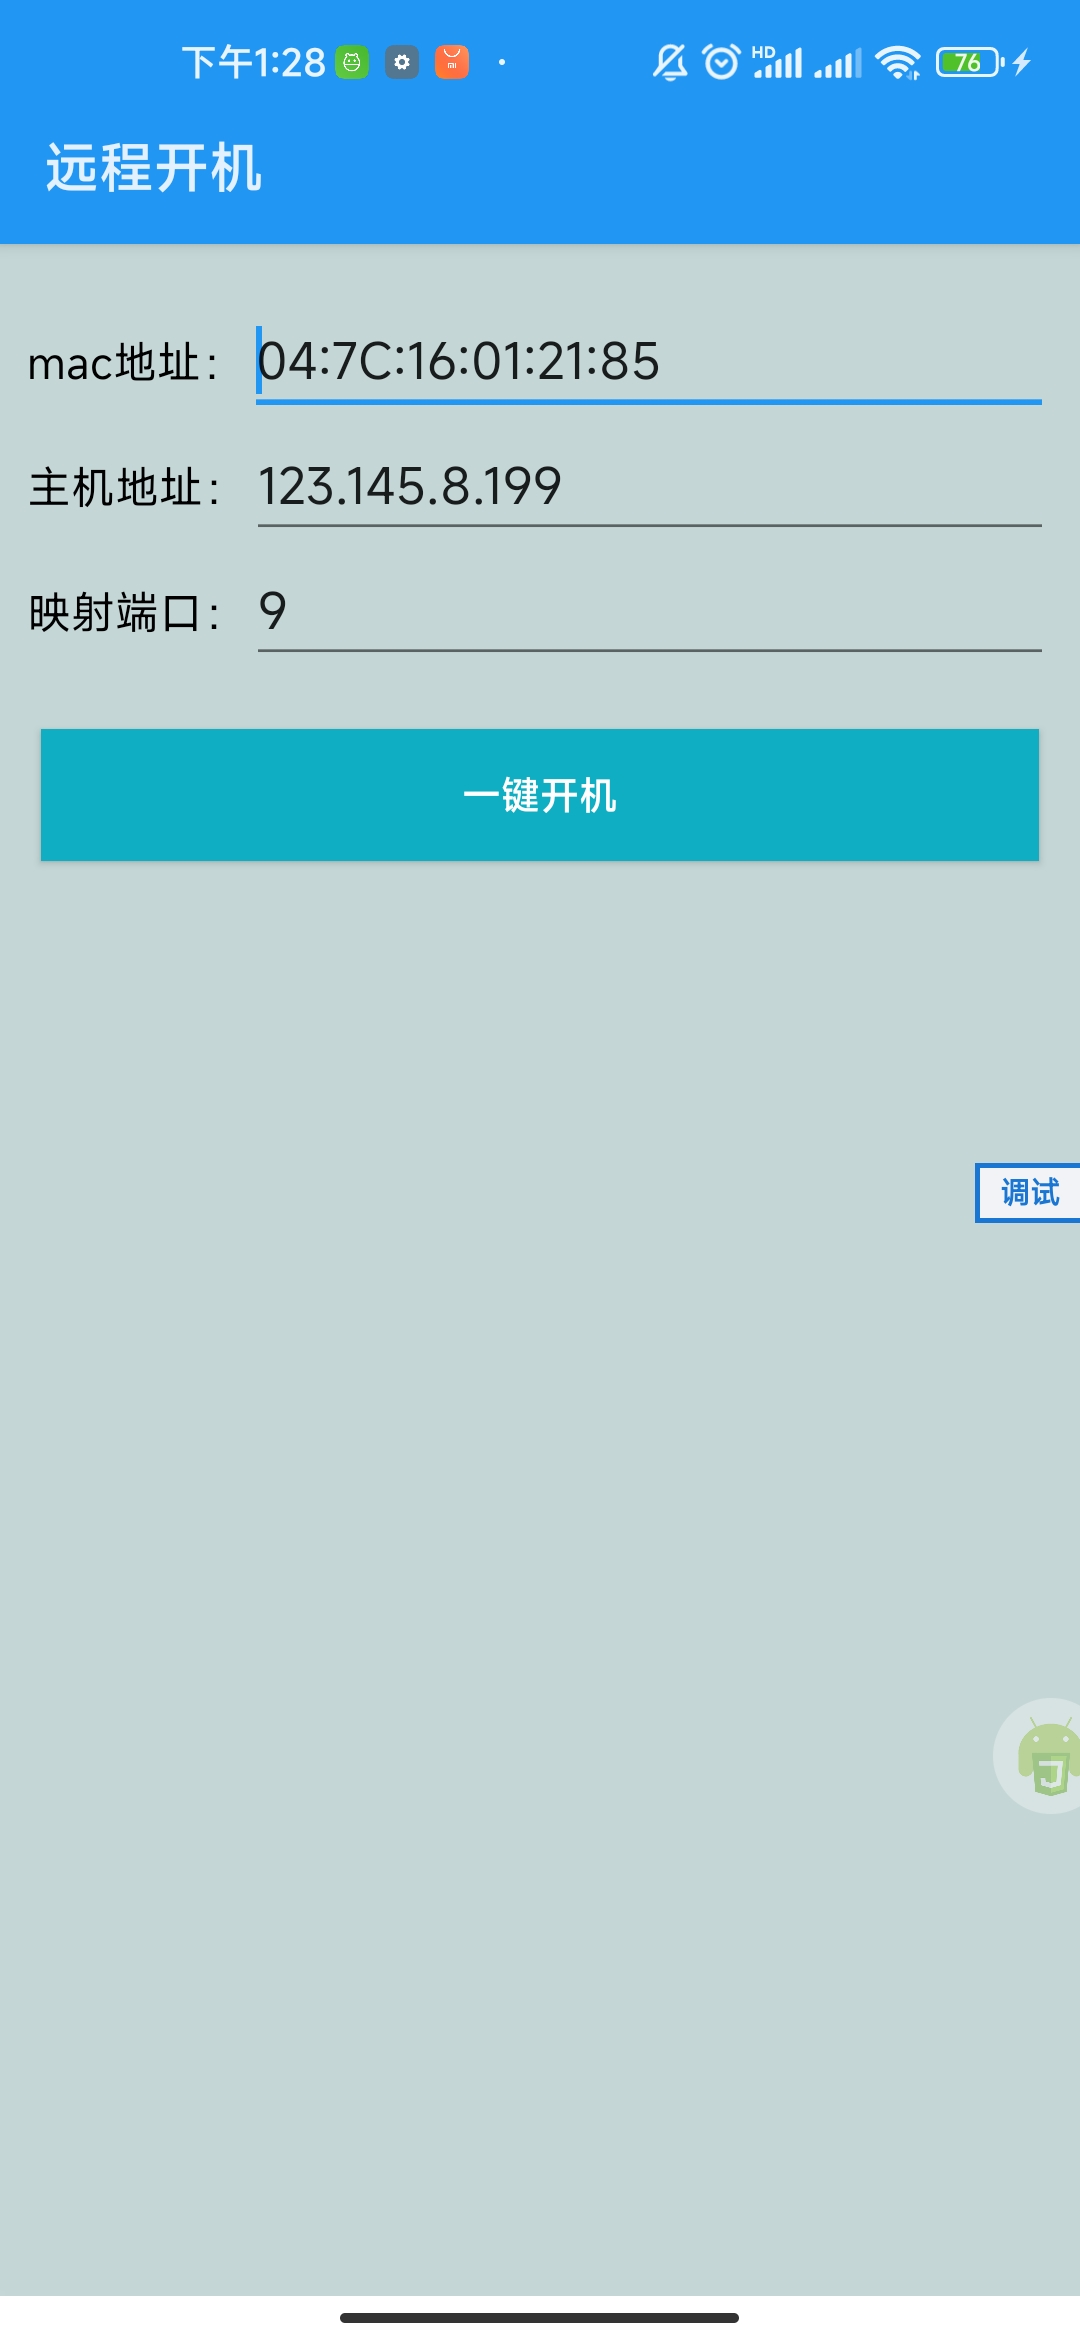
一、最終效果 遠程開機app下載: 下載鏈接:https://wwp.lanzoup.com/iDR330ml4l2b 提取碼 : dxcg 註意:使用前請按照2.1的步驟設置電腦“ mac地址:填寫自己的mac地址 主機地址:填寫自己的公網ip,百度搜索ip 映射埠:第二點準備工作裡面配置的映射 ...
一、最終效果
遠程開機app下載:
下載鏈接:https://wwp.lanzoup.com/iDR330ml4l2b
提取碼 : dxcg
註意:使用前請按照2.1的步驟設置電腦“
mac地址:填寫自己的mac地址
主機地址:填寫自己的公網ip,百度搜索ip
映射埠:第二點準備工作裡面配置的映射埠
二、準備工作
2.1. 開啟bios的wol遠程喚醒功能
- 常見組裝機主板
| 主板品牌 | 啟動按鍵 |
|---|---|
| Intel主板 | F12 |
| 昂達主板 | F11 |
| 頂星主板 | F11或F12 |
| 富士康主板 | ESC或F12 |
| 冠盟主板 | F11或F12 |
| 冠銘主板 | F9 |
| 華擎主板 | F11 |
| 華碩主板 | F8 |
| 技嘉主板 | F12 |
| 傑微主板 | ESC或F8 |
| 捷波主板 | ESC |
| 精英主板 | ESC或F11 |
| 梅捷主板 | E5C或F12 |
| 銘瑄主板 | ESC |
| 譬正主板 | ESC |
| 七彩虹主板 | ESC或F11 |
| 雙敏主板 | ESC |
| 斯巴達卡主板 | ESC |
| 微星主板 | F11 |
| 翔升主板 | F10 |
| 盈通主板 | F8 |
| 映奏主板 | F9 |
| 致銘主板 | F12 |
| 智英主板 | ESC |
常見筆記本品牌
| 筆記本品牌 | 啟動按鍵 |
|---|---|
| eMachines筆記本 | F12 |
| Gateway筆記本 | F12 |
| IBM筆記本 | F12 |
| 東芝筆記本 | F12 |
| 方正筆記本 | F12 |
| 海爾筆記本 | F12 |
| 巨集基筆記本 | F12 |
| 華碩筆記本 | ESC |
| 患晉筆記本 | F9 |
| 技嘉筆記本 | F12 |
| 截爾筆記本 | F12 |
| 聯想Thinkpad | F12 |
| 聯想筆記本 | F12 |
| 明基筆記本 | F9 |
| 蘋果筆記本 | 長按"option"鍵 |
| 清華同方筆記本 | F12 |
| 三星筆記本 | F12 |
| 神舟筆記本 | F12 |
| 室士通筆記本 | F12 |
| 素尼筆記本 | ESC |
| 微星筆記本 | F11 |
- 台式機品牌
| 台式機品牌 | 啟動按鍵 |
|---|---|
| 方正台式機 | F12 |
| 海爾台式機 | F12 |
| 巨集基台式機 | F12 |
| 華碩台式機 | F8 |
| 惠昔台式機 | F12 |
| 截爾台式機 | ESC |
| 聯想台式機 | F12 |
| 明基台式機 | F8 |
| 清華同方台式機 | F12 |
| 神舟台式機 | F12 |
註意:其他品牌請百度或嘗試以上按鍵
進入BIOS後找一下有沒有Wake On LAN 、遠程喚醒、WOL等相關字樣的選項,找到並啟用。
如果還不知如何設置,百度搜索”主板型號+遠程喚醒“
- 設置路由器
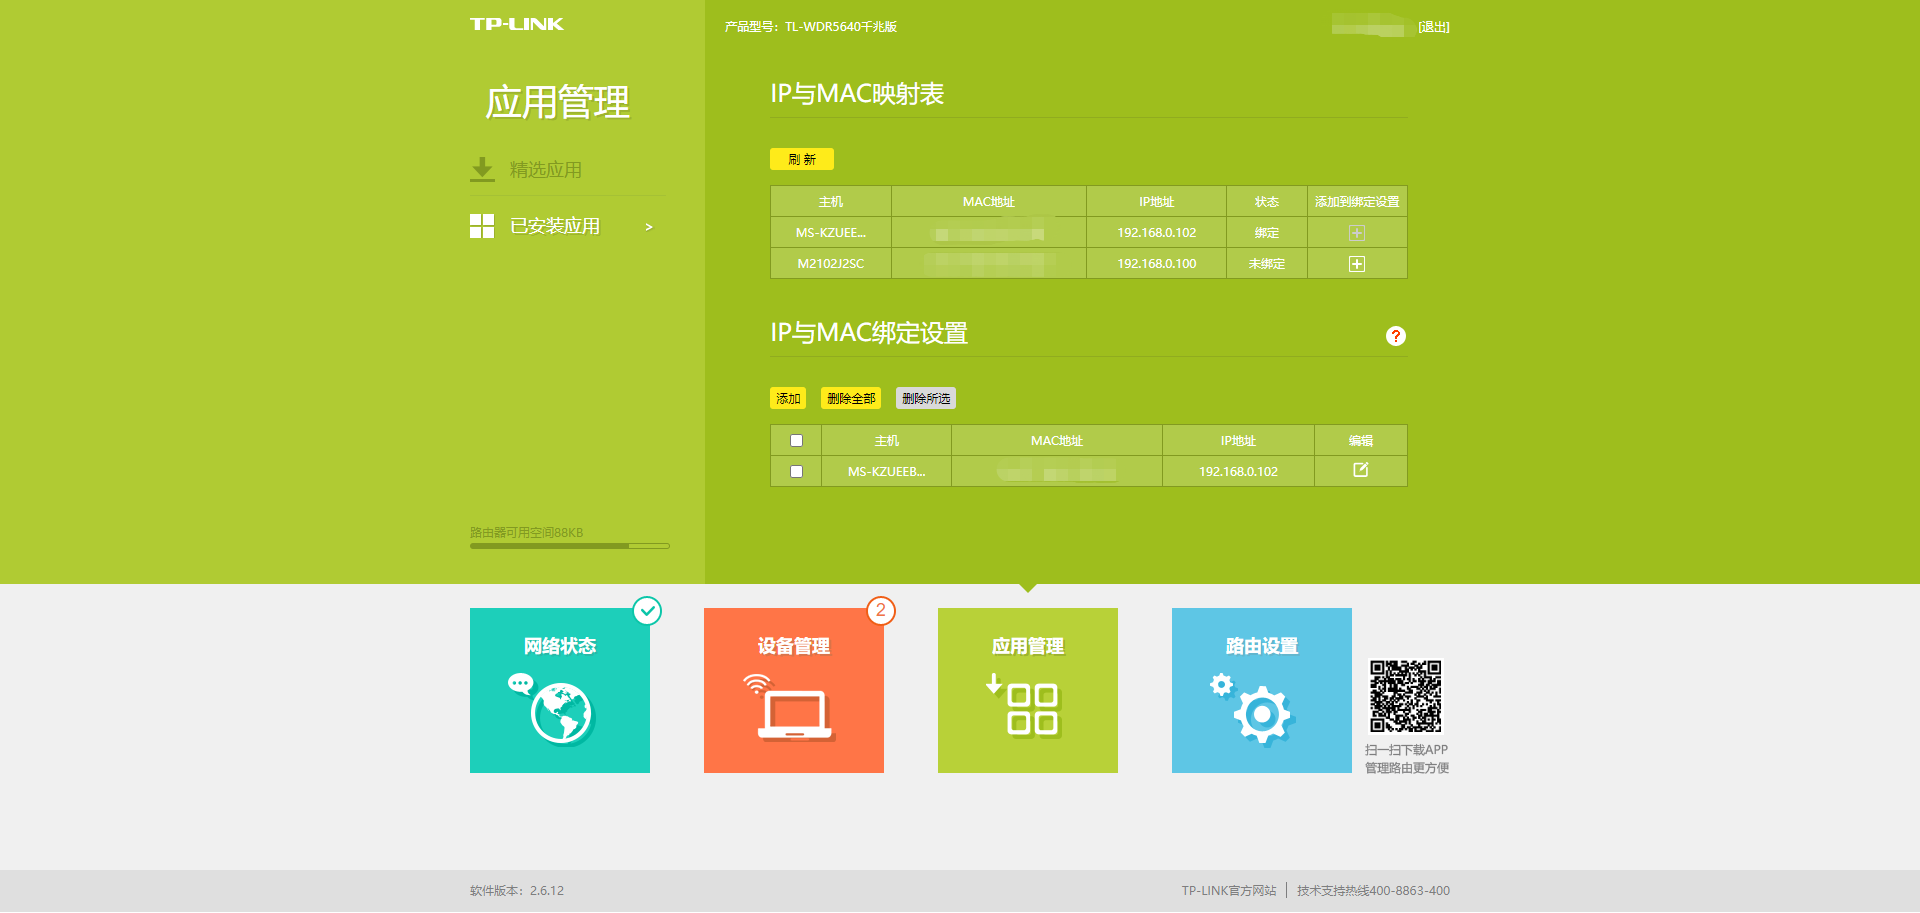
TP Link路由器設置如下,其餘路由器設置類似,請自行百度。
- 設置IP與MAC綁定
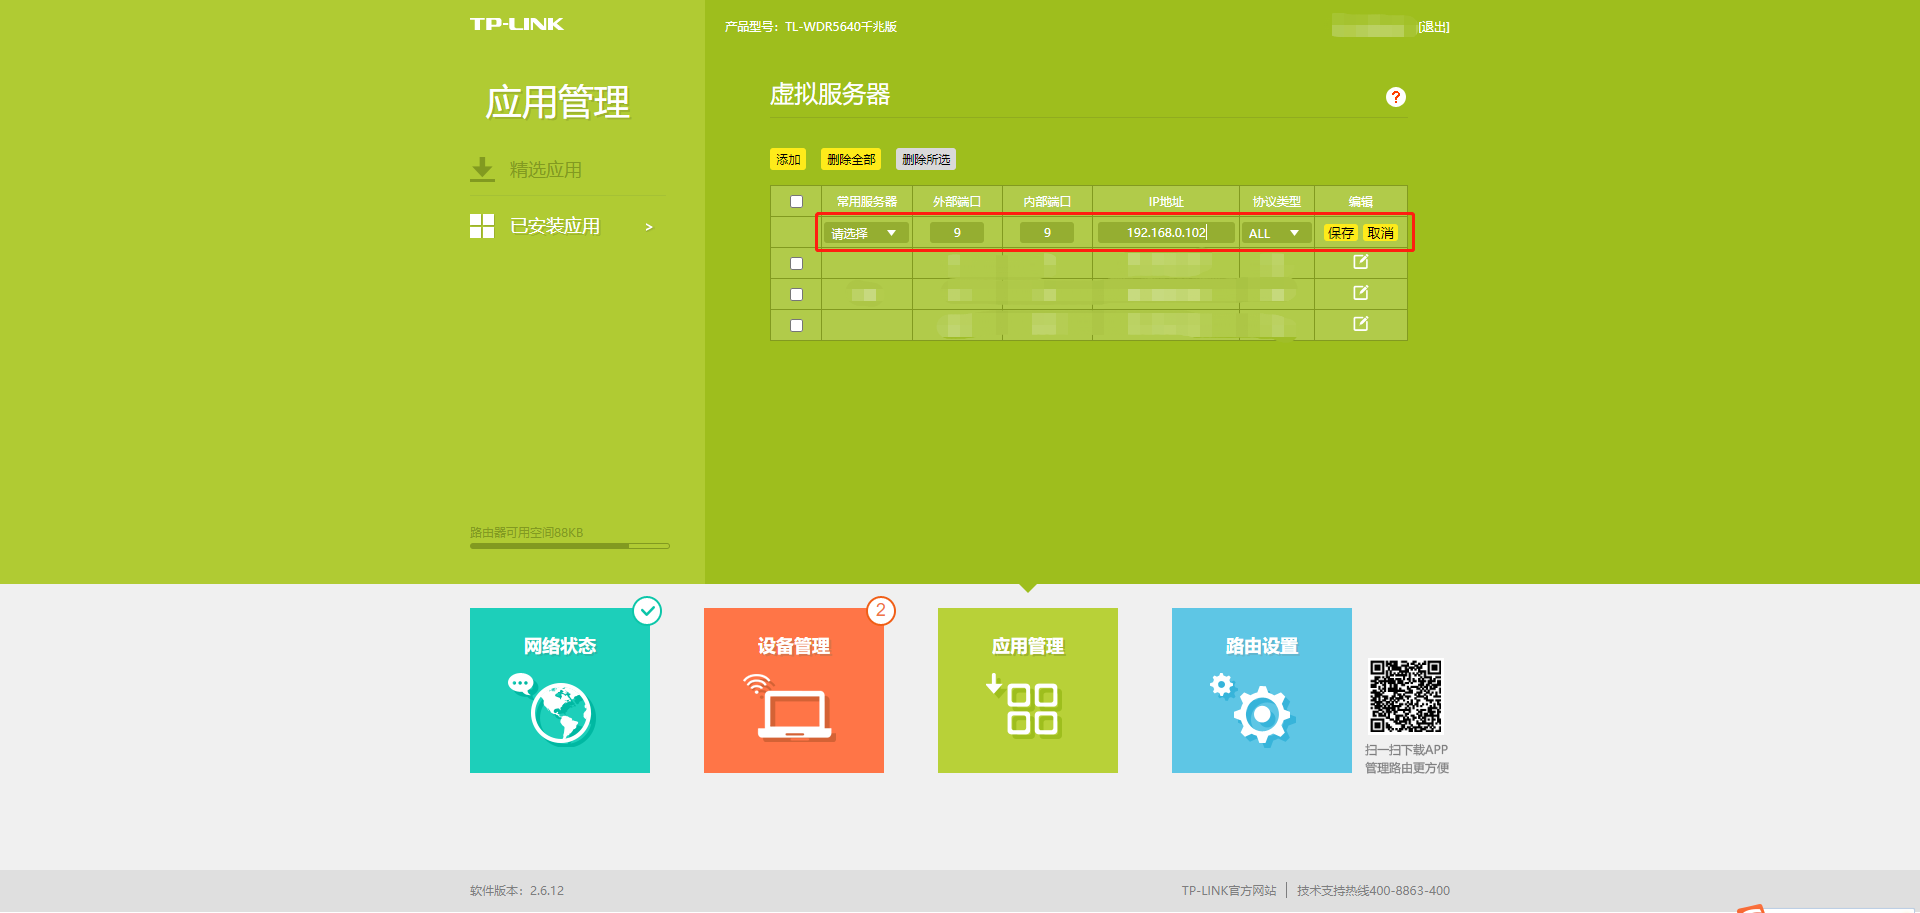
- 設置埠映射
註意內網IP與電腦的IP一致,就是剛纔MAC綁定時的IP地址,埠任意選擇,協議類型選擇ALL或者UDP。
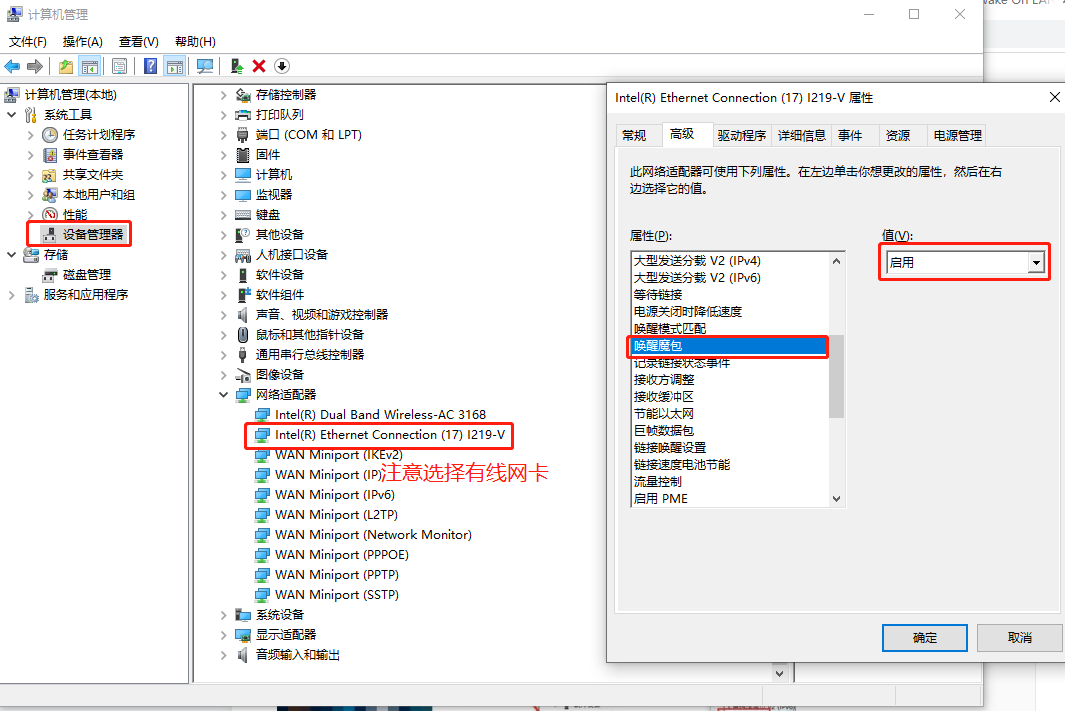
- 設置電腦
點擊”此電腦->設備管理器->網路適配器",啟用喚醒魔包。
2.2. 下載Andlua+軟體
軟體下載鏈接,關註【產品經理不是經理】gzh,回覆【andlua+】即可下載。
三、實現代碼
3.1. 打開軟體,新建項目,創建步驟如下:
- 點擊“+”號
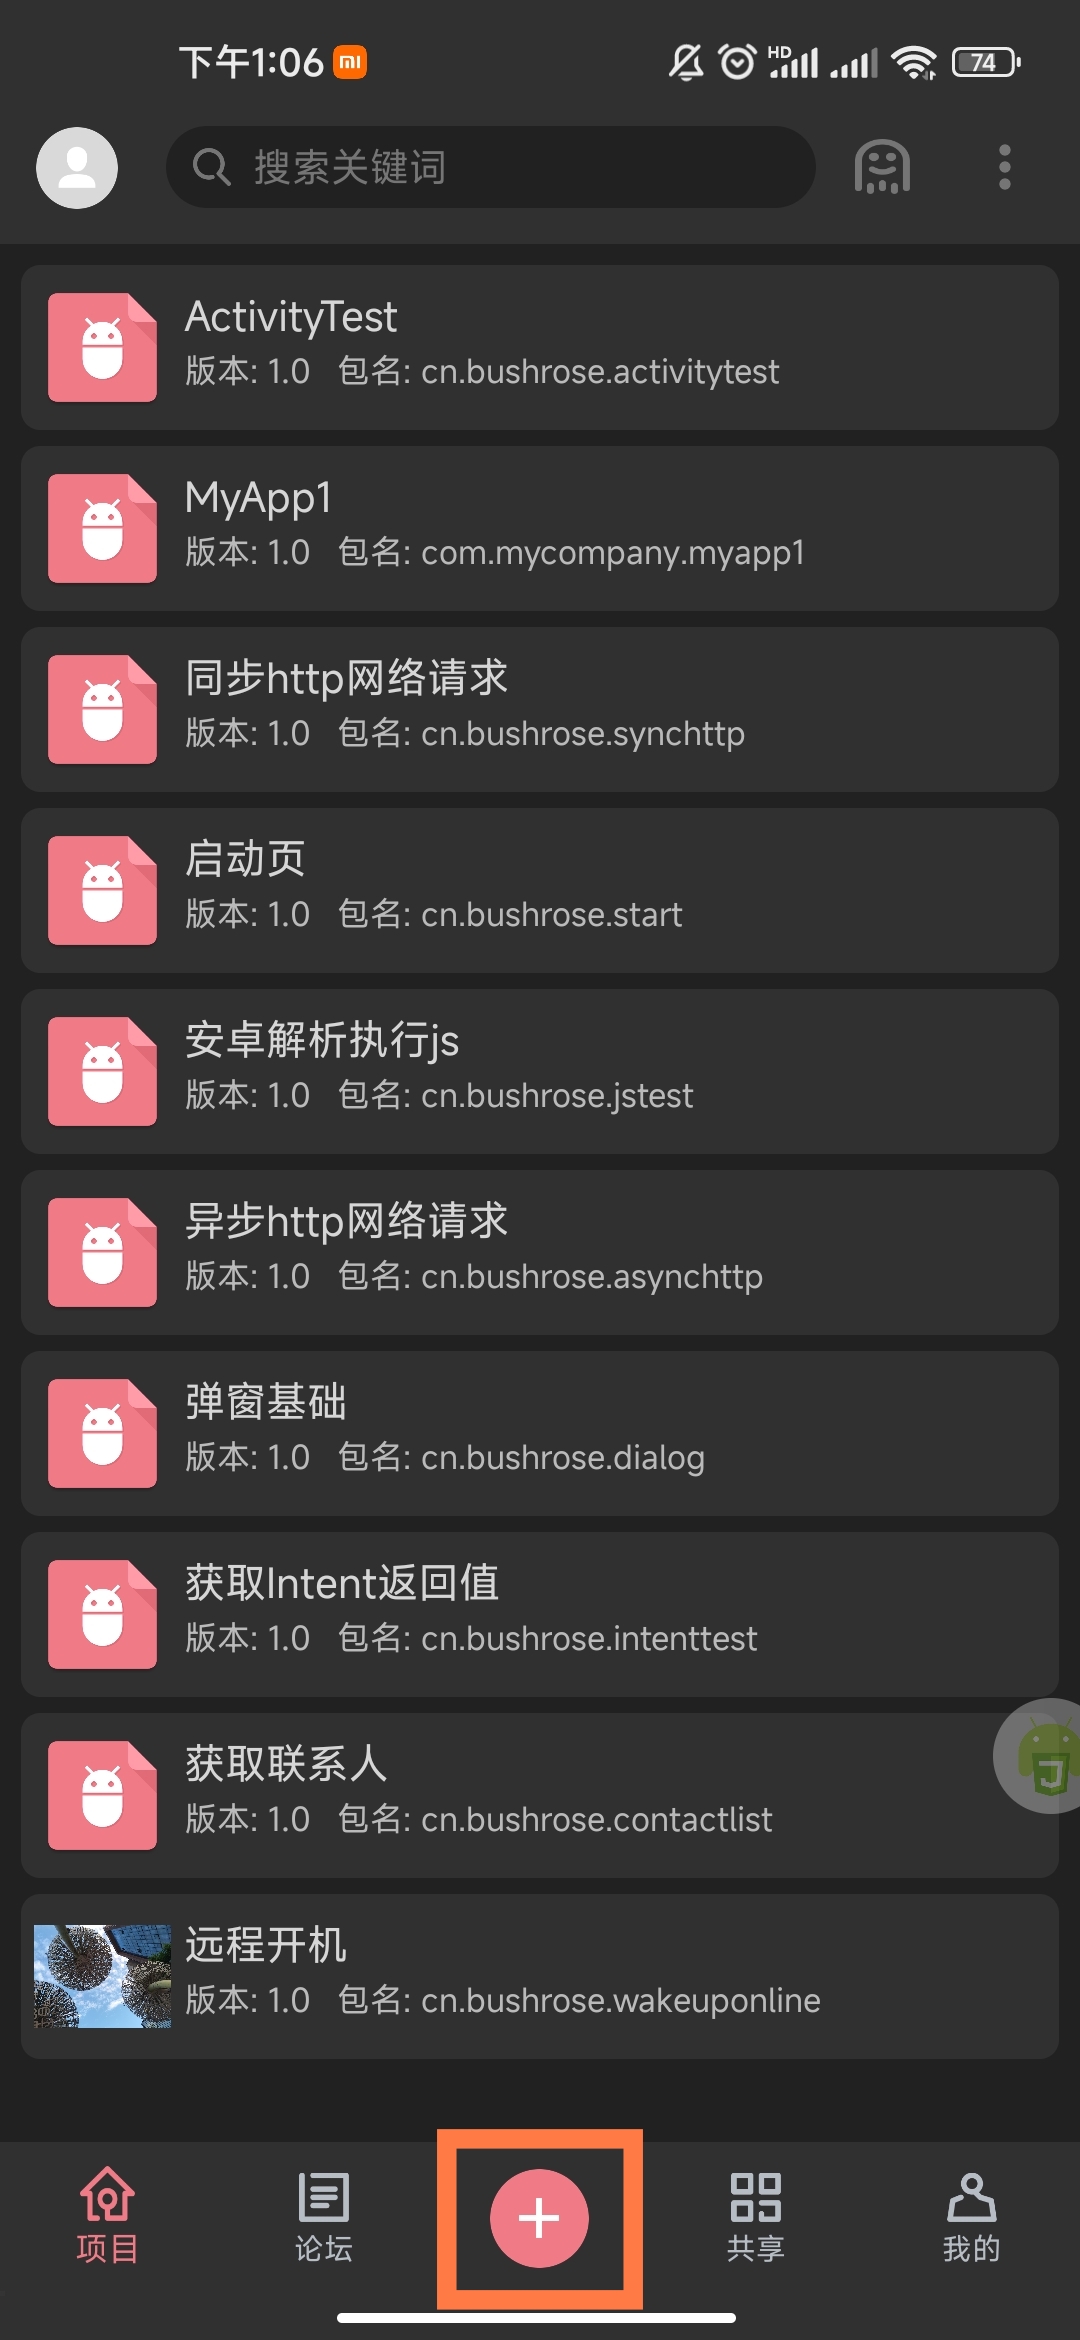
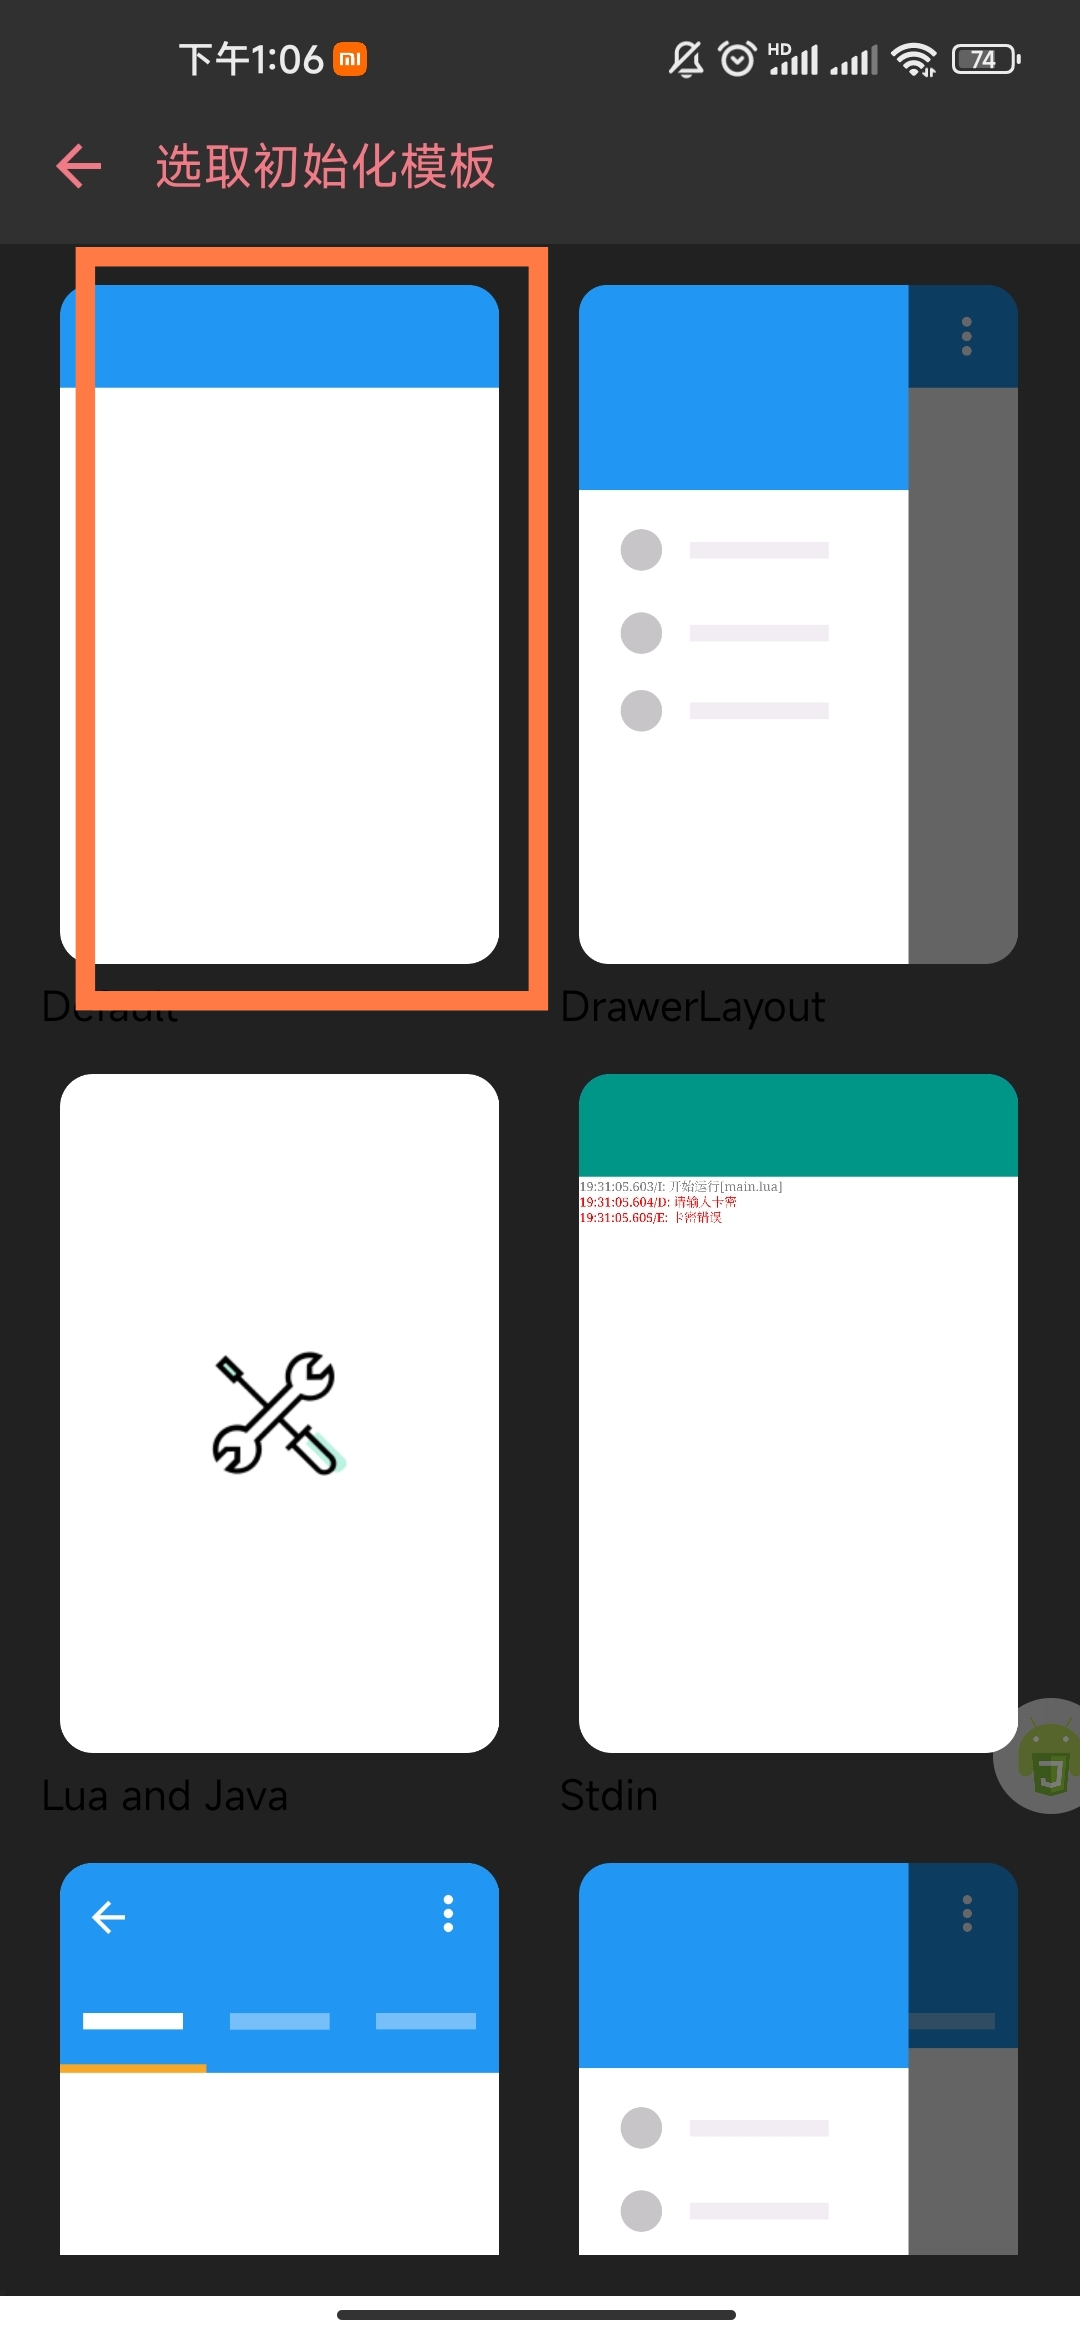
- 選擇模板,這裡我們選擇空白模板。
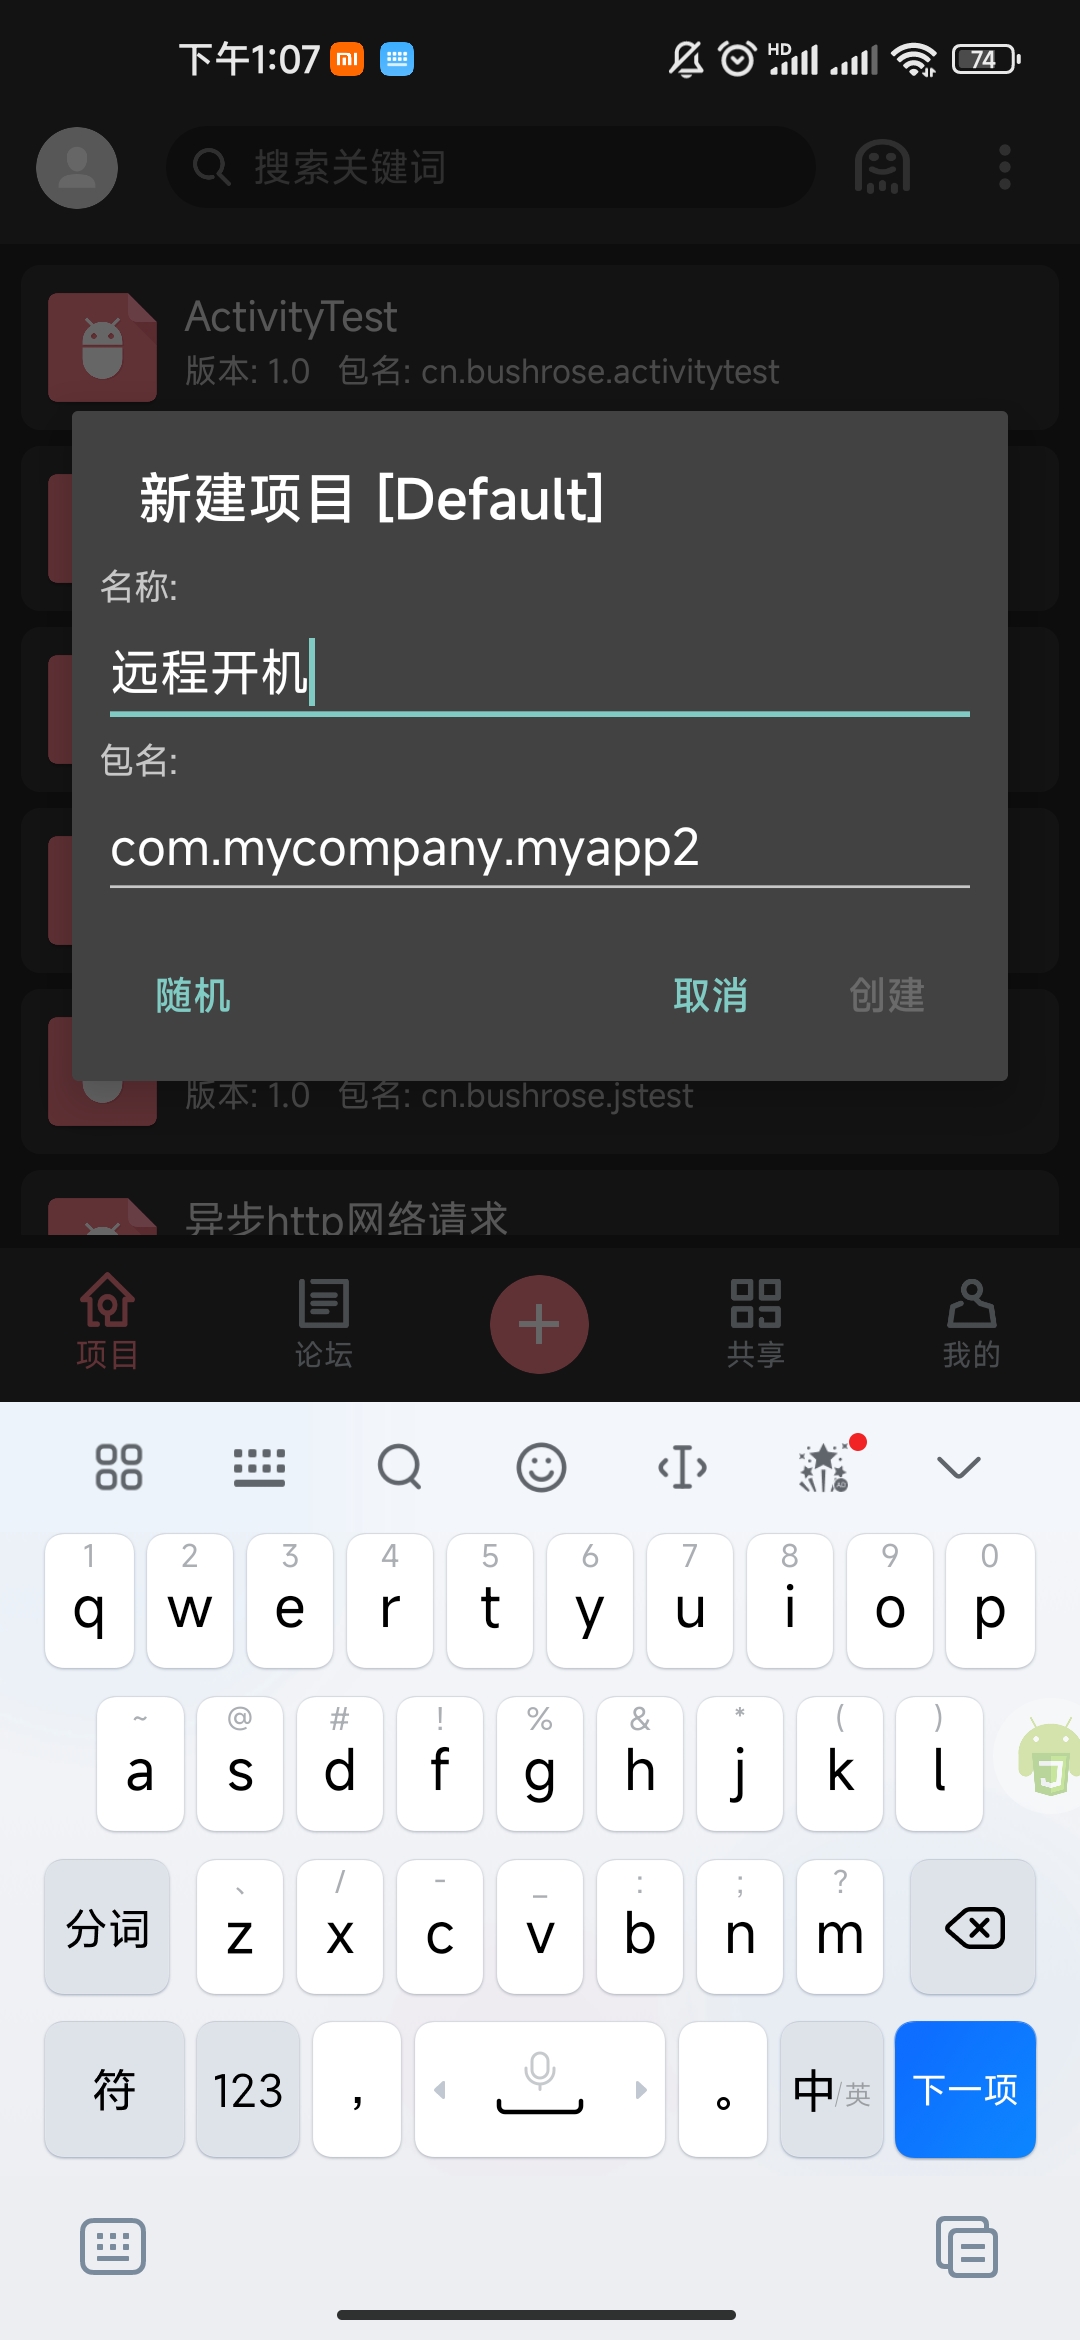
- 填寫項目名稱和包名。項目名稱隨便填,包名類似com.xx.xx,隨意填寫就行。
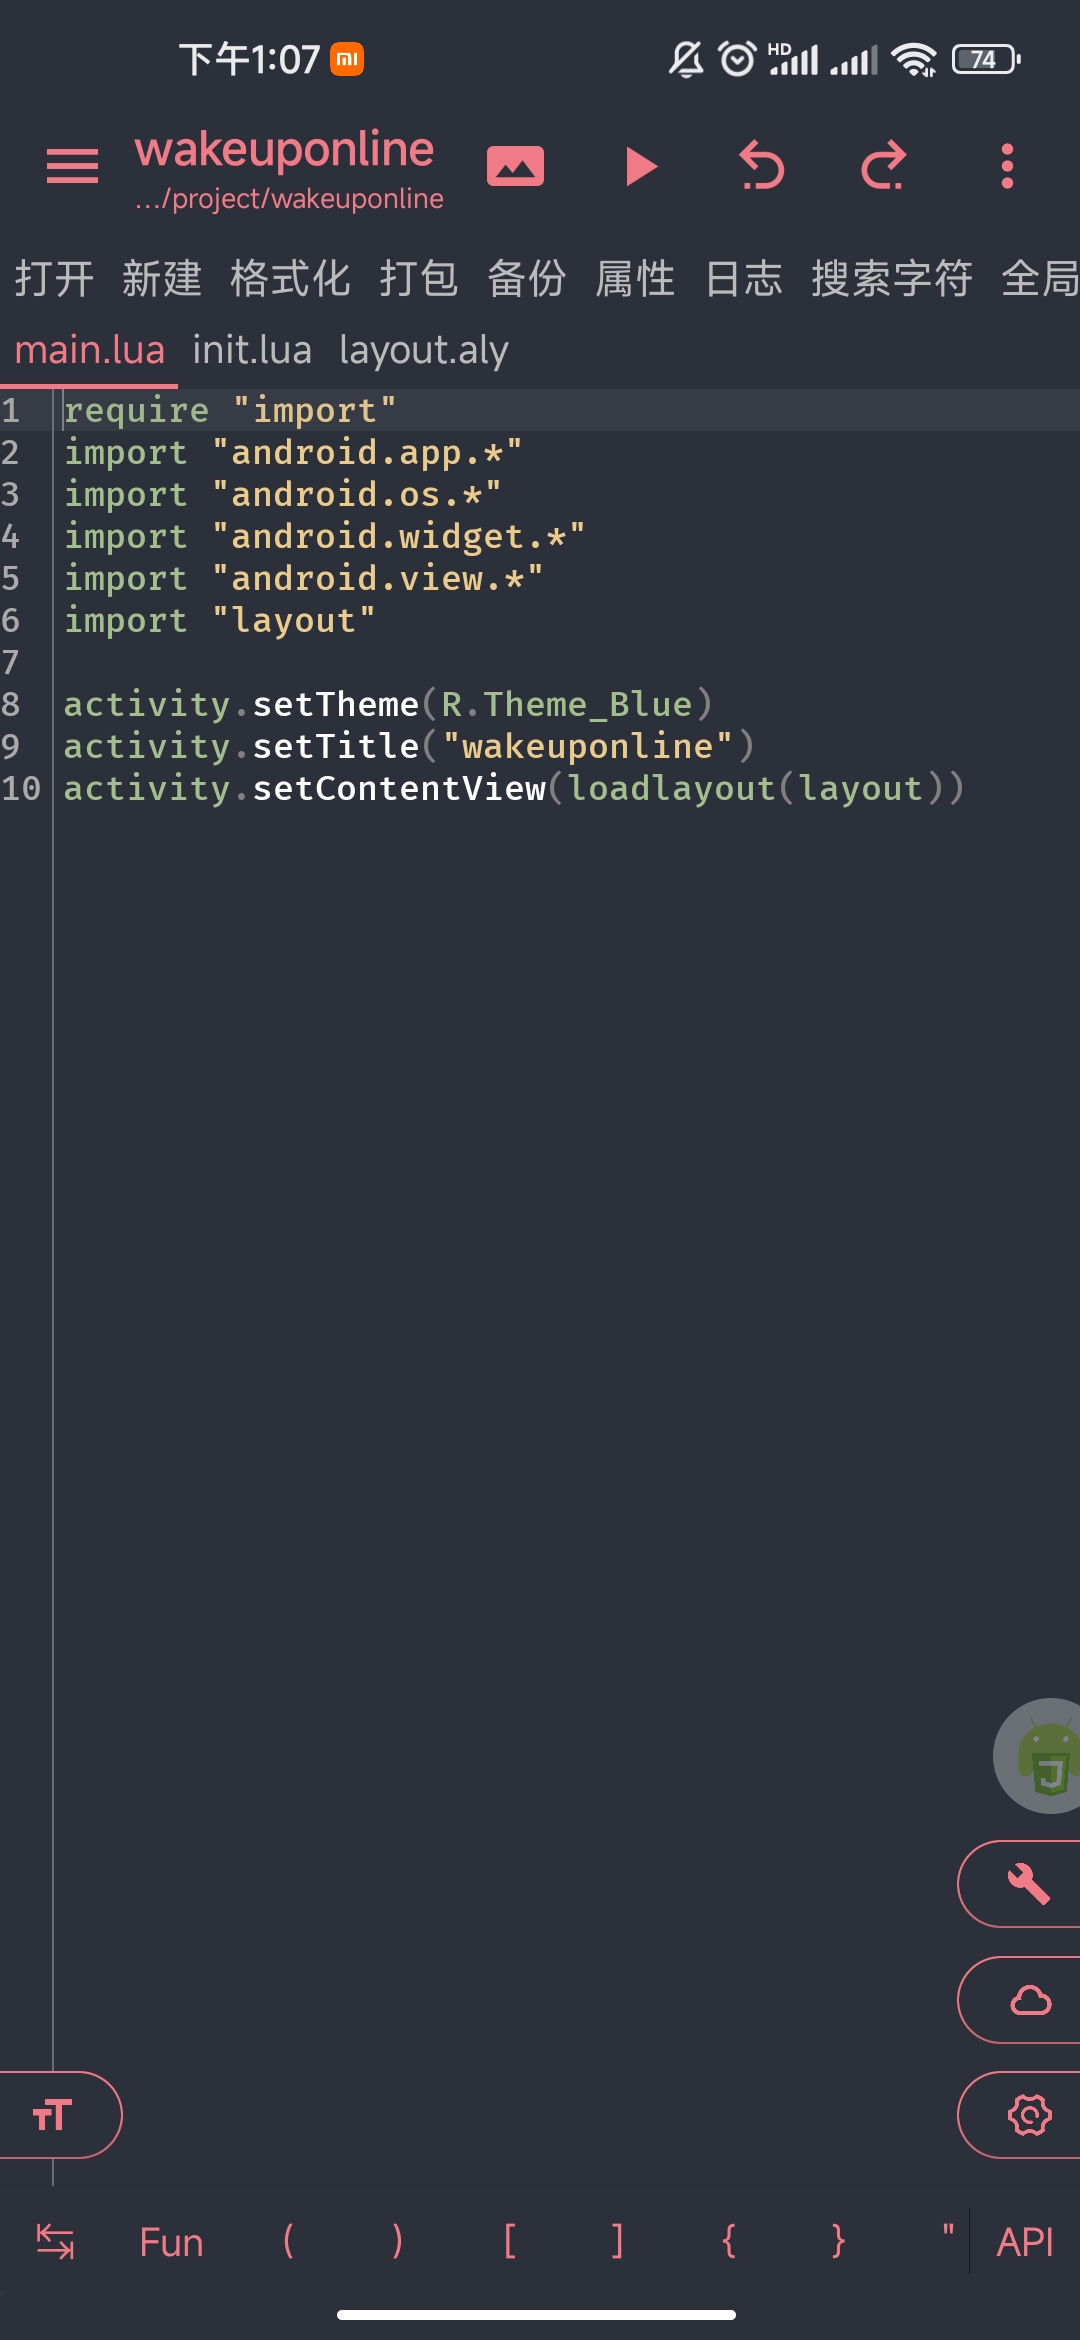
- 生成的模板代碼如下:
3.2. 編寫代碼:
- main.lua代碼如下:
require "import"
import "android.app.*"
import "android.os.*"
import "android.widget.*"
import "android.view.*"
import "layout"
import "socket"

activity.setTheme(R.Theme_Blue)
activity.setTitle("遠程開機")
activity.setContentView(loadlayout(layout))

-- 將兩個一組字元串表示的十六進位轉為十六進位的字元串
-- 'ff'(66 66) -> 0xff -> '.'(255)
function to(str)
  ret = ''
  for i = 1, string.len(str), 2 do
    byte = ('0x' .. string.sub(str, 0 + i, 1 + i))
    a = tonumber(byte)
    ret = ret .. string.char(a)
  end
  return ret
end

function wakeUp(mac,bip,port)
  -- 要進行目標主機的MAC地址
  -- 路由器廣播地址
  -- 映射埠
  mac=string.gsub(mac,":","")
  head = 'FFFFFFFFFFFF' -- 數據頭
  head = to(head)
  mac = to(mac)
  for i = 1, 16 do
    head = head .. mac
  end
  u = socket.udp()
  u:sendto(head,bip,port)
  u:close()
  toast("魔術包發送成功")
end

-- 判斷是否為空
function isEmpty(s)
  local flag=false
  if s==nil or s=="" then
    flag=true
  end
  return flag
end

-- 自定義toast
function toast(msg,activity,duration)
  local activity=activity or this
  local msg=msg or ""
  local duration=duration or Toast.LENGTH_SHORT
  Toast.makeText(activity, msg,duration).show()
end


btn.onClick=function()
  mac=tostring(macAddr.getText())
  host1=tostring(host.getText())
  port1=tostring(port.getText())
  if isEmpty(mac) or isEmpty(host1) or isEmpty(port1) then
    toast("mac地址、主機地址、埠均不能為空")
    return
  end
  wakeUp(mac,host1,port1)
end
- layout.aly代碼如下:
{
  LinearLayout;
  orientation="vertical";
  layout_height="wrap_content";
  layout_width="match_parent";
  backgroundColor="0xffc4d7d6";
  {
    LinearLayout;
    layout_marginTop="20dp";
    layout_width="match_parent";
    {
      TextView;
      textSize="16sp";
      layout_marginLeft="10dp";
      layout_width="wrap_content";
      layout_height="wrap_content";
      textColor="0xff000000";
      text="mac地址:";
    };
    {
      EditText;
      text="04:7C:16:01:21:85";
      layout_width="match_parent";
      id="macAddr";
      layout_marginRight="10dp";
    };
  };
  {
    LinearLayout;
    layout_width="match_parent";
    layout_height="wrap_content";
    {
      TextView;
      textSize="16sp";
      textColor="0xff000000";
      layout_marginLeft="10dp";
      text="主機地址:";
    };
    {
      EditText;
      text="123.145.8.199";
      layout_width="match_parent";
      id="host";
      layout_marginRight="10dp";
    };
  };
  {
    LinearLayout;
    layout_width="match_parent";
    {
      TextView;
      textSize="16sp";
      textColor="0xff000000";
      layout_marginLeft="10dp";
      text="映射埠:";
    };
    {
      EditText;
      layout_marginRight="10dp";
      layout_width="match_parent";
      id="port";
      text="9";
    };
  };
  {
    Button;
    layout_marginLeft="15dp";
    id="btn";
    text="一鍵開機";
    layout_marginTop="20dp";
    backgroundColor="0xff10aec2";
    textColor="0xffffffff";
    layout_height="wrap_content";
    layout_width="match_parent";
    layout_marginRight="15dp";
  };
};
- init.lua使用模板代碼,不做更改。
- 修改完成後,點擊三角符號預覽
3.2. 打包app:
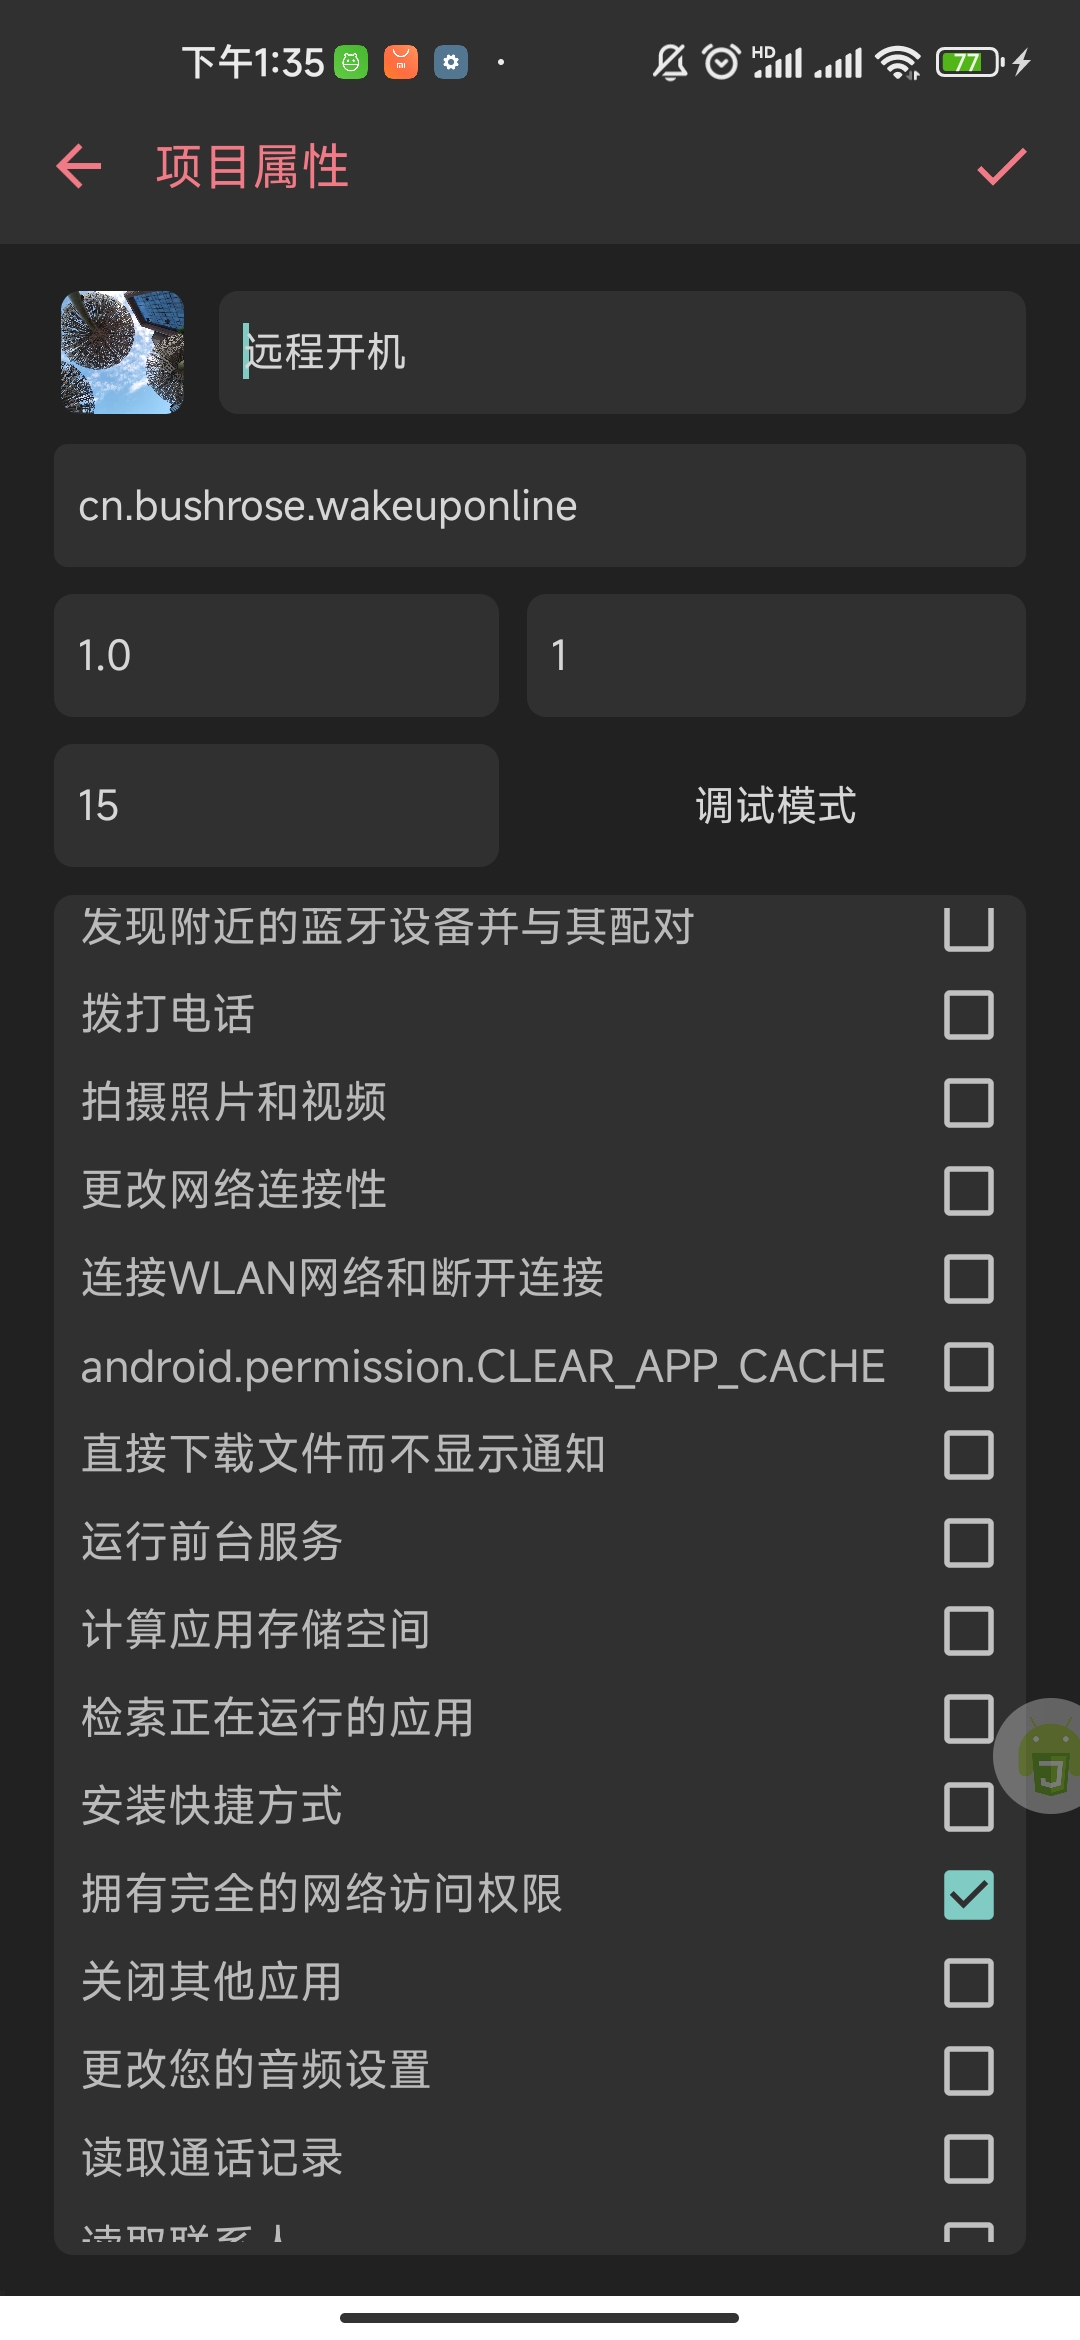
- 點擊屬性,設置項目屬性。
取消選中調試模式,app需要的許可權我們只選擇擁有完全的網路訪問許可權即可,設置完成後點擊右上角的勾保存。
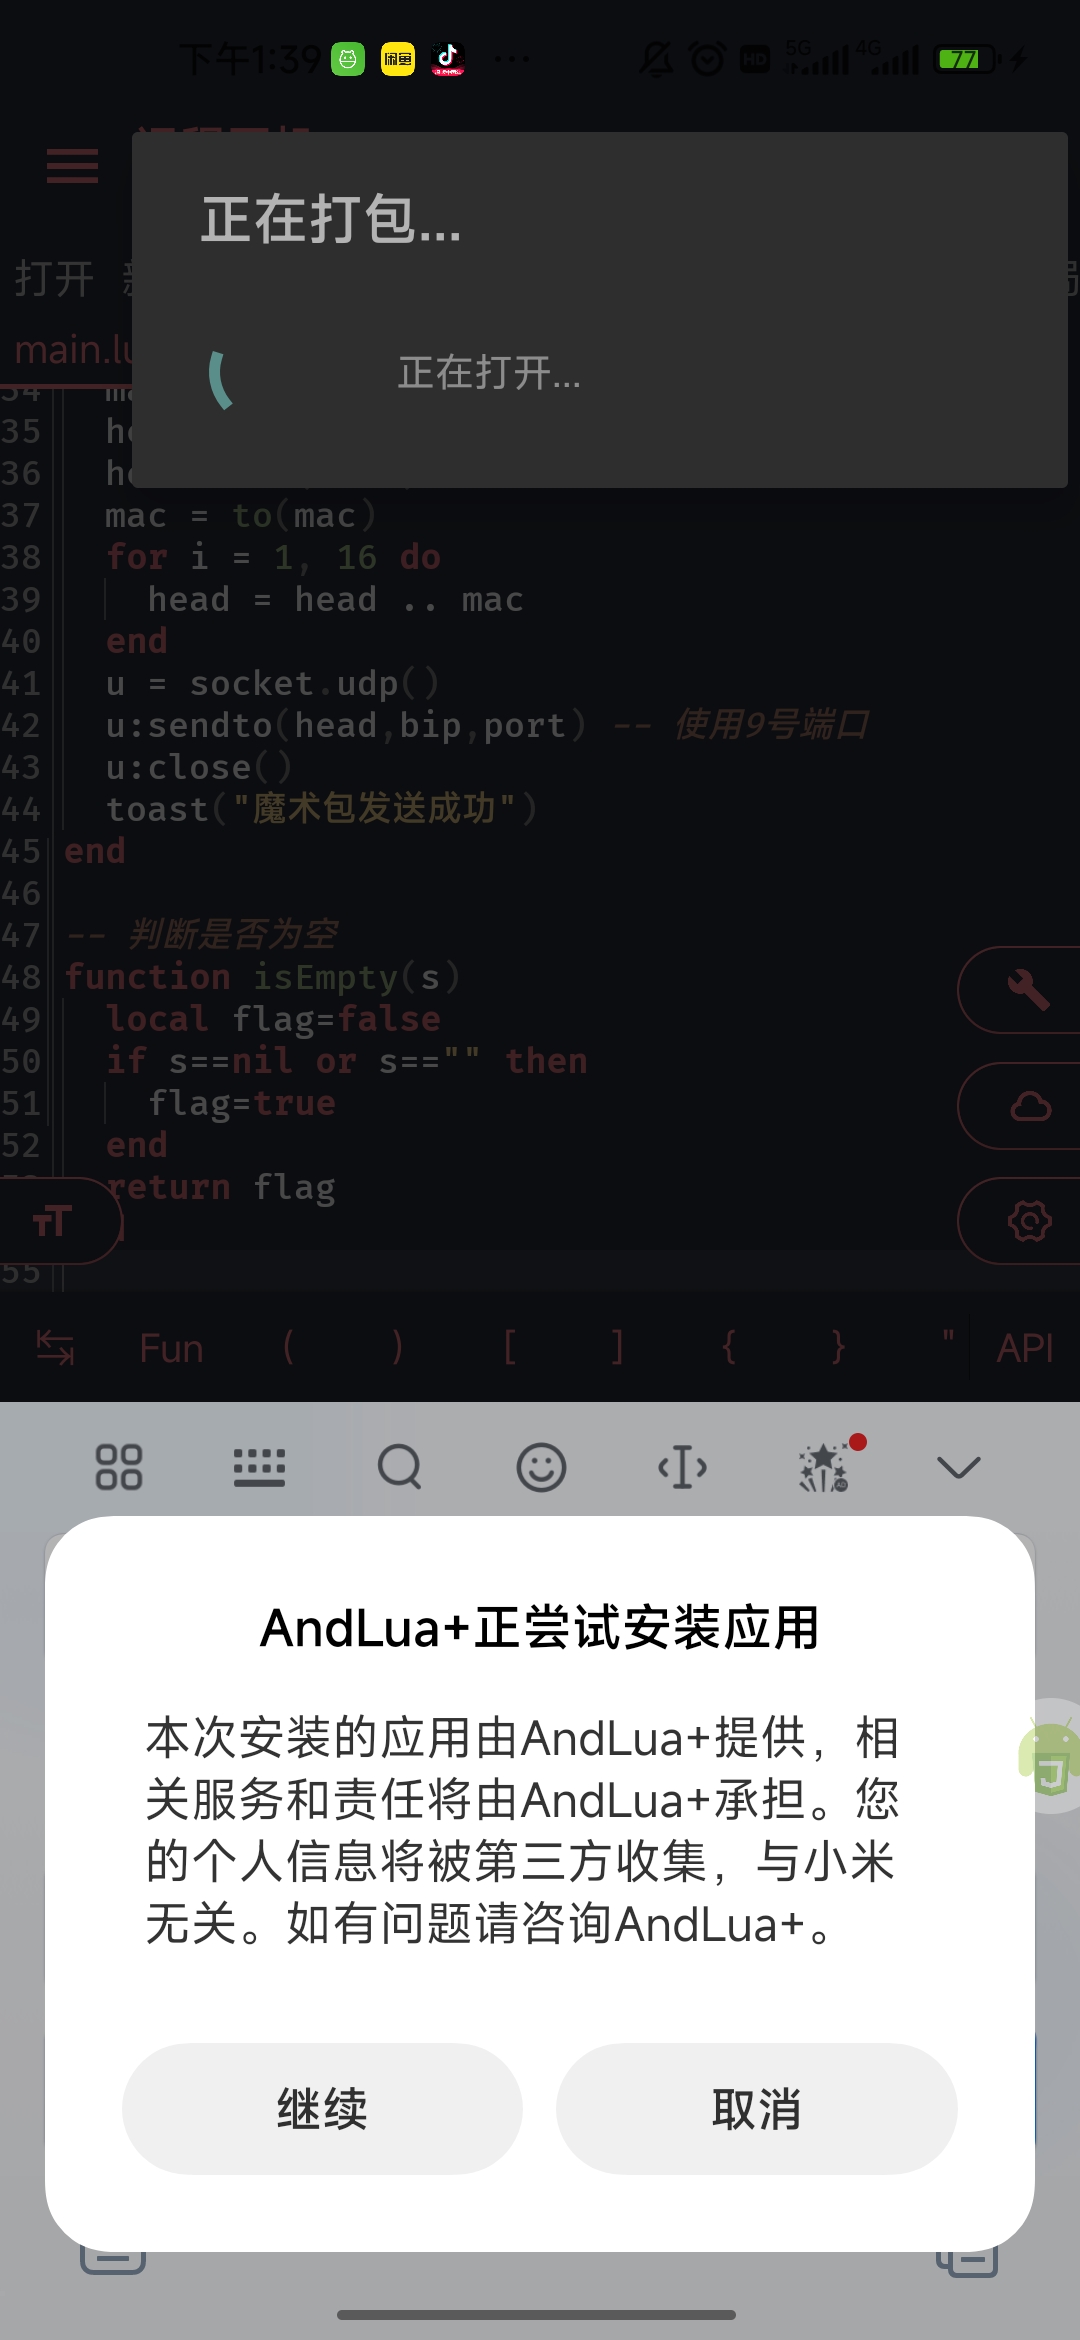
- 點擊打包,打包完成後會提示安裝,點擊安裝即可。
三、總結
andlua+軟體提供了豐富的功能,讓我們在手機上可以編程快速生成我們自己的應用,更多複雜的應用需要大家自行探索。
本文由【產品經理不是經理】gzh同步發佈,歡迎關註


