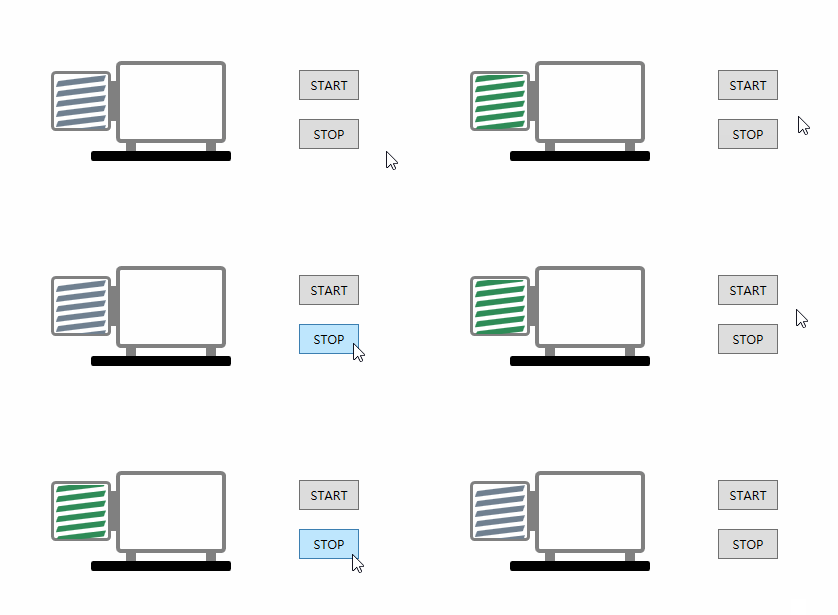
一 引入 考慮實現一種機械泵控制項。 機械泵是工業中通常用來製造真空的一類設備,我們在繪製界面UI時希望可以生動形象地來表述一個機械泵,下麵講述了一種簡單的實現。 二 MechanicalPumpControl 聲明一個MechanicalPumpControl的自定義控制項,它繼承自Control類。 ...
一 引入
考慮實現一種機械泵控制項。
機械泵是工業中通常用來製造真空的一類設備,我們在繪製界面UI時希望可以生動形象地來表述一個機械泵,下麵講述了一種簡單的實現。
二 MechanicalPumpControl
聲明一個MechanicalPumpControl的自定義控制項,它繼承自Control類。
對於一個MechanicalPump來說,它具有狀態,這裡定義一個State依賴屬性來簡單描述泵的狀態,State等於0表示泵停止狀態,State等於1表示泵運行狀態。
State可以綁定到實際的泵狀態數據源,當泵狀態數據變化時,MechanicalPumpControl需要相應動態顯示泵狀態動畫。
定義StartAnimation和StopAnimation兩個依賴屬性,來啟動和停止泵狀態動畫。
關於控制項的狀態切換也可以考慮用VisualStateManager來實現,可以更方便地管理控制項的狀態以及用於狀態過渡的邏輯,推薦用這種方式。
public class MechanicalPumpControl : Control
{
    static MechanicalPumpControl()
    {
        DefaultStyleKeyProperty.OverrideMetadata(typeof(MechanicalPumpControl), new FrameworkPropertyMetadata(typeof(MechanicalPumpControl)));
    }


    public static readonly DependencyProperty StateProperty = DependencyProperty.Register(
    "State",
    typeof(int),
    typeof(MechanicalPumpControl), new PropertyMetadata(PropertyChangedCallback));

    public int State
    {
        get => (int)GetValue(StateProperty);
        set => SetValue(StateProperty, value);
    }

    private static void PropertyChangedCallback(DependencyObject d, DependencyPropertyChangedEventArgs e)
    {
        var pumpControl = d as MechanicalPumpControl;

        if ((int)e.OldValue == 0 && (int)e.NewValue == 1)
        {
            pumpControl.StopAnimation = false;
            pumpControl.StartAnimation = true;
        }
        else if ((int)e.OldValue == 1 && (int)e.NewValue == 0)
        {
            pumpControl.StopAnimation = true;
            pumpControl.StartAnimation = false;
        }
    }

    public static readonly DependencyProperty StartAnimationProperty = DependencyProperty.Register(
        "StartAnimation",
        typeof(bool),
        typeof(MechanicalPumpControl));

    public bool StartAnimation
    {
        get => (bool)GetValue(StartAnimationProperty);
        set => SetValue(StartAnimationProperty, value);
    }

    public static readonly DependencyProperty StopAnimationProperty = DependencyProperty.Register(
        "StopAnimation",
        typeof(bool),
        typeof(MechanicalPumpControl));

    public bool StopAnimation
    {
        get => (bool)GetValue(StopAnimationProperty);
        set => SetValue(StopAnimationProperty, value);
    }
}
三 Style
接下來編寫MechanicalPumpControl的樣式。
考慮繪製出不動的泵體部分,和動作的扇葉部分。當泵停止狀態時,扇葉靜止,當泵運轉狀態時,扇葉轉動。
樣式代碼如下:
 <Style TargetType="{x:Type Rectangle}" x:Key="FanRec">
     <Setter Property="Canvas.Left" Value="7"/>
     <Setter Property="Width" Value="48"/>
     <Setter Property="Height" Value="6"/>
     <Setter Property="RadiusX" Value="0.5"/>
     <Setter Property="RadiusY" Value="0.5"/>
     <Setter Property="Fill" Value="SlateGray"/>
     <Setter Property="RenderTransform">
         <Setter.Value>
             <SkewTransform AngleX="-20" AngleY="-7"/>
         </Setter.Value>
     </Setter>
 </Style>

 <Style TargetType="{x:Type local:MechanicalPumpControl}">
     <Setter Property="Template">
         <Setter.Value>
             <ControlTemplate TargetType="{x:Type local:MechanicalPumpControl}">
                 <Viewbox Stretch="Fill">
                     <Canvas Width="180" Height="100">
                         <Rectangle Width="60" Height="60" Canvas.Top="10" Stroke="Gray"  StrokeThickness="3" RadiusX="3" RadiusY="3" />
                         <Canvas  Width="60" Height="54" Canvas.Top="14" ClipToBounds="True">
                             <Canvas x:Name="canvas1" Width="60" Height="54">
                                 <Rectangle x:Name="rec1" Style="{StaticResource FanRec}" Canvas.Top="6"/>
                                 <Rectangle x:Name="rec2" Style="{StaticResource FanRec}" Canvas.Top="16"/>
                                 <Rectangle x:Name="rec3" Style="{StaticResource FanRec}" Canvas.Top="26"/>
                                 <Rectangle x:Name="rec4" Style="{StaticResource FanRec}" Canvas.Top="36"/>
                                 <Rectangle x:Name="rec5" Style="{StaticResource FanRec}" Canvas.Top="46"/>
                             </Canvas>
                             <Canvas x:Name="canvas2" Width="60" Height="54">
                                 <Rectangle x:Name="rec6" Style="{StaticResource FanRec}" Canvas.Top="56"/>
                                 <Rectangle x:Name="rec7" Style="{StaticResource FanRec}" Canvas.Top="66"/>
                                 <Rectangle x:Name="rec8" Style="{StaticResource FanRec}" Canvas.Top="76"/>
                                 <Rectangle x:Name="rec9" Style="{StaticResource FanRec}" Canvas.Top="86"/>
                                 <Rectangle x:Name="rec10" Style="{StaticResource FanRec}" Canvas.Top="96"/>
                                 <Rectangle x:Name="rec11" Style="{StaticResource FanRec}" Canvas.Top="106"/>
                             </Canvas>
                         </Canvas>
                         <Rectangle  Width="5" Height="40" Canvas.Left="60" Canvas.Top="20"  Stroke="Gray"  StrokeThickness="4"/>
                         <Rectangle  Width="110" Height="82" Canvas.Left="65"  RadiusX="3" RadiusY="3" Stroke="Gray"  StrokeThickness="4"/>
                         <Rectangle  Width="10" Height="8" Canvas.Left="75" Canvas.Top="82" Fill="Gray" />
                         <Rectangle  Width="10" Height="8" Canvas.Left="155" Canvas.Top="82" Fill="Gray" />
                         <Rectangle  Width="140" Height="10" Canvas.Left="40" Canvas.Top="90" Fill="Black" RadiusX="2" RadiusY="2"/>
                     </Canvas>
                 </Viewbox>
                 <ControlTemplate.Triggers>
                     <Trigger Property="StartAnimation" Value="true">
                         <Trigger.EnterActions>
                             <BeginStoryboard Name="moveStory">
                                 <Storyboard RepeatBehavior="Forever" SpeedRatio="4">
                                     <DoubleAnimationUsingKeyFrames
                                                 Storyboard.TargetName="canvas1"
                                                 Storyboard.TargetProperty="(Canvas.Top)"
                                                 Duration="0:0:6" >
                                         <LinearDoubleKeyFrame Value="0" KeyTime="0:0:0"/>
                                         <LinearDoubleKeyFrame Value="-10" KeyTime="0:0:1"/>
                                         <LinearDoubleKeyFrame Value="-20" KeyTime="0:0:2"/>
                                         <LinearDoubleKeyFrame Value="-30" KeyTime="0:0:3"/>
                                         <LinearDoubleKeyFrame Value="-40" KeyTime="0:0:4"/>
                                         <LinearDoubleKeyFrame Value="-50" KeyTime="0:0:5"/>
                                         <LinearDoubleKeyFrame Value="-60" KeyTime="0:0:6"/>
                                     </DoubleAnimationUsingKeyFrames>
                                     <DoubleAnimationUsingKeyFrames
                                                 Storyboard.TargetName="canvas2"
                                                 Storyboard.TargetProperty="(Canvas.Top)"
                                                 Duration="0:0:6" >
                                         <LinearDoubleKeyFrame Value="0" KeyTime="0:0:0"/>
                                         <LinearDoubleKeyFrame Value="-10" KeyTime="0:0:1"/>
                                         <LinearDoubleKeyFrame Value="-20" KeyTime="0:0:2"/>
                                         <LinearDoubleKeyFrame Value="-30" KeyTime="0:0:3"/>
                                         <LinearDoubleKeyFrame Value="-40" KeyTime="0:0:4"/>
                                         <LinearDoubleKeyFrame Value="-50" KeyTime="0:0:5"/>
                                         <LinearDoubleKeyFrame Value="-60" KeyTime="0:0:6"/>
                                     </DoubleAnimationUsingKeyFrames>
                                 </Storyboard>
                             </BeginStoryboard>
                         </Trigger.EnterActions>
                     </Trigger>
                     <Trigger Property="StopAnimation" Value="true">
                         <Trigger.EnterActions>
                             <StopStoryboard BeginStoryboardName="moveStory">
                             </StopStoryboard>
                         </Trigger.EnterActions>
                     </Trigger>
                     <Trigger Property="State" Value="1">
                         <Setter TargetName="rec1" Property="Fill" Value="SeaGreen"/>
                         <Setter TargetName="rec2" Property="Fill" Value="SeaGreen"/>
                         <Setter TargetName="rec3" Property="Fill" Value="SeaGreen"/>
                         <Setter TargetName="rec4" Property="Fill" Value="SeaGreen"/>
                         <Setter TargetName="rec5" Property="Fill" Value="SeaGreen"/>
                         <Setter TargetName="rec6" Property="Fill" Value="SeaGreen"/>
                         <Setter TargetName="rec7" Property="Fill" Value="SeaGreen"/>
                         <Setter TargetName="rec8" Property="Fill" Value="SeaGreen"/>
                         <Setter TargetName="rec9" Property="Fill" Value="SeaGreen"/>
                         <Setter TargetName="rec10" Property="Fill" Value="SeaGreen"/>
                         <Setter TargetName="rec11" Property="Fill" Value="SeaGreen"/>
                     </Trigger>
                 </ControlTemplate.Triggers>
             </ControlTemplate>
         </Setter.Value>
     </Setter>
 </Style>
四 效果演示
Xaml代碼如下:
<Window x:Class="WpfApp1.MainWindow"
        xmlns="http://schemas.microsoft.com/winfx/2006/xaml/presentation"
        xmlns:x="http://schemas.microsoft.com/winfx/2006/xaml"
        xmlns:d="http://schemas.microsoft.com/expression/blend/2008"
        xmlns:mc="http://schemas.openxmlformats.org/markup-compatibility/2006"
        xmlns:local="clr-namespace:WpfApp1"
        mc:Ignorable="d"
        Title="MainWindow" Height="768" Width="1366">
    <Canvas>
        <local:MechanicalPumpControl x:Name="pump" Canvas.Left="115" Canvas.Top="85"/>
        <Button Content="START" Width="60" Height="30"  Canvas.Left="363" Canvas.Top="94" Click="STARTButton_Click"/>
        <Button Content="STOP"  Width="60" Height="30"  Canvas.Left="363" Canvas.Top="143" Click="STOPButton_Click"/>
    </Canvas>
</Window>
後臺代碼如下:
public partial class MainWindow : Window
{
    public MainWindow()
    {
        InitializeComponent();
    }
    private void STARTButton_Click(object sender, RoutedEventArgs e)
    {
        pump.State = 1;
    }
    private void STOPButton_Click(object sender, RoutedEventArgs e)
    {
        pump.State = 0;
    }
}
__ 以 上 __


