Spring基本介紹02 5.簡單模擬Spring基於XML配置的程式 5.1需求說明 自己寫一個簡單的Spring容器,通過讀取beans.xml,獲取第一個Javabean:Monster的對象,給該對象屬性賦值,放入到容器中,並輸出該對象信息 也就是說,不使用spring原生框架,我們自己簡單 ...
Spring基本介紹02
5.簡單模擬Spring基於XML配置的程式
5.1需求說明
-
自己寫一個簡單的Spring容器,通過讀取beans.xml,獲取第一個Javabean:Monster的對象,給該對象屬性賦值,放入到容器中,並輸出該對象信息
-
也就是說,不使用spring原生框架,我們自己簡單模擬實現,目的是瞭解Spring容器的簡單機制
5.2思路分析

5.3代碼實現
引入dom4j.jar包

MyApplicationContext.java:
package com.li.myapplicationcontext;

import com.li.bean.Monster;
import org.dom4j.Document;
import org.dom4j.Element;
import org.dom4j.io.SAXReader;

import java.io.File;
import java.lang.reflect.Method;
import java.util.List;
import java.util.concurrent.ConcurrentHashMap;

/**
 * @author 李
 * @version 1.0
 * 1. 這個程式用於實現Spring的一個簡單容器機制
 * 2. 後面還會詳細的實現
 * 3. 這裡我們主要實現的是如何將beans.xml文件進行解析,並生成對象,放入容器中
 * 4. 然後提供一個getBean(id) 返回對應的對象
 */
public class MyApplicationContext {
    private ConcurrentHashMap<String, Object> singletonObjects
            = new ConcurrentHashMap<>();

    //構造器
    //接收一個容器的配置文件,如 beans.xml,預設路徑在src下
    public MyApplicationContext(String iocBeanXMLFile) throws Exception {
        //1.得到配置文件的類載入路徑
        String path = this.getClass().getResource("/").getPath();

        //2.創建 saxReader
        SAXReader saxReader = new SAXReader();

        //3.得到document對象
        Document document = saxReader.read(new File(path + iocBeanXMLFile));

        //4.得到rootDocument
        Element rootElement = document.getRootElement();

        //5.得到第一個bean-monster01
        Element bean = (Element) rootElement.elements("bean").get(0);

        //6.獲取到第一個bean的相關屬性(真實的情況下會把屬性保存到beanDefinitionMap中)
        String id = bean.attributeValue("id");//bean的id
        String classFullPath = bean.attributeValue("class");//類的全路徑
        List<Element> property = bean.elements("property");
        //原本是遍歷,這裡為了簡化,就直接獲取
        //property的value值
        Integer monsterId =
                Integer.parseInt(property.get(0).attributeValue("value"));
        String name = property.get(1).attributeValue("value");
        String skill = property.get(2).attributeValue("value");

        //7.反射創建對象
        Class<?> aClass = Class.forName(classFullPath);
        //這裡的 o對象就是Monster對象
        Monster o = (Monster) aClass.newInstance();
        //給對象賦值-這裡為了簡化,直接賦值(真實情況下會使用反射)
        o.setMonsterId(monsterId);
        o.setName(name);
        o.setSkill(skill);

        //8.將創建好的對象放到singletonObjects單例對象池中
        singletonObjects.put(id, o);
    }

    public Object getBean(String id) {
        return singletonObjects.get(id);
    }
}
Test.java用於測試:
package com.li.myapplicationcontext;


import com.li.bean.Monster;

/**
 * @author 李
 * @version 1.0
 */
public class Test {
    public static void main(String[] args) throws Exception {
        MyApplicationContext ioc = new MyApplicationContext("beans.xml");
        Monster monster01 = (Monster) ioc.getBean("monster01");
        System.out.println("monster01=" + monster01);
        System.out.println("monsterId=" + monster01.getMonsterId() +
                " name=" + monster01.getName() +
                " skill=" + monster01.getSkill());
    }
}

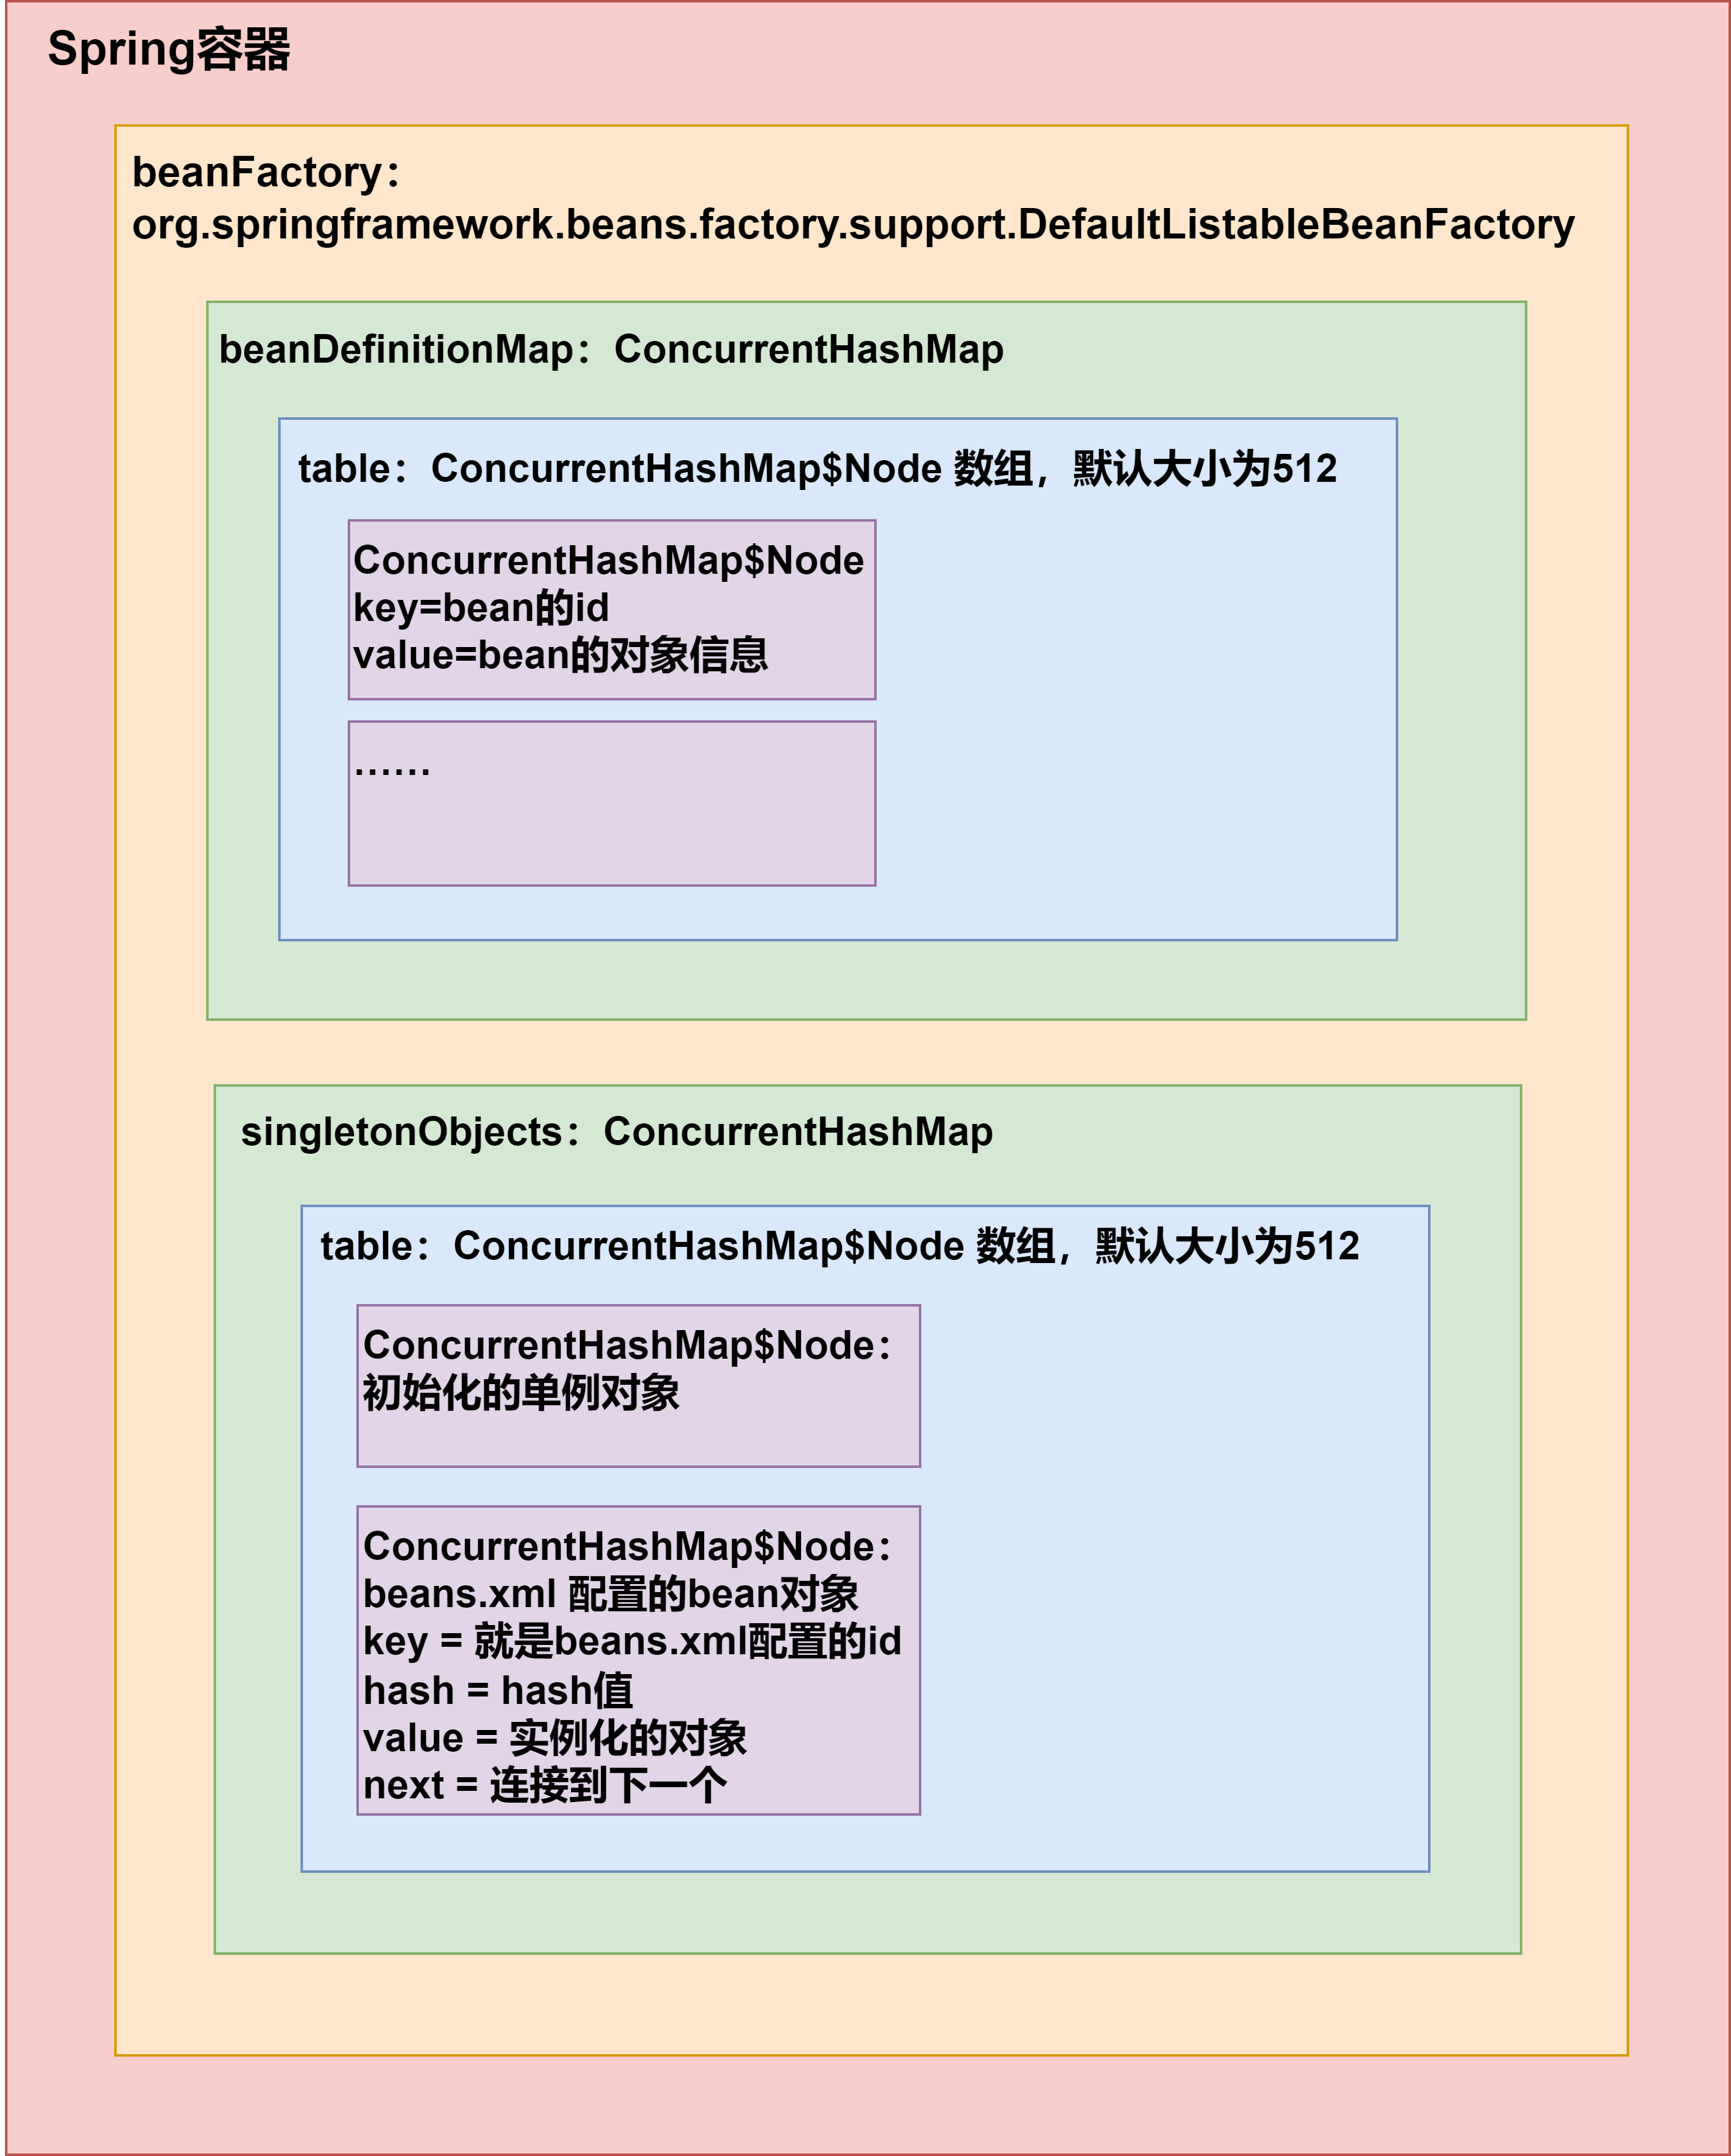
6.Spring原生容器底層結構梳理
我們之前在Spring基本介紹01--4.5Spring容器的結構/機制有一些基礎的分析,現在來梳理一下:

7.練習
7.1關於bean的id
如下,在beans.xml中,我們註入2個Monster對象,但是不指定bean的id
<bean class="com.li.bean.Monster">
    <property name="monsterId" value="100"/>
    <property name="name" value="牛魔王"/>
    <property name="skill" value="芭蕉扇"/>
</bean>

<bean class="com.li.bean.Monster">
    <property name="monsterId" value="200"/>
    <property name="name" value="紅孩兒"/>
    <property name="skill" value="三昧真火"/>
</bean>
問題1:運行會不會報錯?
答:不會報錯,可以正常運行。
問題2:如果不報錯,你是否能找到分配的id並獲取該對象?
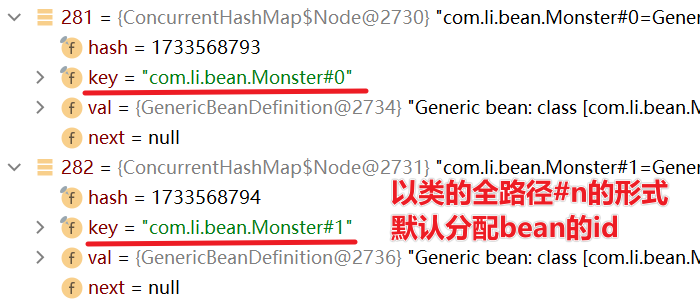
答:系統會預設分配id,分配id的規則是:全類名#0,全類名#1......全類名#n,這樣的規則來分配id
我們可以通過debug的方式來查看:
beanFactory.beanDefinitionMap.table:

package com.li.homework;

import com.li.bean.Monster;
import org.springframework.context.ApplicationContext;
import org.springframework.context.support.ClassPathXmlApplicationContext;
import org.testng.annotations.Test;

/**
 * @author 李
 * @version 1.0
 */
public class Homework01 {
    @Test
    public void getMonster() {
        ApplicationContext ioc =
                new ClassPathXmlApplicationContext("beans.xml");

        Monster monster01 = ioc.getBean("com.li.bean.Monster#0", Monster.class);
        System.out.println("monster01=" + monster01);
        System.out.println("monsterId=" + monster01.getMonsterId());

        Monster monster02 = ioc.getBean("com.li.bean.Monster#1", Monster.class);
        System.out.println("monster02=" + monster02);
        System.out.println("monsterId=" + monster02.getMonsterId());

        System.out.println("ok~~");
    }
}

在實際開發中不會省略bean的id
7.2練習2
創建一個Car類(屬性:id,name,price),具體要求如下:
- 創建ioc容器文件(即配置文件),並配置一個Car對象(bean)
- 通過java程式到ioc容器獲取該bean對象,並輸出
Car:
package com.li.bean;

/**
 * @author 李
 * @version 1.0
 */
public class Car {
    private Integer id;
    private String name;
    private Double price;

    public Car() {
    }

    public Car(Integer id, String name, Double price) {
        this.id = id;
        this.name = name;
        this.price = price;
    }

    public Integer getId() {
        return id;
    }

    public void setId(Integer id) {
        this.id = id;
    }

    public String getName() {
        return name;
    }

    public void setName(String name) {
        this.name = name;
    }

    public Double getPrice() {
        return price;
    }

    public void setPrice(Double price) {
        this.price = price;
    }

    @Override
    public String toString() {
        return "Car{" +
                "id=" + id +
                ", name='" + name + '\'' +
                ", price=" + price +
                '}';
    }
}
beans2.xml:
<?xml version="1.0" encoding="UTF-8"?>
<beans xmlns="http://www.springframework.org/schema/beans"
       xmlns:xsi="http://www.w3.org/2001/XMLSchema-instance"
       xsi:schemaLocation="http://www.springframework.org/schema/beans http://www.springframework.org/schema/beans/spring-beans.xsd">

    <bean class="com.li.bean.Car" id="car01">
        <property name="id" value="10001"/>
        <property name="name" value="寶馬"/>
        <property name="price" value="1230000"/>
    </bean>
</beans>
Homework02:
package com.li.homework;

import com.li.bean.Car;
import org.springframework.context.ApplicationContext;
import org.springframework.context.support.ClassPathXmlApplicationContext;
import org.testng.annotations.Test;

/**
 * @author 李
 * @version 1.0
 */
public class Homework02 {
    @Test
    public void getCart() {
        ApplicationContext ioc =
                new ClassPathXmlApplicationContext("beans2.xml");
        Car car = ioc.getBean("car01", Car.class);
        System.out.println(car);
    }
}


