
這裡給大家分享我在網上總結出來的一些知識,希望對大家有所幫助 一、audio標簽的使用 1、Audio 對象屬性 2、對象方法 二、效果 效果如下: 三、代碼 代碼如下: MusicPlayer.vue <template> <div class="music"> <!-- 占位 --> <div ...
這裡給大家分享我在網上總結出來的一些知識,希望對大家有所幫助

一、audio標簽的使用
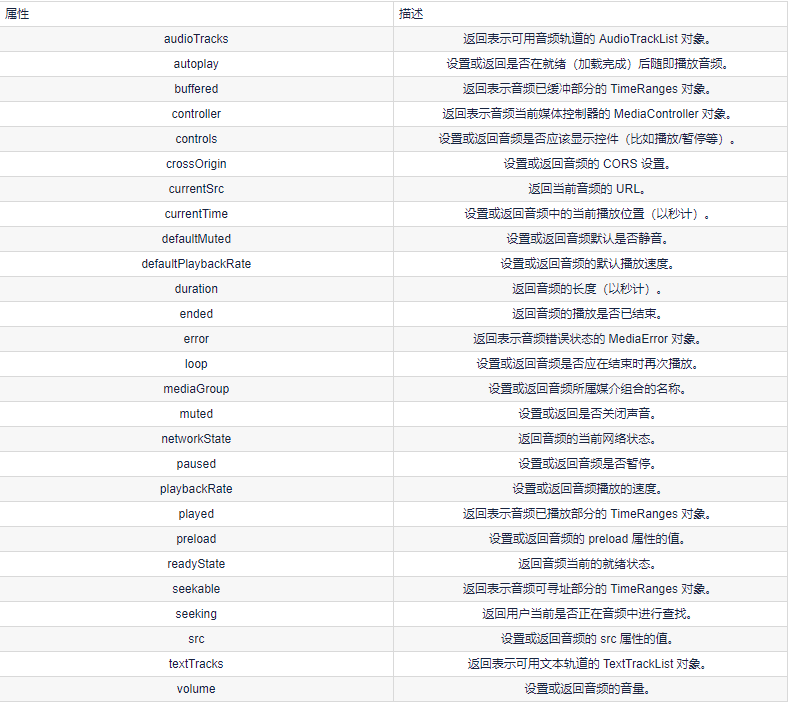
1、Audio 對象屬性
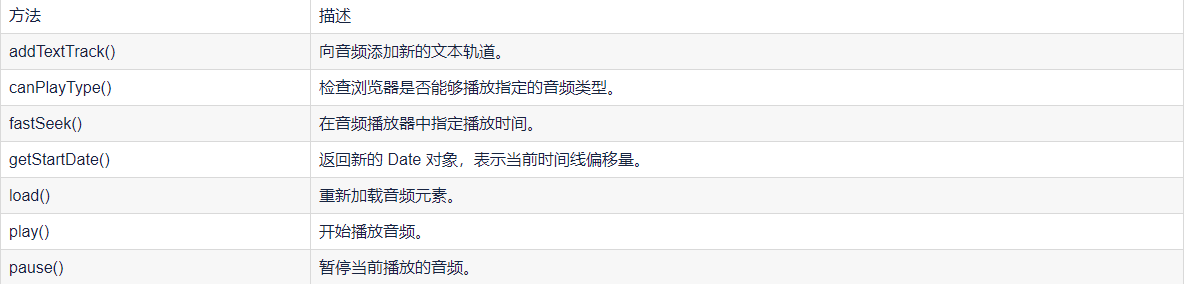
2、對象方法
二、效果
效果如下:

三、代碼
代碼如下: MusicPlayer.vue
<template>
    <div class="music">
        <!-- 占位 -->
        <div class="m_hold">

        </div>
        <div class="m_img">
            <img :src="this.$parent.songNames[this.$parent.index].png" width="90px" :class="this.$parent.isRun">
        </div>
        <!-- 歌曲信息 -->
        <div class="m_text">
            {{ this.$parent.songNames[this.$parent.index].name }}
            <div class="block" style="margin-top:5px">
                <el-slider :v-model="value1"></el-slider>
            </div>
        </div>
        <!-- 按鈕 -->
        <div class="m_btn">
            <a href="#" class="m_prev" @click="playLastSong()"></a>
            <a href="#" class="m_play" @click="changeState()" v-show="this.$parent.isShow"></a>
            <a href="#" class="m_pause" @click="changeState()" v-show="!this.$parent.isShow"></a>
            <a href="#" class="m_next" @click="playNextSong()"></a>
        </div>
        <!-- 摺疊功能 -->
        <div class="m_close" @click="changeCloseState()">
            <a href=""></a>
        </div>

    </div>
</template>

<script>
export default {
    name: 'MusicPlayer',
    data() {
        return {
            songName: '',
            value1:0

        }
    },
    methods: {
        changeState() {

            this.$emit("play")
        },
        changeCloseState() {
            this.$emit("hello");
        },
        playNextSong() {
            this.$emit("nextSongs");
            this.songName = this.$parent.songNames[this.$parent.index].name
        },
        playLastSong() {
            this.$emit("lastSongs");
            this.songName = this.$parent.songNames[this.$parent.index].name
        }
    },
    watch:
    {


    }, mounted() {
        this.songName = this.$parent.songNames[this.$parent.index].name
    }

}
</script>

<style scoped>
/* 關於播放器的樣式 */
.music {
    width: 100%;
    height: 120px;
    background: black;
    /* 相對瀏覽器定位 */
    position: absolute;
    left: 0px;
    bottom: 100px;
    border-bottom: 50px;
    /* 透明度 */
    opacity: 0.8;
    /* 陰影值 */
    box-shadow: 10px 15px 15px 1px black
}

.music .m_hold {
    float: left;
    width: 90px;
    height: 90px;
}

/* 調整音樂盒圖片 */
.music .m_img {
    margin-top: 15px;
    margin-left: 10px;
    margin-right: 10px;
    /* 左浮動 */
    float: left;
    width: 90px;
    height: 90px;
    border-radius: 50%;
    overflow: hidden;

}

/* 修改文字 */
.music .m_text {
    /* 左浮動 */
    float: left;
    color: white;
    font-size: 20px;
    /* 字體加粗 */
    font-weight: bold;
    margin-top: 25px;
    margin-left: 20px;
    margin-bottom: 10px;
    width: 25%;

}

/* 使得所有a標簽一起移動 */
.music .m_btn {
    float: left;
    position: absolute;
    /* 絕對定位:防止歌曲名稱過長,擠出div */
    left: 40%;
}

/* 修改a標簽 */
.music .m_btn a {
    width: 32px;
    height: 32px;
    float: left;
    margin-top: 50px;
    margin-left: 20px;
    background: url(@/assets/player_bg.png);

}

.music .m_btn .m_prev {
    background-position: -69px 0px;
}

.music .m_btn .m_next {
    background-position: -150px 0px;
}

.music .m_btn .m_play {
    background-position: -107px -5px;
}

.music .m_btn .m_prev:hover {
    background-position: -69px -32px;
}

.music .m_btn .m_next:hover {
    background-position: -150px -32px;
}

.music .m_btn .m_play:hover {
    background-position: -107px -47px;
}

.music .m_btn .m_pause {
    background-position: -292px -94px;
}

.music .m_btn .m_pause:hover {
    background-position: -334px -94px;
}

/* 還有一個懸停 沒寫 */
/* 設置最右邊的關閉樣式 */
.music .m_close {
    float: right;
    background: white;
    cursor: pointer;
    width: 23px;
    height: 100px;
    margin-top: 10px;
    background: url(@/assets/player_bg.png);

}

/* 設置最右邊的關閉樣式 */
.music_hide {
    float: left;
    background: white;
    cursor: pointer;
    width: 23px;
    height: 100px;
    margin-top: 2px;
}

.go {
    animation: bounce-in 2s linear infinite;
}

.come {
    animation: none;
}

@keyframes bounce-in {
    from {
        transform: rotate(0deg);
    }

    to {
        transform: rotate(360deg);
    }
}

.open-enter-active {
    animation: slide-in linear 0.5s;
}

.open-leave-active {
    animation: slide-in reverse linear 0.5s;
}

@keyframes slide-in {
    from {
        transform: translateX(-100%);
    }

    to {
        transform: translateX(0%);
    }
}
</style>
HideMusic.vue
<template>
    <div class="music_hide" @click="changeCloseState()"><a href="#" class="m_open"></a></div>
</template>

<script>
export default {
    name:'HidePlayer',
    methods:{
        changeCloseState()
        {
            this.$emit("hello");
        }
    }
}
</script>

<style scoped>
.music_hide {
    float: left;
    background: url(@/assets/player_bg.png);
    cursor: pointer;
    width: 23px;
    height: 100px;
    margin-top: 10px;
    bottom: 100px;
    position: absolute;
    background-position-x: -45px;
}
</style>
MyPlayer.vue
<template>
    <div>
        <transition name="open" mode="out-in">
            <component v-bind:is="view" @hello="changeSlideState" @play="changePlayState" @lastSongs="lastSongs"
                @nextSongs="nextSongs"></component>
        </transition>
        <audio class="m_mp3" id="m_mp3" :src="this.songNames[this.index].Url" autoplay loop>

        </audio>
    </div>

</template>

<script>
import HidePlayer from '@/part/HidePlayer'
import MusicPlayer from '@/part/MusicPlayer'
export default {
    name: 'MyPlayer',
    data() {
        return {
            view: MusicPlayer,
            isClose: false,
            isShow: true,
            isRun: 'come',
            index: 0,
            songNum: 2,
            currentTime: '0:00',
            duration: '0:00',
            songNames: [
                {
                    id: 1,
                    name: '張韶涵-篇章',
                    Url: require('@/assets/張韶涵-篇章.mp3'),
                    png: require('@/assets/篇章.png'),
                },
                {
                    id: 2,
                    name: '愛就一個字 抒情版',
                    Url: require('@/assets/愛就一個字 抒情版.mp3'),
                    png: require('@/assets/愛就一個字.png'),
                },
                {
                    id: 3,
                    name: '最偉大的作品-周傑倫',
                    Url: require('@/assets/最偉大的作品-周傑倫.mp3'),
                    png: require('@/assets/周傑倫.jpg'),
                },
                {
                    id: 4,
                    name: '等你下課 (with 楊瑞代)-周傑倫',
                    Url: require('@/assets/等你下課 (with 楊瑞代)-周傑倫.mp3'),
                    png: require('@/assets/等你下課.png'),
                },
                {
                    id: 5,
                    name: '告白氣球-周傑倫',
                    Url: require('@/assets/告白氣球-周傑倫.mp3'),
                    png: require('@/assets/告白氣球.png'),
                },
                {
                    id: 6,
                    name: '還在流浪-周傑倫',
                    Url: require('@/assets/還在流浪-周傑倫.mp3'),
                    png: require('@/assets/還在流浪.png'),
                },
            ]
        }
    },
    components: {
        HidePlayer,
        MusicPlayer
    },
    methods: {
        changeSlideState() {
            this.isClose = !this.isClose;
            if (this.isClose) {
                this.view = HidePlayer;
            } else {
                this.view = MusicPlayer;
            }
        },
        changePlayState() {
            if (!this.isShow) {
                this.isShow = true;
                this.isRun = "come";
                document.getElementById("m_mp3").pause();
            } else {
                this.isShow = false;
                this.isRun = "go";
                var my_mp3 = document.getElementById("m_mp3");
                my_mp3.play();


            }
        },
        nextSongs() {
            if (this.isShow) {
                this.isShow = false;
                this.isRun = "go";
            }
            this.index = (this.index + 1) % this.songNum;
        },
        lastSongs() {
            if (this.isShow) {
                this.isShow = false;
                this.isRun = "go";
            }
            if (this.index == 0) {
                this.index = this.songNum - 1;
            } else {
                this.index = this.index - 1;
            }

        }
    }, mounted() {
        this.songNum = this.songNames.length;

    }

}
</script>

<style scoped>
.open-enter-active {
    animation: slide-in linear 0.5s;
}

.open-leave-active {
    animation: slide-in reverse linear 0.5s;
}

@keyframes slide-in {
    from {
        transform: translateX(-100%);
    }

    to {
        transform: translateX(0%);
    }
}
</style>
四、難點解析
1、過渡動畫的實現

參考了vue文檔過渡&動畫中多個組件的過渡(下麵三份代碼)
<transition name="component-fade" mode="out-in">
  <component v-bind:is="view"></component>
</transition>
new Vue({
  el: '#transition-components-demo',
  data: {
    view: 'v-a'
  },
  components: {
    'v-a': {
      template: '<div>Component A</div>'
    },
    'v-b': {
      template: '<div>Component B</div>'
    }
  }
})
.component-fade-enter-active, .component-fade-leave-active {
  transition: opacity .3s ease;
}
.component-fade-enter, .component-fade-leave-to
/* .component-fade-leave-active for below version 2.1.8 */ {
  opacity: 0;
}
因此分化出MusicPlayer.vue 和 HideMusic.vue,由此又產生了組件內通信的問題。
2、組件內通信
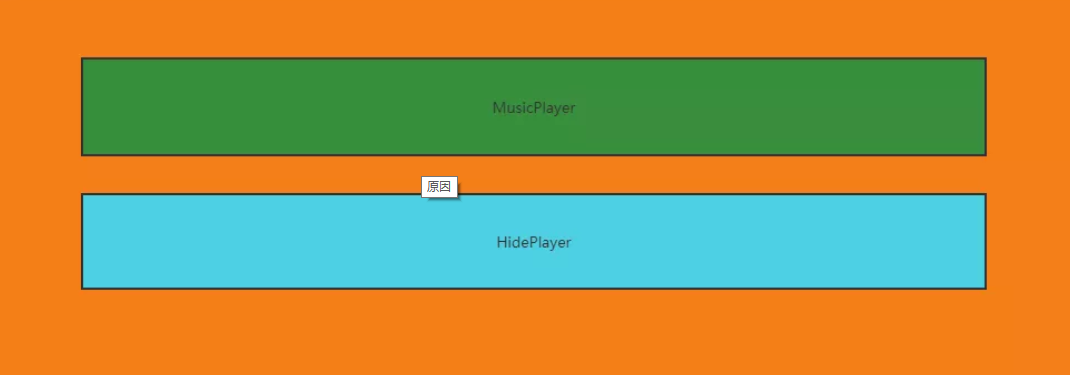
為什麼會產生組件內的通信?原因在於:MusicPlayer組件和HidePlayer組件,只能有一個展示,但是在不展示的過程中,他的數據應該也是實時改變的。例如MusicPlayer組件上有播放按鈕,如果不採用組件通信,那麼MusicPlayer重新渲染的時候,播放按鈕會回到最初的設定,是不符合邏輯的。所以需要採用組件內通信的方式。實現的方式也比較簡單,子組件直接訪問父組件的數據,子組件通過$emit調用父組件的方法,修改父組件的數據。
3、旋轉動畫的實現
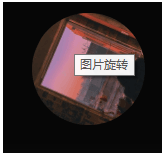
首先,編寫動畫。
.go {
    animation: bounce-in 2s linear infinite;
}

.come {
    animation: none;
}

@keyframes bounce-in {
    from {
        transform: rotate(0deg);
    }

    to {
        transform: rotate(360deg);
    }
}
然後,動態綁定class,isRun兩個值即為"go","come"。
<div class="m_img">
   <img :src="this.$parent.songNames[this.$parent.index].png" width="90px" :class="this.$parent.isRun">
</div>
本文轉載於:
https://blog.51cto.com/u_15807146/5807883
如果對您有所幫助,歡迎您點個關註,我會定時更新技術文檔,大家一起討論學習,一起進步。


