
上一節,描述了服務發現、負載均衡以及服務之間的調用。到這裡,加上第二節的服務註冊,整個微服務的架構就已經搭建出來了,即功能性需求就完成了。從本節開始的記錄其實全部都是非功能性需求。 一、集群容錯 技術選型:hystrix。(就是上圖中熔斷器) 熔斷的作用: 第一個作用: 假設有兩台伺服器server ...
上一節,描述了服務發現、負載均衡以及服務之間的調用。到這裡,加上第二節的服務註冊,整個微服務的架構就已經搭建出來了,即功能性需求就完成了。從本節開始的記錄其實全部都是非功能性需求。
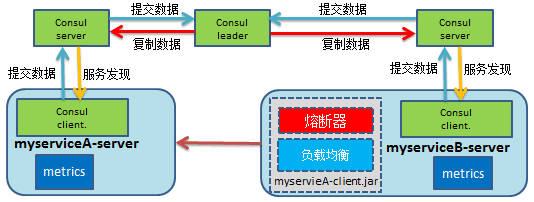
一、集群容錯
技術選型:hystrix。(就是上圖中熔斷器)
熔斷的作用:
第一個作用:
假設有兩台伺服器server1(假設可以處理的請求閾值是1W請求)和server2,在server1上註冊了三個服務service1、service2、service3,在server2上註冊了一個服務service4,假設service4服務響應緩慢,service1調用service4時,一直在等待響應,那麼在高併發下,很快的server1處很快就會達到請求閾值(server1很快就會耗盡處理線程)之後可能宕機,這時候,不只是service1不再可用,server1上的service2和service3也不可用了。
如果我們引入了hystrix,那麼service1調用service4的時候,當發現service4超時,立即斷掉不再執行,執行getFallback邏輯。這樣的話,server1就不會耗盡處理線程,server1上的其他服務也是可用的。當然,這是在合理的配置了超時時間的情況下,如果超時時間設置的太長的話,還是會出現未引入hystrix之前的情況。
第二個作用:
當被調服務經常失敗,比如說在10min(可配)中之內調用了20次,失敗了15次(可配),那麼我們認為這個服務是失敗的,先關閉該服務,等一會兒後再自動重新啟動該服務!(這是真正的熔斷!)
二、實現
由於代碼變動比較大,我會列出全部關鍵代碼。
1、framework

1.1、pom.xml


  1 <?xml version="1.0" encoding="UTF-8"?>
  2 <project xmlns="http://maven.apache.org/POM/4.0.0" xmlns:xsi="http://www.w3.org/2001/XMLSchema-instance"
  3     xsi:schemaLocation="http://maven.apache.org/POM/4.0.0 http://maven.apache.org/maven-v4_0_0.xsd">
  4
  5     <modelVersion>4.0.0</modelVersion>
  6
  7     <parent>
  8         <groupId>org.springframework.boot</groupId>
  9         <artifactId>spring-boot-starter-parent</artifactId>
 10         <version>1.3.0.RELEASE</version>
 11     </parent>
 12
 13     <groupId>com.microservice</groupId>
 14     <artifactId>framework</artifactId>
 15     <version>1.0-SNAPSHOT</version>
 16
 17     <properties>
 18         <java.version>1.8</java.version><!-- 官方推薦 -->
 19     </properties>
 20
 21     <!-- 引入實際依賴 -->
 22     <dependencies>
 23         <dependency>
 24             <groupId>org.springframework.boot</groupId>
 25             <artifactId>spring-boot-starter-web</artifactId>
 26         </dependency>
 27         <!-- consul-client -->
 28         <dependency>
 29             <groupId>com.orbitz.consul</groupId>
 30             <artifactId>consul-client</artifactId>
 31             <version>0.10.0</version>
 32         </dependency>
 33         <!-- consul需要的包 -->
 34         <dependency>
 35             <groupId>org.glassfish.jersey.core</groupId>
 36             <artifactId>jersey-client</artifactId>
 37             <version>2.22.2</version>
 38         </dependency>
 39         <dependency>
 40             <groupId>com.alibaba</groupId>
 41             <artifactId>fastjson</artifactId>
 42             <version>1.1.15</version>
 43         </dependency>
 44         <!-- 引入監控工具,包含health檢查(用於consul註冊) -->
 45         <dependency>
 46             <groupId>org.springframework.boot</groupId>
 47             <artifactId>spring-boot-starter-actuator</artifactId>
 48         </dependency>
 49         <!-- 引入lombok,簡化pojo -->
 50         <dependency>
 51             <groupId>org.projectlombok</groupId>
 52             <artifactId>lombok</artifactId>
 53             <version>1.16.8</version>
 54         </dependency>
 55         <!-- 引入swagger2 -->
 56         <dependency>
 57             <groupId>io.springfox</groupId>
 58             <artifactId>springfox-swagger2</artifactId>
 59             <version>2.2.2</version>
 60         </dependency>
 61         <dependency>
 62             <groupId>io.springfox</groupId>
 63             <artifactId>springfox-swagger-ui</artifactId>
 64             <version>2.2.2</version>
 65         </dependency>
 66         <!-- retrofit -->
 67         <dependency>
 68             <groupId>com.squareup.retrofit</groupId>
 69             <artifactId>retrofit</artifactId>
 70             <version>1.9.0</version>
 71         </dependency>
 72         <!-- converter-jackson -->
 73         <dependency>
 74             <groupId>com.squareup.retrofit</groupId>
 75             <artifactId>converter-jackson</artifactId>
 76             <version>1.9.0</version>
 77         </dependency>
 78         <!-- okhttp -->
 79         <dependency>
 80             <groupId>com.squareup.okhttp</groupId>
 81             <artifactId>okhttp</artifactId>
 82             <version>2.4.0</version>
 83         </dependency>
 84         <!-- hystrix -->
 85         <dependency>
 86             <groupId>com.netflix.hystrix</groupId>
 87             <artifactId>hystrix-core</artifactId>
 88             <version>1.5.3</version>
 89         </dependency>
 90         <dependency>
 91             <groupId>com.netflix.hystrix</groupId>
 92             <artifactId>hystrix-metrics-event-stream</artifactId>
 93             <version>1.5.3</version>
 94         </dependency>
 95     </dependencies>
 96
 97     <build>
 98         <plugins>
 99             <plugin>
100                 <groupId>org.springframework.boot</groupId>
101                 <artifactId>spring-boot-maven-plugin</artifactId>
102             </plugin>
103         </plugins>
104     </build>
105 </project>
View Code
1.2、啟動類
 1 package com.microservice;
 2
 3 import org.springframework.boot.SpringApplication;
 4 import org.springframework.boot.autoconfigure.SpringBootApplication;
 5
 6 import com.microservice.consul.ConsulRegisterListener;
 7
 8 import springfox.documentation.swagger2.annotations.EnableSwagger2;
 9
10 /**
11  * 註意:@SpringBootApplication該註解必須在SpringApplication.run()所在的類上
12  */
13 @SpringBootApplication
14 @EnableSwagger2
15 public class MySpringAplication {
16
17     public void run(String[] args) {
18         SpringApplication sa = new SpringApplication(MySpringAplication.class);
19         sa.addListeners(new ConsulRegisterListener());
20         sa.run(args);
21     }
22
23     public static void main(String[] args) {
24     }
25 }
View Code
1.3、服務註冊(consul包)
1.3.1、ConsulProperties
 1 package com.microservice.consul;
 2
 3 import org.springframework.beans.factory.annotation.Value;
 4 import org.springframework.stereotype.Component;
 5
 6 import lombok.Getter;
 7 import lombok.Setter;
 8
 9 @Component
10 @Getter @Setter
11 public class ConsulProperties {
12
13     @Value("${service.name}")
14     private String servicename;
15     @Value("${service.port:8080}")
16     private int servicePort;
17     @Value("${service.tag:dev}")
18     private String serviceTag;
19     @Value("${health.url}")
20     private String healthUrl;
21     @Value("${health.interval:10}")
22     private int healthInterval;
23
24 }
View Code
1.3.2、ConsulConfig
 1 package com.microservice.consul;
 2
 3 import org.springframework.context.annotation.Bean;
 4 import org.springframework.context.annotation.Configuration;
 5
 6 import com.orbitz.consul.Consul;
 7
 8 @Configuration
 9 public class ConsulConfig {
10
11     @Bean
12     public Consul consul(){
13         return Consul.builder().build();
14     }
15 }
View Code
1.3.3、ConsulRegisterListener
 1 package com.microservice.consul;
 2
 3 import java.net.MalformedURLException;
 4 import java.net.URI;
 5
 6 import org.springframework.context.ApplicationListener;
 7 import org.springframework.context.event.ContextRefreshedEvent;
 8
 9 import com.orbitz.consul.AgentClient;
10 import com.orbitz.consul.Consul;
11
12 /**
13  * 監聽contextrefresh事件
14  */
15 public class ConsulRegisterListener implements ApplicationListener<ContextRefreshedEvent> {
16
17     @Override
18     public void onApplicationEvent(ContextRefreshedEvent event) {
19         Consul consul = event.getApplicationContext().getBean(Consul.class);
20         ConsulProperties prop = event.getApplicationContext().getBean(ConsulProperties.class);
21
22         AgentClient agentClient = consul.agentClient();
23         try {
24             agentClient.register(prop.getServicePort(),
25                                  URI.create(prop.getHealthUrl()).toURL(),
26                                  prop.getHealthInterval(),
27                                  prop.getServicename(),
28                                  prop.getServicename(), // serviceId:
29                                  prop.getServiceTag());
30         } catch (MalformedURLException e) {
31             e.printStackTrace();
32         }
33     }
34
35 }
View Code
1.4、服務發現+負載均衡(loadBalance包)
1.4.1、ServerAddress
 1 package com.microservice.loadBalancer;
 2
 3 import lombok.AllArgsConstructor;
 4 import lombok.Getter;
 5 import lombok.Setter;
 6
 7 /**
 8  * 這裡只做簡單的封裝,如果需要複雜的,可以使用java.net.InetAddress類
 9  */
10 @Getter @Setter
11 @AllArgsConstructor
12 public class ServerAddress {
13     private String ip;
14     private int port;
15 }
View Code
1.4.2、MyLoadBalancer
 1 package com.microservice.loadBalancer;
 2
 3 import java.util.ArrayList;
 4 import java.util.List;
 5 import java.util.Random;
 6
 7 import org.springframework.beans.factory.annotation.Autowired;
 8 import org.springframework.stereotype.Component;
 9
10 import com.orbitz.consul.Consul;
11 import com.orbitz.consul.HealthClient;
12 import com.orbitz.consul.model.health.ServiceHealth;
13
14 /**
15  * 實現思路:
16  * 1、拉取可用服務列表(服務發現)serverList
17  * 2、緩存到本地guava cache中去,以後每隔10min從consulServer拉取一次(這裡這樣做的原因,是因為consul沒有做這樣的事)
18  * 3、使用配置好的路由演算法選出其中1台,執行邏輯
19  */
20 @Component
21 public class MyLoadBalancer {
22
23     @Autowired
24     private Consul consul;
25
26     /**
27      * 獲取被調服務的服務列表
28      * @param serviceName 被調服務
29      */
30     public List<ServerAddress> getAvailableServerList(String serviceName){
31         List<ServerAddress> availableServerList = new ArrayList<>();
32         HealthClient healthClient = consul.healthClient();//獲取Health http client
33         List<ServiceHealth> availableServers = healthClient.getHealthyServiceInstances(serviceName).getResponse();//從本地agent查找所有可用節點
34         availableServers.forEach(x->availableServerList.add(new ServerAddress(x.getNode().getAddress(), x.getService().getPort())));
35         return availableServerList;
36     }
37
38     /**
39      * 選擇一臺伺服器
40      * 這裡使用隨機演算法,如果需要換演算法,我們可以抽取介面進行編寫
41      */
42     public ServerAddress chooseServer(String serviceName){
43         List<ServerAddress> servers = getAvailableServerList(serviceName);
44         Random random = new Random();
45         int index = random.nextInt(servers.size());
46         return servers.get(index);
47     }
48
49 }
View Code
以上代碼均與第三節一樣。這的負載均衡之後會用ribbon來做。
1.5、服務通信(retrofit)+集群容錯(hystrix)
註意:這裡我先給出代碼,最後我會好好的說一下調用流程。
1.5.1、RestAdapterConfig
 1 package com.microservice.retrofit;
 2
 3 import org.springframework.beans.factory.annotation.Autowired;
 4 import org.springframework.stereotype.Component;
 5
 6 import com.microservice.loadBalancer.MyLoadBalancer;
 7 import com.microservice.loadBalancer.ServerAddress;
 8
 9 import retrofit.RestAdapter;
10 import retrofit.converter.JacksonConverter;
11
12 @Component
13 public class RestAdapterConfig {
14
15     @Autowired
16     private MyLoadBalancer myLoadBalancer;
17
18     /**
19      * 負載均衡並且創建傳入的API介面實例
20      */
21     public <T> T create(Class<T> tclass, String serviceName) {
22         String commandGroupKey = tclass.getSimpleName();// 獲得簡單類名作為groupKey
23
24         ServerAddress server = myLoadBalancer.chooseServer(serviceName);// 負載均衡
25         RestAdapter restAdapter = new RestAdapter.Builder()
26                                   .setConverter(new JacksonConverter())
27                                   .setErrorHandler(new MyErrorHandler())
28                                   .setClient(new MyHttpClient(server, commandGroupKey))
29                                   .setEndpoint("/").build();
30         T tclassInstance = restAdapter.create(tclass);
31         return tclassInstance;
32     }
33 }
View Code
說明:這裡我們定義了自己的retrofit.Client和自己的retrofit.ErrorHandler
1.5.2、MyHttpClient(自定義retrofit的Client)
 1 package com.microservice.retrofit;
 2
 3 import java.io.IOException;
 4
 5 import com.microservice.hystrix.HttpHystrixCommand;
 6 import com.microservice.loadBalancer.ServerAddress;
 7 import com.netflix.hystrix.HystrixCommand.Setter;
 8 import com.netflix.hystrix.HystrixCommandGroupKey;
 9 import com.netflix.hystrix.HystrixCommandProperties;
10
11 import retrofit.client.Client;
12 import retrofit.client.Request;
13 import retrofit.client.Response;
14
15 public class MyHttpClient implements Client {
16     private ServerAddress server;
17     private String commandGroupKey;
18     private int hystrixTimeoutInMillions = 3000;// 這裡暫且將數據硬編碼在這裡(之後會改造)
19
20     public MyHttpClient(ServerAddress server, String commandGroupKey) {
21         this.server = server;
22         this.commandGroupKey = commandGroupKey;
23     }
24
25     @Override
26     public Response execute(Request request) throws IOException {
27         Setter setter = Setter.withGroupKey(HystrixCommandGroupKey.Factory.asKey(commandGroupKey));
28         setter.andCommandPropertiesDefaults(HystrixCommandProperties.Setter().withExecutionTimeoutInMilliseconds(hystrixTimeoutInMillions));
29         return new HttpHystrixCommand(setter, server, request).execute();// 同步執行
30     }
31 }
View Code
說明:在execute()中引入了hystrix
- 定義了hystrix的commandGroupKey是服務名(eg.myserviceA,被調用服務名)
- 沒有定義commandKey(通常commandKey是服務的一個方法名,例如myserviceA的client的getProvinceByCityName),通常該方法名是被調用服務的client中的被調用方法名
- 硬編碼了hystrix的超時時間(這裡的硬編碼會通過之後的配置集中管理來處理)
1.5.3、HttpHystrixCommand(hystrix核心類)
 1 package com.microservice.hystrix;
 2
 3 import java.util.ArrayList;
 4 import java.util.List;
 5
 6 import org.slf4j.Logger;
 7 import org.slf4j.LoggerFactory;
 8
 9 import com.microservice.loadBalancer.ServerAddress;
10


