
前言 所謂熱部署,簡單來說,就是代碼修改後不需重啟項目就可自動載入出新的內容。 ==註意:熱部署在 debug 調試模式下才生效!== IDEA 配置 在 IDE(IDEA)中開啟相關項目自動構建選項 開啟編譯器設置中修改後自動編譯的選項(下圖是 IDEA 2021版本,其他版本可能在其他位置) S ...
@
目錄- 自己添加的後端管理頁面
- 鋒迷商城項目
- 鋒迷商城資料庫設計
- 十一、添加購物車的功能實現
- 十二、添加購物車時候用戶未登錄
- 十三購物車的列表
- 十四購物車提交訂單結算功能實現
- 十五、訂單提交及支付流程
- swagger報錯解決
- 十六 商品個人中心訂單信息的查詢
- 20.鋒迷項目的後端雲部署
- 21.前端的項目的部署在雲伺服器上面
- Tomcat作為前端項目的弊端
- 22.Nginx
- 23.前端項目部署在Nginx上面
- 24.Linux安裝Nginx(線上安裝)
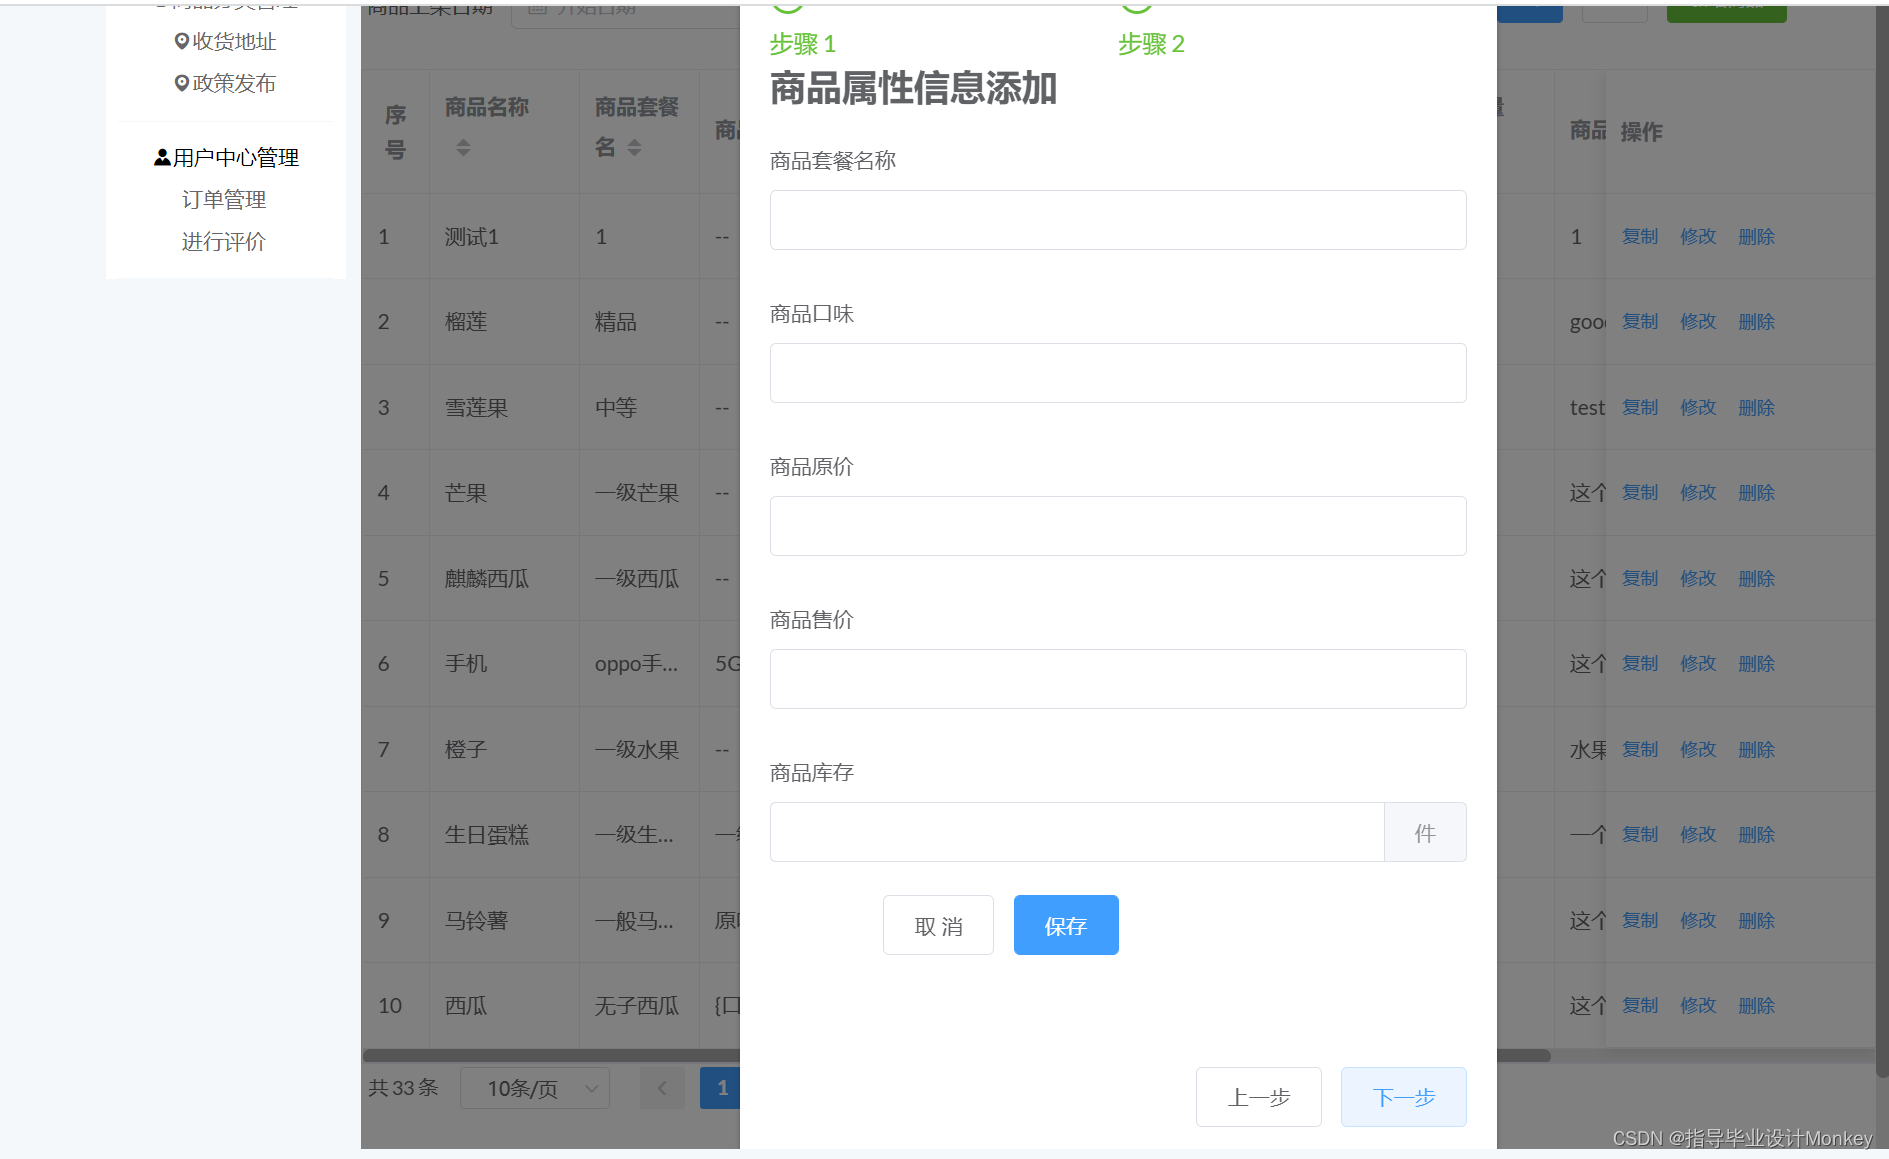
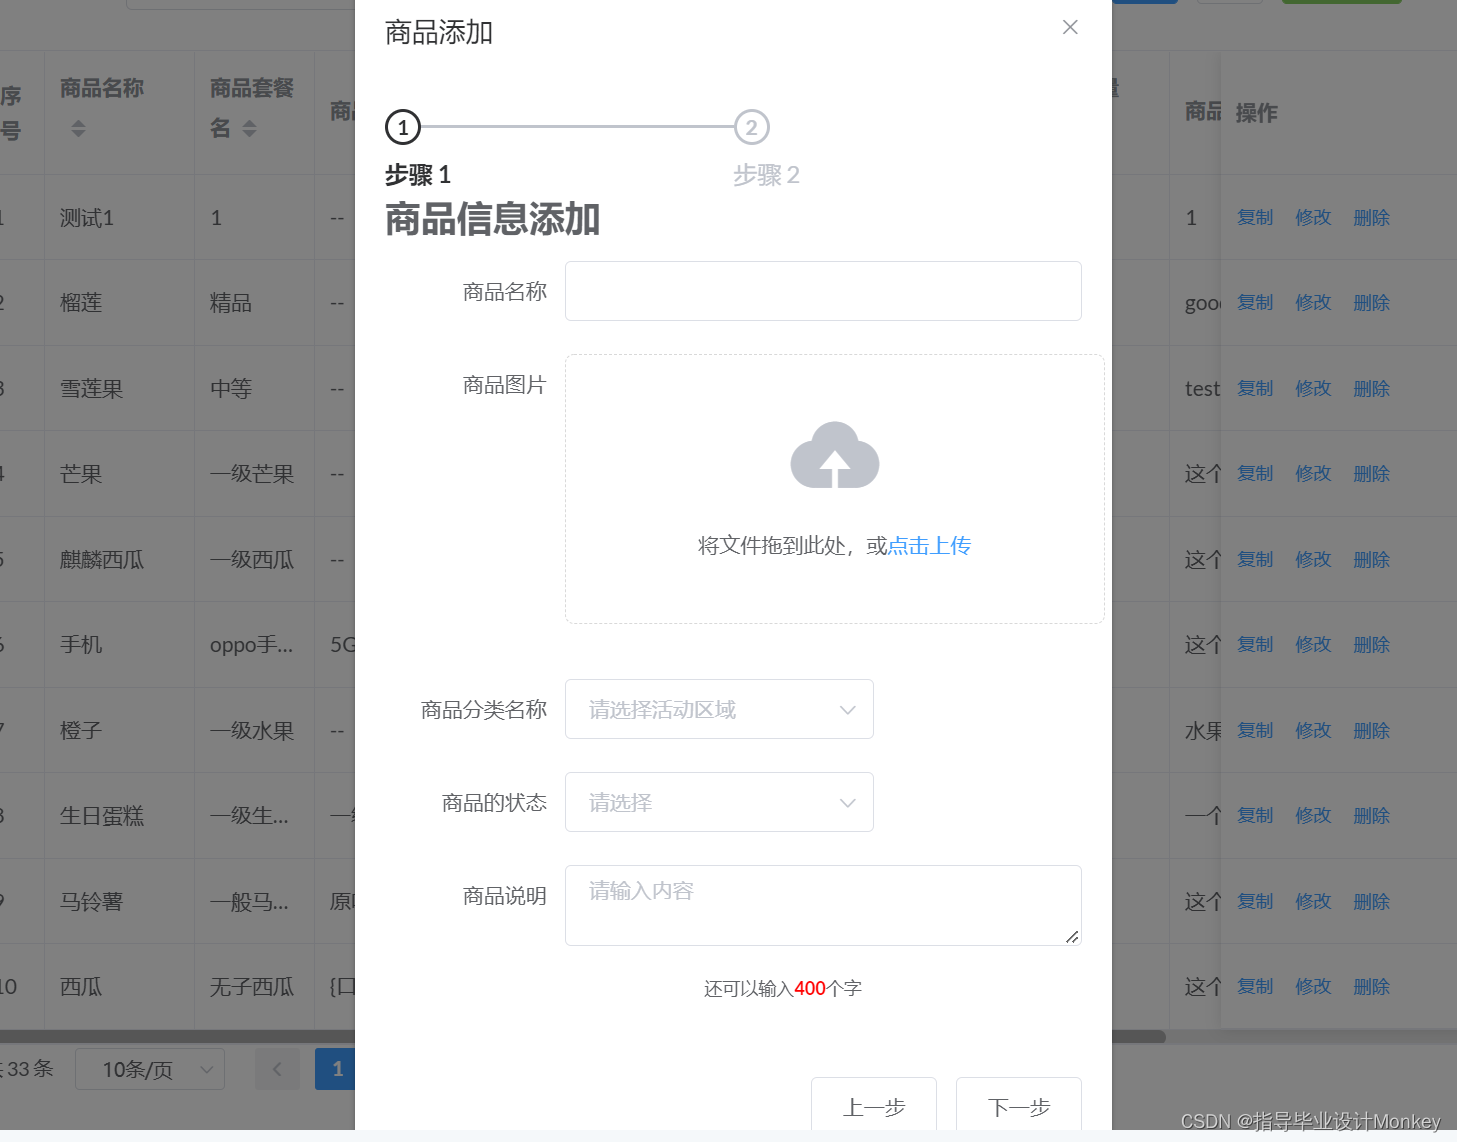
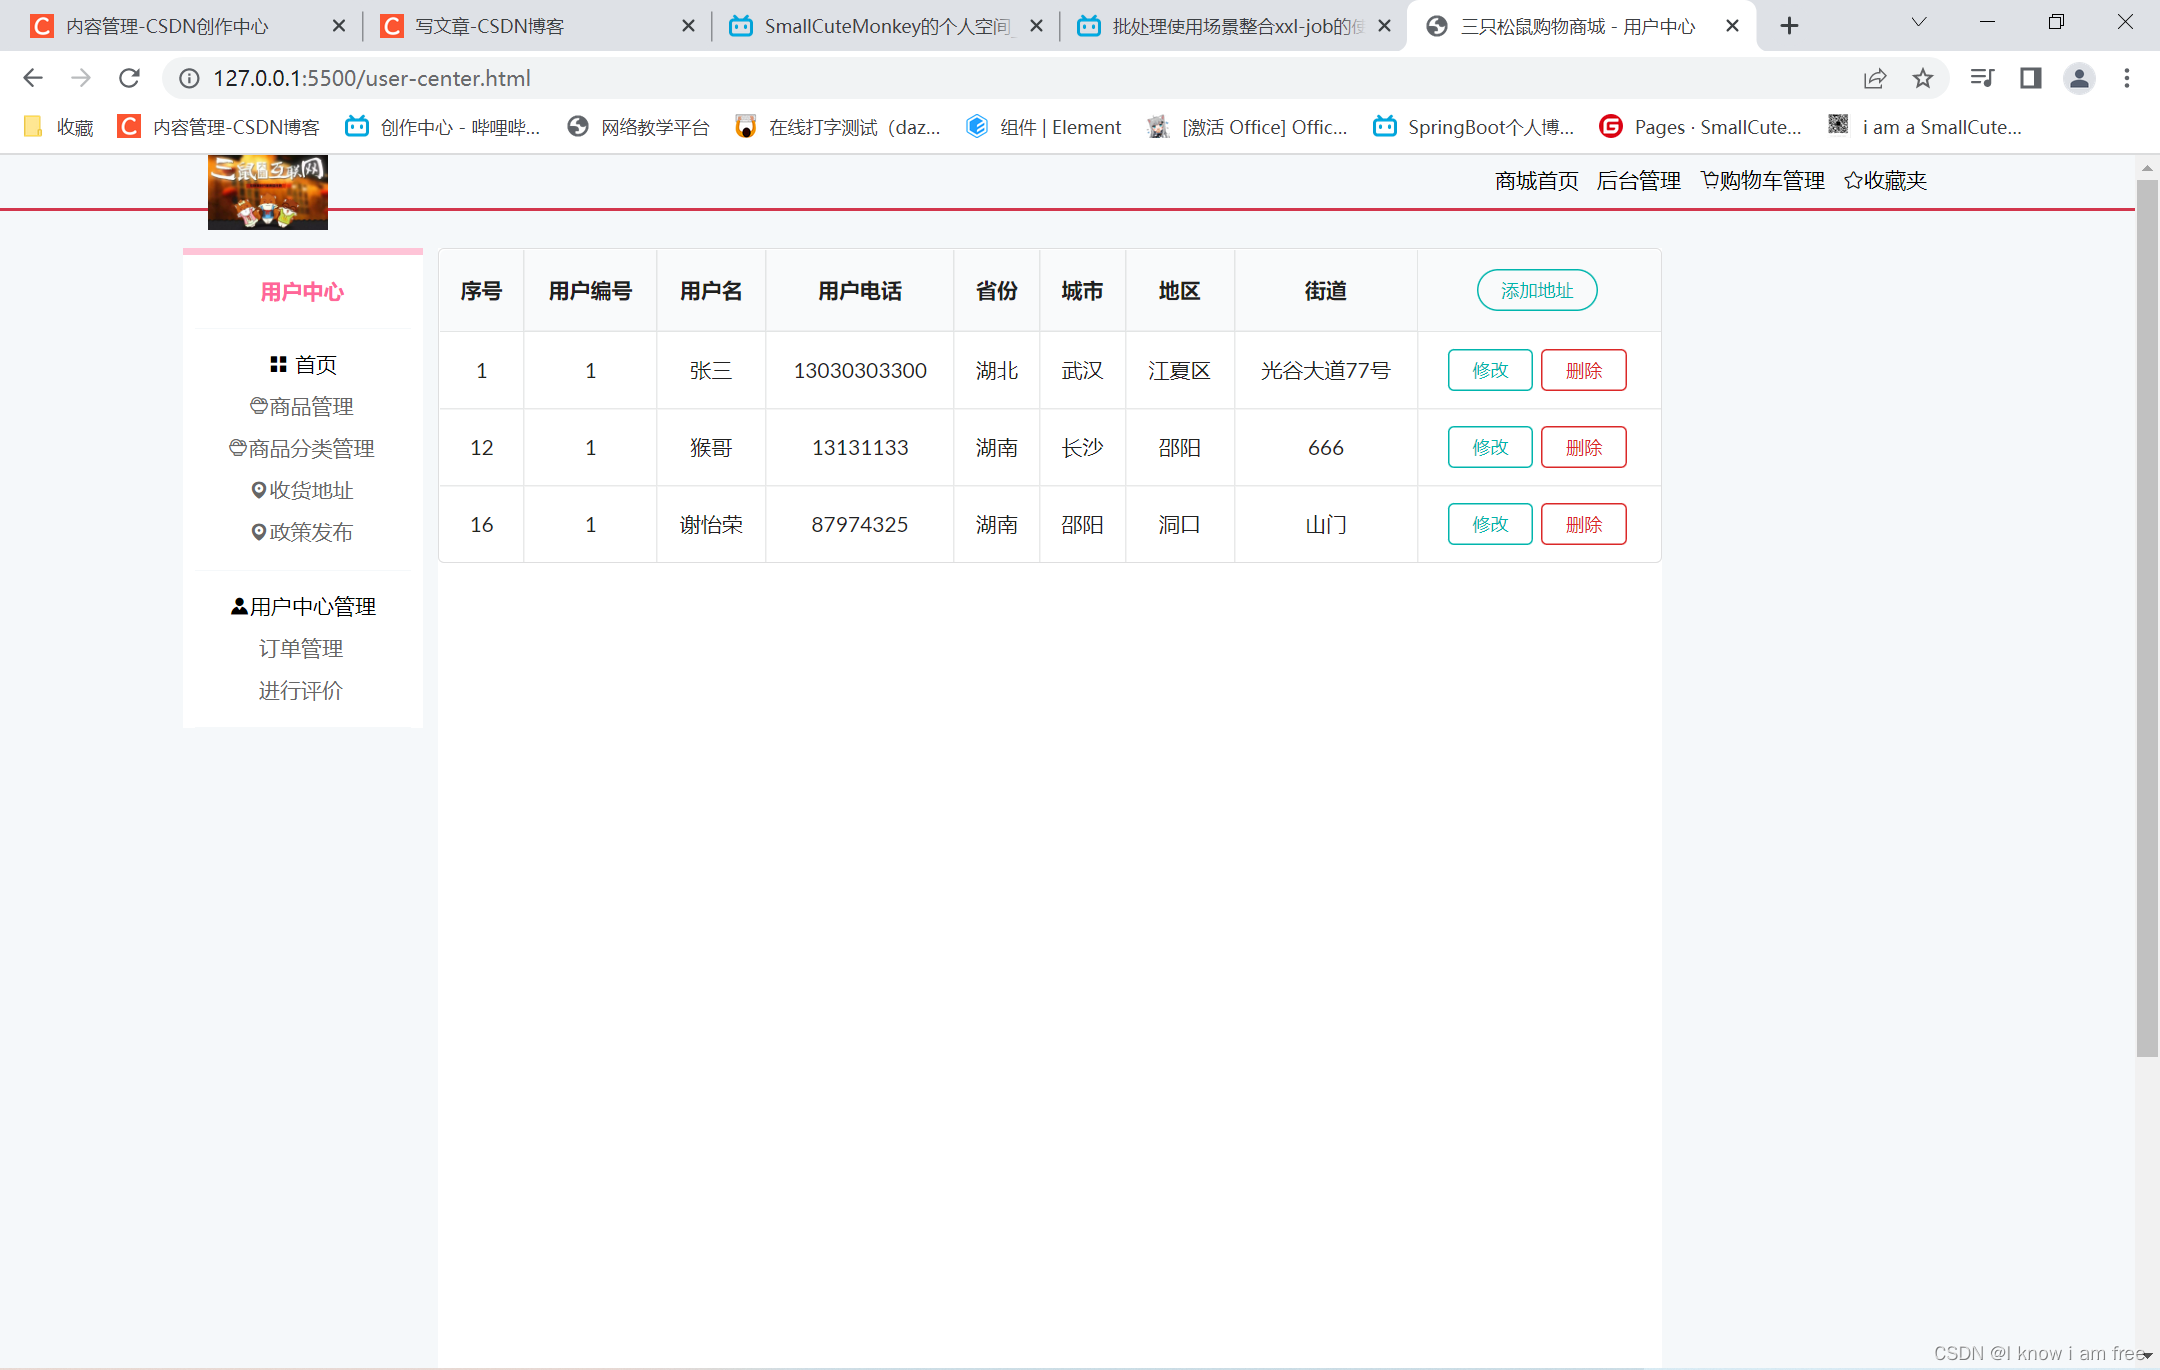
自己添加的後端管理頁面
視頻演示效果
[video(video-CZIQF8d5-1652505187791)(type-bilibili)(url-https://player.bilibili.com/player.html?aid=641370075)(image-https://img-blog.csdnimg.cn/img_convert/6fc48aff3f62b207e20ca7badb21395a.png)(title-畢業設計SpringBoot+Vue+ElementUI商城系統實現(有後臺))]
論文地址
後臺代碼視頻實現講解思路
[video(video-zgz2Gybc-1667056389114)(type-bilibili)(url-https://player.bilibili.com/player.html?aid=816242633)(image-https://img-blog.csdnimg.cn/img_convert/69a030b2c0a14349f093065947c707ae.jpeg)(title-畢業設計鋒迷商城手敲後臺管理,實現邏輯講解,代碼講解)]
1. 商品管理
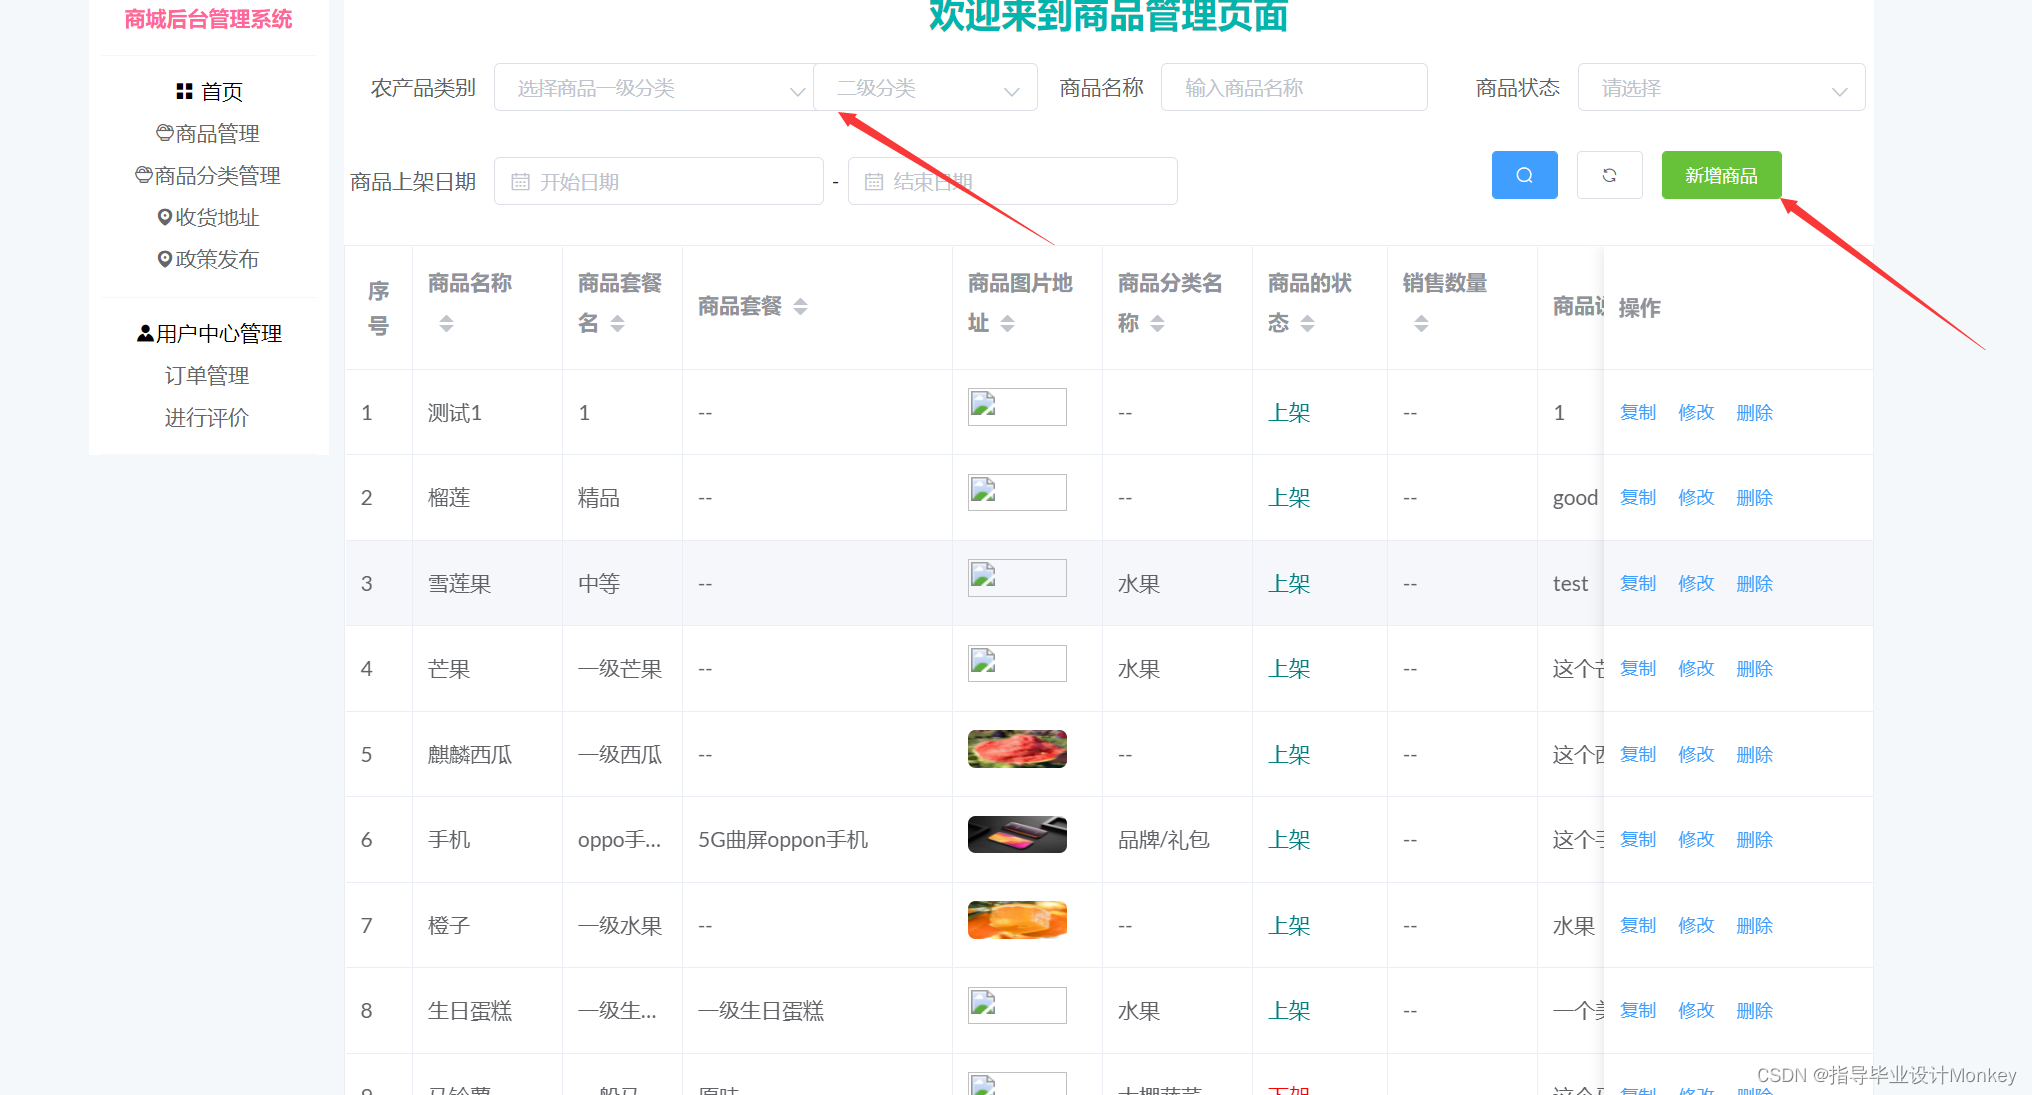
2.商品分類管理

3.商品地址管理
4.用戶中心管理
4. 用戶許可權管理
5.訂單管理
5.1
6.商品品牌管理
鋒迷商城項目
使用Maven聚合項目進行創建(一個maven的父項目多個maven的子項目),
可以在父項目pom.xml文件中加上:
<package>pom<package>
[外鏈圖片轉存失敗,源站可能有防盜鏈機制,建議將圖片保存下來直接上傳(img-aKHt478Q-1633568521449)(C:\Users\CourageAndLove\AppData\Roaming\Typora\typora-user-images\image-20210812151308862.png)]
1.通過Maven聚合工程搭建項目:
1. 創建一個Maven的父項目,然後修改它的pom.xml文件,可以刪除src等一些沒有用的目錄
<packaging>pom<packaing>
2.在父項目下麵創建多個module,包括(common,beans,mapper,service,api)把它們全部打包成jar包
pom.xml加上
<packaging>jar</packaging>
3.由於mapper層需要調用beans層(pojo),需要在pom.xml文件中,然後可以在mapper中加入相關的依賴。
   <dependencies>

<!--        mapper需要用到Beans所以需要加上beans的依賴-->
        <dependency>
            <groupId>org.example</groupId>
            <artifactId>beans</artifactId>
            <version>2.0.1</version>
        </dependency>
    </dependencies>
4.創建service需要調用mapper,和common,需要在pom.xml文件中加上
 <dependency>
            <groupId>org.example</groupId>
            <artifactId>mapper</artifactId>
            <version>2.0.1</version>
        </dependency>
        <dependency>
            <groupId>org.example</groupId>
            <artifactId>common</artifactId>
            <version>2.0.1</version>
        </dependency>
5.api層需要接收前端的請求所以需要我們創建一個SpringBoot工程,你可以創建一個Maven工程,然後加入相關的依賴
6.api子工程,對外提供介面
總的說父項目的所以依賴可以被子項目引用,子項目也可以單獨的添加所需的依賴
鋒迷商城資料庫設計
2.軟體開發步驟
-
提出問題
-
可行性分析(技術(一般可以相關人員實現),成本,法律法規)
-
概要設計
- 系統設計(技術選型,架構模式)
- 資料庫設計
- UI設計
- 業務流程設計
-
詳細設計
- 實現步驟(業務流程的實現細節)
-
編碼
- 根據設計好的實現步驟進行代碼實現
- 開發過程使用單元測試
-
測試
- 集成測試
- 功能測試(墨盒)
- 性能測試(白盒)高併發,壓力測試
-
交付/部署實施
3.資料庫設計流程
-
根據功能分析出資料庫實體(javaBean)
- 商品,訂單,購物車,用戶,地址...
-
提取實體屬性
-
spu商品(id,商品名稱,商品圖片,商品描述...)
-
1 min10 ..... ....
-
sku(skuId, 參數 , 價格 商品id
-
101 記憶體8G\存儲128G 2999 1
-
102 記憶體12G\存儲256G 3999 1
-
地址(姓名,地址,電話.....)
-
[外鏈圖片轉存失敗,源站可能有防盜鏈機制,建議將圖片保存下來直接上傳(img-P8zP9MYA-1633446686624)(C:\Users\CourageAndLove\AppData\Roaming\Typora\typora-user-images\image-20210814172548189.png)]
可以知道價格的依賴於參數的改變而改變,參數依賴於id改變,不滿足資料庫設計表的要求,可以設計兩張表進行實現。
- 使用資料庫的第三範式進行檢查數據項是否合理
- 分析實體關係圖:E-R圖 (一對一,一對多)
- 資料庫建模(三線圖)建模工具(PdMan)
- 建庫建表-sql
3.數據建模工具PDMan
-
可視化創建資料庫表(數據表)
-
視圖顯示表之間的關係(關係圖)
-
導出sql指令(模型---導出DDL腳本)
-
記錄資料庫模型版本管理
-
可以連接資料庫直接生成表
Spu和Sku的區別
-
spu(Standard Product Unit):商品信息聚合的最小 單位。通俗講屬性值,特性相同的商品可以稱為一個SPU.
產品: 榮耀8 小米10
-
sku(Stock Keeping Unit)最小存貨單元,定義為保存最小庫存的控制最小可用單元
sku 榮耀8 8G/128G 10
sku 榮耀8 4G/124G 20
註意一下 :訂單表的設計功能:因為訂單表只要用戶一下訂單,訂單表的相關信息就不可以進行改變 ,所以需要進行地址的的快照 ,和商品信息的快照,這樣就算你臨時改變了價格的信息或者其他的也沒有關係
購物車的設計:
4.鋒城業務流程設計
在企業開發中,當完成項目的需求分析,功能分析,資料庫分析與設計後,項目組就會按照項目中的功能模塊進行開發任務的分配。
每個人會被分配不同的功能
4.1用戶管理9業務流程分析
單體架構:頁面和控制之間可以進行跳轉,同步請求控制器,流程式控制制由控制器來完成
前後端分離架構:前端和後端開發開發和部署,前端只能通過非同步發送請求,後端只負責接收請求及參數,處理請求,返回結果
前端可以發送如圖所示的請求:需要url,params
5介面介紹
狹義:的理解:就是控制器中可以接受用戶請求的方法
標准定義:API(Application Programming interface)應用程式編程介面,就是軟體系統不同組成部分銜接的約定。
5.1介面規範
作為後端程式員不僅要完成介面程式的開發,還要編寫介面的說明文檔---介面規範
5.2Swagger(自動生成伺服器介面的規範性文檔)
前後端分離規開發,後端需要編寫介面說明文檔,會耗費比較多的時間
swagger是一個用於生成伺服器介面的的規範性文檔,並且能夠對介面進行測試的工具。
- swagger作用
- 生成介面規範性文檔
- 生成介面測試工具
5.2.1引入相關的依賴:
<!--        swagger2介面文檔生成工具-->
        <dependency>
            <groupId>io.springfox</groupId>
            <artifactId>springfox-swagger2</artifactId>
            <version>2.9.2</version>
        </dependency>
<!--        swagger-ui-->
        <dependency>
            <groupId>io.springfox</groupId>
            <artifactId>springfox-swagger-ui</artifactId>
            <version>2.9.2</version>
        </dependency>
5.2.2 創建相關的配置類
可以在api這個module中進行相關的controller層的測試,建立一個config包下麵的SwaggerConfig類進行相關的測試,加上@Configuration,@EnableSwagger2註解,然後進行配置相關的信息
package com.qfedu.fmmall.config;

import org.springframework.context.annotation.Bean;
import org.springframework.context.annotation.Configuration;
import org.w3c.dom.DocumentType;
import springfox.documentation.builders.ApiInfoBuilder;
import springfox.documentation.builders.PathSelectors;
import springfox.documentation.builders.RequestHandlerSelectors;
import springfox.documentation.service.ApiInfo;
import springfox.documentation.service.Contact;
import springfox.documentation.spi.DocumentationType;
import springfox.documentation.spring.web.plugins.Docket;
import springfox.documentation.swagger2.annotations.EnableSwagger2;

@Configuration
@EnableSwagger2
public class SwaggerConfig {
    /*
    * swagger生成我們的介面文檔:
    * 1.需要配置生成文檔的信息
    * 2.配置生成規則
    *
    * */
    @Bean
    public Docket docket(){

//創建封面信息對象
        ApiInfoBuilder apiInfoBuilder=new ApiInfoBuilder();//指定生成文檔中的封面信息:文檔標題,作者,版本
        apiInfoBuilder.title("《鋒迷商城》後端介面說明")
                .description("此文檔詳細說明瞭鋒迷商城項目後端介面規範")
                .version("v 2.0.1")
                .contact(new Contact("houge","www.houge.com","[email protected]"));


        ApiInfo apiInfo=apiInfoBuilder.build();


        Docket docket=new Docket(DocumentationType.SWAGGER_2) //指定文檔風格
                .apiInfo(apiInfo)
                .select()
                .apis(RequestHandlerSelectors.basePackage("com.qfedu.fmmall.controller"))
//                定義了path之後只會為user開頭的請求進行掃描 .paths(PathSelectors.regex("/user/"))
//                PathSelectors.any()表示任何的請求
                .paths(PathSelectors.any())
                .build();


        return docket;

    }


}
5.2.3根據你的配置的埠號進行相關的測試
http://localhost:8080/swagger-ui.html
5.2.4 swagger提供了一套註解對每個介面進行詳細的說明
@Api(value=" 用戶管理",tags="提供用戶的登錄和註冊的介面")//這個介面可以直接放在@Controller註解下麵
@ApiOperation 和ApiImplicitParams({ @ApiImplicitParam(dataType="",name="username",value="",required=true), @ApiImplictParm}) 這兩個註解放在@RequestMapping("/login")請求之上,用來修飾方法和方法中的參數。
 @ApiOperation("用戶登錄的介面")
    @ApiImplicitParams({
            @ApiImplicitParam(dataType = "string",name = "username",value = "用戶登錄的賬號",required = true),
            @ApiImplicitParam(dataType = "string",name = "password",value = "用戶登錄的密碼",defaultValue = "111111",required = false)
    })
    @RequestMapping("/login")
//    @RequestParam可以有預設的參數
    public ResultVO login(@RequestParam("username") String name,@RequestParam(value = "password",defaultValue = "111111") String pwd){

        return userService.checkLogin(name,pwd);


    }
    @RequestMapping(value = "regist",metho
@ApiModel 和@ApiModelProperty當介面參數返回一個對象類型時,需要在實體類中添加註解說明(也就是Beans這個Module進行相關的配置)
package com.qfedu.fmmall.entity;

import io.swagger.annotations.ApiModel;
import io.swagger.annotations.ApiModelProperty;
import lombok.AllArgsConstructor;
import lombok.Data;
import lombok.NoArgsConstructor;

@Data
@AllArgsConstructor
@NoArgsConstructor

@ApiModel(value = "用戶的買家信息",description = "買家的相關的參數")
public class User {

    @ApiModelProperty(name = "用戶id",required = false,dataType = "int")
    private Integer userId;

    @ApiModelProperty(dataType = "string",name = "買家姓名",required = true)
    private String  userName;
    @ApiModelProperty(dataType = "string",name = "買家密碼",required = true)
    private String userPwd;
    @ApiModelProperty(dataType = "string",name = "買家真實姓名",required = true)
    private String userRealname;
    @ApiModelProperty(dataType = "string",name = "用戶圖片",required = true)
    private String userImg;


}
@ApiIgnore 介面方法註解,添加此註解的方法將不會生成到介面文檔中
5.2.5swagger-ui插件使用
1.api的module加入依賴
<!--        swagger-ui插件-->
        <!-- https://mvnrepository.com/artifact/com.github.xiaoymin/swagger-bootstrap-ui -->
        <dependency>
            <groupId>com.github.xiaoymin</groupId>
            <artifactId>swagger-bootstrap-ui</artifactId>
            <version>1.9.6</version>
        </dependency>
2.進行訪問,然後可以使用它進行相關的測試
http://ip:port/doc.html
一、鋒迷商城設計及實現用戶管理
1.UserDao介面的創建:
package com.qfedu.fmmall.dao;

import com.qfedu.fmmall.entity.User;
import org.springframework.stereotype.Repository;

@Repository
public interface UserDao {

//    用戶註冊
    public int insert(User user);

//   根據用戶名進行登錄的驗證
    public User queryByName(String name);


}
2.UserMapper.xml
<?xml version="1.0" encoding="UTF-8" ?>
<!DOCTYPE mapper
        PUBLIC "-//mybatis.org//DTD Mapper 3.0//EN"
        "http://mybatis.org/dtd/mybatis-3-mapper.dtd">
<mapper namespace="com.qfedu.fmmall.dao.UserDao">

 <resultMap id="userResultMap" type="User">
  <id column="user_id" property="userId"></id>

 <result column="username" property="userName"/>
 <result column="password" property="password"/>
 <result column="nickname" property="nickname"/>
 <result column="realname" property="realname"/>
 <result column="user_img" property="userImg"/>
 <result column="user_mobile " property="userMobile"/>
 <result column=" user_email" property="userEmail"/>
 <result column="user_sex " property="userSex"></result>
     <result column=" user_birth" property="userBirth"></result>
     <result column="user_regtime " property="userRegtime"></result>
     <result column="user_modtime " property="userModtime"></result>

 </resultMap>


    <select id="queryByName" resultType="User">

     select *from users where username=#{username}

 </select>
    <insert id="insert" parameterType="User">

        insert into users(username,password,user_regtime,user_modtime) values (#{username},
        #{password},#{userRegtime},#{userModtime})
    </insert>
    </mapper>
3.UserService
package com.qfedu.fmmall.service;

import com.qfedu.fmmall.entity.User;
import com.qfedu.fmmall.vo.ResultVO;

public interface UserService {
//    ResultVO是一個響應給前端的自定義的一個類。
    public ResultVO checkLogin(String username, String pwd);

//    用戶註冊
    public ResultVO insert(String username, String pwd);
}
4.UserServiceimpl:
package com.qfedu.fmmall.service.impl;

import com.qfedu.fmmall.service.UserService;
import com.qfedu.fmmall.dao.UserDao;
import com.qfedu.fmmall.entity.User;
import com.qfedu.fmmall.utils.MD5Utils;
import com.qfedu.fmmall.vo.ResultVO;
import org.springframework.beans.factory.annotation.Autowired;
import org.springframework.context.annotation.Scope;
import org.springframework.stereotype.Service;
import org.springframework.transaction.annotation.Transactional;

import java.util.Date;

@Service
@Transactional
//使所有的線程都用這個對象,單例模式預設是開啟的
@Scope("singleton")
public class UserServiceimpl implements UserService {
    @Autowired
    private UserDao userDao;//可以在UserDao上面加上userDao,這個不會報紅,但是沒有什麼意義
    @Override
    public ResultVO checkLogin(String username, String pwd) {
//        查詢用戶名
        User user = userDao.queryByName(username);
        if(user==null){
//            用戶名不正確

            return new ResultVO(10001,"用戶名不正確",null);


        }else {
            //密碼使用MD5進行加密
            String md5Pwd = MD5Utils.md5(pwd);

            if(md5Pwd.equals(user.getPassword())){
//          驗證成功
                return  new ResultVO(200,"登錄成功",user);
            }else {
                //密碼不正確
                return  new ResultVO(10001,"密碼錯誤",null);

            }


        }


    }
    @Transactional
    @Override
    public ResultVO insert(String username, String pwd) {
//        判斷這個用戶是否被註冊

//        加上這個鎖可以使用所有的註冊都用這個userServiceimpl
        synchronized (this){
//            把密碼進行MD5的加密
            String password = MD5Utils.md5(pwd);

            User user1 = userDao.queryByName(username);
//表示用戶名沒有被註冊過,可以進行註冊
            if (user1==null){
//一個是註冊時間,regtime,一個是修改時間modtime
                User user=new User(username,password,new Date(),new Date());
                int i = userDao.insert(user);
                if(i>0){
                    return new ResultVO(1000,"註冊成功",null);
                }else {

                    return new ResultVO(1001,"註冊失敗",null);

                }


            }
//            判斷一下用戶名是否已經被註冊,然後把數據返回前端,goodjob,Noone can influence you
            else {

                return new ResultVO(1001,"用戶名已經被註冊",null);
            }


        }


    }
}
5.api模塊的UserController:
package com.qfedu.fmmall.vo;


import io.swagger.annotations.ApiModel;
import io.swagger.annotations.ApiModelProperty;
import lombok.AllArgsConstructor;
import lombok.Data;
import lombok.NoArgsConstructor;

@Data
@AllArgsConstructor
@NoArgsConstructor

@ApiModel(value = "ResultVO對象",description = "響應封裝的數據給前端")
public class ResultVO {
//    響應給前端的狀態碼
    @ApiModelProperty(dataType = "int",value = "響應的狀態碼")
    private  int code;

//    響應給前端的提示消息
    @ApiModelProperty(dataType = "string",value = "響應的消息")
    private  String msg;
//響應給前端的數據
    @ApiModelProperty(dataType = "object",value = "響應數據的內容")
    private  Object data;
}
6.ResultVO一個和前端進行數據交互的類
package com.qfedu.fmmall.vo;


import io.swagger.annotations.ApiModel;
import io.swagger.annotations.ApiModelProperty;
import lombok.AllArgsConstructor;
import lombok.Data;
import lombok.NoArgsConstructor;

@Data
@AllArgsConstructor
@NoArgsConstructor

@ApiModel(value = "ResultVO對象",description = "響應封裝的數據給前端")
public class ResultVO {
//    響應給前端的狀態碼
    @ApiModelProperty(dataType = "int",value = "響應的狀態碼")
    private  int code;

//    響應給前端的提示消息
    @ApiModelProperty(dataType = "string",value = "響應的消息")
    private  String msg;
//響應給前端的數據
    @ApiModelProperty(dataType = "object",value = "響應數據的內容")
    private  Object data;
}
7.在common模塊的MD5Utils類:
package com.qfedu.fmmall.utils;

import java.math.BigInteger;
import java.security.MessageDigest;
import java.security.NoSuchAlgorithmException;

//MD5 生成器
public class MD5Utils {
	public static String md5(String password){
		//生成一個md5加密器
		try {
			MessageDigest md = MessageDigest.getInstance("MD5");
			//計算MD5 的值
			md.update(password.getBytes());
			//BigInteger 將8位的字元串 轉成16位的字元串 得到的字元串形式是哈希碼值
			//BigInteger(參數1,參數2) 參數1 是 1為正數 0為0 -1為負數
			return new BigInteger(1, md.digest()).toString(16);
		} catch (NoSuchAlgorithmException e) {
			e.printStackTrace();
		}
		return null;
	}
}
二、逆向工程
根據創建好的表,生成實體類,和DAO層、映射文件
在Dependencies下麵加入依賴,這個依賴是一個Mybatis的maven插件
<build>
    <plugins>
        <plugin>
            <groupId>org.mybatis.generator</groupId>
            <artifactId>mybatis-generator-maven-plugin</artifactId>
            <version>1.3.5</version>
            <configuration>
                <configurationFile>${basedir}/src/main/resources/generator/generatorConfig.xml</configurationFile>
            </configuration>


            <dependencies>
                <dependency>
                    <groupId>mysql</groupId>
                    <artifactId>mysql-connector-java</artifactId>
                    <version>5.1.46</version>
                </dependency>
                <dependency>
                    <groupId>tk.mybatis</groupId>
                    <artifactId>mapper</artifactId>
                    <version>4.1.5</version>
                </dependency>


            </dependencies>

  </plugin>

    </plugins>


</build>
7.1逆向工程配置
在resources的generator目錄下麵創建generatorConfig.xml
-
需要修改資料庫的配置
-
需要修改pojo,mapper,Mapper.xml文件生成位置的配置
-
<!--%表示當前這個資料庫裡面的所有的表都會被生成--> <table tableName="%"></table> -
<!-- 指定生成 Mapper 的繼承模板 --> <plugin type="tk.mybatis.mapper.generator.MapperPlugin"> <property name="mappers" value="com.hou.general.GeneralDao"/> </plugin> -
指定你的用Configuration generatorConfig.xml文件的路徑
-
註意一下你的文件一定想要有空格什麼東西的
<?xml version="1.0" encoding="UTF-8"?>
<!DOCTYPE generatorConfiguration
        PUBLIC "-//mybatis.org//DTD MyBatis Generator Configuration 1.0//EN"
        "http://mybatis.org/dtd/mybatis-generator-config_1_0.dtd">

<generatorConfiguration>
    <!-- 引入 application.properties -->

<!--    <properties resource="application.properties" />-->

    <!-- MyBatis3Simple:不生成 Example相關類及方法 defaultModelType="flat" -->
    <context id="MysqlContext" targetRuntime="MyBatis3Simple" >

        <property name="beginningDelimiter" value="`"/>
        <property name="endingDelimiter" value="`"/>

        <!-- 指定生成 Mapper 的繼承模板 -->
        <plugin type="tk.mybatis.mapper.generator.MapperPlugin">
            <property name="mappers" value="com.qfedu.fmmall.general.GeneralDao"/>
        </plugin>

        <!--註意context內的文件要按序放-->
        <commentGenerator>
            <property name="suppressDate" value="true"/>
            <!-- 是否去除自動生成的註釋 true:是 : false:否 -->
            <property name="suppressAllComments" value="true"/>
        </commentGenerator>


        <!-- jdbc 連接配置 -->
        <jdbcConnection driverClass="com.mysql.jdbc.Driver"
                        connectionURL="jdbc:mysql://localhost:3306/fmmall?characterEncoding=utf8"
                        userId="root"
                        password="roothouzhicong">
        </jdbcConnection>

        <javaTypeResolver>
            <!-- 是否使用bigDecimal, false可自動轉化以下類型(Long, Integer, Short, etc.) -->
            <property name="forceBigDecimals" value="false"/>
        </javaTypeResolver>

        <!-- 生成實體類的包名和位置 ,targetPackage指的是包名,targetProject值得是路徑位置-->
        <!-- 對於生成的pojo所在包,pojo其實就是domain Entity-->
        <javaModelGenerator targetPackage="com.qfedu.fmmall.entity" targetProject="src/main/java">
            <property name="enableSubPackages" value="true"/>
            <property name="trimStrings" value="true"/>
        </javaModelGenerator>

        <!-- 對於生成的mapper.xml所在目錄 -->
        <sqlMapGenerator targetPackage="/" targetProject="src/main/resources/mappers"/>

        <!-- 配置mapper對應的java映射  也可以叫dao層 -->
        <javaClientGenerator targetPackage="com.qfedu.fmmall.dao" targetProject="src/main/java"
                             type="XMLMAPPER"/>

        <!--%表示當前這個資料庫裡面的所有的表都會被繼承-->
        <table tableName="%"></table>

    </context>
</generatorConfiguration>
7.2在pom.xml文件中指定generatorConfig.xml文件的路徑
加上了這個:
 <configuration>
                <configurationFile>${basedir}/src/main/resources/generator/generatorConfig.xml</configurationFile>
            </configuration>
        <plugin>
            <groupId>org.mybatis.generator</groupId>
            <artifactId>mybatis-generator-maven-plugin</artifactId>
            <version>1.3.5</version>
            <configuration>
                <configurationFile>${basedir}/src/main/resources/generator/generatorConfig.xml</configurationFile>
            </configuration>

            <dependencies>
                <dependency>
                    <groupId>mysql</groupId>
                    <artifactId>mysql-connector-java</artifactId>
                    <version>5.1.46</version>
                </dependency>
                <dependency>
                    <groupId>tk.mybatis</groupId>
                    <artifactId>mapper</artifactId>
                    <version>4.1.5</version>
                </dependency>


            </dependencies>


        </plugin>
三、跨域問題
解決方案:
後端解決辦法:在UserController加上@CrossOrigin註解
前端通過Ajax請求跨域登錄:
		<form>
							<div class="user-name"  style="margin-top: 20px;">
								<label for="user"><span class="glyphicon glyphicon-user" aria-hidden="true"></span></label>
								<input type="text" name="username" id="userName" placeholder="郵箱/手機/用戶名">
							</div>
							<div class="user-pass"  style="margin-top: 20px;">
								<label for="password"><span class="glyphicon glyphicon-lock" aria-hidden="true"></span></label>
								<input type="password" name="" id="userPwd" placeholder="請輸入密碼">
							</div>
						</form>


<input type="button" name="" id="submitBtn"  value="登 錄" class="am-btn am-btn-primary am-btn-sm">


<script src="static/js/jquery-1.7.2.min.js"></script>
<script type="text/javascript">

$("#submitBtn").click(function(){
	var name=$("#userName").val();
	var pwd=$('#userPwd').val();
  $.get("http://localhost:8080/user/login",{
	  username:name,
	  password:pwd,
  },function(res){
	  console.log(res);


  },"json"


  )


})

</script>
前端使用JSONP設置,後端使用@CrossOrigin註解解決---設置響應頭header允許跨域。
debugger;前端 可以加上代碼debugger進行相關的調試。可以直接進行前端的校驗
四、前端頁面的傳值
cookie和localstorage可以進行前端的頁面之間的傳值
Cookie瀏覽器端的緩存文件:大小受瀏覽器的限制。
LocalStorage:為了存儲更大容量的數據
區別:cookie可以和後臺進行傳值,localStorage只可以在前端存儲值,但是存儲的時間長。
4.1Cookie使用(自定義封裝一個js,cookie_utils.js)
var opertor="=";

function getCookieValue(keyStr){


	var s=window.document.cookie;
	var arr=s.split("; ");
for(var i=0;i<arr.length;i++){
	var str=arr[i];

	var k=str.split(opertor)[0];
	var v=str.split(opertor)[1];
	if(k==keyStr){

		value=v;
		break;
	}


}
return value;


}


function setCookieValue(key,value){

	document.cookie=key+opertor+value;


}
A頁面設置值:
function(res){
	  console.log(res);
	  if(res.code==1000){
// 獲取前端傳過來的數據 data
		var userInfo=res.data;
		// cookie和localstorage可以進行前端的頁面之間的傳值
	setCookieValue("username",userInfo.username);
	setCookieValue("userImg",userInfo.userImg);

		window.location.href="index.html";
	  }else{

		$("#tips").html("<label style='color:red'>"+ res.msg +"</label>");


	  }
B頁面取值:
var name=getCookieValue("username");
 var userImg=getCookieValue("userImg");
 console.log(name+userImg);
4.2localStorage
A頁面:
localStorage.setItem("user",JSON.stringify(userInfo));
B頁面:
var jsonStr=localStorage.getItem("user");

// 把json串轉換為對象
var userInfo=eval("("+jsonStr+")");


// 把取到的值消失
localStorage.removeItem("user");
console.log(userInfo);
4.3Vue實現登錄
data:{
		username:"",
		password:"",
		tips:" ",
		colorStyle:"",
		isRight:false,


	},
	methods:{
		doSubmit:function() {
			// 校驗成功

			if(vm.isRight){
				var url=baseUrl+"/user/login";
				axios.get(url,{
					params:{
						username:vm.username,password:vm.password

					} }

					).then((res)=>{

				console.log(res);

					var vo=res.data;
					if(vo.code==1){
						window.location.href="index.html";
					}else{
						vm.tips="賬號或者密碼錯誤";
					}


				});

			}else{
				vm.tips="請輸入正確的用戶名和密碼";
				vm.colorStyle="color:red"
			}

            //  1.進行數據的校驗

            if(vm.username==" "){
                vm.tips="請輸入用戶名";
                vm.colorStyle="color:red";


            }

         },
         checkInfo:function(){
            if(vm.username==""){
                vm.tips="請輸入用戶名";
                this.colorStyle="color:red";
				vm.isRight=false;


            }else if(vm.username.length<6 ||vm.username.length>20){
                vm.tips="賬號長度必須為6-20";
                vm.colorStyle="color:red";
				vm.isRight=false;


            }else{
// 校驗密碼
				if(vm.password==" "){
                vm.tips="請輸入密碼";
                this.colorStyle="color:red";
				vm.isRight=false;


            }else if(vm.password.length<6 ||vm.password.length>16){
				vm.tips="密碼長度為6-16";
                this.colorStyle="color:red";

			}else{
				vm.tips=" ";
				vm.isRight=true;
			}


			}


         }


	}
from表單(用@keyup進行表單的輸入的綁定):
	<form>
							<div class="user-name"  style="margin-top: 20px;">
								<label for="user"><span class="glyphicon glyphicon-user" aria-hidden="true"></span></label>
								<!-- @keyup進行綁定 -->
								<input type="text" name="username" v-model="username" id="userName" @keyup="checkInfo" placeholder="郵箱/手機/用戶名">
							</div>
							<div class="user-pass"  style="margin-top: 20px;">
								<label for="password"><span class="glyphicon glyphicon-lock" aria-hidden="true"></span></label>
								<input type="password" name="" v-model="password" id="userPwd" placeholder="請輸入密碼"@keyup="checkInfo">
							</div>
						</form>
五、前後端分離開發用戶認證的問題
5.1單體項目中:
可以知道每台伺服器中存在多個Session,只是id不相同,Cookie中可以存放sessionId,然後判斷是是不是同一個session
在單體項目中用戶怎麼認證的?
在單體項目中視圖資源和控制器都在同一臺伺服器,用戶的多次請求老師基於同一個會話,可以基於session進行會話的驗證:
- 用戶登錄將信息存放在session中
- 根據session中是否有用戶信息來判斷用戶是否可以進行登錄。
5.2前後端分離項目中
可以知道使用token實現用戶驗證,token存在於cookie中(同一臺伺服器可以訪問cookie),然後驗證token是否正確
基於token認證的用戶代碼實現
在commons模塊中引入
package com.qfedu.fmmall.utils;

import java.util.Base64;

//base64 加密 解密 激活郵件的時候 為 郵箱地址 code驗證碼 進行加密
//當 回傳回來後 進行郵箱地址 和 code 的解密
public class Base64Utils {
	//加密
	public static String encode(String msg){
		return Base64.getEncoder().encodeToString(msg.getBytes());
	}
	//解密
	public static String decode(String msg){
		return new String(Base64.getDecoder().decode(msg));
	}
}
登錄成功生成token:UserController
package com.qfedu.fmmall.controller;


import com.qfedu.fmmall.entity.Users;
import com.qfedu.fmmall.service.UserService;
import com.qfedu.fmmall.vo.ResultVO;
import io.swagger.annotations.Api;
import io.swagger.annotations.ApiImplicitParam;
import io.swagger.annotations.ApiImplicitParams;
import io.swagger.annotations.ApiOperation;
import org.springframework.beans.factory.annotation.Autowired;
import org.springframework.web.bind.annotation.*;

/*@Controller
@ResponseBody*/

@RestController
@RequestMapping("/user")
@CrossOrigin
@Api(value = "提供用戶的登錄和註冊的介面",tags = "用戶管理")
public class UserController {

    @Autowired
    private UserService userService;

//    @ApiIgnore加上這個註解會swagger忽略這個方法
    @ApiOperation("用戶登錄的介面")
    @ApiImplicitParams({
            @ApiImplicitParam(dataType = "string",name = "username",value = "用戶登錄的賬號",required = true),
            @ApiImplicitParam(dataType = "string",name = "password",value = "用戶登錄的密碼",required = true)
    })
    @RequestMapping("/login")
//    @RequestParam可以有預設的參數
    public ResultVO login(@RequestParam("username") String name,@RequestParam(value = "password") String pwd){

        return userService.checkLogin(name,pwd);


    }

    @ApiOperation(value = "用戶註冊")
    @PostMapping("/regist")
    @ApiImplicitParams({
            @ApiImplicitParam(dataType = "string",name = "username",value = "用戶註冊的賬號",required = true),
            @ApiImplicitParam(dataType = "string",name = "password",value = "用戶註冊的密碼",required = true)
    })
//    前端用user傳值,後端可以用users 接收
     public ResultVO register(@RequestBody Users users){

        return userService.insert(users.getUsername(),users.getPassword());

    }


}
然後在UserServiceimpl中進行token的加密:
// 如果登錄成功,則需要生成令牌token(token就是按照規則生成的字元串)
String token= Base64Util.encode(username+"roothouzhicong");
package com.qfedu.fmmall.service.impl;

import com.qfedu.fmmall.dao.UsersMapper;
import com.qfedu.fmmall.entity.Users;
import com.qfedu.fmmall.service.UserService;
import com.qfedu.fmmall.utils.MD5Utils;
import com.qfedu.fmmall.vo.ResultStatus;
import com.qfedu.fmmall.vo.ResultVO;
import org.apache.logging.log4j.util.Base64Util;
import org.springframework.beans.factory.annotation.Autowired;
import org.springframework.context.annotation.Scope;
import org.springframework.stereotype.Service;
import org.springframework.transaction.annotation.Transactional;
import tk.mybatis.mapper.entity.Example;

import java.util.Date;
import java.util.List;

@Service
@Transactional
//使所有的線程都用這個對象,單例模式預設是開啟的
@Scope("singleton")
public class UserServiceimpl implements UserService {
    @Autowired
    private UsersMapper userDao;//可以在UserDao上面加上userDao,這個不會報紅,但是沒有什麼意義
    @Override
    public ResultVO checkLogin(String username, String pwd) {
//        查詢用戶名

        Example example = new Example(Users.class);
        Example.Criteria criteria = example.createCriteria();
        criteria.andEqualTo("username",username);
        List<Users> users = userDao.selectByExample(example);

//
        if(users.size()==0){
//            用戶名不正確

            return new ResultVO(10001,"用戶名不正確",null);


        }else {
            //密碼使用MD5進行加密
            String md5Pwd = MD5Utils.md5(pwd);
            System.out.println(users.get(0).getPassword());

            if(md5Pwd.equals(users.get(0).getPassword())){

//                如果登錄成功,則需要生成令牌token(token就是按照規則生成的字元串)
                String token= Base64Util.encode(username+"roothouzhicong");

                //          驗證成功
                return  new ResultVO(ResultStatus.OK,token,users.get(0));
            }else {
                //密碼不正確
                return  new ResultVO(ResultStatus.NO,"密碼錯誤",null);

            }


        }


    }
    @Transactional
    @Override
    public ResultVO insert(String username, String pwd) {
//        判斷這個用戶是否被註冊

//        加上這個鎖可以使用所有的註冊都用這個userServiceimpl
        synchronized (this){
//            把密碼進行MD5的加密
            String password = MD5Utils.md5(pwd);

            //        查詢用戶名

            Example example = new Example(Users.class);
            Example.Criteria criteria = example.createCriteria();
            criteria.andEqualTo("username",username);
            List<Users> users = userDao.selectByExample(example);
//表示用戶名沒有被註冊過,可以進行註冊
            if (users.size()==0){
//一個是註冊時間,regtime,一個是修改時間modtime
                Users user=new Users(username,password,new Date(),new Date());
                int i = userDao.insert(user);
                if(i>0){
                    return new ResultVO(ResultStatus.OK,"註冊成功",null);
                }else {

                    return new ResultVO(ResultStatus.NO,"註冊失敗",null);

                }


            }
//            判斷一下用戶名是否已經被註冊,然後把數據返回前端,goodjob,Noone can influence you
            else {

                return new ResultVO(ResultStatus.NO,"用戶名已經被註冊",null);
            }


        }


    }
}
前端設置token:
	doSubmit:function() {
			// 校驗成功

			if(vm.isRight){
				var url=baseUrl+"/user/login";
				axios.get(url,{
					params:{
						username:vm.username,password:vm.password

					} }

					).then((res)=>{

				console.log(res);

					var vo=res.data;

					console.log(vo);
					if(vo.code==1){

 // 如果登錄成功就把token存儲到時cookie中
						setCookieValue("token",vo.msg);

						 window.location.href="index.html";
					}else{
						vm.tips="賬號或者密碼錯誤";
					}


				});
前端的購物車獲取token:
	<script type="text/javascript">
		// 進入購物車時要訪問購物車列表的介面shopController介面
		var baseUrl="http://localhost:8080/";
		var vm=new Vue({
			el:"#app",
			data:{
				token:"",
			},
			created() {
				this.token=getCookieValue("token");
				console.log("token="+this.token);
				axios({
					method:"get",
					url:baseUrl+"shopcart/list",
					params:{
						token:this.token,
					}

				}).then(function (res) {
					console.log(res);
				});
			},


		})


		</script>
登錄進行來可以把購物車獲取token,前端的token用CookieUtils.js封裝的包進行相關的獲取,
package com.qfedu.fmmall.controller;


import com.qfedu.fmmall.utils.Base64Utils;
import com.qfedu.fmmall.vo.ResultStatus;
import com.qfedu.fmmall.vo.ResultVO;
import io.swagger.annotations.Api;
import io.swagger.annotations.ApiImplicitParam;
import org.springframework.web.bind.annotation.CrossOrigin;
import org.springframework.web.bind.annotation.RequestMapping;
import org.springframework.web.bind.annotation.RestController;

@RestController
@CrossOrigin
@Api(value = "提供購物車業務相關的介面",tags = "購物車管理介面")
@RequestMapping("/shopcart")
public class ShopCartController {

    @RequestMapping("/list")
    @ApiImplicitParam(dataType = "string",name = "token",value = "登錄的一個標誌",required = true)
    public ResultVO shopcartList(String token){
//        校驗輸入的token看看是否是用戶自己登錄的token
       //解密
        String decode = Base64Utils.decode(token);
        if(token==null){
            return new ResultVO(ResultStatus.NO, "請先登錄", null);


        }else if(decode.endsWith("roothouzhicong")) {


            System.out.println("購物車列表相關的介面------------");
            return new ResultVO(ResultStatus.OK, "success", null);


        }else {

            return new ResultVO(ResultStatus.NO, "登錄已經過期,請重新登錄!!", null);

        }


    }
}
六、JWT(json Web Token)一個別人封裝好的工具類生成相關的token
- 用自定義的token生成的時效性不可以進行定義
- 安全性較差
JWT結構:
6.1生成JWT
-
添加依賴:
<!--        jwt生成 -->
        <dependency>
            <groupId>com.auth0</groupId>
            <artifactId>java-jwt</artifactId>
            <version>3.10.3</version>
        </dependency>
<!--        jjwt生成-->
        <dependency>
        <groupId>io.jsonwebtoken</groupId>
        <artifactId>jjwt</artifactId>


