在上一遍文章中已經介紹了PixelShaderEffect 用hlsl(著色器) 可以實現各種自定義濾鏡效果了,本文將用 "ThresholdEffect" 來講解如何編寫,編譯hlsl,然後使用PixelShaderEffect製作自定義濾鏡。 效果圖: 一.hlsl幫助程式介紹 在寫hlsl 代 ...
在上一遍文章中已經介紹了PixelShaderEffect 用hlsl(著色器) 可以實現各種自定義濾鏡效果了,本文將用 "ThresholdEffect" 來講解如何編寫,編譯hlsl,然後使用PixelShaderEffect製作自定義濾鏡。
效果圖:

一.hlsl幫助程式介紹
在寫hlsl 代碼前需要簡單介紹下 “hlsl幫助程式”.通過學習了 hlsl幫助程式 後我們不需要將hlsl的所有知識都掌握了就可以寫一寫簡單的hlsl代碼了。hlsl幫助程式分為兩部分,巨集定義和函數。
1.巨集定義
| D2D_INPUT_COUNT N | 紋理輸入個數。必須定義 |
| D2D_INPUTn_SIMPLE | 指定第n個紋理的為簡單採樣,預設為此定義,可選的 |
| D2D_INPUTn_COMPLEX | 指定第n個紋理為複雜採樣.可選的 |
| D2D_REQUIRES_SCENE_POSITION | 指示著色器函數調用使用場景位置的值的幫助方法(即使用D2DGetScenePosition函數,必須要有該定義) |
| D2D_CUSTOM_ENTRY | 著色器程式入口 |
| #include "d2d1effecthelpers.hlsli" | 引入 hlsl幫助程式 |
2.函數
| D2DGetInput(n) | 獲取第n張紋理的當前位置的像素,返回float4,即是rgba顏色。 |
| D2DSampleInput(n,float2(x,y)) | (按百分比位置進行採樣)獲取第n張紋理指定位置(xy按照百分比0~1)的像素顏色,返回float4,即rgba顏色。(需要定義紋理為複雜採樣才能使用該函數) |
| D2DSampleInputAtOffset(n,float2(ox,oy)) | (按絕對位置進行偏移採樣)從輸入坐標偏移的偏移量對第n張紋理進行採樣(需要定義紋理為複雜採樣)。例子:比如需要獲取當前像素的左邊像素可以使用該函數 D2DSampleInputAtOffset(0,float(-1,0))來獲取左邊像素的顏色; |
| D2DSampleInputAtPosition(n,float2(x,y)) | (按絕對位置進行採樣) 例子:比如輸入的紋理圖像大小的寬和高都為100,現在需要獲取該紋理位置 50,50位置的像素可以使用該函數D2DSampleInputAtPosition(0,float2(50,50));(需要定義紋理為複雜採樣) |
| D2DGetInputCoordinate(n) | 獲取當前像素在屏幕上的坐標(相對位置0~1)(需要定義紋理為複雜採樣) |
| D2DGetScenePosition() | 獲取當前像素在屏幕上的坐標(絕對位置)(需要定義 D2D_REQUIRES_SCENE_POSITION巨集) |
| D2D_PS_ENTRY 函數 |
一個巨集,用於定義具有給定函數名稱的像素著色器入口點。 |
hlsl幫助程式文檔:HLSL 幫助程式 - Win32 apps | Microsoft Docs
hlsl文檔:高級著色器語言 (HLSL) - Win32 apps | Microsoft Docs
二.編寫hlsl代碼
在項目程式中右鍵-》添加新建項-》常規-》文本文件 並將文件名改成ThresholdEffect.hlsl
在代碼中用巨集定義了 輸入一張紋理,並且將紋理的採樣模式定義為簡單模式,通過#include 引入hlsl幫助程式。
然後在聲明瞭 三個變數 hreshold,startColor,endColor;
聲明一個 getGray(in float3 color) 函數將顏色的各個分量相加再除以3 並且返回;
最後定義了一個 D2D_PS_ENTRY 函數,該函數是著色器程式的入口函數,在函數裡面調用了 D2DGetInput(0)函數獲取第0張紋理的當前像素,然後通過調用getGray 函數將像素的顏色轉換成灰度值後跟 threshold 比較再決定返回那個顏色。
註意:函數的聲明需要寫在調用前,否則編譯的時候會找不到函數而報錯;
//定義輸入紋理數量為 1張
#define D2D_INPUT_COUNT 1
//定義第一張紋理的採樣模式為簡單模式
#define D2D_INPUT0_SIMPLE
//引入 hlsl幫助程式
#include "d2d1effecthelpers.hlsli"

//定義屬性
//閾值
float threshold;
//預設第一個顏色為白色
float4 startColor = float4(1,1,1,1);
//預設第二個顏色為黑色
float4 endColor = float4(0, 0, 0, 1);
//將輸入顏色轉換成灰度 (r+g+b)/3
float getGray(in float3 color)
{
    float gray = (color.r + color.g + color.b) / 3;
    return gray;
}
//程式入口
D2D_PS_ENTRY(main){
    //獲取當前位置的輸入紋理像素顏色
float3 color = D2DGetInput(0).rgb;
float gray = getGray(color);
    if(gray<=threshold){
    return endColor;
    }
    return startColor;
}
三.編譯hlsl
現在我們來將上面寫好的hlsl 編譯成二進位文件。
1.記事本方式打開我們報錯好的 ThresholdEffect.hlsl 文件查看它的編碼格式是否是 UTF-8 ,如果不是則需要將編碼改成UTF-8後保存。如果編碼不對的情況下會在編譯時報錯說”找不到任何代碼“.


2.在vs工具欄中找到 工具-》命令行-》開發者提示 然後將位置切換到存放 ThresholdEffect.hlsl 文件的目錄下,
然後輸入以下命令進行編譯,如果編譯成功就會在存放目錄下看到會多了一個ThresholdEffect.bin的文件,這個文件就是將hlsl編譯好的二進位文件了:
set INCLUDEPATH="%WindowsSdkDir%\Include\%WindowsSDKVersion%\um"
 fxc ThresholdEffect.hlsl /nologo /T lib_4_0_level_9_3_ps_only /D D2D_FUNCTION /D D2D_ENTRY=main /Fl ThresholdEffect.fxlib /I %INCLUDEPATH%
 fxc ThresholdEffect.hlsl /nologo /T ps_4_0_level_9_3 /D D2D_FULL_SHADER /D D2D_ENTRY=main /E main /setprivate ThresholdEffect.fxlib /Fo:ThresholdEffect.bin /I %INCLUDEPATH%
del ThresholdEffect.fxlib
編譯命令就不在這裡展開講了感興趣的可以 看文檔:像素陰影效果構造函數 (microsoft.github.io) 裡面有介紹;


編譯成功
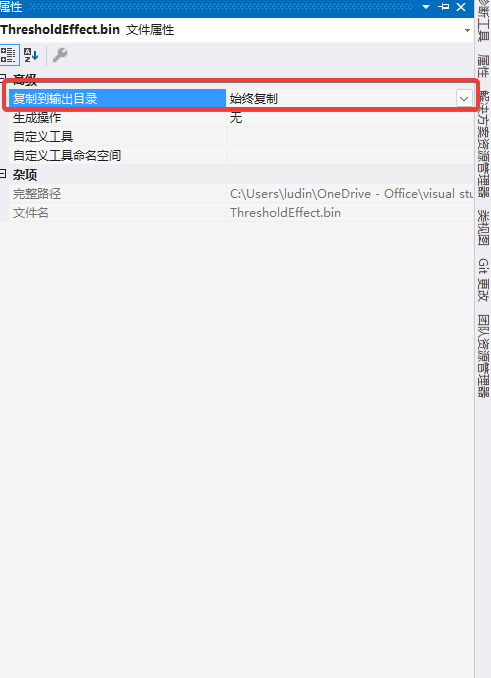
四.導入編譯好的bin文件,然後右鍵文件->屬性,將複製到輸出目錄改為 始終複製;


五.xaml界面
在界面中放置了一個 CanvasControl 控制項用於顯示繪製內容,在下麵添加選擇圖片按鈕,更改閾值的slider,和兩個顏色選擇器;

<Grid>
        <Grid.RowDefinitions>
            <RowDefinition></RowDefinition>
            <RowDefinition Height="auto"></RowDefinition>
        </Grid.RowDefinitions>
        <canvas:CanvasControl x:Name="canvas"></canvas:CanvasControl>
        <StackPanel Grid.Row="1">
            <Button Content="選擇圖片" x:Name="selectPicture"></Button>
            <Slider Header="閾值:" Value="0" Maximum="1" StepFrequency="0.01" x:Name="threshold"></Slider>
            <StackPanel Orientation="Horizontal">
                <Button Content="顏色一" >
                    <Button.Flyout>
                        <Flyout>
                            <ColorPicker Color="White" x:Name="cp1"></ColorPicker>
                        </Flyout>
                    </Button.Flyout>
                </Button>
                <Rectangle Width="50" Fill="{Binding ElementName=cp1,Path=Color,Mode=TwoWay,Converter={StaticResource colorToBrush}}"></Rectangle>
            </StackPanel>
            <StackPanel Orientation="Horizontal">
                <Button Content="顏色二" >
                    <Button.Flyout>
                        <Flyout>
                            <ColorPicker Color="Black" x:Name="cp2"></ColorPicker>
                        </Flyout>
                    </Button.Flyout>
                </Button>
                <Rectangle  Width="50" Fill="{Binding ElementName=cp2,Path=Color,Mode=TwoWay,Converter={StaticResource colorToBrush}}"></Rectangle>
            </StackPanel>
        </StackPanel>
    </Grid>
xaml
六.後臺代碼
1.在 canvas的CreateResource 事件中讀取bin文件中的位元組數組並創建一個 PixelShaderEffect 對象;
2.添加選擇圖片事件用於選擇一張輸入的源圖;
3.繪製圖像,effect 對象通過 Properties 鍵值對的形式對著色器裡面的屬性進行賦值。這裡需要註意 著色器裡面的顏色範圍是 0~1 並且是float類型,所以需要將c#裡面的顏色的每個分量都除以255,轉換成Vector4結構;
4.監聽Slider 和顏色選擇器 的更改並重新繪製顯示圖像;

public sealed partial class ThresholdEffectPage : Page
    {
        PixelShaderEffect effect;
        CanvasBitmap bitmap;
        public ThresholdEffectPage()
        {
            this.InitializeComponent();
            Init();
        }

        void Init()
        {
            canvas.CreateResources += async (s, e) =>
             {
                 //獲取著色器二進位文件
                 StorageFile file = await StorageFile.GetFileFromApplicationUriAsync(new Uri("ms-appx:///Shaders/ThresholdEffect.bin"));
                 IBuffer buffer = await FileIO.ReadBufferAsync(file);
                 //轉換成位元組數組
                 var bytes = buffer.ToArray();
                 //用 位元組數組 初始化一個 PixelShaderEffect 對象;
                 effect = new PixelShaderEffect(bytes);

             };

            //選擇圖片
            selectPicture.Click += async (s, e) =>
            {
                var file = await Ulit.SelectFileAsync(new List<string> { ".png", ".jpg" });
                if (file == null)
                    bitmap = null;
                else
                    bitmap = await CanvasBitmap.LoadAsync(canvas.Device, await file.OpenAsync(FileAccessMode.Read));
                canvas.Invalidate();
            };

            canvas.Draw += (s, e) =>
            {
                //繪製黑白網格
                Win2dUlit.DrawGridGraphics(e.DrawingSession, 100);
                //判斷effect 和點陣圖是否為空
                if (effect == null || bitmap == null)
                    return;
                var element = (FrameworkElement)s;
                float effectWidth = (float)element.ActualWidth;
                float effectHeight = (float)element.ActualHeight * 0.7f;
                float previewWidth = effectWidth;
                float previewHeight = (float)element.ActualHeight * 0.3f;
                //繪製原圖
                var previewTran = Win2dUlit.CalcutateImageCenteredTransform(previewWidth, previewHeight, bitmap.Size.Width, bitmap.Size.Height);
                previewTran.Source = bitmap;
                e.DrawingSession.DrawImage(previewTran, 0, effectHeight);

                //顏色將0~255 轉換成0~1 因為hlsl裡面的顏色是0~1範圍的並且是float類型,所以這裡需要將每個顏色的分量除以255
                Vector4 startColor = new Vector4(cp1.Color.R / 255f, cp1.Color.G / 255f, cp1.Color.B / 255f, 1f);
                Vector4 endColor = new Vector4(cp2.Color.R / 255f, cp2.Color.G / 255f, cp2.Color.B / 255f, 1f);
                //通過鍵值對的形式設置屬性傳遞到著色器裡面
                effect.Properties["threshold"] = (float)threshold.Value;
                effect.Properties["startColor"] = startColor;
                effect.Properties["endColor"] = endColor;
                effect.Source1 = bitmap;

                //繪製效果圖
                var effectTran = Win2dUlit.CalcutateImageCenteredTransform(effectWidth, effectHeight, bitmap.Size.Width, bitmap.Size.Height);
                effectTran.Source = effect;
                e.DrawingSession.DrawImage(effectTran);
            };

            threshold.ValueChanged += (s, e) => canvas.Invalidate();
            //這裡遇到問題了 說找不到 WinRT.ObjectReferenceValue ABI.Windows.Foundation.TypedEventHandler`2.CreateMarshaler2(Windows.Foundation.TypedEventHandler`2<!0,!1>)'。”
            //cp1.ColorChanged += (s, e) =>
            //{
            //    //if (canvas.IsLoaded)
            //    //    canvas.Invalidate();
            //};
            //cp2.ColorChanged += (s, e) =>
            //{
            //    //if (canvas.IsLoaded)
            //    //    canvas.Invalidate();
            //};

        }
    }
ThresholdEffectPage
結語:
現在已經將PixelShaderEffect 的整個使用過程都講解完了。下一篇講解 "ReplaceColorEffect";


