1.配置多個數據源 多個數據源是指在同一個系統中,用戶數據來自不同的表,在認證時,如果第一張表沒有查找到用戶,那就去第二張表中査詢,依次類推。 看了前面的分析,要實現這個需求就很容易了,認證要經過AuthenticationProvider,每一 個 AuthenticationProvider 中 ...
1.配置多個數據源
多個數據源是指在同一個系統中,用戶數據來自不同的表,在認證時,如果第一張表沒有查找到用戶,那就去第二張表中査詢,依次類推。
看了前面的分析,要實現這個需求就很容易了,認證要經過AuthenticationProvider,每一 個 AuthenticationProvider 中都配置了一個 UserDetailsService,而不同的 UserDetailsService 則可以代表不同的數據源,所以我們只需要手動配置多個AuthenticationProvider,併為不同的 AuthenticationProvider 提供不同的 UserDetailsService 即可。
為了方便起見,這裡通過 InMemoryUserDetailsManager 來提供 UserDetailsService 實例, 在實際開發中,只需要將UserDetailsService換成自定義的即可,具體配置如下:
@Configuration
public class SecurityConfig extends WebSecurityConfigurerAdapter {
    @Bean
    @Primary
    UserDetailsService us1(){
        return new InMemoryUserDetailsManager(User.builder().username("testuser1").password("{noop}123")
                .roles("admin").build());
    }
    @Bean
    UserDetailsService us2(){
        return new InMemoryUserDetailsManager(User.builder().username("testuser2").password("{noop}123")
                .roles("user").build());
    }
    @Override
    public AuthenticationManager authenticationManagerBean() throws Exception {
        DaoAuthenticationProvider dao1 = new DaoAuthenticationProvider();
        dao1.setUserDetailsService(us1());
        DaoAuthenticationProvider dao2 = new DaoAuthenticationProvider();
        dao2.setUserDetailsService(us2());
        ProviderManager manager = new ProviderManager(dao1, dao2);
        return manager;
    }

    @Override
    protected void configure(HttpSecurity http) throws Exception {
        //省略
    }
}
首先定義了兩個UserDetailsService實例,不同實例中存儲了不同的用戶;然後重寫 authenticationManagerBean 方法,在該方法中,定義了兩個 DaoAuthenticationProvider 實例並分別設置了不同的UserDetailsService ;最後構建ProviderManager實例並傳入兩個 DaoAuthenticationProvider,當系統進行身份認證操作時,就會遍歷ProviderManager中不同的 DaoAuthenticationProvider,進而調用到不同的數據源。
2. 添加登錄驗證碼
登錄驗證碼也是項目中一個常見的需求,但是Spring Security對此並未提供自動化配置方案,需要開發者自行定義,一般來說,有兩種實現登錄驗證碼的思路:
- 自定義過濾器。
- 自定義認證邏輯。
通過自定義過濾器來實現登錄驗證碼,這種方案我們會在後面的過濾器中介紹, 這裡先來看如何通過自定義認證邏輯實現添加登錄驗證碼功能。
生成驗證碼,可以自定義一個生成工具類,也可以使用一些現成的開源庫來實現,這裡 採用開源庫kaptcha,首先引入kaptcha依賴,代碼如下:
<dependency>
    <groupId>com.github.penggle</groupId>
    <artifactId>kaptcha</artifactId>
    <version>2.3.2</version>
</dependency>
然後對kaptcha進行配置:
查看代碼
 package com.intehel.demo.config;

import com.google.code.kaptcha.Producer;
import com.google.code.kaptcha.impl.DefaultKaptcha;
import com.google.code.kaptcha.util.Config;
import org.springframework.context.annotation.Bean;
import org.springframework.context.annotation.Configuration;
import java.util.Properties;

@Configuration
public class KaptchaConfig {
    @Bean
    Producer kaptcha(){
        Properties properties = new Properties();
        properties.setProperty("kaptcha.image.width", "150");
        properties.setProperty("kaptcha.image.height", "50");
        properties.setProperty("kaptcha.textproducer.char.string", "0123456789");
        properties.setProperty("kaptcha.textproducer.char.length", "4");
        Config config = new Config(properties);
        DefaultKaptcha defaultKaptcha = new DefaultKaptcha();
        defaultKaptcha.setConfig(config);
        return defaultKaptcha;
    }
}
配置一個Producer實例,主要配置一下生成的圖片驗證碼的寬度、長度、生成字元、驗證碼的長度等信息,配置完成後,我們就可以在Controller中定義一個驗證碼介面了。
查看代碼
 package com.intehel.demo.controller;

import com.google.code.kaptcha.Producer;
import org.springframework.beans.factory.annotation.Autowired;
import org.springframework.web.bind.annotation.RequestMapping;
import org.springframework.web.bind.annotation.RestController;
import javax.imageio.ImageIO;
import javax.servlet.ServletOutputStream;
import javax.servlet.http.HttpServletResponse;
import javax.servlet.http.HttpSession;
import java.awt.image.BufferedImage;
import java.io.IOException;

@RestController
public class LoginController {
    @Autowired
    Producer producer;
    @RequestMapping("/vc.jpg")
    public void getVerifyCode(HttpServletResponse resp, HttpSession session){
        resp.setContentType("image/jpeg");
        String text = producer.createText();
        session.setAttribute("kaptcha",text);
        BufferedImage image = producer.createImage(text);
        try(ServletOutputStream out = resp.getOutputStream()) {
            ImageIO.write(image,"jpg",out);
        } catch (IOException e) {
            e.printStackTrace();
        }
    }
}
在這個驗證碼介面中,我們主要做了兩件事:
- 生成驗證碼文本,並將文本存入HttpSession中。
- 根據驗證碼文本生成驗證碼圖片,並通過IO流寫出到前端。
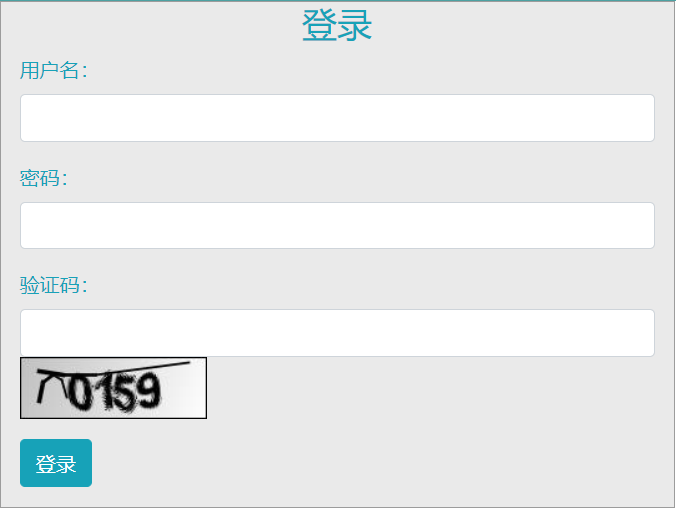
接下來修改登錄表單,加入驗證碼,代碼如下:
查看代碼
 <!DOCTYPE html>
<html lang="en" xmlns:th="http://www.thymeleaf.org">
<head>
    <meta charset="UTF-8">
    <title>登錄</title>
    <link href="//maxcdn.bootstrapcdn.com/bootstrap/4.1.1/css/bootstrap.min.css" rel="stylesheet" id="bootstrap-css">
    <script src="//maxcdn.bootstrapcdn.com/bootstrap/4.1.1/js/bootstrap.min.js"></script>
    <script src="//cdnjs.cloudflare.com/ajax/libs/jquery/3.2.1/jquery.min.js"></script>
</head>
<style>
    #login .container #login-row #login-column #login-box {
        border: 1px solid #9c9c9c;
        background-color: #EAEAEA;
    }
</style>
<body>
<div id="login">
    <div class="container">
        <div id="login-row" class="row justify-content-center align-items-center">
            <div id="login-column" class="col-md-6">
                <div id="login-box" class="col-md-12">
                    <form id="login-form" class="form" action="/doLogin" method="post">
                        <h3 class="text-center text-info">登錄</h3>
                        <!--/*@thymesVar id="SPRING_SECURITY_LAST_EXCEPTION" type="com"*/-->
                        <div th:text="${SPRING_SECURITY_LAST_EXCEPTION}"></div>
                        <div class="form-group">
                            <label for="username" class="text-info">用戶名:</label><br>
                            <input type="text" name="uname" id="username" class="form-control">
                        </div>
                        <div class="form-group">
                            <label for="password" class="text-info">密碼:</label><br>
                            <input type="text" name="passwd" id="password" class="form-control">
                        </div>
                        <div class="form-group">
                            <label for="kaptcha" class="text-info">驗證碼:</label><br>
                            <input type="text" name="kaptcha" id="kaptcha" class="form-control">
                            <img src="/vc.jpg" alt="">
                        </div>
                        <div class="form-group">
                            <input type="submit" name="submit" class="btn btn-info btn-md" value="登錄">
                        </div>
                    </form>
                </div>
            </div>
        </div>
    </div>
</div>
</body>
</html>
登錄表單中增加一個驗證碼輸入框,驗證碼的圖片地址就是我們在Controller中定義的驗證碼介面地址。
接下來就是驗證碼的校驗了。經過前面的介紹,讀者已經瞭解到,身份認證實際上就是在AuthenticationProvider.authenticate方法中完成的。所以,驗證碼的校驗,我們可以在該方法執行之前進行,需要配置如下類:
查看代碼
 package com.intehel.demo.provider;

import org.springframework.security.authentication.AuthenticationServiceException;
import org.springframework.security.authentication.dao.DaoAuthenticationProvider;
import org.springframework.security.core.Authentication;
import org.springframework.security.core.AuthenticationException;
import org.springframework.web.context.request.RequestContextHolder;
import org.springframework.web.context.request.ServletRequestAttributes;
import javax.servlet.http.HttpServletRequest;

public class KaptchaAuthenticationProvider extends DaoAuthenticationProvider{
    @Override
    public Authentication authenticate(Authentication authentication) throws AuthenticationException {
        HttpServletRequest req = ((ServletRequestAttributes)RequestContextHolder.getRequestAttributes()).getRequest();
        String kaptcha = req.getParameter("kaptcha");
        String serssionKaptcha = (String) req.getSession().getAttribute("kaptcha");
        if (kaptcha != null && serssionKaptcha != null && kaptcha.equalsIgnoreCase(serssionKaptcha)){
            return super.authenticate(authentication);
        }
        throw new AuthenticationServiceException("驗證碼輸入錯誤");
    }
}
這裡重寫authenticate方法,在authenticate方法中,從RequestContextHolder中獲取當前請求,進而獲取到驗證碼參數和存儲在HttpSession中的驗證碼文本進行比較,比較通過則繼續執行父類的authenticate方法,比較不通過,就拋出異常。
你可能會想到通過重寫 DaoAuthenticationProvider類的 additionalAuthenticationChecks 方法來完成驗證碼的校驗,這個從技術上來說是沒有問題的,但是這會讓驗證碼失去存在的意義,因為當additionalAuthenticationChecks方法被調用時,資料庫查詢已經做了,僅僅剩下密碼沒有校驗,此時,通過驗證碼來攔截惡意登錄的功能就已經失效了。
最後,在 SecurityConfig 中配置 AuthenticationManager,代碼如下:
查看代碼
 package com.intehel.demo.config;

import com.fasterxml.jackson.databind.ObjectMapper;
import com.intehel.demo.Service.MyUserDetailsService;
import com.intehel.demo.handler.MyAuthenticationFailureHandler;
import com.intehel.demo.provider.KaptchaAuthenticationProvider;
import org.springframework.beans.factory.annotation.Autowired;
import org.springframework.context.annotation.Bean;
import org.springframework.context.annotation.Configuration;
import org.springframework.security.authentication.AuthenticationManager;
import org.springframework.security.authentication.AuthenticationProvider;
import org.springframework.security.authentication.ProviderManager;
import org.springframework.security.config.annotation.web.builders.HttpSecurity;
import org.springframework.security.config.annotation.web.configuration.WebSecurityConfigurerAdapter;
import org.springframework.security.web.util.matcher.AntPathRequestMatcher;
import org.springframework.security.web.util.matcher.OrRequestMatcher;
import java.util.HashMap;
import java.util.Map;

@Configuration
public class SecurityConfig extends WebSecurityConfigurerAdapter {
    @Autowired
    MyUserDetailsService myUserDetailsService;
    @Override
    protected void configure(HttpSecurity http) throws Exception {
        http.authorizeRequests()
                .antMatchers("/vc.jpg").permitAll()
                .anyRequest().authenticated()
                .and()
                .formLogin()
                .loginPage("/mylogin.html")
                .loginProcessingUrl("/doLogin")
                .defaultSuccessUrl("/index.html")
                .failureHandler(new MyAuthenticationFailureHandler())
                .usernameParameter("uname")
                .passwordParameter("passwd")
                .permitAll()
                .and()
                .logout()
                .logoutRequestMatcher(new OrRequestMatcher(new AntPathRequestMatcher("/logout1","GET"),
                        new AntPathRequestMatcher("/logout2","POST")))
                .invalidateHttpSession(true)
                .clearAuthentication(true)
                .defaultLogoutSuccessHandlerFor((req,resp,auth)->{
                    resp.setContentType("application/json;charset=UTF-8");
                    Map<String,Object> result = new HashMap<String,Object>();
                    result.put("status",200);
                    result.put("msg","使用logout1註銷成功!");
                    ObjectMapper om = new ObjectMapper();
                    String s = om.writeValueAsString(result);
                    resp.getWriter().write(s);
                },new AntPathRequestMatcher("/logout1","GET"))
                .defaultLogoutSuccessHandlerFor((req,resp,auth)->{
                    resp.setContentType("application/json;charset=UTF-8");
                    Map<String,Object> result = new HashMap<String,Object>();
                    result.put("status",200);
                    result.put("msg","使用logout2註銷成功!");
                    ObjectMapper om = new ObjectMapper();
                    String s = om.writeValueAsString(result);
                    resp.getWriter().write(s);
                },new AntPathRequestMatcher("/logout1","GET"))
                .and()
                .csrf().disable();
    }
    @Bean
    AuthenticationProvider kaptchaAuthenticationProvider(){
        KaptchaAuthenticationProvider provider = new KaptchaAuthenticationProvider();
        provider.setUserDetailsService(myUserDetailsService);
        return provider;
    }

    @Override
    public AuthenticationManager authenticationManagerBean() throws Exception {
        ProviderManager manager = new ProviderManager(kaptchaAuthenticationProvider());
        return manager;
    }
}
這裡配置分三步:首先配置UserDetailsService提供數據源;然後提供一個 AuthenticationProvider 實例並配置 UserDetailsService;最後重寫 authenticationManagerBean 方 法,提供一個自己的PioviderManager並使用自定義的AuthenticationProvider實例。
另外需要註意,在configure(HttpSecurity)方法中給驗證碼介面配置放行,permitAll表示這個介面不需要登錄就可以訪問。
配置完成後,啟動項目,瀏覽器中輸入任意地址都會跳轉到登錄頁面,如圖3-5所示。

圖 3-5
此時,輸入用戶名、密碼以及驗證碼就可以成功登錄。如果驗證碼輸入錯誤,則登錄頁面會自動展示錯誤信息,如下:


