本文包含SQL基礎語法、函數、索引、sql編程、事務、事務原則、備份恢復,許可權資料庫設計、三大範式、JDBC、SQL註入、資料庫連接池等所有知識都在這裡了 ...
目錄
MySQL HA部署
環境準備
| 地址 | 說明 |
|---|---|
| 10.5.12.92 | pro-mysql-ha01,主節點 1 |
| 10.5.12.93 | pro-mysql-ha02,主節點 2 |
| 10.5.12.91 | pro-mysql-vip,虛擬 Virtual IP |
創建本地yum源
上傳 CentOS-7-x86_64-DVD-1708.iso 到/opt/software
cd /etc/yum.repos.d/
mkdir bkp
mv *.repo bkp
sudo touch /etc/yum.repos.d/local.repo
編輯文件 local.repo 的內容
[CentOS74]
name=CentOS7.4
baseurl=file:///media
enabled=1gpgcheck=0
gpgkey=file:///media/RPM-GPG-KEY-CentOS-7
掛載並清空yum緩存
mount /opt/software/CentOS-7-x86_64-DVD-1708.iso /media -o loop
yum clean all
yum makecache
確認關閉 SELinux
1、臨時關閉:輸入命令setenforce 0,重啟系統後還會開啟。
2、永久關閉:輸入命令vi /etc/selinux/config,將SELINUX=enforcing改為SELINUX=disabled,然後保存退出。
防火牆設置
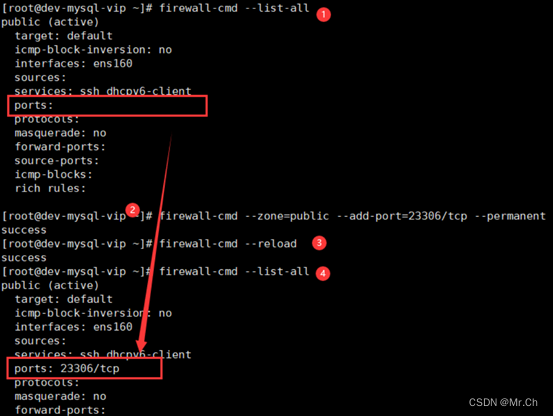
使用 root 用戶在 pro-mysql-ha01 和 pro-mysql-ha02 上需要將相應的埠(例如 MySQL 使用的 23306 埠)加入到防火牆的過濾規則裡面
firewall-cmd --zone=public --add-port=23306/tcp –permanent
firewall-cmd –reload
firewall-cmd –list-all

MySQL安裝
使用 root 用戶操作創建相關的用戶組和用戶
groupadd mysql
useradd -r -g mysql mysql
passwd mysql
上傳/解壓介質
將 mysql-8.0.22-linux-glibc2.12-x86_64.tar.xz 上傳到/opt/software 目錄,並解壓介質到 目錄/opt/mysql
tar zxvf mysql-8.0.22-linux-glibc2.12-x86_64.tar.gz -C /opt
ln -s /opt/mysql-8.0.22-linux-glibc2.12-x86_64 /opt/mysql
yum remove mariadb-libs-5.5.56-2.el7.x86_64 #mariadb 相關內容卸載
mkdir /mysql-data #用來存放 mysql 的數據,後面的配置文件需要用到
編輯/etc/my.cnf 文件,如下
[mysqld]
basedir = /opt/mysql
datadir = /mysql-data
socket = /mysql-data/mysql.sock
skip-name-resolve
log-error = /mysql-data/error.log
pid-file = /mysql-data/mysql.pid
character-set-server=utf8mb4
port=23306
lower_case_table_names = 1
default-storage-engine=INNODB
[client]
socket = /mysql-data/mysql.sock
default-character-set=utf8mb4
port=23306
設置自啟動
cp /opt/mysql/support-files/mysql.server /etc/init.d/mysqld
修改/etc/init.d/mysqld 的 basedir 和 datadir 為上面指定的實際值
......
basedir=/opt/mysql
datadir=/mysql-data
......
vi /usr/lib/systemd/system/mysqld.service
[Unit]
Description=MySQL
After=syslog.target network.target remote-fs.target nss-lookup.target
Before=shutdown.target
[Service]
User=mysql
Group=mysql
Type=forking
PIDFile=/mysql-data/mysql.pid
#Disable service start and stop timeout logic of systemd for mysqld service.
TimeoutSec=0
#Execute pre and post scripts as root
PermissionsStartOnly=true# Start|Stop main service
ExecStart=/etc/init.d/mysqld start
ExecStop=/etc/init.d/mysqld stop
#Sets open_files_limit
LimitNOFILE = 5000
Restart=on-failure
RestartPreventExitStatus=1
PrivateTmp=false
[Install]
WantedBy=multi-user.target
Alias=mysqld.service
使用 root 用戶執行以下的命令修改 basedir 和 datadir 的屬主
chown mysql:mysql /etc/init.d/mysqld
chown -Rf mysql:mysql /opt/mysql /opt/mysql-8.0.22-linux-glibc2.12-x86_64
chown -Rf mysql:mysql /mysql-data
systemctl daemon-reload
chkconfig --level 345 mysqld on
chkconfig --add mysqld
Mysql初始化
cd /opt/mysql/bin
./mysqld --initialize --user=mysql --basedir=/opt/mysql --datadir=/mysql-data
cat /mysql-data/error.log #獲取 root 的臨時密碼

啟動mysql
/opt/mysql/bin/mysqld_safe --user=mysql &

進入mysql修改root密碼
/opt/mysql/bin/mysql -uroot -p
alter user root@'localhost' identified with mysql_native_password by '指定的密碼';  #修改root密碼
/opt/mysql/bin/mysqladmin -uroot -p -S /mysql-data/mysql.sock shutdown #停止MySQL

到此,pro-mysql-ha0l 和pro-mysql-ha02上的MySQL安裝並設置完畢
主主同步環境配置
1.1.3.1 基礎配置
編輯 pro-mysql-ha01 伺服器上的文件/etc/my.cnf 的,在 mysqld 部分添加下麵的配置
server-id = 1
log_bin = mysql-bin
expire_logs_days=10
sync_binlog = 1
binlog_checksum = none
binlog_format = mixed
auto-increment-increment = 2
auto-increment-offset = 1
slave-skip-errors = all
使用 root 用戶執行 systemctl restart mysqld 重啟 mysql 服務
systemctl restart mysqld
登錄 mysql 執行一下操作
create user syncoper@'%' identified with mysql_native_password by '指定的密碼';
grant replication slave, replication client on *.* to syncoper@'%';
flush privileges;
flush tables with read lock;
show master status;
編輯 pro-mysql-ha02 伺服器上的文件/etc/my.cnf 的,在 mysqld 部分添加下麵的配置
server-id = 2
log_bin = mysql-bin
expire_logs_days=10
sync_binlog = 1
binlog_checksum = none
binlog_format = mixed
auto-increment-increment = 2
auto-increment-offset = 2
slave-skip-errors = all
使用 root 用戶執行 systemctl restart mysqld 重啟 mysql 服務
systemctl restart mysqld
登錄 mysql 執行一下操作
create user syncoper@'%' identified with mysql_native_password by '指定的密碼';
grant replication slave, replication client on *.* to syncoper@'%';
flush privileges;
flush tables with read lock;
show master status;
pro-mysql-ha01同步操作測試
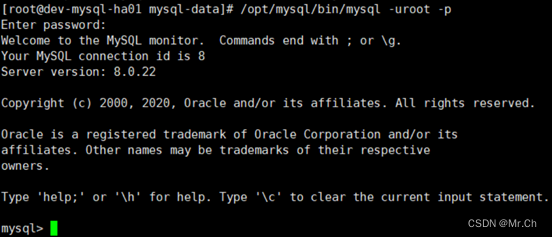
登錄 mysql 命令行,執行下麵的操作
unlock tables;
stop slave;
change maste master_host='10.5.15.18', master_user='syncoper',master_password= 'syncoper 的用戶密碼',master_log_file='mysql-bin.000001',master_log_pos=871;
start slave;
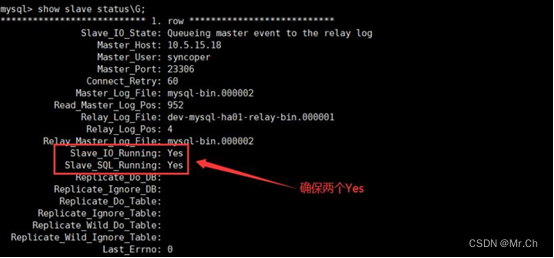
show slave status\G;

其中master_host 為 dev-mysql-ha02 的地址
master_user 為連接的用戶
master_password 為連接密碼
master_log_file 為上一步在 dev-mysql-ha02 執行得到 binlog 文件名
master_log_pos 為上一步在 dev-mysql-ha02 執行得到 binlog
pro-mysql-ha02同步操作測試
unlock tables;
stop slave;
change master to master_host='10.5.15.17', master_port=23306,
master_user='syncoper', master_password='syncoper
的 用 戶 密 碼 ',
master_log_file='mysql-bin.000002', master_log_pos=1435;
start slave;
show slave status\G;

MySQL +Keepalived配置
Keepalived安裝
yum install keepalived
使用 root 用戶配置兩台伺服器上的 keepalived, pro-mysql-ha01 上的配置內容
vi /etc/keepalived/keepalived.conf
! Configuration File for keepalived
global_defs {
notification_email {
[email protected]
[email protected]
}
notification_email_from [email protected]
smtp_server 127.0.0.1
smtp_connect_timeout 30
router_id MySQL_HA
}
vrrp_instance VI_1 {
state BACKUP
interface ens160
virtual_router_id 51 priority 100
advert_int 1
nopreempt
authentication {
auth_type PASS
auth_pass 12345678
}
virtual_ipaddress {
10.5.15.16
}
}
virtual_server virtual_server 10.5.15.16 23306 {
delay_loop 2
persistence_timeout 50
protocal TCP
real_server 10.5.15.17 23306 {
weight 3
notify_down /opt/mysql/monitor/switch_keepalived.sh
TCP_CHECK {
connect_timeout 3
nb_get_retry 3
delay_before_retry 3
}
}
}
pro-mysql-ha02 上的配置內容
! Configuration File for keepalived
global_defs {
notification_email {
[email protected]
[email protected]
}
notification_email_from [email protected]
smtp_server 127.0.0.1
smtp_connect_timeout 30
router_id MySQL_HA
}
vrrp_instance VI_1 {
state BACKUP
interface ens160
virtual_router_id 51
priority 90
advert_int 1
# nopreempt
authentication {
auth_type PASS
auth_pass 12345678
}
virtual_ipaddress {
10.5.15.16
}}
virtual_server virtual_server 10.5.15.16 23306 {
delay_loop 2
persistence_timeout 50
protocal TCP
real_server 10.5.15.18 23306 {
weight 3
notify_down /opt/mysql/monitor/switch_keepalived.sh
TCP_CHECK {
connect_timeout 3
nb_get_retry 3
delay_before_retry 3
}
}
}
修改防火牆,註意命令中要修改自己的網卡名稱ens33
firewall-cmd --direct --permanent --add-rule ipv4 filter INPUT 0 --in-interface ens33 --destination 224.0.0.18 --protocol vrrp -j ACCEPT
firewall-cmd --reload
執行一下的命令設置 keepalived 為隨伺服器自啟動
重新載入
systemctl daemon-reload
設置開機自動啟動
systemctl enable keepalived.service
查看兩台vip配置情況, 若兩台主機只有一個VIP,則配置正常
ip addr
至此,MySQL HA 配置完成


