Go 語言入門練手項目系列 01 基於命令行的圖書的增刪查改 02 文件管理 持續更新中... > 本文來自博客園,作者:Arway,轉載請註明原文鏈接:https://www.cnblogs.com/cenjw/p/gobeginner-proj-bookstore-cli.html 介紹 這是一 ...
SpringBoot整合Redis--RedisTemplate
1、導入依賴
<dependency>
    <groupId>org.springframework.boot</groupId>
    <artifactId>spring-boot-starter-data-redis</artifactId>
</dependency>
2、編寫配置文件
spring:
  redis:
    host: 192.168.27.132
    port: 6379
    password: lzyredis
    database: 1
    jedis:
      pool:
        max-active: 10
        max-wait: 3000
        min-idle: 5
        max-idle: 10
3、測試代碼
RedisTemplate.opsForXxx().操作
- Xxx:代表要操作的數據類型【value代表操作的是string】
@SpringBootTest
class SpringbootRedisDemoApplicationTests {
    @Autowired
    private RedisTemplate redisTemplate;

    @Test
    public void test(){
        //setIfAbsent 就是 setnx
        Boolean absent = redisTemplate.opsForValue().setIfAbsent("name", "xiaoming", 5 * 60, SECONDS);
        System.out.println("absent = " + absent);

        String name = (String) redisTemplate.opsForValue().get("name");
        System.out.println("name = " + name);

    }
}
| springboot整合redis測試後存儲的數據 |
|---|
 |
| 列印結果 |
 |
在第一張圖中發現存儲的key和value前出現了一些不認識的字元,雖然在RedisDesktopManager工具上顯示不是期望的格式,但在列印結果上看卻是正常顯示的。
這是因為使用RedisTemplate來操作字元串時,在存儲數據時會對key和value進行序列化操作。
序列化操作會對選擇對應的序列化器來操作,如果沒有指定序列化器,那麼預設選擇是JDK序列化器。
所以會出現一長串字元串。
4、RedisTemplate選擇序列化器的原理:
RedisTemplate繼承RedisAccessor類,而該類實現了InitializingBean介面,所以
RedisTemplate會調用afterPropertiesSet方法。在該方法中會對操作key和value進行序列化操作,
如果指定了具體的序列化器,那麼就會使用指定的序列化器,
如果沒有指定具體的序列化器,則使用JDK序列化器
public void afterPropertiesSet() {
    super.afterPropertiesSet();
    boolean defaultUsed = false;
    if (this.defaultSerializer == null) {
        //沒有指定的序列化器,那預設序列化器就為jdk序列化器
        this.defaultSerializer = new JdkSerializationRedisSerializer(this.classLoader != null ? this.classLoader : this.getClass().getClassLoader());
    }

    if (this.enableDefaultSerializer) {
        if (this.keySerializer == null) {
            this.keySerializer = this.defaultSerializer;
            defaultUsed = true;
        }

        if (this.valueSerializer == null) {
            this.valueSerializer = this.defaultSerializer;
            defaultUsed = true;
        }

        if (this.hashKeySerializer == null) {
            this.hashKeySerializer = this.defaultSerializer;
            defaultUsed = true;
        }

        if (this.hashValueSerializer == null) {
            this.hashValueSerializer = this.defaultSerializer;
            defaultUsed = true;
        }
    }

    if (this.enableDefaultSerializer && defaultUsed) {
        Assert.notNull(this.defaultSerializer, "default serializer null and not all serializers initialized");
    }

    if (this.scriptExecutor == null) {
        this.scriptExecutor = new DefaultScriptExecutor(this);
    }

    this.initialized = true;
}
如果不想使用預設的序列化器,可以自己指定序列化器或使用redis提供的StringRedisTemplate對象
5、配置序列化器
- 增加一個配置類,類上加@Configuration註解
- 添加如下方法,返回類型為RedisTemplate,並通過@Bean註解註入容器中
@Configuration
public class MyRedisConfig {

    @Bean("myRedisTemplate")
    public RedisTemplate myRedisTemplate(RedisConnectionFactory connectionFactory){
        RedisTemplate myRedisTemplate = new RedisTemplate();
        //設置連接工廠
        myRedisTemplate.setConnectionFactory(connectionFactory);

        //更換key和value的序列化器
        myRedisTemplate.setKeySerializer(new StringRedisSerializer());
        myRedisTemplate.setValueSerializer(new StringRedisSerializer());
        return myRedisTemplate;
    }

}
- 測試
@SpringBootTest
public class myRedisTemplateTest {
    @Autowired
    private RedisTemplate myRedisTemplate;

    @Test
    public void myRedisTemplateTest(){
        Boolean flag = myRedisTemplate.opsForValue().setIfAbsent("name2", "zhangsan", 5 * 60, TimeUnit.SECONDS);
        System.out.println("flag = " + flag);

        String  name2 = (String) myRedisTemplate.opsForValue().get("name2");
        System.out.println("name2 = " + name2);
    }
}
- redisTemlate加上序列化器後存儲的數據
| redisTemlate指定序列化器後存儲的數據 |
|---|
 |
6、StringRedisTemplate
6.2 StringRedisTemplate分析
StringRedisTemplate就相當於指定了String序列化器的RedisTemplate對象。
查看org.springframework.data.redis.core包下的StringRedisTemplate源碼:
public class StringRedisTemplate extends RedisTemplate<String, String> {
    public StringRedisTemplate() {
        this.setKeySerializer(RedisSerializer.string());
        this.setValueSerializer(RedisSerializer.string());
        this.setHashKeySerializer(RedisSerializer.string());
        this.setHashValueSerializer(RedisSerializer.string());
    }

    public StringRedisTemplate(RedisConnectionFactory connectionFactory) {
        this();
        this.setConnectionFactory(connectionFactory);
        this.afterPropertiesSet();
    }

    protected RedisConnection preProcessConnection(RedisConnection connection, boolean existingConnection) {
        return new DefaultStringRedisConnection(connection);
    }
}
從源碼中可以看到StringRedisTemplate構造函數中指定了key、value的序列化器為string序列化器
這就相當於第五點我們自定義RedisTemplate並指定string序列化器。因此我們可以直接註入使用StringRedisTemplate對象
6.2 StringRedisTemplate使用
@SpringBootTest
public class myRedisTemplateTest {

    @Resource
    private StringRedisTemplate stringRedisTemplate;

    @Test
    public void test(){
        stringRedisTemplate.opsForValue().set("age","123");
    }
}
| StringRedisTemplate使用結果 |
|---|
 |
7、redisTemplate存儲對象
使用redisTemplate的opsForValue可以存儲對象,存儲時會把對象轉成位元組數組來存儲
@SpringBootTest
public class SaveObjectTest {
    @Autowired
    private RedisTemplate redisTemplate;

    @Test
    public void saveTest(){
        Person person = new Person();
        person.setId(1);
        person.setName("zhangsan");
        person.setAge(20);
		//使用redisTemplate的opsForValue可以存儲對象,存儲時會把對象轉成位元組數組來存儲
        redisTemplate.opsForValue().set("person"+person.getId(),person);

        Person person1 = (Person) redisTemplate.opsForValue().get("person1");
        System.out.println("person1 = " + person1);
    }
}
相比較與jedis存儲對象,更加方便,去掉了我們自己自定義的將對象轉為字元串或者字元數組的過程。redisTemplate會將對象轉為位元組數組來存儲。
運行結果:
| redisTemplate存儲對象 |
|---|
 |
8、redisTemplate管道操作
- 不使用管道存儲10000個對象,用時約7158ms
@SpringBootTest
public class SaveObjectTest {
    @Autowired
    private RedisTemplate redisTemplate;

    @Test
    public void saveTest(){
        Person person = new Person();
        person.setId(1);
        person.setName("zhangsan");
        person.setAge(20);
        long start = System.currentTimeMillis();
        for (int i = 0; i < 10000; i++) {
            redisTemplate.opsForValue().set("person" + person.getId()+i, person);
        }
        System.out.println(System.currentTimeMillis()-start); //用時7158ms
    }
}
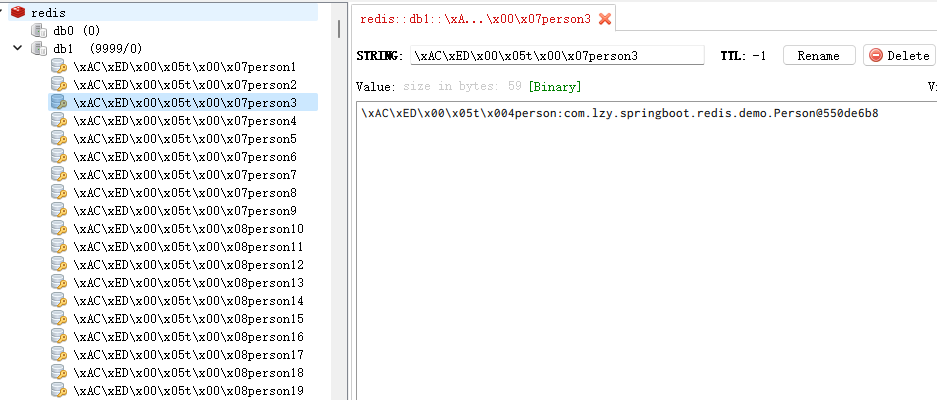
- 使用管道存儲10000個對象
@SpringBootTest
public class SaveObjectTest {
    @Autowired
    private RedisTemplate redisTemplate;

   @Test
    public void pipelineTest() {
        long start = System.currentTimeMillis();
        redisTemplate.executePipelined(new SessionCallback<String>() {
            @Override
            public String execute(RedisOperations operations) throws DataAccessException 			{
                Person person = new Person();
                person.setId(1);
                person.setName("zhangsan");
                person.setAge(20);
                long start = System.currentTimeMillis();
                for (int i = 1; i < 10000; i++) {
                    operations.opsForValue().set("person" + i, "person:" + person);
                }
                System.out.println(System.currentTimeMillis()-start); //312ms
                return null;
            }
        });
        System.out.println(System.currentTimeMillis()-start);//2123ms
    }
}
| 管道存儲10000個對象,用時約2123ms |
|---|
 |


