本文和接下來的幾篇文章為閱讀郭霖先生所著《第一行代碼:Android(篇第2版)》的學習筆記,按照書中的內容順序進行記錄,書中的Demo本人全部都做過了。 每一章節本人都做了詳細的記錄,以下是我學習記錄(包含大量書中內容的整理和自己在學習中遇到的各種bug及解決方案),方便以後閱讀和查閱。最後,非常 ...
本文和接下來的幾篇文章為閱讀郭霖先生所著《第一行代碼:Android(篇第2版)》的學習筆記,按照書中的內容順序進行記錄,書中的Demo本人全部都做過了。
每一章節本人都做了詳細的記錄,以下是我學習記錄(包含大量書中內容的整理和自己在學習中遇到的各種bug及解決方案),方便以後閱讀和查閱。最後,非常感激郭霖先生提供這麼好的書籍。
第10章 後臺默默的勞動者——探究服務
以前,全球的手機市場是由諾基亞統治著的。諾基亞的Symbian操作系統做得特別出色,因為比起一般的手機,它可以支持後臺功能。
而如今,Symbian早已風光不再,Android和iOS幾乎占據了智能手機全部的市場份額。在這兩大移動操作系統中,iOS一開始是不支持後臺的,後來逐漸意識到這個功能的重要性,才加入了後臺功能。而Android則是沿用了Symbian的老習慣,從一開始就支持後臺功能,這使得應用程式即使在關閉的情況下仍然可以在後臺繼續運行。
10.1 服務是什麼
服務(Service)是Android中實現程式後臺運行的解決方案,它非常適合去執行那些不需要和用戶交互而且還要求長期運行的任務。服務的運行不依賴於任何用戶界面,即使程式被切換到後臺,或者用戶打開了另外一個應用程式,服務仍然能夠保持正常運行。
需要註意的是,服務並不是運行在一個獨立的進程當中的,而是依賴於創建服務時所在的應用程式進程。當某個應用程式進程被殺掉時,所有依賴於該進程的服務也會停止運行。
另外,也不要被服務的後臺概念所迷惑,實際上服務並不會自動開啟線程,所有的代碼都是預設運行在主線程當中的。也就是說,我們需要在服務的內部手動創建子線程,併在這裡執行具體的任務,否則就有可能出現主線程被阻塞住的情況。
10.2 Android多線程編程
當我們需要執行一些耗時操作,比如說發起一條網路請求時,考慮到網速等其他原因,伺服器未必會立刻響應我們的請求,如果不將這類操作放在子線程里去運行,就會導致主線程被阻塞住,從而影響用戶對軟體的正常使用。
10.2.1 線程的基本用法
Android多線程編程其實並不比Java多線程編程特殊,基本都是使用相同的語法。比如說,定義一個線程只需要新建一個類繼承自Thread,然後重寫父類的run()方法,併在裡面編寫耗時邏輯即可,如下所示:
class MyThread extends Thread {
    @Override
    public void run() {
        //處理具體的邏輯
    }
}
啟動線程
new MyThread().start();
當然,使用繼承的方式耦合性有點高,更多的時候我們都會選擇使用實現Runnable介面的方式來定義一個線程,如下所示:
class MyThread implements Runnable {
    @Override
    public void run() {
        //處理具體邏輯
    }
}
如果使用了這種寫法,啟動線程的方法也需要進行相應的改變,如下所示:
MyThread myThread = new MyThread();
new Thread(myThread).start();
當然,如果你不想專門再定義一個類去實現Runnable介面,也可以使用匿名類的方式,這種寫法更為常見,如下所示:
new Thread(new Runnable() {
    @Override
    public void run() {
        //處理具體的邏輯
    }
}).start();
下麵我們來看一下Android多線程編程與Java多線程編程不同的地方。
10.2.2 在子線程中更新UI
和許多其他的GUI庫一樣,Android的UI也是線程不安全的。也就是說,如果想要更新應用程式里的UI元素,則必須在主線程中進行,否則就會出現異常。新建一個AndroidThreadTest項目,然後修改activity_main.xml中的代碼,如下所示:
<?xml version="1.0" encoding="utf-8"?>
<RelativeLayout xmlns:android="http://schemas.android.com/apk/res/android"
    android:layout_width="match_parent"
    android:layout_height="match_parent">
    <Button
        android:layout_width="match_parent"
        android:layout_height="wrap_content"
        android:id="@+id/change_text"
        android:text="Change Text"/>
    <TextView
        android:layout_width="wrap_content"
        android:layout_height="wrap_content"
        android:id="@+id/text"
        android:layout_centerInParent="true"
        android:text="Hello World"
        android:textSize="20sp"/>
</RelativeLayout>
佈局文件中定義了兩個控制項,TextView用於在屏幕的正中央顯示一個Helloworld字元串,Button用於改變TextView中顯示的內容,我們希望在點擊Button後可以把TextView中顯示的字元串改成Nice to meet you。接下來修改MainActivity中的代碼,如下所示:
package com.zhouzhou.androidthreadtest;

import androidx.appcompat.app.AppCompatActivity;

import android.os.Bundle;
import android.view.View;
import android.widget.Button;
import android.widget.TextView;

public class MainActivity extends AppCompatActivity implements View.OnClickListener {
    private TextView text;
    @Override
    protected void onCreate(Bundle savedInstanceState) {
        super.onCreate(savedInstanceState);
        setContentView(R.layout.activity_main);
        text = (TextView) findViewById(R.id.text);
        Button changeText = (Button) findViewById(R.id.change_text);
        changeText.setOnClickListener(this);
    }

    @Override
    public void onClick(View view) {
        switch (view.getId()) {
            case R.id.change_text:
                new Thread(new Runnable() {
                    @Override
                    public void run() {
                        text.setText("Nice to meet you!");
                    }
                }).start();
                break;
            default:
                break;
        }
    }
}
可以看到,在Change Text按鈕的點擊事件裡面開啟了一個子線程,然後在子線程中調用TextView的setText()方法將顯示的字元串改成Nice to meetyou。
代碼的邏輯非常簡單,只不過我們是在子線程中更新UI的。現在運行一下程式,並點擊Change Text按鈕,你會發現程式果然崩潰了,閃退。
然後觀察logcat中的錯誤日誌,可以看出是由於在子線程中更新UI所導致的,如圖:
android.view.ViewRootImpl$CalledFromWrongThreadException: Only the original thread that created a view hierarchy can touch its views.

由此證實了Android確實是不允許在子線程中進行UI操作的。但是有些時候,我們必須在子線程里去執行一些耗時任務,然後根據任務的執行結果來更新相應的UI控制項,這該如何是好呢?
對於這種情況,Android提供了一套非同步消息處理機制,完美地解決了在子線程中進行UI操作的問題。本小節中我們先來學習一下非同步消息處理的使用方法,下一小節中再去分析它的原理。修改MainActivity中的代碼,如下所示:
package com.zhouzhou.androidthreadtest;

import androidx.appcompat.app.AppCompatActivity;

import android.os.Bundle;
import android.os.Handler;
import android.os.Message;
import android.view.View;
import android.widget.Button;
import android.widget.TextView;

public class MainActivity extends AppCompatActivity implements View.OnClickListener {
    public static final int UPDATE_TEXT =1;
    private TextView text;
    private Handler handler = new Handler() {
        public void handleMessage(Message msg) {
            switch (msg.what) {
                case UPDATE_TEXT:
                    //這裡可以進行UI操作
                    text.setText("Nice to meet you!");
                    break;
                default:
                    break;
            }
        }
    };
    @Override
    protected void onCreate(Bundle savedInstanceState) {
        super.onCreate(savedInstanceState);
        setContentView(R.layout.activity_main);
        text = (TextView) findViewById(R.id.text);
        Button changeText = (Button) findViewById(R.id.change_text);
        changeText.setOnClickListener(this);
    }

    @Override
    public void onClick(View view) {
        switch (view.getId()) {
            case R.id.change_text:
                new Thread(new Runnable() {
                    @Override
                    public void run() {
                        Message message = new Message();
                        message.what = UPDATE_TEXT;
                        handler.sendMessage(message);//將Message對象發送出去
                    }
                }).start();
                break;
            default:
                break;
        }
    }
}
我們先是定義了一個整型常量UPDATE_TEXT,用於表示更新TextView這個動作。然後新增一個Handler對象,並重寫父類的handleMessage()方法,在這裡對具體的Message進行處理。如果發現Message的what欄位的值等於UPDATE_TEXT,就將TextView顯示的內容改成Nice to meet you。
下麵再來看一下Change Text按鈕的點擊事件中的代碼。可以看到,這次我們並沒有在子線程里直接進行UI操作,而是創建了一個Message(android.os.Message)對象,並將它的what欄位的值指定為UPDATE_TEXT,然後調用Handler的sendMessage()方法將這條Message發送出去。
Handler就會收到這條Message,併在handleMessage()方法中對它進行處理。註意此時handleMessage()方法中的代碼就是在主線程當中運行的了,所以我們可以放心地在這裡進行UI操作。接下來對Message攜帶的what欄位的值進行判斷,如果等於UPDATE_TEXT,就將TextView顯示的內容改成Nice to meet you。
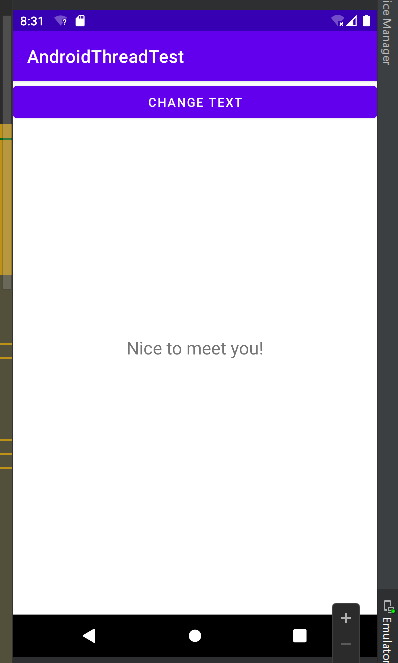
現在重新運行程式,可以看到屏幕的正中央顯示著Hello world。然後點擊一下Change Text按鈕,顯示的內容就被替換成Nice to meet you,如圖:
10.2.3 解析非同步消息處理機制
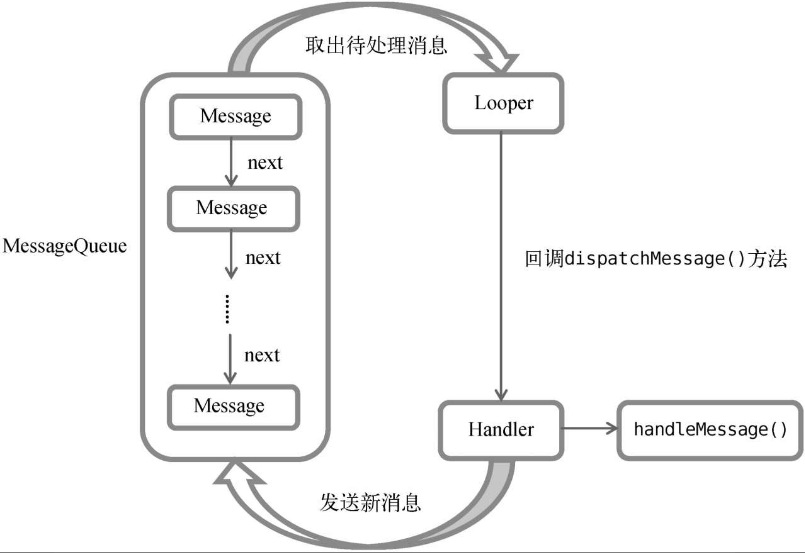
Android中的非同步消息處理主要由4個部分組成:Message、Handler、MessageQueue和Looper。其中Message和Handler在上一小節中我們已經接觸過了,而MessageQueue和Looper對於你來說還是全新的概念,下麵我就對這4個部分進行一下簡要的介紹。
- Message
Message是線上程之間傳遞的消息,它可以在內部攜帶少量的信息,用於在不同線程之間交換數據。上一小節中我們使用到了Message的what欄位,除此之外還可以使用arg1和arg2欄位來攜帶一些整型數據,使用obj欄位攜帶一個Object對象。
- Handler
Handler顧名思義也就是處理者的意思,它主要是用於發送和處理消息的。發送消息一般是使用Handler的sendMessage()方法,而發出的消息經過一系列地輾轉處理後,最終會傳遞到Handler的handleMessage()方法中。
- MessageQueue
MessageQueue是消息隊列的意思,它主要用於存放所有通過Handler發送的消息。這部分消息會一直存在於消息隊列中,等待被處理。每個線程中只會有一個MessageQueue對象。
- Looper
Looper是每個線程中的MessageQueue的管家,調用Looper的loop()方法後,就會進入到一個無限迴圈當中,然後每當發現MessageQueue中存在一條消息,就會將它取出,並傳遞到Handler的handleMessage()方法中。每個線程中也只會有一個Looper對象。
瞭解了Message、Handler、MessageQueue以及Looper的基本概念後,我們再來把非同步消息處理的整個流程梳理一遍。
- 首先,需要在主線程當中創建一個Handler對象,並重寫handleMessage()方法。
- 然後,當子線程中需要進行UI操作時,就創建一個Message對象,並通過Handler將這條消息發送出去。
- 之後,這條消息會被添加到MessageQueue的隊列中等待被處理,而Looper則會一直嘗試從MessageQueue中取出待處理消息。
- 最後分發回Handler的handleMessage()方法中。
由於Handler是在主線程中創建的,所以此時handleMessage()方法中的代碼也會在主線程中運行,於是我們在這裡就可以安心地進行UI操作了。整個非同步消息處理機制的流程示意圖如圖:
一條Message經過這樣一個流程的輾轉調用後,也就從子線程進入到了主線程,從不能更新UI變成了可以更新UI,整個非同步消息處理的核心思想也就是如此。
而我們在9.2.1小節中使用到的runOnUiThread()方法:
...
private void showResponse(final String response) {
        runOnUiThread(new Runnable() {
            @Override
            public void run() {
                //在這裡進行Ui操作,將結果顯示到界面
                responseText.setText(response);
            }
        });
    }
其實就是一個非同步消息處理機制的介面封裝,它雖然錶面上看起來用法更為簡單,但其實背後的實現原理和上圖的描述是一模一樣的。
10.2.4 使用AsyncTask
為了更加方便我們在子線程中對UI進行操作,Android還提供了另外一些好用的工具,比如AsyncTask。
藉助AsyncTask,即使你對非同步消息處理機制完全不瞭解,也可以十分簡單地從子線程切換到主線程。當然,AsyncTask背後的實現原理也是基於非同步消息處理機制的,只是Android幫我們做了很好的封裝而已。
首先來看一下AsyncTask的基本用法,由於AsyncTask是一個抽象類,所以如果我們想使用它,就必須要創建一個子類去繼承它。在繼承時我們可以為AsyncTask類指定3個泛型參數,這3個參數的用途如下:
❑ Params。在執行AsyncTask時需要傳入的參數,可用於在後臺任務中使用。
❑ Progress。後臺任務執行時,如果需要在界面上顯示當前的進度,則使用這裡指定的泛型作為進度單位。
❑ Result。當任務執行完畢後,如果需要對結果進行返回,則使用這裡指定的泛型作為返回值類型。
因此,一個最簡單的自定義AsyncTask就可以寫成如下方式:
class DownloadTask extends AsyncTask<Void,Integer,Boolean> {
    ...
}
這裡我們把AsyncTask的第一個泛型參數指定為Void,表示在執行AsyncTask的時候不需要傳入參數給後臺任務。第二個泛型參數指定為Integer,表示使用整型數據來作為進度顯示單位。第三個泛型參數指定為Boolean,則表示使用布爾型數據來反饋執行結果。
當然,目前我們自定義的DownloadTask還是一個空任務,並不能進行任何實際的操作,我們還需要去重寫AsyncTask中的幾個方法才能完成對任務的定製。經常需要去重寫的方法有以下4個。
- onPreExecute()
這個方法會在後臺任務開始執行之前調用,用於進行一些界面上的初始化操作,比如顯示一個進度條對話框等。
- doInBackground(Params...)
這個方法中的所有代碼都會在子線程中運行,我們應該在這裡去處理所有的耗時任務。任務一旦完成就可以通過return語句來將任務的執行結果返回,如果AsyncTask的第三個泛型參數指定的是Void,就可以不返回任務執行結果。
註意,在這個方法中是不可以進行UI操作的,如果需要更新UI元素,比如說反饋當前任務的執行進度,可以調用publishProgress (Progress...)方法來完成。
- onProgressUpdate(Progress...)
當在後臺任務中調用了publishProgress(Progress...)方法後,onProgressUpdate (Progress...)方法就會很快被調用,該方法中攜帶的參數就是在後臺任務中傳遞過來的。在這個方法中可以對UI進行操作,利用參數中的數值就可以對界面元素進行相應的更新。
- onPostExecute(Result)
當後臺任務執行完畢並通過return語句進行返回時,這個方法就很快會被調用。返回的數據會作為參數傳遞到此方法中,可以利用返回的數據來進行一些UI操作,比如說提醒任務執行的結果,以及關閉掉進度條對話框等。
因此,一個比較完整的自定義AsyncTask就可以寫成如下方式:
class DownloadTask extends AsyncTask <Void,Integer,Boolean>{
    @Override
    protected void onPreExecute() {
        progressDialog.show();//顯示進度對話框
    }
    @Override
    protected Boolean doInBackground(Void...params) {
        try {
            while (true) {
                int downloadPercent = doDownload();//這是一個虛構的方法
                publishProgress(downloadPercent);
                if (downloadPercent >= 100) {
                    break;
                }
            }
        } catch (Exception e) {
            return false;
        }
        return true;
    }

    @Override
    protected void onProgressUpdate(Integer...values) {
        //在這裡更新下載進度
        progressDialog.setMessage("Downloaded " + values[0] + "%");
    }
    @Override
    protected void onPostExecute(Boolean result) {
        progressDialog.dismiss();//關閉進度對話框
        //這裡顯示下載結果
        if (result) {
            Toast.makeText(context,"Download succeded",Toast.LENGTH_SHORT).show();
        } else {
            Toast.makeText(context,"Download failed",Toast.LENGTH_SHORT).show();
        }
    }
}
在這個DownloadTask中,我們在doInBackground()方法里去執行具體的下載任務。這個方法里的代碼都是在子線程中運行的,因而不會影響到主線程的運行。
註意,這裡虛構了一個doDownload()方法,這個方法用於計算當前的下載進度並返回,我們假設這個方法已經存在了。在得到了當前的下載進度後,下麵就該考慮如何把它顯示到界面上了,由於doInBackground()方法是在子線程中運行的,在這裡肯定不能進行UI操作,所以我們可以調用publishProgress()方法並將當前的下載進度傳進來,這樣onProgressUpdate()方法就會很快被調用,在這裡就可以進行UI操作了。
當下載完成後,doInBackground()方法會返回一個布爾型變數,這樣onPostExecute()方法就會很快被調用,這個方法也是在主線程中運行的。然後在這裡我們會根據下載的結果來彈出相應的Toast提示,從而完成整個DownloadTask任務。
簡單來說,使用AsyncTask的訣竅就是,在doInBackground()方法中執行具體的耗時任務,在onProgressUpdate()方法中進行UI操作,在onPostExecute()方法中執行一些任務的收尾工作。
如果想要啟動這個任務,只需編寫以下代碼即可:
new DownloadTask().execute();
以上就是AsyncTask的基本用法,我們並不需要去考慮什麼非同步消息處理機制,也不需要專門使用一個Handler來發送和接收消息,只需要調用一下publishProgress()方法,就可以輕鬆地從子線程切換到UI線程了。在本章的最佳實踐環節,我們會對下載這個功能進行完整的實現。
10.3 服務的基本用法
作為Android四大組件之一,服務也少不了有很多非常重要的知識點,先從最基本的用法開始學習。
10.3.1 定義一個服務
首先看一下如何在項目中定義一個服務。新建一個ServiceTest項目,然後右擊com.zhouzhou. servicetest→New→Service→Service→MyService,會彈出如圖所示的視窗:
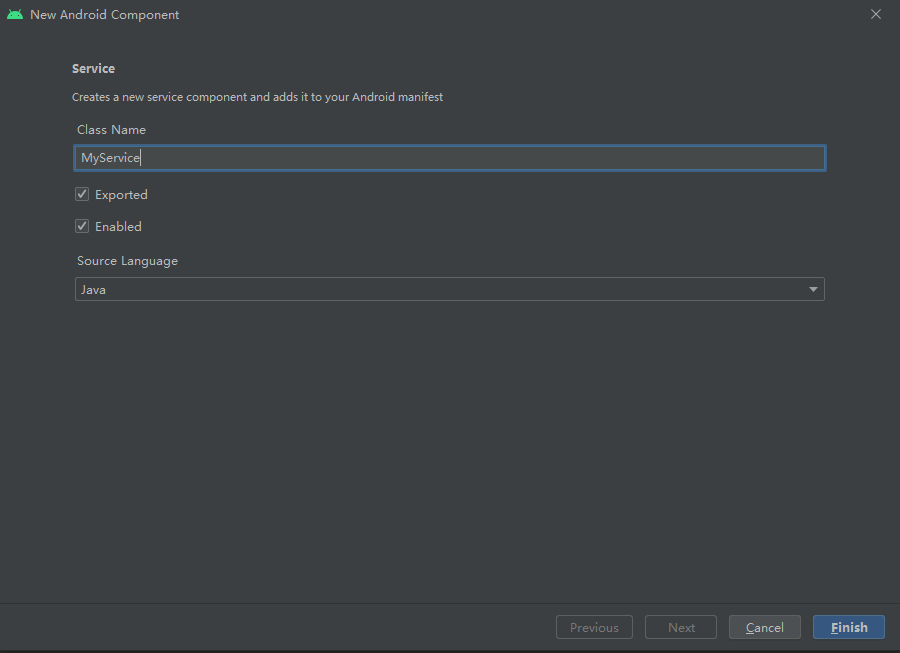
將服務命名為MyService, Exported屬性表示是否允許除了當前程式之外的其他程式訪問這個服務,Enabled屬性表示是否啟用這個服務。將兩個屬性都勾中,點擊Finish完成創建。現在觀察MyService中的代碼,如下所示:
package com.zhouzhou.servicetest;

import android.app.Service;
import android.content.Intent;
import android.os.IBinder;

public class MyService extends Service {
    public MyService() {
    }

    @Override
    public IBinder onBind(Intent intent) {
        // TODO: Return the communication channel to the service.
        throw new UnsupportedOperationException("Not yet implemented");
    }
}
MyService是繼承自Service類的,說明這是一個服務。onBind()方法是Service中唯一的一個抽象方法,所以必須要在子類里實現。
會在後面的小節中使用到onBind()方法,目前可以暫時將它忽略掉。既然是定義一個服務,自然應該在服務中去處理一些事情了,那處理事情的邏輯應該寫在哪裡呢?這時就可以重寫Service中的另外一些方法了,如下所示:
package com.zhouzhou.servicetest;

import android.app.Service;
import android.content.Intent;
import android.os.IBinder;

public class MyService extends Service {
    public MyService() {
    }

    @Override
    public IBinder onBind(Intent intent) {
        // TODO: Return the communication channel to the service.
        throw new UnsupportedOperationException("Not yet implemented");
    }

    @Override
    public void onCreate() {
        super.onCreate();
    }

    @Override
    public int onStartCommand(Intent intent, int flags, int startId) {
        return super.onStartCommand(intent, flags, startId);
    }

    @Override
    public void onDestroy() {
        super.onDestroy();
    }
}
可以看到,這裡我們又重寫了onCreate()、onStartCommand()和onDestroy()這3個方法,它們是每個服務中最常用到的3個方法了。
- onCreate()方法會在服務創建的時候調用。
- onStartCommand()方法會在每次服務啟動的時候調用。
- onDestroy()方法會在服務銷毀的時候調用。
通常情況下,如果希望服務一旦啟動就立刻去執行某個動作,就可以將邏輯寫在onStartCommand()方法里。而當服務銷毀時,又應該在onDestroy()方法中去回收那些不再使用的資源。另外需要註意,每一個服務都需要在AndroidManifest.xml文件中進行註冊才能生效,這是Android四大組件共有的特點。智能的Android Studio早已自動幫我們將這一步完成了。打開AndroidManifest.xml文件瞧一瞧,代碼如下所示:
<?xml version="1.0" encoding="utf-8"?>
<manifest xmlns:android="http://schemas.android.com/apk/res/android"
    package="com.zhouzhou.servicetest">

    <application
        android:allowBackup="true"
        android:icon="@mipmap/ic_launcher"
        android:label="@string/app_name"
        android:roundIcon="@mipmap/ic_launcher_round"
        android:supportsRtl="true"
        android:theme="@style/Theme.ServiceTest">

        <service
            android:name=".MyService"
            android:enabled="true"
            android:exported="true" />

        <activity
            android:name=".MainActivity"
            android:exported="true">
            <intent-filter>
                <action android:name="android.intent.action.MAIN" />

                <category android:name="android.intent.category.LAUNCHER" />
            </intent-filter>
        </activity>
    </application>

</manifest>
這樣的話,就已經將一個服務完全定義好了。
10.3.2 啟動和停止服務
定義好了服務之後,接下來就應該考慮如何去啟動以及停止這個服務。主要是藉助Intent來實現的,下麵就讓我們在ServiceTest項目中嘗試去啟動以及停止MyService這個服務。首先修改activity_main.xml中的代碼,如下所示:
<?xml version="1.0" encoding="utf-8"?>
<LinearLayout xmlns:android="http://schemas.android.com/apk/res/android"
    android:orientation="vertical"
    android:layout_width="match_parent"
    android:layout_height="match_parent">

    <Button
        android:layout_width="match_parent"
        android:layout_height="wrap_content"
        android:id="@+id/start_service"
        android:text="Start Service"/>
    <Button
        android:layout_width="match_parent"
        android:layout_height="wrap_content"
        android:id="@+id/stop_service"
        android:text="Stop Service"/>

</LinearLayout>
加入了兩個按鈕,分別是用於啟動服務和停止服務的。然後修改MainActivity中的代碼,如下所示:
package com.zhouzhou.servicetest;

import androidx.appcompat.app.AppCompatActivity;

import android.content.Intent;
import android.os.Bundle;
import android.view.View;
import android.widget.Button;

public class MainActivity extends AppCompatActivity implements View.OnClickListener {

    @Override
    protected void onCreate(Bundle savedInstanceState) {
        super.onCreate(savedInstanceState);
        setContentView(R.layout.activity_main);
        Button startService = (Button) findViewById(R.id.start_service);
        Button stopService = (Button) findViewById(R.id.stop_service);
        startService.setOnClickListener(this);
        stopService.setOnClickListener(this);
    }

    @Override
    public void onClick(View view) {
        switch (view.getId()) {
            case R.id.start_service:
                Intent startIntent = new Intent(this,MyService.class);
                startService(startIntent);//啟動服務
                break;
            case R.id.stop_service:
                Intent stopIntent = new Intent(this,MyService.class);
                stopService(stopIntent);
                break;
            default:
                break;
        }
    }
}
可以看到,這裡在onCreate()方法中分別獲取到了Start Service按鈕和StopService按鈕的實例,並給它們註冊了點擊事件。然後在Start Service按鈕的點擊事件里,我們構建出了一個Intent對象,並調用startService()方法來啟動MyService這個服務。在Stop Serivce按鈕的點擊事件里,我們同樣構建出了一個Intent對象,並調用stopService()方法來停止MyService這個服務。
startService()和stopService()方法都是定義在Context類中的,所以在活動里可以直接調用這兩個方法。註意,這裡完全是由活動來決定服務何時停止的,如果沒有點擊Stop Service按鈕,服務就會一直處於運行狀態。那服務有沒有什麼辦法讓自已停止下來呢?當然可以,只需要在MyService的任何一個位置調用stopSelf()方法就能讓這個服務停止下來了。
那麼接下來又有一個問題需要思考了,我們如何才能證實服務已經成功啟動或者停止了呢?最簡單的方法就是在MyService的幾個方法中加入列印日誌,如下所示:
package com.zhouzhou.servicetest;

import android.app.Service;
import android.content.Intent;
import android.os.IBinder;
import android.util.Log;

public class MyService extends Service {
    public MyService() {
    }

    @Override
    public IBinder onBind(Intent intent) {
        // TODO: Return the communication channel to the service.
        throw new UnsupportedOperationException("Not yet implemented");
    }

    @Override
    public void onCreate() {
        super.onCreate();
        Log.d("MyService","onCreate executed");
    }

    @Override
    public int onStartCommand(Intent intent, int flags, int startId) {
        Log.d("MyService","onStartCommand executed");
        return super.onStartCommand(intent, flags, startId);
    }

    @Override
    public void onDestroy() {
        Log.d("MyService","on Destroy executed");
        super.onDestroy();
    }
}
現在可以運行一下程式來進行測試了,點擊一下Start Service按鈕,觀察logcat中的列印日誌,如圖:

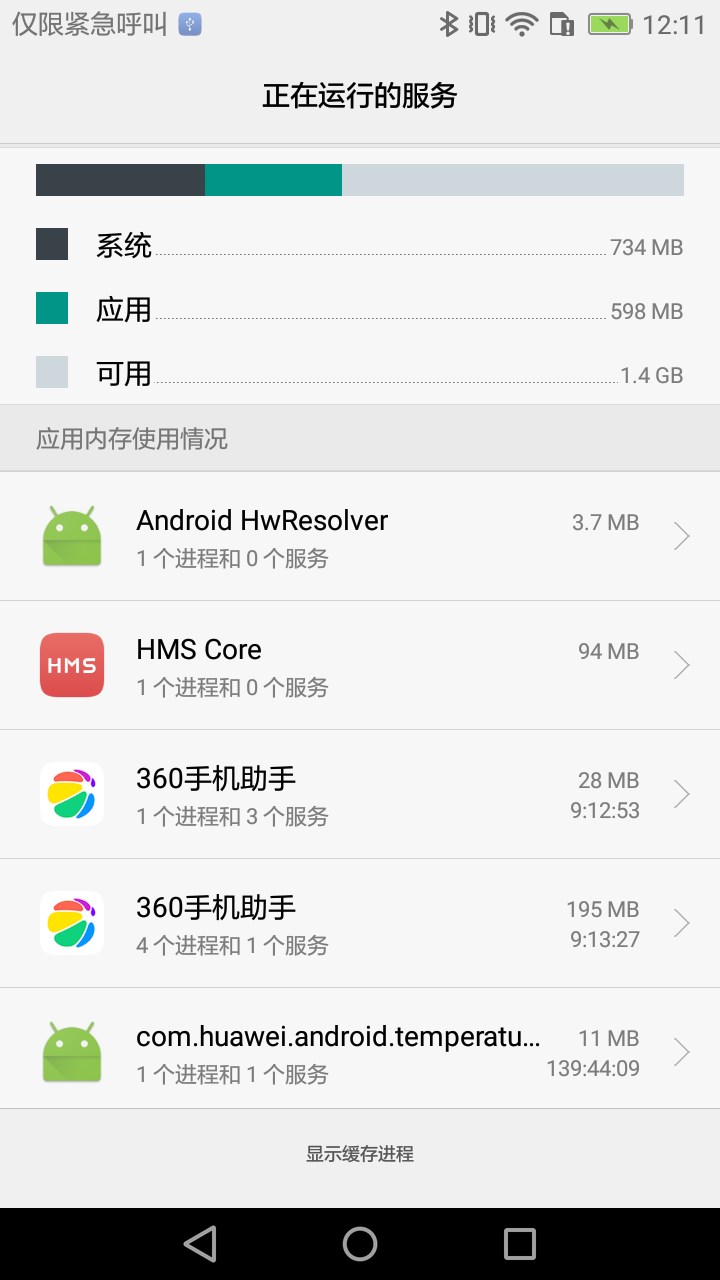
MyService中的onCreate()和onStartCommand()方法都執行了,說明這個服務確實已經啟動成功了,並且還可以在(我用的是手機來測試的)Settings→Developeroptions(開發人員選項)→Running services(正在運行的服務)中找到它,如圖(手機截屏):
然後,再點擊一下Stop Service按鈕,觀察logcat中的列印日誌:

再次查看,Settings→Developeroptions(開發人員選項)→Running services(正在運行的服務),發現MyService確實已經成功停止下來了。(圖略)
onCreate()方法和onStartCommand()方法到底有什麼區別呢?
因為剛剛點擊Start Service按鈕後兩個方法都執行了。其實onCreate()方法是在服務第一次創建的時候調用的,而onStartCommand()方法則在每次啟動服務的時候都會調用,由於剛纔我們是第一次點擊Start Service按鈕,服務此時還未創建過,所以兩個方法都會執行,之後如果你再連續多點擊幾次Start Service按鈕,就會發現只有onStartCommand()方法可以得到執行了。

10.3.3 活動和服務進行通信
上一小節中,我們在活動里調用了startService()方法來啟動MyService這個服務,然後MyService的onCreate()和onStartCommand()方法就會得到執行。之後服務會一直處於運行狀態,但具體運行的是什麼邏輯,活動就控制不了了。這就類似於活動通知了服務一下:“你可以啟動了!”然後服務就去忙自己的事情了,但活動並不知道服務到底去做了什麼事情,以及完成得如何。
那麼有沒有什麼辦法能讓活動和服務的關係更緊密一些呢?例如在活動中指揮服務去乾什麼,服務就去乾什麼。當然可以,這就需要藉助我們剛剛忽略的onBind()方法了。
比如說,目前我們希望在MyService里提供一個下載功能,然後在活動中可以決定何時開始下載,以及隨時查看下載進度。實現這個功能的思路是創建一個專門的Binder對象來對下載功能進行管理,修改MyService中的代碼,如下所示:
package com.zhouzhou.servicetest;

import android.app.Service;
import android.content.Intent;
import android.os.Binder;
import android.os.IBinder;
import android.util.Log;

public class MyService extends Service {
    private DownloadBinder mBinder = new DownloadBinder();

    class DownloadBinder extends Binder {
        public void startDownload() {
            Log.d("MyService","startDownload executed");
        }
        public int getProgress() {
            Log.d("MyService","getProgress executed");
            return 0;
        }
    }

    public MyService() {
    }

    @Override
    public IBinder onBind(Intent intent) {
        // TODO: Return the communication channel to the service.
        //throw new UnsupportedOperationException("Not yet implemented");
        return mBinder;
    }

    @Override
    public void onCreate() {
        super.onCreate();
        Log.d("MyService","onCreate executed");
    }

    @Override
    public int onStartCommand(Intent intent, int flags, int startId) {
        Log.d("MyService","onStartCommand executed");
        return super.onStartCommand(intent, flags, startId);
    }

    @Override
    public void onDestroy() {
        Log.d("MyService","on Destroy executed");
        super.onDestroy();
    }

}
可以看到,這裡新建了一個DownloadBinder類,並讓它繼承自Binder,然後在它的內部提供了開始下載以及查看下載進度的方法。當然這隻是兩個模擬方法,並沒有實現真正的功能,我們在這兩個方法中分別列印了一行日誌.
接著,在MyService中創建了DownloadBinder的實例,然後在onBind()方法里返回了這個實例,這樣MyService中的工作就全部完成了。下麵就要看一看,在活動中如何去調用服務里的這些方法了。首先需要在佈局文件里新增兩個按鈕,修改activity_main.xml中的代碼,如下所示:
<?xml version="1.0" encoding="utf-8"?>
<LinearLayout xmlns:android="http://schemas.android.com/apk/res/android"
    android:orientation="vertical"
    android:layout_width="match_parent"
    android:layout_height="match_parent">
...
    <Button
        android:layout_width="match_parent"
        android:layout_height="wrap_content"
        android:id="@+id/bind_service"
        android:text="Bind Service"/>
    <Button
        android:layout_width="match_parent"
        android:layout_height="wrap_content"
        android:id="@+id/unbind_service"
        android:text="Unbind Service"/>
</LinearLayout>
這兩個按鈕分別是用於綁定服務和取消綁定服務的,那到底誰需要去和服務綁定呢?當然就是活動了。當一個活動和服務綁定了之後,就可以調用該服務里的Binder提供的方法了。修改MainActivity中的代碼,如下所示:
package com.zhouzhou.servicetest;

import androidx.appcompat.app.AppCompatActivity;

import android.content.ComponentName;
import android.content.Intent;
import android.content.ServiceConnection;
import android.os.Bundle;
import android.os.IBinder;
import android.view.View;
import android.widget.Button;

public class MainActivity extends AppCompatActivity implements View.OnClickListener {
    private MyService.DownloadBinder downloadBinder;
    private ServiceConnection connection = new ServiceConnection() {
        @Override
        public void onServiceConnected(ComponentName componentName, IBinder iBinder) {
            downloadBinder = (MyService.DownloadBinder) iBinder;
            downloadBinder.startDownload();
            downloadBinder.getProgress();
        }

        @Override
        public void onServiceDisconnected(ComponentName componentName) {

        }
    };
    @Override
    protected void onCreate(Bundle savedInstanceState) {
        super.onCreate(savedInstanceState);
        setContentView(R.layout.activity_main);
        Button startService = (Button) findViewById(R.id.start_service);
        Button stopService = (Button) findViewById(R.id.stop_service);
        startService.setOnClickListener(this);
        stopService.setOnClickListener(this);

        Button bindService = (Button) findViewById(R.id.bind_service);
        Button unbindService = (Button) findViewById(R.id.unbind_service);
        bindService.setOnClickListener(this);
        unbindService.setOnClickListener(this);
    }

    @Override
    public void onClick(View view) {
        switch (view.getId()) {
            case R.id.start_service:
                Intent startIntent = new Intent(this,MyService.class);
                startService(startIntent);//啟動服務
                break;
            case R.id.stop_service:
                Intent stopIntent = new Intent(this,MyService.class);
                stopService(stopIntent);
                break;
            case R.id.bind_service:
                Intent bindIntent = new Intent(this,MyService.class);
                bindService(bindIntent,connection,BIND_AUTO_CREATE);//綁定服務
                break;
            case R.id.unbind_service:
                unbindService(connection);//解綁服務
                break;
            default:
                break;
        }
    }
}
這裡首先創建了一個ServiceConnection的匿名類,在裡面重寫了onServiceConnected()方法和onServiceDisconnected()方法,這兩個方法分別會在活動與服務成功綁定以及活動與服務的連接斷開的時候調用。在onServiceConnected()方法中,又通過向下轉型得到了DownloadBinder的實例,有了這個實例,活動和服務之間的關係就變得非常緊密了。
現在可以在活動中根據具體的場景來調用DownloadBinder中的任何public方法,即實現了指揮服務乾什麼服務就去乾什麼的功能。這裡仍然只是做了個簡單的測試,在onServiceConnected()方法中調用了DownloadBinder的startDownload()和getProgress()方法。
當然,現在活動和服務其實還沒進行綁定呢,這個功能是在Bind Service按鈕的點擊事件里完成的。可以看到,這裡我們仍然是構建出了一個Intent對象,然後調用bindService()方法將MainActivity和MyService進行綁定。
bindService()方法接收3個參數:
- 第一個參數就是剛剛構建出的Intent對象;
- 第二個參數是前面創建出的ServiceConnection的實例;
- 第三個參數則是一個標誌位;
(這裡傳入BIND_AUTO_CREATE表示在活動和服務進行綁定後自動創建服務。這會使得MyService中的onCreate()方法得到執行,但onStartCommand()方法不會執行。)
然後,如果我們想解除活動和服務之間的綁定該怎麼辦呢?調用一下unbindService()方法就可以了,這也是Unbind Service按鈕的點擊事件里實現的功能。現在讓我們重新運行一下程式,點擊一下Bind Service按鈕,然後觀察logcat中的列印日誌,如圖:

可以看到,首先是MyService的onCreate()方法得到了執行,然後startDownload()和getProgress()方法都得到了執行,說明我們確實已經在活動里成功調用了服務里提供的方法了。
另外需要註意,任何一個服務在整個應用程式範圍內都是通用的,即MyService不僅可以和MainActivity綁定,還可以和任何一個其他的活動進行綁定,而且在綁定完成後它們都可以獲取到相同的DownloadBinder實例。
10.4 服務的生命周期
服務也有自己的生命周期,前面我們使用到的onCreate()、onStartCommand()、onBind()和onDestroy()等方法都是在服務的生命周期內可能回調的方法。
一旦在項目的任何位置調用了Context的startService()方法,相應的服務就會啟動起來,並回調onStartCommand()方法。如果這個服務之前還沒有創建過,onCreate()方法會先於onStartCommand()方法執行。服務啟動了之後會一直保持運行狀態,直到stopService()或stopSelf()方法被調用。
註意,雖然每調用一次startService()方法,onStartCommand()就會執行一次,但實際上每個服務都只會存在一個實例。所以不管你調用了多少次startService()方法,只需調用一次stopService()或stopSelf()方法,服務就會停止下來了。
另外,還可以調用Context的bindService()來獲取一個服務的持久連接,這時就會回調服務中的onBind()方法。類似地,如果這個服務之前還沒有創建過,onCreate()方法會先於onBind()方法執行。之後,調用方可以獲取到onBind()方法里返回的IBinder對象的實例,這樣就能自由地和服務進行通信了。只要調用方和服務之間的連接沒有斷開,服務就會一直保持運行狀態。
當調用了startService()方法後,又去調用stopService()方法,這時服務中的onDestroy()方法就會執行,表示服務已經銷毀了。類似地,當調用了bindService()方法後,又去調用unbindService()方法,onDestroy()方法也會執行,這兩種情況都很好理解。
需要註意,我們是完全有可能對一個服務既調用了startService()方法,又調用了bindService()方法的,這種情況下該如何才能讓服務銷毀掉呢?根據Android系統的機制,一個服務只要被啟動或者被綁定了之後,就會一直處於運行狀態,必須要讓以上兩種條件同時不滿足,服務才能被銷毀。所以,這種情況下要同時調用stopService()和unbindService()方法,onDestroy()方法才會執行。
10.5 服務的更多技巧
關於服務的更多高級使用技巧。
10.5.1 使用前臺服務
服務幾乎都是在後臺運行的,一直以來它都是默默地做著辛苦的工作。但是,服務的系統優先順序還是比較低的,當系統出現記憶體不足的情況時,就有可能會回收掉正在後臺運行的服務。如果你希望服務可以一直保持運行狀態,而不會由於系統記憶體不足的原因導致被回收,就可以考慮使用前臺服務。
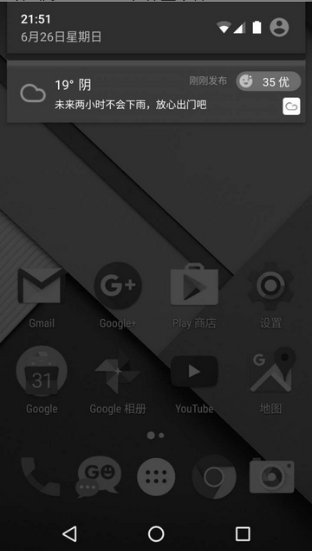
前臺服務和普通服務最大的區別就在於,它會一直有一個正在運行的圖標在系統的狀態欄顯示,下拉狀態欄後可以看到更加詳細的信息,非常類似於通知的效果。當然有時候你也可能不僅僅是為了防止服務被回收掉才使用前臺服務的,有些項目由於特殊的需求會要求必須使用前臺服務,比如說彩雲天氣這款天氣預報應用,它的服務在後臺更新天氣數據的同時,還會在系統狀態欄一直顯示當前的天氣信息,如圖:
那麼我們就來看一下如何才能創建一個前臺服務吧,修改MyService中的代碼,如下所示:
package com.zhouzhou.servicetest;

import android.app.Notification;
import android.app.NotificationChannel;
import android.app.NotificationManager;
import android.app.PendingIntent;
import android.app.Service;
import android.content.Intent;
import android.graphics.BitmapFactory;
import android.os.Binder;
import android.os.Build;
import android.os.IBinder;
import android.util.Log;

import androidx.core.app.NotificationCompat;

public class MyService extends Service {
    private DownloadBinder mBinder = new DownloadBinder();

    class DownloadBinder extends Binder {
        public void startDownload() {
            Log.d("MyService","startDownload executed");
        }
        public int getProgress() {
            Log.d("MyService","getProgress executed");
            return 0;
        }
    }

    public MyService() {
    }

    @Override
    public IBinder onBind(Intent intent) {
        // TODO: Return the communication channel to the service.
        //throw new UnsupportedOperationException("Not yet implemented");
        return mBinder;
    }

    @Override
    public void onCreate() {
        super.onCreate();
        Log.d("MyService","onCreate executed");
        Intent intent = new Intent(this,MainActivity.class);
        PendingIntent pi = PendingIntent.getActivity(this,0,intent,0);
        NotificationManager manager = (NotificationManager)getSystemService(NOTIFICATION_SERVICE);
        if (Build.VERSION.SDK_INT >= Build.VERSION_CODES.O) {
            String channelId = "default";
            String channelName = "預設通知";
            //new NotificationChannel(channelId, channelName, NotificationManager.IMPORTANCE_HIGH)
            manager.createNotificationChannel(new NotificationChannel(channelId, channelName, NotificationManager.IMPORTANCE_HIGH));
        }
        Notification notification = new NotificationCompat.Builder(MyService.this,"default")
                .setContentTitle("This is content title")
                .setContentText("This is content text")
                .setWhen(System.currentTimeMillis())
                .setSmallIcon(R.drawable.small_icon)
                .setLargeIcon(BitmapFactory.decodeResource(getResources(),
                        R.drawable.large_icon)).build();
        manager.notify(1,notification);
    }

    @Override
    public int onStartCommand(Intent intent, int flags, int startId) {
        Log.d("MyService","onStartCommand executed");
        return super.onStartCommand(intent, flags, startId);
    }

    @Override
    public void onDestroy() {
        Log.d("MyService","on Destroy executed");
        super.onDestroy();
    }

}
可以看到,這裡只是修改了onCreate()方法中的代碼,這是在第8章中學習的創建通知的方法。
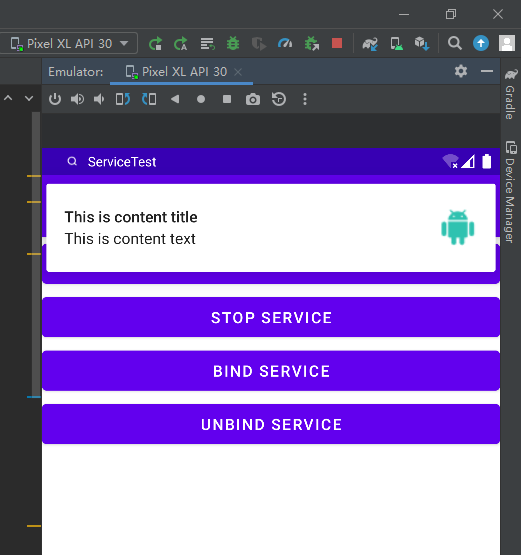
現在重新運行一下程式,並點擊Start Service或Bind Service按鈕,MyService就會以前臺服務的模式啟動了,並且在系統狀態欄會顯示一個通知圖標,下拉狀態欄後可以看到該通知的詳細內容,如圖:
10.5.2 使用IntentService
在本章一開始的時候我們就已經知道,服務中的代碼都是預設運行在主線程當中的,如果直接在服務里去處理一些耗時的邏輯,就很容易出現ANR(Application Not Responding)的情況。
所以,這個時候就需要用到Android多線程編程的技術,我們應該在服務的每個具體的方法里開啟一個子線程,然後在這裡去處理那些耗時的邏輯。因此,一個比較標準的服務就可以寫成如下形式:
public class MyService extends Service {
    ...
    @Override
    public int onStartCommand(Intent intent, int flags, int startId) {

        new Thread(new Runnable() {
            @Override
            public void run() {
                //處理具體邏輯
            }
        }).start();
        return super.onStartCommand(intent, flags, startId);
    }
...

}
但是,這種服務一旦啟動之後,就會一直處於運行狀態,必須調用stopService()或者stopSelf()方法才能讓服務停止下來。所以,如果想要實現讓一個服務在執行完畢後自動停止的功能,就可以這樣寫:
public class MyService extends Service {
    ...
    @Override
    public int onStartCommand(Intent intent, int flags, int startId) {

        new Thread(new Runnable() {
            @Override
            public void run() {
                //處理具體邏輯
                stopSelf();
            }
        }).start();
        return super.onStartCommand(intent, flags, startId);
    }
...

}
雖說這種寫法並不複雜,但是總會有一些程式員忘記開啟線程,或者忘記調用stopSelf()方法。為了可以簡單地創建一個非同步的、會自動停止的服務,Android專門提供了一個IntentService類,這個類就很好地解決了前面所提到的兩種尷尬。
下麵我們就來看一下它的用法。新建一個MyIntentService類繼承自IntentService,代碼如下所示:
package com.zhouzhou.servicetest;

import android.app.IntentService;
import android.content.Intent;
import android.util.Log;

import androidx.annotation.Nullable;

public class MyIntentService extends IntentService {
    //下麵是無參構造哦~,是super()中再調用父類的有參構造函數。不然在AndroidManifest.xml裡面註冊的時候會爆紅。並且在運行後點擊測試按鈕,程式會閃退,報錯:“has no zero argument constructor”
    public MyIntentService() {
        super("MyIntentService");//調用父類的有參構造函數
    }

    @Override
    protected void onHandleIntent(@Nullable Intent intent) {
        //列印當前線程的id
        Log.d("MyIntentService","This id is " + Thread.currentThread().getId());
    }

    @Override
    public void onDestroy() {
        super.onDestroy();
        Log.d("MyIntentService","onDestroy executed");
    }
}
這裡首先要提供一個無參的構造函數,並且必須在其內部調用父類的有參構造函數。然後要在子類中去實現onHandleIntent()這個抽象方法,在這個方法中可以去處理一些具體的邏輯,而且不用擔心ANR的問題,因為這個方法已經是在子線程中運行的了。這裡為了證實一下,我們在onHandleIntent()方法中列印了當前線程的id。另外根據IntentService的特性,這個服務在運行結束後應該是會自動停止的,所以我們又重寫了onDestroy()方法,在這裡也列印了一行日誌,以證實服務是不是停止掉了。
接下來修改activity_main.xml中的代碼,加入一個用於啟動MyIntentService這個服務的按鈕,如下所示:
<?xml version="1.0" encoding="utf-8"?>
<LinearLayout xmlns:android="http://schemas.android.com/apk/res/android"
    android:orientation="vertical"
    android:layout_width="match_parent"
    android:layout_height="match_parent">
    ...
    <Button
        android:layout_width="match_parent"
        android:layout_height="wrap_content"
        android:id="@+id/start_intent_service"
        android:text="Start IntentService"/>
</LinearLayout>
然後修改MainActivity中的代碼,如下所示:
package com.zhouzhou.servicetest;

import androidx.appcompat.app.AppCompatActivity;

import android.content.ComponentName;
import android.content.Intent;
import android.content.ServiceConnection;
import android.os.Bundle;
import android.os.IBinder;
import android.util.Log;
import android.view.View;
import android.widget.Button;

public class MainActivity extends AppCompatActivity implements View.OnClickListener {
    private MyService.DownloadBinder downloadBinder;
    private ServiceConnection connection = new ServiceConnection() {
        @Override
        public void onServiceConnected(ComponentName componentName, IBinder iBinder) {
            downloadBinder = (MyService.DownloadBinder) iBinder;
            downloadBinder.startDownload();
            downloadBinder.getProgress();
        }

        @Override
        public void onServiceDisconnected(ComponentName componentName) {

        }
    };
    @Override
    protected void onCreate(Bundle savedInstanceState) {
        super.onCreate(savedInstanceState);
        setContentView(R.layout.activity_main);
        Button startService = (Button) findViewById(R.id.start_service);
        Button stopService = (Button) findViewById(R.id.stop_service);
        startService.setOnClickListener(this);
        stopService.setOnClickListener(this);

        Button bindService = (Button) findViewById(R.id.bind_service);
        Button unbindService = (Button) findViewById(R.id.unbind_service);
        bindService.setOnClickListener(this);
        unbindService.setOnClickListener(this);

        Button startIntentService = (Button) findViewById(R.id.start_intent_service);
        startIntentService.setOnClickListener(this);
    }

    @Override
    public void onClick(View view) {
        switch (view.getId()) {
            case R.id.start_service:
                Intent startIntent = new Intent(this,MyService.class);
                startService(startIntent);//啟動服務
                break;
            case R.id.stop_service:
                Intent stopIntent = new Intent(this,MyService.class);
                stopService(stopIntent);
                break;
            case R.id.bind_service:
                Intent bindIntent = new Intent(this,MyService.class);
                bindService(bindIntent,connection,BIND_AUTO_CREATE);//綁定服務
                break;
            case R.id.unbind_service:
                unbindService(connection);//解綁服務
                break;
            case R.id.start_intent_service:
                // 列印主線程的id
                Log.d("MainActivity","Thread id is " + Thread.currentThread().getId());
                Intent intentService = new Intent(this,MyIntentService.class);
                startService(intentService);
                break;
            default:
                break;
        }
    }
}
可以看到,我們在Start IntentService按鈕的點擊事件裡面去啟動MyIntentService這個服務,併在這裡列印了一下主線程的id,稍後用於和IntentService進行比對。你會發現,其實IntentService的用法和普通的服務沒什麼兩樣。最後不要忘記,服務都是需要在AndroidManifest.xml里註冊的,如下所示:
<?xml version="1.0" encoding="utf-8"?>
<manifest xmlns:android="http://schemas.android.com/apk/res/android"
    package="com.zhouzhou.servicetest">

    <application
        android:allowBackup="true"
        android:icon="@mipmap/ic_launcher"
        android:label="@string/app_name"
        android:roundIcon="@mipmap/ic_launcher_round"
        android:supportsRtl="true"
        android:theme="@style/Theme.ServiceTest">

        <service android:name=".MyIntentService"/>
        ...
</manifest>
當然,也可以使用Android Studio提供的快捷方式來創建IntentService,不過這樣會自動生成一些我們用不到的代碼。現在重新運行一下程式,點擊Start IntentService按鈕後,觀察logcat中的列印日誌,如圖:
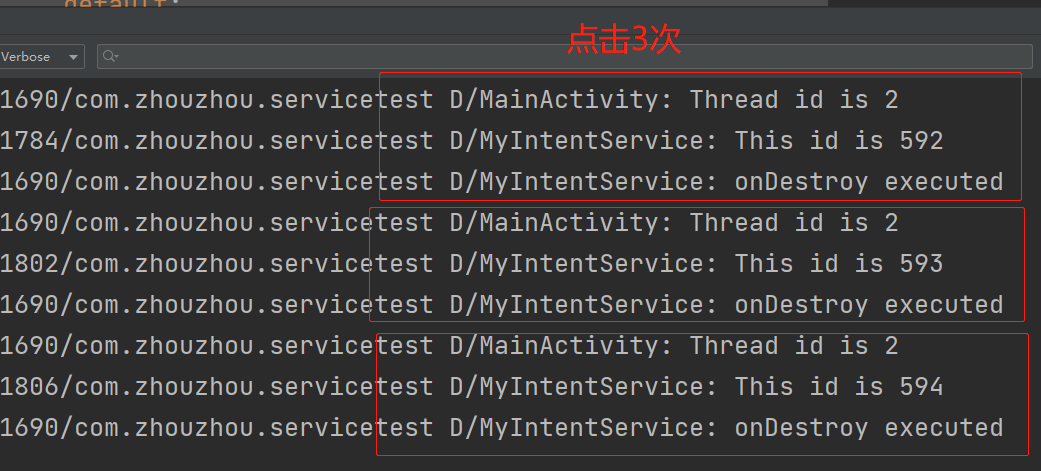
可以看到,不僅MyIntentService和MainActivity所在的線程id不一樣,而且onDestroy()方法也得到了執行,說明MyIntentService在運行完畢後確實自動停止了。集開啟線程和自動停止於一身,IntentService還是博得了不少程式員的喜愛。
10.6 服務的最佳實踐——完整版的下載示例
下麵我們就來綜合運用一下,嘗試實現一個在服務中經常會使用到的功能——下載。
本節中我們將要編寫一個完整版的下載示例,其中會涉及第7章、第8章、第9章和第10章的部分內容。
創建一個ServiceBestPractice項目,然後開始本節內容。首先我們需要將項目中會使用到的依賴庫添加好,編輯app/build.gradle文件,在dependencies閉包中添加如下內容:
dependencies {
	implementation("com.squareup.okhttp3:okhttp:4.9.3")
}
只需添加一個OkHttp的依賴就行了,待會兒在編寫網路相關的功能時,我們將使用OkHttp來進行實現。
接下來需要定義一個回調介面,用於對下載過程中的各種狀態進行監聽和回調。新建一個DownloadListener介面,代碼如下所示:
package com.zhouzhou.servicebestpractice;

public interface DownloadListener {
    //用於通知當前的下載進度
    void onProgress(int progress);
    //用於通知下載成功事件
    void onSuccess();
    //用於通知下載失敗事件
    void onFailed();
    //用於通知下載暫停事件
    void onPaused();
    //用於通知下載取消事件
    void onCanceled();
}
一共定義了5個回調方法。回調介面定義好了之後,下麵可以開始編寫下載功能了。這裡使用本章中剛學的AsyncTask來進行實現,新建一個DownloadTask繼承自AsyncTask,代碼如下所示:
package com.zhouzhou.servicebestpractice;

import android.os.AsyncTask;
import android.os.Environment;

import java.io.File;
import java.io.IOException;
import java.io.InputStream;
import java.io.RandomAccessFile;

import okhttp3.OkHttpClient;
import okhttp3.Request;
import okhttp3.Response;

/**
 * 在AsyncTask中的3個泛型參數:
 * 第一個泛型參數指定為String,表示在執行AsyncTask的時候需要傳入一個字元串參數給後臺任務;
 * 第二個泛型參數指定為Integer,表示使用整型數據來作為進度顯示單位;
 * 第三個泛型參數指定為Integer,則表示使用整型數據來反饋執行結果。
 */
public class DownloadTask extends AsyncTask<String,Integer,Integer> {
    public static final int TYPE_SUCCESS = 0; //下載成功
    public static final int TYPE_FAILED = 1; //下載失敗
    public static final int TYPE_PAUSED = 2; //暫停下載
    public static final int TYPE_CANCELED = 3; //取消下載
    private DownloadListener listener;
    private boolean isCanceled = false;
    private boolean isPaused = false;
    private int lastProgress;

    // 在DownloadTask的構造函數中要求傳入一個剛剛定義的DownloadListener參數,待會就會將下載的狀態通過這個參數進行回調。
    public DownloadTask(DownloadListener listener) {
        this.listener = listener;
    }

    /**
     * doInBackground()方法:
     * 首先從參數中獲取到了下載的URL地址,並根據URL地址解析出了下載的文件名;
     * 然後指定將文件下載到Environment.DIRECTORY_DOWNLOADS目錄下,也就是SD卡的Download目錄;
     */
    @Override
    protected Integer doInBackground(String... params) {
        InputStream is = null;
        RandomAccessFile savedFile = null;
        File file = null;
        try {
            long downloadedLength = 0;// 記錄已下載的文件長度
            String downloadUrl = params[0];
            String fileName = downloadUrl.substring(downloadUrl.lastIndexOf("/"));
            String directory = Environment.getExternalStoragePublicDirectory(Environment.DIRECTORY_DOWNLOADS).getPath();
            file = new File(directory + fileName);
            if (file.exists()) {
                //還要判斷一下Download目錄中是不是已經存在要下載的文件了,
                // 如果已經存在的話則讀取已下載的位元組數,這樣就可以在後面啟用斷點續傳的功能。
                downloadedLength = file.length();
            }
            //先是調用了getContentLength()方法來獲取待下載文件的總長度,
            // 如果文件長度等於0則說明文件有問題,直接返回TYPE_FAILED,
            // 如果文件長度等於已下載文件長度,那麼就說明文件已經下載完了,直接返回TYPE_SUCCESS即可
            long contentLength = getContentLength(downloadUrl);
            if (contentLength == 0) {
                return TYPE_FAILED;
            } else if (contentLength == downloadedLength) {
                //已下載位元組和文件總位元組數相等,說明已經下載完成了
                return TYPE_SUCCESS;
            }
            //使用OkHttp來發送一條網路請求,需要註意的是,這裡在請求中添加了一個header,
            // 用於告訴伺服器我們想要從哪個位元組開始下載,因為已下載過的部分就不需要再重新下載了。
            OkHttpClient client = new OkHttpClient();
            Request request = new Request.Builder()
                    // 斷點下載,指定從哪個位元組開始下載
                    .addHeader("RANGE","bytes=" + downloadedLength + "-")
                    .url(downloadUrl)
                    .build();
            Response response = client.newCall(request).execute();
            //使用Java的文件流方式,不斷從網路上讀取數據,不斷寫入到本地,一直到文件全部下載完成為止。
            if (response != null) {
                is = response.body().byteStream();
                savedFile = new RandomAccessFile(file,"rw");
                savedFile.seek(downloadedLength);//跳過已經下載的位元組
                byte[] b = new byte[1024];
                int total = 0;
                int len;
                //在這個過程中,我們還要判斷用戶有沒有觸發暫停或者取消的操作,
                // 如果有的話則返回TYPE_PAUSED或TYPE_CANCELED來中斷下載,
                // 如果沒有的話則實時計算當前的下載進度,然後調用publishProgress()方法進行通知。
                // 暫停和取消操作都是使用一個布爾型的變數來進行控制的,調用pauseDownload()或cancelDownload()方法即可更改變數的值。
                while ((len = is.read(b)) != -1) {
                    if (isCanceled) {
                        return TYPE_CANCELED;
                    } else if (isPaused) {
                        return TYPE_PAUSED;
                    } else {
                        total += len;
                        savedFile.write(b,0,len);
                        // 計算已經下載的百分比
                        int progress = (int) ((total + downloadedLength) * 100/contentLength);
                        publishProgress(progress);
                    }
                }
                response.body().close();
                return TYPE_SUCCESS;
            }
        } catch (Exception e) {
            e.printStackTrace();
        } finally {
            try {
                if (is != null) {
                    is.close();
                }
                if (savedFile != null) {
                    savedFile.close();
                }
                if (isCanceled && file != null) {
                    file.delete();
                }
            } catch (Exception e) {
                e.printStackTrace();
            }
        }
        return TYPE_FAILED;
    }

    /**
     * onProgressUpdate()方法:
     * 它首先從參數中獲取到當前的下載進度,然後和上一次的下載進度進行對比,
     * 如果有變化的話則調用DownloadListener的onProgress()方法來通知下載進度更新。
     */
    @Override
    protected void onProgressUpdate(Integer... values) {
        super.onProgressUpdate(values);
        int progress = values[0];
        if (progress > lastProgress) {
            listener.onProgress(progress);
            lastProgress = progress;
        }
    }

    /**
     * onPostExecute()方法:是根據參數中傳入的下載狀態來進行回調。
     * 下載成功就調用DownloadListener的onSuccess()方法,
     * 下載失敗就調用onFailed()方法,暫停下載就調用onPaused()方法,
     * 取消下載就調用onCanceled()方法。
     */
    @Override
    protected void onPostExecute(Integer status) {
        super.onPostExecute(status);
        switch (status) {
            case TYPE_SUCCESS:
                listener.onSuccess();
                break;
            case TYPE_FAILED:
                listener.onFailed();
                break;
            case TYPE_PAUSED


