上一篇文章 https://www.cnblogs.com/redwinter/p/16167214.html 解讀瞭如何進行自定義屬性值的編輯器的解析器,並且還介紹了BeanFactory的準備過程中做了哪些事情。這篇文章繼續介紹AbstractApplicationContext#refresh ...
上一篇文章 https://www.cnblogs.com/redwinter/p/16167214.html 解讀瞭如何進行自定義屬性值的編輯器的解析器,並且還介紹了BeanFactory的準備過程中做了哪些事情。這篇文章繼續介紹AbstractApplicationContext#refresh的方法。
AbstractApplicationContext提供的postProcessBeanFactory空方法
postProcessBeanFactory這個方法沒名字跟BeanFactoryPostProcessor介面中的方法一樣,但是他的功能是提供給子類進行添加一些額外的功能,比如添加BeanPostProcessor介面的實現,或者定製一些其他的功能也是可以的,因為這個方法你可以拿到BeanFactory,自然是可以對他進行一些功能的定製的。
這裡看下Spring 提供的子類GenericWebApplicationContext是如何實現的:
@Override
protected void postProcessBeanFactory(ConfigurableListableBeanFactory beanFactory) {
  if (this.servletContext != null) {
    beanFactory.addBeanPostProcessor(new ServletContextAwareProcessor(this.servletContext));
    beanFactory.ignoreDependencyInterface(ServletContextAware.class);
  }
  WebApplicationContextUtils.registerWebApplicationScopes(beanFactory, this.servletContext);
  WebApplicationContextUtils.registerEnvironmentBeans(beanFactory, this.servletContext);
}
這裡他註冊了一個ServletContextAwreProcessor 到beanFactory中,ServletContexAwareProcessor是一個BeanPostProcessor介面的子類。
重頭戲BeanFactoryPostProcessor
接下來分析AbstractApplicationContext#refresh中的invokeBeanFactoryPostProcessors方法,這個方法用來註冊和執行BeanFactoryPostProcessor的。
直接上源碼:
protected void invokeBeanFactoryPostProcessors(ConfigurableListableBeanFactory beanFactory) {
  // 執行所有的BeanFactoryPostProcessor
  PostProcessorRegistrationDelegate.invokeBeanFactoryPostProcessors(beanFactory, getBeanFactoryPostProcessors());

  // Detect a LoadTimeWeaver and prepare for weaving, if found in the meantime
  // (e.g. through an @Bean method registered by ConfigurationClassPostProcessor)
  // aop的處理
  if (beanFactory.getTempClassLoader() == null && beanFactory.containsBean(LOAD_TIME_WEAVER_BEAN_NAME)) {
    beanFactory.addBeanPostProcessor(new LoadTimeWeaverAwareProcessor(beanFactory));
    beanFactory.setTempClassLoader(new ContextTypeMatchClassLoader(beanFactory.getBeanClassLoader()));
  }
}
重點在這裡:
PostProcessorRegistrationDelegate.invokeBeanFactoryPostProcessors(beanFactory, getBeanFactoryPostProcessors());
首先獲取BeanFactoryPostProcessor的集合,這裡獲取到都是用戶在定製BeanFactory時add加入進去的,進入這個方法:
public static void invokeBeanFactoryPostProcessors(
  ConfigurableListableBeanFactory beanFactory, List<BeanFactoryPostProcessor> beanFactoryPostProcessors) {

  // Invoke BeanDefinitionRegistryPostProcessors first, if any.
  // 已經處理的Bean
  Set<String> processedBeans = new HashSet<>();
  // 先進性外部BFPP的處理,並且判斷當前Factory是否是BeanDefinitionRegistry
  if (beanFactory instanceof BeanDefinitionRegistry) {
    BeanDefinitionRegistry registry = (BeanDefinitionRegistry) beanFactory;
    // 保存BFPP的Bean
    List<BeanFactoryPostProcessor> regularPostProcessors = new ArrayList<>();
    // 保存BDRPP的Bean
    List<BeanDefinitionRegistryPostProcessor> registryProcessors = new ArrayList<>();
    // 開始處理外部傳入的BFPP
    for (BeanFactoryPostProcessor postProcessor : beanFactoryPostProcessors) {
      // 先處理BDRPP
      if (postProcessor instanceof BeanDefinitionRegistryPostProcessor) {
        BeanDefinitionRegistryPostProcessor registryProcessor =
          (BeanDefinitionRegistryPostProcessor) postProcessor;
        // 直接調用BDRPP的介面方法,後面的postProcessBeanFactory 方法後面統一處理
        registryProcessor.postProcessBeanDefinitionRegistry(registry);
        // 加入到BFPP的集合中
        registryProcessors.add(registryProcessor);
      }
      else {
        // 加入到BDRPP的集合中
        regularPostProcessors.add(postProcessor);
      }
    }

    // Do not initialize FactoryBeans here: We need to leave all regular beans
    // uninitialized to let the bean factory post-processors apply to them!
    // Separate between BeanDefinitionRegistryPostProcessors that implement
    // PriorityOrdered, Ordered, and the rest.
    // 保存當前的BDRPP
    List<BeanDefinitionRegistryPostProcessor> currentRegistryProcessors = new ArrayList<>();

    // First, invoke the BeanDefinitionRegistryPostProcessors that implement PriorityOrdered.
    // 按類型獲取BeanName
    String[] postProcessorNames =
      beanFactory.getBeanNamesForType(BeanDefinitionRegistryPostProcessor.class, true, false);
    for (String ppName : postProcessorNames) {
      // 判斷當前的beanName是都是實現了PriorityOrdered
      if (beanFactory.isTypeMatch(ppName, PriorityOrdered.class)) {
        // 加入到當前註冊的BDRPP集合中
        currentRegistryProcessors.add(beanFactory.getBean(ppName, BeanDefinitionRegistryPostProcessor.class));
        // 加入到已經處理的bean集合中
        processedBeans.add(ppName);
      }
    }
    // 對當前的BDRPP進行排序
    sortPostProcessors(currentRegistryProcessors, beanFactory);
    // 將當前的BDRPP全部加入到最前面定義的BDRPP的集合中
    registryProcessors.addAll(currentRegistryProcessors);
    // 執行當前的BDRPP的postProcessBeanDefinitionRegistry方法
    invokeBeanDefinitionRegistryPostProcessors(currentRegistryProcessors, registry);
    // 清空當前的BDRPP
    currentRegistryProcessors.clear();

    // Next, invoke the BeanDefinitionRegistryPostProcessors that implement Ordered.
    // 再次獲取bdrpp,因為上面的執行可能還會加入新的bdrpp進來
    postProcessorNames = beanFactory.getBeanNamesForType(BeanDefinitionRegistryPostProcessor.class, true, false);
    for (String ppName : postProcessorNames) {
      // 判斷是否已經處理過,並且是否實現了Ordered介面
      if (!processedBeans.contains(ppName) && beanFactory.isTypeMatch(ppName, Ordered.class)) {
        // 加入到當前的BDRPP的集合中
        currentRegistryProcessors.add(beanFactory.getBean(ppName, BeanDefinitionRegistryPostProcessor.class));
        // 添加到已經處理的集合中
        processedBeans.add(ppName);
      }
    }
    // 排序
    sortPostProcessors(currentRegistryProcessors, beanFactory);
    // 加入到BDRPP集合中
    registryProcessors.addAll(currentRegistryProcessors);
    // 執行bdrpp的postProcessBeanDefinitionRegistry方法
    invokeBeanDefinitionRegistryPostProcessors(currentRegistryProcessors, registry);
    // 清空當前bdrpp集合
    currentRegistryProcessors.clear();

    // Finally, invoke all other BeanDefinitionRegistryPostProcessors until no further ones appear.
    boolean reiterate = true;
    // 迴圈去獲取BDRPP,然後進行排序、執行操作,直到所有的BDRPP全部執行完
    while (reiterate) {
      reiterate = false;
      // 獲取BDRPP
      postProcessorNames = beanFactory.getBeanNamesForType(BeanDefinitionRegistryPostProcessor.class, true, false);
      for (String ppName : postProcessorNames) {
        // 如果已經處理過,就執行BDRPP,並且退出迴圈,否則繼續迴圈
        if (!processedBeans.contains(ppName)) {
          currentRegistryProcessors.add(beanFactory.getBean(ppName, BeanDefinitionRegistryPostProcessor.class));
          processedBeans.add(ppName);
          reiterate = true;
        }
      }
      // 排序
      sortPostProcessors(currentRegistryProcessors, beanFactory);
      // 加入到BDRPP集合中
      registryProcessors.addAll(currentRegistryProcessors);
      // 執行bdrpp
      invokeBeanDefinitionRegistryPostProcessors(currentRegistryProcessors, registry);
      currentRegistryProcessors.clear();
    }

    // Now, invoke the postProcessBeanFactory callback of all processors handled so far.
    // 執行bdrpp 中的postProcessBeanFactory方法
    invokeBeanFactoryPostProcessors(registryProcessors, beanFactory);
    // 執行bfpp 中的postProcessBeanFactory方法
    invokeBeanFactoryPostProcessors(regularPostProcessors, beanFactory);
  }

  else {
    // 如果不是bdrpp,那麼直接執行bfpp的postProcessBeanFactory
    // Invoke factory processors registered with the context instance.
    invokeBeanFactoryPostProcessors(beanFactoryPostProcessors, beanFactory);
  }

  // Do not initialize FactoryBeans here: We need to leave all regular beans
  // uninitialized to let the bean factory post-processors apply to them!
  // 獲取BFPP的beanName集合
  String[] postProcessorNames =
    beanFactory.getBeanNamesForType(BeanFactoryPostProcessor.class, true, false);

  // Separate between BeanFactoryPostProcessors that implement PriorityOrdered,
  // Ordered, and the rest.
  // 定義實現了PriorityOrdered的BFPP
  List<BeanFactoryPostProcessor> priorityOrderedPostProcessors = new ArrayList<>();
  // 定義實現了Ordered介面的集合
  //		List<String> orderedPostProcessorNames = new ArrayList<>();
  List<BeanFactoryPostProcessor> orderedPostProcessors = new ArrayList<>();
  // 定義沒有排序的集合
  //		List<String> nonOrderedPostProcessorNames = new ArrayList<>();
  List<BeanFactoryPostProcessor> nonOrderedPostProcessors = new ArrayList<>();
  for (String ppName : postProcessorNames) {
    // 如果已經處理過了就不做處理
    if (processedBeans.contains(ppName)) {
      // skip - already processed in first phase above
    }
    else if (beanFactory.isTypeMatch(ppName, PriorityOrdered.class)) {
      priorityOrderedPostProcessors.add(beanFactory.getBean(ppName, BeanFactoryPostProcessor.class));
    }
    else if (beanFactory.isTypeMatch(ppName, Ordered.class)) {
      //				orderedPostProcessorNames.add(ppName);
      orderedPostProcessors.add(beanFactory.getBean(ppName,BeanFactoryPostProcessor.class));
    }
    else {
      //				nonOrderedPostProcessorNames.add(ppName);
      nonOrderedPostProcessors.add(beanFactory.getBean(ppName,BeanFactoryPostProcessor.class));
    }
  }

  // First, invoke the BeanFactoryPostProcessors that implement PriorityOrdered.
  // 排序
  sortPostProcessors(priorityOrderedPostProcessors, beanFactory);
  // 先執行PriorityOrdered介面的bfpp
  invokeBeanFactoryPostProcessors(priorityOrderedPostProcessors, beanFactory);

  // Next, invoke the BeanFactoryPostProcessors that implement Ordered.
  // 這裡將上面獲取到Ordered介面的BFPP進行集合轉換,然後排序,然後執行,這裡其實可以直接合併,
  // 在上述進行獲取時就放在這個orderedPostProcessors集合中
  //		List<BeanFactoryPostProcessor> orderedPostProcessors = new ArrayList<>(orderedPostProcessorNames.size());
  //		for (String postProcessorName : orderedPostProcessorNames) {
  //			orderedPostProcessors.add(beanFactory.getBean(postProcessorName, BeanFactoryPostProcessor.class));
  //		}
  sortPostProcessors(orderedPostProcessors, beanFactory);
  invokeBeanFactoryPostProcessors(orderedPostProcessors, beanFactory);

  // Finally, invoke all other BeanFactoryPostProcessors.
  // 處理沒有排序的
  //		List<BeanFactoryPostProcessor> nonOrderedPostProcessors = new ArrayList<>(nonOrderedPostProcessorNames.size());
  //		for (String postProcessorName : nonOrderedPostProcessorNames) {
  //			nonOrderedPostProcessors.add(beanFactory.getBean(postProcessorName, BeanFactoryPostProcessor.class));
  //		}
  invokeBeanFactoryPostProcessors(nonOrderedPostProcessors, beanFactory);

  // Clear cached merged bean definitions since the post-processors might have
  // modified the original metadata, e.g. replacing placeholders in values...
  // 清除緩存的元數據,因為經過BFPP的執行,可能BeanDefinition的屬性值已經個變化,比如使用占位符的屬性值
  beanFactory.clearMetadataCache();
}
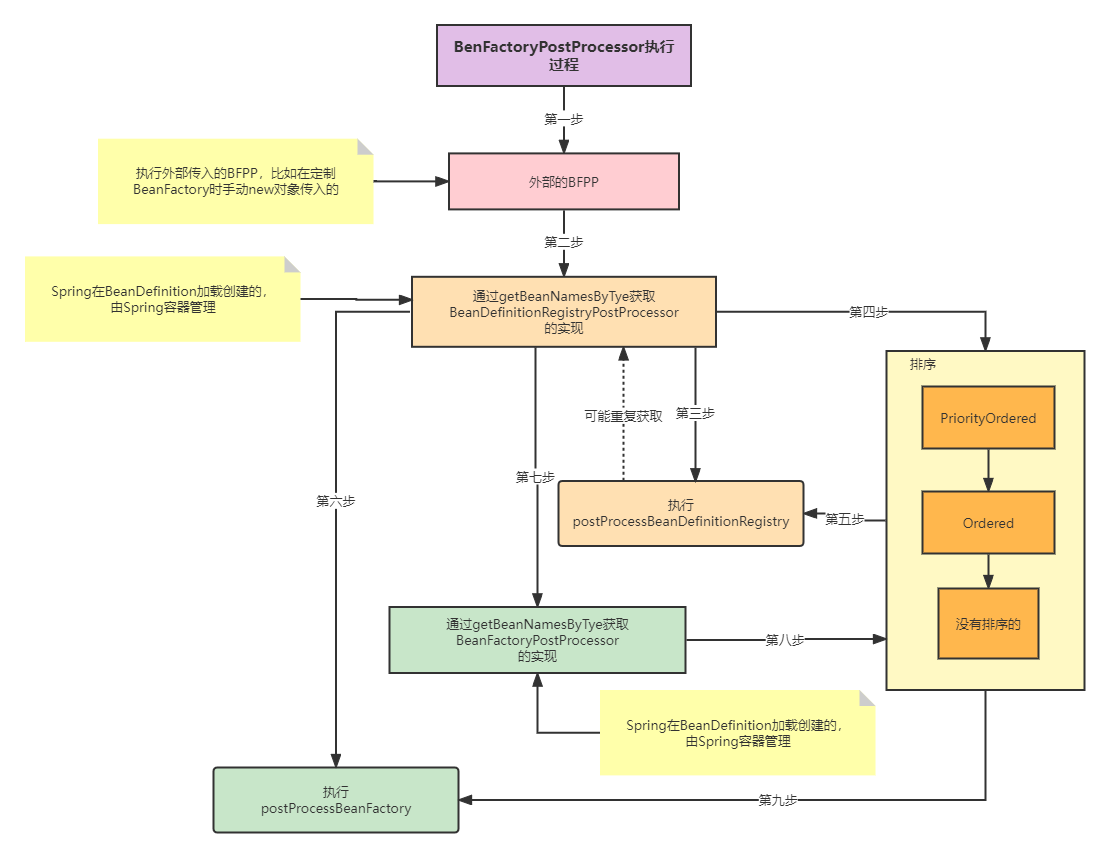
這個方法大概很長,實際上就做了一下這麼幾點事情:
- 先執行外部傳入的
BeanFactoryPostProcessor的實現 - 處理時先處理
BeanFactoryPostProcessor的子介面BeanDefinitionRegistryPostProcessor的實現 - 處理
BeanDefinitionRegistryPostProcessor實現的時候先處理實現了PriorityOrdered介面的實現 - 處理完
PriorityOrdered介面實現的類之後再處理實現了Ordered介面的實現 - 處理完
Ordered介面的實現類之後處理沒有排序的 - 處理完
BeanDefinitionRegistryPostProcessor的實現之後處理BeanFactoryPostProcessor的實現 - 處理順序也是
PriorityOreded,Ordered,沒有排序的
這裡大概邏輯就是這個,看起來可能不是很懂,畫個流程圖:

通過流程圖可以簡化為:先遍歷執行外部傳入的BFPP,再執行BDRPP,再執行BFPP三部分,處理每一部分可能會進行排序操作,排序按照PriorityOrdered,Ordered,noSort進行排序再執行。
這裡解釋下BeanDefinitionRegistryPostProcessor,這個介面是BeanFactoryPostProcessor,它裡面包含一個方法叫postProcessBeanDefinitionRegistry,這個方法非常重要,在實現類ConfigurationClassPostProcessor中就是使用這個方法進行註解的解析的,而且這個類也是實現SpringBoot自動裝配的關鍵。
ConfigurationClassPostProcessor這個類是什麼時候加入到Spring容器的呢?
在我們啟動容器的時候,Spring會進行BeanDefinition的掃描,如果我們在xml配置文件中開啟了註解掃描:
<context:component-scan base-package="com.redwinter.test"/>
那麼這個時候就會自動添加多個BeanDefinition到Spring容器中,beanName為org.springframework.context.annotation.internalConfigurationAnnotationProcessor,其他還有幾個:

前面的文章 https://www.cnblogs.com/redwinter/p/16165878.html 講到自定義標簽,在spring解析xml時分為預設的命名空間和自定義的命名空間的,而context就是自定義的命名空間,這個標簽的解析器為ComponentScanBeanDefinitionParser,這個類中的parse方法就是解析邏輯處理:
@Override
@Nullable
public BeanDefinition parse(Element element, ParserContext parserContext) {
  String basePackage = element.getAttribute(BASE_PACKAGE_ATTRIBUTE);
  basePackage = parserContext.getReaderContext().getEnvironment().resolvePlaceholders(basePackage);
  String[] basePackages = StringUtils.tokenizeToStringArray(basePackage,
                                                            ConfigurableApplicationContext.CONFIG_LOCATION_DELIMITERS);
  // Actually scan for bean definitions and register them.
  // 配置掃描器
  ClassPathBeanDefinitionScanner scanner = configureScanner(parserContext, element);
  // 掃描BeanDefinition,在指定的包下
  Set<BeanDefinitionHolder> beanDefinitions = scanner.doScan(basePackages);
  // 註冊組件
  registerComponents(parserContext.getReaderContext(), beanDefinitions, element);

  return null;
}
這個方法執行流程:
- 創建一個配置掃描器
- 掃描指定包下標有註解的類並解析為
BeanDefinition - 執行
registerComponents方法,註冊組件
registerComponents方法裡面就是添加ConfigurationClassPostProcessor的地方,由於代碼太多這裡只貼部分代碼:
// ...省略部分代碼
Set<BeanDefinitionHolder> beanDefs = new LinkedHashSet<>(8);
		// 判斷註冊器中個是否包含org.springframework.context.annotation.internalConfigurationAnnotationProcessor
		// 不包含就加入一個ConfigurationClassPostProcessor的BeanDefinition
		// 用於解析註解
		if (!registry.containsBeanDefinition(CONFIGURATION_ANNOTATION_PROCESSOR_BEAN_NAME)) {
			// 創建一個BeanDefinition為ConfigurationClassPostProcessor
			RootBeanDefinition def = new RootBeanDefinition(ConfigurationClassPostProcessor.class);
			def.setSource(source);
			// 註冊一個beanName為org.springframework.context.annotation.internalConfigurationAnnotationProcessor
			// 的BeanDefinition,class為ConfigurationClassPostProcessor
			beanDefs.add(registerPostProcessor(registry, def, CONFIGURATION_ANNOTATION_PROCESSOR_BEAN_NAME));
		}
		// 創建一個AutowiredAnnotationBeanPostProcessor的BeanDefinition
		// 用於自動裝配
		if (!registry.containsBeanDefinition(AUTOWIRED_ANNOTATION_PROCESSOR_BEAN_NAME)) {
			RootBeanDefinition def = new RootBeanDefinition(AutowiredAnnotationBeanPostProcessor.class);
			def.setSource(source);
			beanDefs.add(registerPostProcessor(registry, def, AUTOWIRED_ANNOTATION_PROCESSOR_BEAN_NAME));
		}
// ...省略部分代碼
源碼中註冊了一個beanName為CONFIGURATION_ANNOTATION_PROCESSOR_BEAN_NAME常量的名字,這個常量就是org.springframework.context.annotation.internalConfigurationAnnotationProcessor,class為ConfigurationClassPostProcessor
那註解的解析是如何進行解析的呢?由於篇幅過長,下一篇再來解析。


