
背景 在配置中心增加許可權功能 目前配置中心已經包含了單點登錄功能,可以通過統一頁面進行登錄,登錄完會將用戶寫入用戶表 RBAC的用戶、角色、許可權表CRUD、授權等都已經完成 希望不用用戶再次登錄,就可以使用SpringSecurity的許可權控制 Spring Security Spring Secu ...
背景
在配置中心增加許可權功能
- 目前配置中心已經包含了單點登錄功能,可以通過統一頁面進行登錄,登錄完會將用戶寫入用戶表
- RBAC的用戶、角色、許可權表CRUD、授權等都已經完成
- 希望不用用戶再次登錄,就可以使用SpringSecurity的許可權控制
Spring Security
Spring Security最主要的兩個功能:認證和授權
| 功能 | 解決的問題 | Spring Security中主要類 |
|---|---|---|
| 認證(Authentication) | 你是誰 | AuthenticationManager |
| 授權(Authorization) | 你可以做什麼 | AuthorizationManager |
實現
在這先簡單瞭解一下Spring Security的架構是怎樣的,如何可以認證和授權的
過濾器大家應該都瞭解,這屬於Servlet的範疇,Servlet 過濾器可以動態地攔截請求和響應,以變換或使用包含在請求或響應中的信息
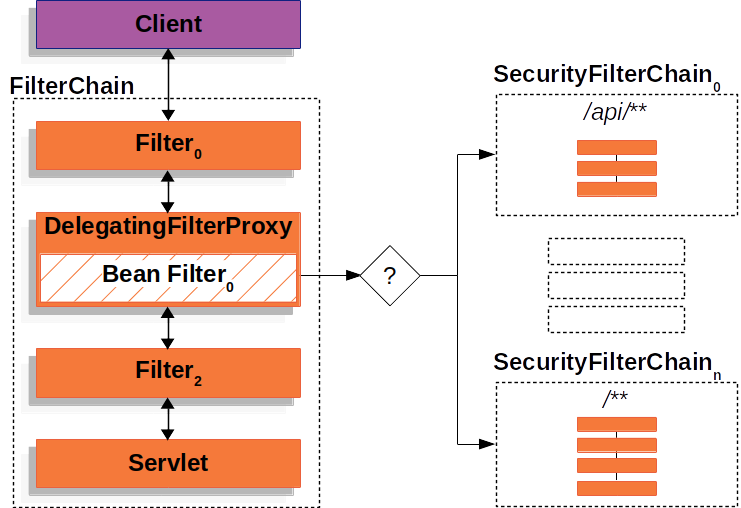
DelegatingFilterProxy是一個屬於Spring Security的過濾器
通過這個過濾器,Spring Security就可以從Request中獲取URL來判斷是不是需要認證才能訪問,是不是得擁有特定的許可權才能訪問。
已經有了單點登錄頁面,Spring Security怎麼登錄,不登錄可以拿到許可權嗎
Spring Security官方文檔-授權架構中這樣說,GrantedAuthority(也就是擁有的許可權)被AuthenticationManager寫入Authentication對象,後而被AuthorizationManager用來做許可權認證
The GrantedAuthority objects are inserted into the Authentication object by the AuthenticationManager and are later read by either the AuthorizationManager when making authorization decisions.
為瞭解決我們的問題,即使我只想用許可權認證功能,也得造出一個Authentication,先看下這個對象:
Authentication
Authentication包含三個欄位:
- principal,代表用戶
- credentials,用戶密碼
- authorities,擁有的許可權
有兩個作用:
- AuthenticationManager的入參,僅僅是用來存用戶的信息,準備去認證
- AuthenticationManager的出參,已經認證的用戶信息,可以從SecurityContext獲取
SecurityContext和SecurityContextHolder用來存儲Authentication, 通常是用了線程全局變數ThreadLocal, 也就是認證完成把Authentication放入SecurityContext,後續在整個同線程流程中都可以獲取認證信息,也方便了認證
繼續分析
看到這可以得到,要實現不登錄的許可權認證,只需要手動造一個Authentication,然後放入SecurityContext就可以了,先嘗試一下,大概流程是這樣,在每個請求上
- 獲取sso登錄的用戶
- 讀取用戶、角色、許可權寫入Authentication
- 將Authentication寫入SecurityContext
- 請求完畢時將SecurityContext清空,因為是ThreadLocal的,不然可能會被別的用戶用到
- 同時Spring Security的配置中是對所有的url都允許訪問的
加了一個過濾器,代碼如下:
import javax.servlet.*;
import javax.servlet.annotation.WebFilter;
import javax.servlet.http.HttpServletRequest;
import java.io.IOException;
import java.util.HashMap;
import java.util.List;
import java.util.Map;
import java.util.stream.Collectors;

@WebFilter( urlPatterns = "/*", filterName = "reqResFilter" )
public class ReqResFilter implements Filter{

	@Autowired
	private SSOUtils ssoUtils;
	@Autowired
	private UserManager userManager;
	@Autowired
	private RoleManager roleManager;

	@Override
	public void init( FilterConfig filterConfig ) throws ServletException{

	}

	@Override
	public void doFilter( ServletRequest servletRequest, ServletResponse servletResponse, FilterChain filterChain )
			throws IOException, ServletException{
		setAuthentication(servletRequest);
		filterChain.doFilter( servletRequest, servletResponse );
		clearAuthentication();
	}

	@Override
	public void destroy(){

	}

	private void setAuthentication( ServletRequest request ){

		Map<String, String> data;
		try{
			data = ssoUtils.getLoginData( ( HttpServletRequest )request );
		}
		catch( Exception e ){
			data = new HashMap<>();
			data.put( "name", "visitor" );
		}
		String username = data.get( "name" );
		if( username != null ){
			userManager.findAndInsert( username );
		}
		List<Role> userRole = userManager.findUserRole( username );
		List<Long> roleIds = userRole.stream().map( Role::getId ).collect( Collectors.toList() );
		List<Permission> rolePermission = roleManager.findRolePermission( roleIds );
		List<SimpleGrantedAuthority> authorities = rolePermission.stream().map( one -> new SimpleGrantedAuthority( one.getName() ) ).collect(
				Collectors.toList() );

		UsernamePasswordAuthenticationToken authenticationToken = new UsernamePasswordAuthenticationToken( username, "", authorities );
		SecurityContextHolder.getContext().setAuthentication( authenticationToken );
	}

	private void clearAuthentication(){

		SecurityContextHolder.clearContext();
	}
}
從日誌可以看出,Principal: visitor,當訪問未授權的介面被拒絕了
16:04:07.429 [http-nio-8081-exec-9] DEBUG org.springframework.security.access.intercept.aopalliance.MethodSecurityInterceptor - Previously Authenticated: org.springframework.security.authentication.UsernamePasswordAuthenticationToken@cc4c6ea0: Principal: visitor; Credentials: [PROTECTED]; Authenticated: true; Details: null; Granted Authorities: CHANGE_USER_ROLE, CHANGE_ROLE_PERMISSION, ROLE_ADD
...
org.springframework.security.access.AccessDeniedException: 不允許訪問
結論
不登錄是可以使用Spring Security的許可權,從功能上是沒有問題的,但存在一些別的問題
- 性能問題,每個請求都需要請求用戶角色許可權資料庫,當然可以利用緩存優化
- 我們寫的過濾器其實也是Spring Security做的事,除此之外,它做了更多的事,比如結合HttpSession, Remember me這些功能
我們可以採取另外一種做法,對用戶來說只登錄一次就行,我們仍然是可以手動用代碼再去登錄一次Spring Security的
如何手動登錄Spring Security
How to login user from java code in Spring Security? 從這篇文章從可以看到,只要通過以下代碼即可
	private void loginInSpringSecurity( String username, String password ){

		UsernamePasswordAuthenticationToken loginToken = new UsernamePasswordAuthenticationToken( username, password );
		Authentication authenticatedUser = authenticationManager.authenticate( loginToken );
		SecurityContextHolder.getContext().setAuthentication( authenticatedUser );
	}
和上面我們直接拿已經認證過的用戶對比,這段代碼讓Spring Security來執行認證步驟,不過需要配置額外的AuthenticationManager和UserDetailsServiceImpl,這兩個配置只是AuthenticationManager的一種實現,和上面的流程區別不大,目的就是為了拿到用戶的信息和許可權進行認證
import org.slf4j.Logger;
import org.slf4j.LoggerFactory;
import org.springframework.beans.factory.annotation.Autowired;
import org.springframework.security.core.GrantedAuthority;
import org.springframework.security.core.authority.SimpleGrantedAuthority;
import org.springframework.security.core.userdetails.UserDetails;
import org.springframework.security.core.userdetails.UserDetailsService;
import org.springframework.security.core.userdetails.UsernameNotFoundException;
import org.springframework.stereotype.Service;

import java.util.List;
import java.util.stream.Collectors;

@Service
public class UserDetailsServiceImpl implements UserDetailsService{

	private static final Logger logger = LoggerFactory.getLogger( UserDetailsServiceImpl.class );

	@Autowired
	private UserManager userManager;

	@Autowired
	private RoleManager roleManager;

	@Override
	public UserDetails loadUserByUsername( String username ) throws UsernameNotFoundException{

		User user = userManager.findByName( username );
		if( user == null ){
			logger.info( "登錄用戶[{}]沒註冊!", username );
			throw new UsernameNotFoundException( "登錄用戶[" + username + "]沒註冊!" );
		}
		return new org.springframework.security.core.userdetails.User( user.getUsername(), "", getAuthority( username ) );
	}

	private List<? extends GrantedAuthority> getAuthority( String username ){

		List<Role> userRole = userManager.findUserRole( username );
		List<Long> roleIds = userRole.stream().map( Role::getId ).collect( Collectors.toList() );
		List<Permission> rolePermission = roleManager.findRolePermission( roleIds );
		return rolePermission.stream().map( one -> new SimpleGrantedAuthority( one.getName() ) ).collect( Collectors.toList() );
	}
}
	@Override
	@Bean
	public AuthenticationManager authenticationManagerBean() throws Exception{

		DaoAuthenticationProvider daoAuthenticationProvider = new DaoAuthenticationProvider();
		daoAuthenticationProvider.setUserDetailsService( userDetailsService );
		daoAuthenticationProvider.setPasswordEncoder( NoOpPasswordEncoder.getInstance() );
		return new ProviderManager( daoAuthenticationProvider );
	}
結論
通過這樣的方式,同樣實現了許可權認證,同時Spring Security會將用戶信息和許可權緩存到了Session中,這樣就不用每次去資料庫獲取
總結
可以通過兩種方式來實現不登錄使用SpringSecurity的許可權功能
- 手動組裝認證過的Authentication直接寫到SecurityContext,需要我們自己使用過濾器控制寫入和清除
- 手動組裝未認證過的Authentication,並交給Spring Security認證,並寫入SecurityContext
附
Spring Security是如何配置的,因為只使用許可權功能,所有允許所有的路徑訪問(我們的單點登錄會限制介面的訪問)
import org.springframework.beans.factory.annotation.Autowired;
import org.springframework.context.annotation.Bean;
import org.springframework.context.annotation.Configuration;
import org.springframework.security.authentication.AuthenticationManager;
import org.springframework.security.authentication.ProviderManager;
import org.springframework.security.authentication.dao.DaoAuthenticationProvider;
import org.springframework.security.config.annotation.method.configuration.EnableGlobalMethodSecurity;
import org.springframework.security.config.annotation.web.builders.HttpSecurity;
import org.springframework.security.config.annotation.web.configuration.EnableWebSecurity;
import org.springframework.security.config.annotation.web.configuration.WebSecurityConfigurerAdapter;
import org.springframework.security.core.userdetails.UserDetailsService;
import org.springframework.security.crypto.password.NoOpPasswordEncoder;
import org.springframework.web.cors.CorsConfiguration;
import org.springframework.web.cors.CorsConfigurationSource;
import org.springframework.web.cors.UrlBasedCorsConfigurationSource;

import java.util.Arrays;
import java.util.Collections;


@Configuration
@EnableWebSecurity
@EnableGlobalMethodSecurity(prePostEnabled = true)
public class WebSecurityConfig extends WebSecurityConfigurerAdapter{

	@Autowired
	private UserDetailsService userDetailsService;

	@Override
	protected void configure( HttpSecurity http ) throws Exception{

		http
				.cors()
				.and()
				.csrf()
				.disable()
				.sessionManagement()
				.and()
				.authorizeRequests()
				.anyRequest()
				.permitAll()
				.and()
				.exceptionHandling()
				.accessDeniedHandler( new SimpleAccessDeniedHandler() );
	}


	@Override
	@Bean
	public AuthenticationManager authenticationManagerBean() throws Exception{

		DaoAuthenticationProvider daoAuthenticationProvider = new DaoAuthenticationProvider();
		daoAuthenticationProvider.setUserDetailsService( userDetailsService );
		daoAuthenticationProvider.setPasswordEncoder( NoOpPasswordEncoder.getInstance() );
		return new ProviderManager( daoAuthenticationProvider );
	}

	@Bean
	public CorsConfigurationSource corsConfigurationSource(){

		CorsConfiguration configuration = new CorsConfiguration();
		configuration.setAllowedOrigins( Collections.singletonList( "*" ) );
		configuration.setAllowedMethods( Arrays.asList( "GET", "HEAD", "POST", "PUT", "DELETE", "OPTIONS" ) );
		configuration.setAllowCredentials( true );
		configuration.setAllowedHeaders( Collections.singletonList( "*" ) );
		configuration.setMaxAge( 3600L );
		UrlBasedCorsConfigurationSource source = new UrlBasedCorsConfigurationSource();
		source.registerCorsConfiguration( "/**", configuration );
		return source;
	}

}

