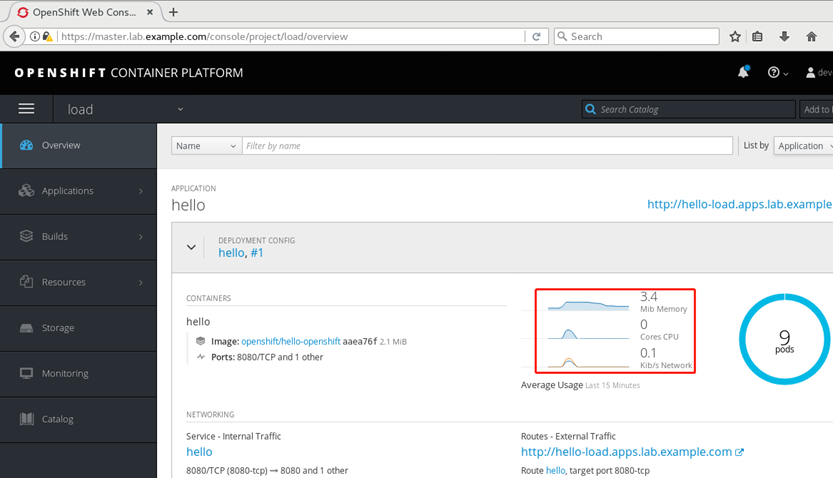
一 METRICS子系統組件 1.1 metric架構介紹 OpenShift metric子系統支持捕獲和長期存儲OpenShift集群的性能度量,收集節點以及節點中運行的所有容器的指標。 metric子系統被由以下開源項目的容器組件構成: Heapster 從Kubernetes集群中的所有節點 ...
一 METRICS子系統組件
1.1 metric架構介紹
OpenShift metric子系統支持捕獲和長期存儲OpenShift集群的性能度量,收集節點以及節點中運行的所有容器的指標。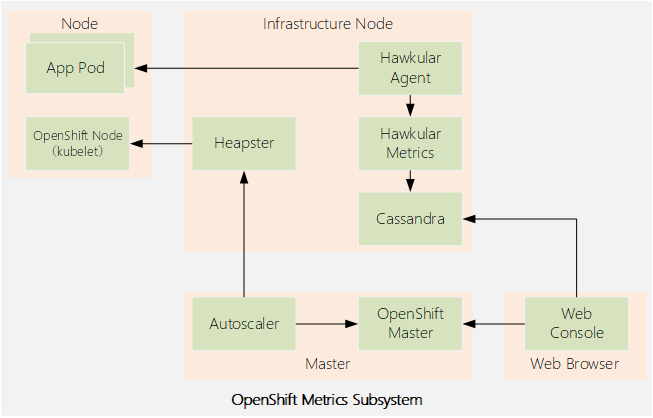 metric子系統被由以下開源項目的容器組件構成:
- Heapster
- Hawkular Metrics
- Hawkular Agent
- Cassandra
- web控制台調用Hawkular Metrics API來獲取數據,以呈現項目中pod的性能圖形。如果沒有部署度量子系統,則不顯示圖表。
- oc adm top命令使用Heapster API來獲取關於集群中所有pod和節點的當前狀態的數據。
- Kubernetes的autoscaler控制器調用Heapster API來從部署中獲取關於所有pod當前狀態的數據,以便決定如何伸縮部署控制器。
1.2 訪問Heapster和Hawkular
OpenShift用戶需要區分聲明的資源請求(和限制)與實際的資源使用情況。pod聲明的資源請求用於調度,聲明的資源請求從節點容量中減去,其差值是節點的剩餘可用容量。 節點的可用容量不反映在節點內運行的容器和其他應用程式使用的實際記憶體和CPU。 oc describe node命令,在OCP 3.9中,只顯示與pods聲明的資源請求相關的信息。如果pod沒有聲明任何資源請求,則不會考慮pod的實際資源使用情況,節點的可用容量可能看起來比實際容量大。 web控制台顯示的信息與oc describe node命令相同,還可以顯示Hawkular Metrics的實際資源使用情況。但是,OCP 3.9的web控制台只顯示pod和項目的指標,web控制台不顯示節點指標。 要獲得節點的實際資源使用情況,並確定節點是否接近其全部硬體或虛擬容量,系統管理員需要使用oc adm top命令。如果需要更詳細的信息,系統管理員可以使用標準的Linux命令,比如vmstat和ps。 OpenShift不向集群外部公開Heapster組件。外部應用程式需要訪問Heapster必須使用OpenShift master API代理。master API代理確保對內部組件API的訪問遵從OpenShift集群身份驗證和訪問控制策略。 將Hawkular暴露給外部訪問涉及到一些安全方面的考慮。如果系統管理員認為使用Heapster和Hawkular api過於複雜,那麼Origin和Kubernetes開源項目的上游社區還提供了與Nagios和Zabbix等流行的開源監控工具的集成,或者當前最火熱的Prometheus。1.3 Metrics subsystem大小
OpenShift度量子系統的每個組件都使用自己的dc進行部署,並且獨立於其他組件進行伸縮。它們可以計劃在OpenShift集群的任何地方運行,但是建議為生產環境中的metrics子系統pod特定保留一些node0。 Cassandra和Hawkular是Java應用程式。Hawkular運行在JBoss EAP 7應用伺服器中。Hawkular和Cassandra都利用了大規模的優勢,預設值是為中小型OpenShift集群設置的大小。測試環境可能需要更改預設值,以減少記憶體和CPU資源。 Heapster和Hawkular部署使用標準的OpenShift工具部署size、比例和調度。少量Heapster和Hawkular pods可以管理數百個OpenShift節點和數千個項目的指標。 可以使用oc命令配置Heapster和Hawkular部署。例如增加每個pod請求的副本數量或資源數量,但是推薦的配置參數的方法是修改為安裝Metrics的Ansible劇本中的變數。 Cassandra不能使用標準oc命令進行伸縮和配置,因為Cassandra(大多數資料庫都是這樣)不是無狀態雲應用程式。Cassandra有嚴格的存儲要求,每個Cassandra pod都有不同的部署配置。必須使用Metrics安裝playbook來伸縮和配置Cassandra部署。1.4 CASSANDRA配置持久存儲
Cassandra可以部署為單個pod,使用一個持久捲。但至少需要三個Cassandra pod才能為度量子系統實現高可用性(HA)。每個pod都需要一個獨占捲:Cassandra使用“無共用”存儲架構。 儘管Cassandra可以使用enptyDir存儲進行部署,但這意味著存在永久數據丟失的風險。通常生產環境不推薦使用臨時存儲(即emptyDir捲類型)。 每個Cassandra捲使用的存儲量不僅取決於預期的集群大小(節點和pod的數量),還取決於度量的時間序列的粒度和持續時間。 Metrics安裝劇本支持使用靜態供應的持久捲或動態捲。無論選擇哪種方法,playbook都基於首碼創建持久捲聲明,首碼後面附加一個序列號。對於靜態供應的持久捲,請確保使用相同的命名約定。二 METRICS子系統
2.1 部署metrics子系統
OpenShift Metrics子系統由Ansible playbook部署,可以選擇使用基本playbook或單獨用於Metrics的playbook進行部署。 大多數Metrics子系統配置是使用用於高級安裝方法的Inventory文件中的Ansible變數執行的。儘管可以使用-e選項覆蓋或自定義某些變數的值,更建議在Inventory中定義metrics變數。如果需要更改度量Metrics配置,可更新Inventory中的變數並重新運行安裝劇本。 metrics子系統在許多生產環境中不需要認定配置,可直接通過運行metrics安裝劇本使用預設設置安裝。 示例:Ansible結合主配置文件和Metrics子系統playbook安裝。 Ansible主配置文件如下:1 [defaults] 2 remote_user = student 3 inventory = ./inventory 4 log_path = ./ansible.log 5 [privilege_escalation] 6 become = yes 7 become_user = root 8 become_method = sudo 9 Metrics子系統劇本: 10 # ansible-playbook \ 11 /usr/share/ansible/openshift-ansible/playbooks/openshift-metrics/config.yml \ -e openshift_metrics_install_metrics=True 提示:OpenShift metrics劇本由openshift-ansibl -playbooks包提供,該包是作為atom-openshift-utils包的依賴項安裝的。 openshift_metrics_install_metrics Ansible變數配置劇本用來部署metrics子系統,playbook為metrics子系統創建dc、service和其他支撐metrics的Kubernetes資源,還可以在用於部署集群的Inventory文件中定義該變數。 metrics子系統安裝playbook會在openshift-infra項目中創建所需Kubernetes資源。安裝playbook不配置任何節點選擇器來限制pod所運行的node。
2.2 卸載metrics子系統
卸載OpenShift metrics子系統的一種方法是手動刪除OpenShift-infra項目中的所有Kubernetes資源。通常需要多個oc命令,且容易出錯,因為其他OpenShift子系統也被部署到這個項目。 卸載metrics子系統的推薦方法是運行安裝劇本,但是將openshift_metrics_install_metrics Ansible變數設置為False,如下麵的示例所示,-e選項覆蓋庫存文件中定義的值。1 # ansible-playbook \ 2 /usr/share/ansible/openshift-ansible/playbooks/openshift-metrics/config.yml \ 3 -e openshift_metrics_install_metrics=False
2.3 驗證metrics子系統
OpenShift metrics子系統playbook完成後,應該創建所有Cassandra、Hawkular和Heapster pod,並可能需要一些時間進行初始化。可能由於Cassandra pod初始化時間過長,會重新啟動Hawkular和Heapster pod。 除非另外配置,否則安裝程式劇本應該為每個組件創建一個dc,其中包含一個pod,並且openshift-infra項目的oc get pod能顯示相應pod。2.4 部署metrics子系統常見錯誤
造成部署錯誤的常見原因通常有:- image缺失;
- metrics所需資源過高,節點無法滿足;
- Cassandra pod所需的持久捲無法滿足。
2.5 其他配置
在所有pod準備好並運行之後,需要執行一個特定配置以便於和web對接。如果跳過此步驟,OpenShift web控制台將無法顯示項目的metrics圖形,儘管底層metrics子系統正在正常工作。 OpenShift web控制台是一個JavaScript應用程式,它直接訪問Hawkular API,而不需要經過OpenShift master service。 但由於內部使用TLS訪問API,預設情況下,TLS證書不是由受信任的認證機構簽署的。因此web瀏覽器拒絕連接到Hawkular API endpoint。 在OpenShift安裝之後,web控制台本身也會出現類似證書不信任的問題。與metrics同樣的方式解決,配置瀏覽器接受TLS證書。為此,在web瀏覽器中打開Hawkular API歡迎頁面,並接受不受信任的TLS證書。 https://hawkular-metrics.<master-wildcard-domain> 主通配符域DNS尾碼應該與OpenShift主服務中配置的尾碼相同,並用作新路由的預設域。 playbook從Ansible hosts文件中獲取主通配符域值,由openshift_master_default_subdomain變數定義。如果更改了OpenShift master service配置,則它們將不匹配。在本例中,為metrics劇本中的openshift_metrics_hawkular_hostname變數提供新值。2.62.6 metrics涉及變數
OCP安裝和配置文檔提供了metrics安裝劇本使用的所有可能變數的列表,它們控制著各種配置參數。常見有: 每個組件的pod比例:- openshift_metrics_cassandra_replicas
- openshift_metrics_hawkular_replicas
- openshift_metrics_cassandra_requests_memory
- openshift_metrics_cassandra_limits_memory
- openshift_metrics_cassandra_requests_cpu
- openshift_metrics_cassandra_limits_cpu
- openshift_metrics_hawkular_requests_memory
- openshift_metrics_heapster_requests_memory
- openshift_metrics_duration
- openshift_metrics_resolution
- openshift_metrics_cassandra_storage_type
- openshift_metrics_cassandra_pvc_prefix
- openshift_metrics_cassandra_pvc_size
- openshift_metrics_image_prefix
- openshift_metrics_image_version
- openshift_metrics_heapster_standalone
- openshift_metrics_hawkular_hostname
  1 [OSEv3:vars]
  2 ...output omitted...
  3 openshift_metrics_cassandra_replicas=2
  4 openshift_metrics_cassandra_requests_memory=2Gi
  5 openshift_metrics_cassandra_pvc_size=50Gi
示例2:使用自定義配置,用於覆蓋Cassandra定義的屬性。
  1 # ansible-playbook \
  2 /usr/share/ansible/openshift-ansible/playbooks/openshift-metrics/config.yml \
  3 -e openshift_metrics_cassandra_replicas=3 \
  4 -e openshift_metrics_cassandra_requests_memory=4Gi \
  5 -e openshift_metrics_cassandra_pvc_size=25Gi
提示:大多數配置參數都可以使用OpenShift oc命令進行更改,但是推薦的方法是使用更新Inventory中變數值運行metrics安裝劇本進行修改。
三 安裝metrics子系統
3.1 前置準備
準備完整的OpenShift集群,參考《003.OpenShift網路》2.1。3.2 本練習準備
1 [student@workstation ~]$ lab install-metrics setup
3.3 驗證image
  1 [student@workstation ~]$ docker-registry-cli registry.lab.example.com \
  2 search metrics-cassandra ssl
  3 [student@workstation ~]$ docker-registry-cli registry.lab.example.com \
  4 search ose-recycler ssl
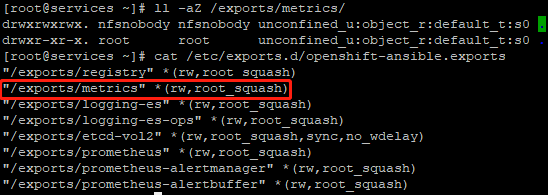
3.4 驗證NFS
  1 [root@services ~]# ll -aZ /exports/metrics/
  2 drwxrwxrwx. nfsnobody nfsnobody unconfined_u:object_r:default_t:s0 .
  3 drwxr-xr-x. root      root      unconfined_u:object_r:default_t:s0 ..
  4 [root@services ~]# cat /etc/exports.d/openshift-ansible.exports
3.5 創建PV
  1 [student@workstation ~]$ cat /home/student/DO280/labs/install-metrics/metrics-pv.yml
  2 apiVersion: v1
  3 kind: PersistentVolume
  4 metadata:
  5   name: metrics
  6 spec:
  7   capacity:
  8     storage: 5Gi			#定義capacity.storage容量為5G
  9   accessModes:
 10   - ReadWriteOnce			#定義訪問模式
 11   nfs:
 12     path: /exports/metrics		#定義nfs.path
 13     server: services.lab.example.com	#定義nfs.services
 14   persistentVolumeReclaimPolicy: Recycl	#定義回收策略
  1 [student@workstation ~]$ oc login -u admin -p redhat https://master.lab.example.com
  2 [student@workstation ~]$ oc create -f /home/student/DO280/labs/install-metrics/metrics-pv.yml
  3 [student@workstation ~]$ oc get pv
  4 NAME        CAPACITY    ACCESS MODES    RECLAIM POLICY    STATUS    CLAIM    STORAGECLASS    REASON    AGE
  5 metrics     Gi          RWO             Recycle           Available                                    14s
3.6 規劃安裝變數
openshift_metrics_image_prefix:指向服務VM上的私有倉庫,並添加openshift3/ose-作為映像名稱首碼。 openshift_metrics_image_version:要使用的容器image標記,私有倉庫為image添加一個v3.9標記。 openshift_metrics_heapster_requests_memory:本環境配置300mb記憶體。 openshift_metrics_hawkular_requests_memory:本環境配置750mb記憶體。 openshift_metrics_cassandra_requests_memory:本環境配置750mb記憶體。 openshift_metrics_cassandra_storage_type:使用pv選擇一個持久捲作為存儲類型。 openshift_metrics_cassandra_pvc_size:本環境配置5gib容量。 openshift_metrics_cassandra_pvc_prefix:使用metrics作為pvc名稱的首碼. 提示:生產環境中建議根據實際規划進行配置,可適當調大配置規格。3.7 配置安裝變數
  1 [student@workstation ~]$ cd /home/student/DO280/labs/install-metrics
  2 [student@workstation install-metrics]$ cat metrics-vars.txt
  3 # Metrics Variables
  4 # Append the variables to the [OSEv3:vars] group
  5 openshift_metrics_install_metrics=True
  6 openshift_metrics_image_prefix=registry.lab.example.com/openshift3/ose-
  7 openshift_metrics_image_version=v3.9
  8 openshift_metrics_heapster_requests_memory=300M
  9 openshift_metrics_hawkular_requests_memory=750M
 10 openshift_metrics_cassandra_requests_memory=750M
 11 openshift_metrics_cassandra_storage_type=pv
 12 openshift_metrics_cassandra_pvc_size=5Gi
 13 openshift_metrics_cassandra_pvc_prefix=metrics
 14 [student@workstation install-metrics]$ cat metrics-vars.txt >> inventory
 15 [student@workstation install-metrics]$ lab install-metrics grade		#本環境使用腳本判斷配置
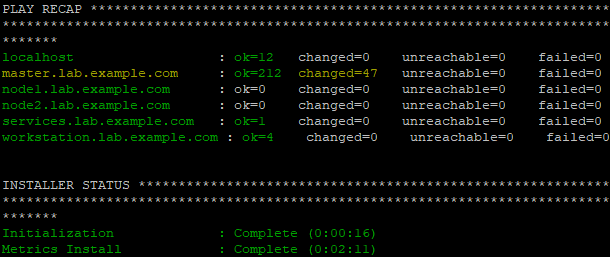
3.8 執行安裝
1 [student@workstation install-metrics]$ ansible-playbook /usr/share/ansible/openshift-ansible/playbooks/openshift-metrics/config.yml
3.9 驗證安裝
  1 [student@workstation install-metrics]$ oc get pvc -n openshift-infra		#驗證持久捲是否成功掛載
  2 NAME        STATUS    VOLUME    CAPACITY   ACCESS MODES   STORAGECLASS   AGE
  3 metrics-1   Bound     metrics   5Gi        RWO                           5m
  4 [student@workstation install-metrics]$ oc get pod -n openshift-infra		#驗證metric相關pod
  5 NAME                         READY     STATUS    RESTARTS   AGE
  6 hawkular-cassandra-1-6k7fr   1/1       Running   0          5m
  7 hawkular-metrics-z9v85       1/1       Running   0          5m
  8 heapster-mbdcl               1/1       Running   0          5m
  9 [student@workstation install-metrics]$ oc get route -n openshift-infra		#查看metric route地址
 10 NAME                HOST/PORT                                PATH    SERVICES            PORT    TERMINATION    WILDCARD
 11 hawkular-metrics   hawkular-metrics.apps.lab.example.com             hawkular-metrics    <all>   reencrypt
 12 None
瀏覽器訪問: https://hawkular-metrics.apps.lab.example.com
 提示:瀏覽器信任SSL證書。
3.10 部署測試應用
  1 [student@workstation ~]$ oc login -u developer -p redhat \
  2 https://master.lab.example.com				#登錄OpenShift
  3 [student@workstation ~]$ oc new-project load		#創建project
  4 [student@workstation ~]$ oc new-app --name=hello \
  5 --docker-image=registry.lab.example.com/openshift/hello-openshift	#部署應用
  6 [student@workstation ~]$ oc scale --replicas=9 dc/hello			#擴展應用
  7 [student@workstation ~]$ oc get pod -o wide				#查看pod
  8 NAME            READY     STATUS    RESTARTS   AGE       IP            NODE
  9 hello-1-4nvfd   1/1       Running   0          1m        10.129.0.40   node2.lab.example.com
 10 hello-1-c9f8t   1/1       Running   0          1m        10.128.0.22   node1.lab.example.com
 11 hello-1-dfczg   1/1       Running   0          1m        10.128.0.23   node1.lab.example.com
 12 hello-1-dvdx2   1/1       Running   0          1m        10.129.0.36   node2.lab.example.com
 13 hello-1-f6rsl   1/1       Running   0          1m        10.128.0.20   node1.lab.example.com
 14 hello-1-m2hb4   1/1       Running   0          1m        10.129.0.39   node2.lab.example.com
 15 hello-1-r64z9   1/1       Running   0          1m        10.128.0.21   node1.lab.example.com
 16 hello-1-tf4l5   1/1       Running   0          1m        10.129.0.37   node2.lab.example.com
 17 hello-1-wl6zx   1/1       Running   0          1m        10.129.0.38   node2.lab.example.com
 18 [student@workstation ~]$ oc expose svc hello
3.11 壓力測試
  1 [student@workstation ~]$ sudo yum -y install httpd-tools
  2 [student@workstation ~]$ ab -n 300000 -c 20 http://hello-load.apps.lab.example.com/
3.12 查看資源使用情況
  1 [student@workstation ~]$ oc login -u admin -p redhat
  2 [student@workstation ~]$ oc adm top node \
  3 --heapster-namespace=openshift-infra \
  4 --heapster-scheme=https
  5 NAME                     CPU(cores)   CPU%      MEMORY(bytes)   MEMORY%
  6 master.lab.example.com   273m         13%       1271Mi          73%
  7 node1.lab.example.com    1685m        84%       3130Mi          40%
  8 node2.lab.example.com    1037m        51%       477Mi           6%
提示:保持3.11的壓測程式,重開終端進行查看。
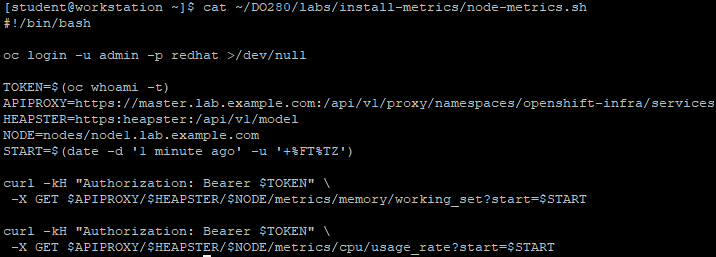
3.13 獲取指標
1 [student@workstation ~]$ cat ~/DO280/labs/install-metrics/node-metrics.sh #使用此腳本獲取指標
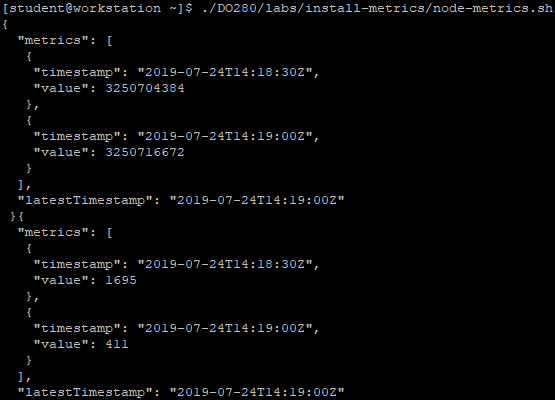
1 [student@workstation ~]$ ./DO280/labs/install-metrics/node-metrics.sh
 瀏覽器訪問:https://master.lab.example.com
查看相關性能監控。
