一、zabbix簡介 1、簡介 zabbix([`zæbiks])是一個基於WEB界面的提供分散式系統監視以及網路監視功能的企業級的開源解決方案。zabbix能監視各種網路參數如:CPU負荷、記憶體使用、磁碟使用、網路狀況、埠監視、日誌監視等。zabbix主要由2部分構成,zabbix server ...
一、zabbix簡介
1、簡介
zabbix([`zæbiks])是一個基於WEB界面的提供分散式系統監視以及網路監視功能的企業級的開源解決方案。zabbix能監視各種網路參數如:CPU負荷、記憶體使用、磁碟使用、網路狀況、埠監視、日誌監視等。zabbix主要由2部分構成,zabbix server與可選組件zabbix agent。
zabbix server可以通過SNMP,zabbix agent,ping,埠監視等方法提供對遠程伺服器/網路狀態的監視,數據收集等功能,它可以運行在Linux,Solaris,HP-UX,AIX,Free BSD,Open BSD,OS X等平臺上。
zabbix agent需要安裝在被監視主機上,它主要完成對硬體信息或與操作系統有關的記憶體,CPU等信息的收集。zabbix agent可以運行在Linux,Solaris,HP-UX,AIX,Free BSD,Open BSD,OS X,Tru64/OSF1,Windows NT4.0,Windows (2000/2003/XP/Vista)等系統之上。
2、實驗環境
系統:centos 7
軟體:Apache 2.4.6-93 mariadb 5.5.65 php 5.4.16 zabbix 4.0.21
3、安裝前的準備工作
# 1、設置本機IP地址:192.168.10.100
[root@bogon ~]# vim /etc/sysconfig/network-scripts/ifcfg-ens33
TYPE=Ethernet
PROXY_METHOD=none
BROWSER_ONLY=no
BOOTPROTO=static
DEFROUTE=yes
IPV4_FAILURE_FATAL=no
IPV6INIT=yes
IPV6_AUTOCONF=yes
IPV6_DEFROUTE=yes
IPV6_FAILURE_FATAL=no
IPV6_ADDR_GEN_MODE=stable-privacy
NAME=ens33
UUID=84e3956a-e882-4039-baa3-1a7dd1c733ea
DEVICE=ens33
ONBOOT=yes
IPADDR=192.168.10.100
NETMASE=255.255.255.0
GATEWAY=192.168.10.2
DNS1=192.168.10.2

# 2、設置主機名為:zabbix-server
[root@bogon ~]# vim /etc/hostname
zabbix-server

# 3、關閉selinux
[root@bogon ~]# vim /etc/selinux/config
...
SELINUX=disabled
...

# 4、重啟電腦
[root@bogon ~]# reboot
二、使用yum安裝LAMP
1、安裝Apache
[root@zabbix-server ~]# yum install httpd -y
1.1 驗證Apache
啟動Apache服務
[root@zabbix-server ~]# systemctl start httpd
訪問本機127.0.0.1,你會看到如下界面:

2、安裝mariadb
[root@zabbix-server ~]# yum install mariadb-server mariadb -y
2.1 驗證mariadb

2.2 對mariadb進行初始化安全設置

 1 [root@zabbix-server ~]# systemctl start mariadb  # 啟動mariadb
 2 [root@zabbix-server ~]# mysql_secure_installation   # 初始化mariadb資料庫
 3
 4 NOTE: RUNNING ALL PARTS OF THIS SCRIPT IS RECOMMENDED FOR ALL MariaDB
 5       SERVERS IN PRODUCTION USE!  PLEASE READ EACH STEP CAREFULLY!
 6
 7 In order to log into MariaDB to secure it, we'll need the current
 8 password for the root user.  If you've just installed MariaDB, and
 9 you haven't set the root password yet, the password will be blank,
10 so you should just press enter here.
11
12 Enter current password for root (enter for none):   # 預設root密碼為空,這裡回車即可
13 OK, successfully used password, moving on...
14
15 Setting the root password ensures that nobody can log into the MariaDB
16 root user without the proper authorisation.
17
18 Set root password? [Y/n] Y   # 是否設置root密碼
19 New password:     # 設置root密碼
20 Re-enter new password:   # 確認密碼
21 Password updated successfully!
22 Reloading privilege tables..
23  ... Success!
24
25
26 By default, a MariaDB installation has an anonymous user, allowing anyone
27 to log into MariaDB without having to have a user account created for
28 them.  This is intended only for testing, and to make the installation
29 go a bit smoother.  You should remove them before moving into a
30 production environment.
31
32 Remove anonymous users? [Y/n] Y   # 是否刪除匿名用戶,建議刪除,否則可以通過匿名用戶訪問資料庫
33  ... Success!
34
35 Normally, root should only be allowed to connect from 'localhost'.  This
36 ensures that someone cannot guess at the root password from the network.
37
38 Disallow root login remotely? [Y/n] n  # 是否拒絕root遠程登錄,這裡是實驗環境我們允許
39  ... skipping.
40
41 By default, MariaDB comes with a database named 'test' that anyone can
42 access.  This is also intended only for testing, and should be removed
43 before moving into a production environment.
44
45 Remove test database and access to it? [Y/n] Y  # 是否刪除預設test資料庫,這個隨意
46  - Dropping test database...
47  ... Success!
48  - Removing privileges on test database...
49  ... Success!
50
51 Reloading the privilege tables will ensure that all changes made so far
52 will take effect immediately.
53
54 Reload privilege tables now? [Y/n] Y  # 是否使設置立即生效
55  ... Success!
56
57 Cleaning up...
58
59 All done!  If you've completed all of the above steps, your MariaDB
60 installation should now be secure.
61
62 Thanks for using MariaDB!
mysql_secure_installation
2.3 設置客戶端和服務端的字元集為utf-8
[root@zabbix-server ~]# vim /etc/my.cnf
[mysqld]

character-set-server=utf8             # 設置服務端的字元集
collation-server=utf8_general_ci      # 設置服務端的字元集

datadir=/var/lib/mysql
socket=/var/lib/mysql/mysql.sock
# Disabling symbolic-links is recommended to prevent assorted security risks
symbolic-links=0
# Settings user and group are ignored when systemd is used.
# If you need to run mysqld under a different user or group,
# customize your systemd unit file for mariadb according to the
# instructions in http://fedoraproject.org/wiki/Systemd

[mysqld_safe]
log-error=/var/log/mariadb/mariadb.log
pid-file=/var/run/mariadb/mariadb.pid

[client]                #  設置客戶端的字元集
default-character-set=utf8
[mysql]                #  設置客戶端的字元集
default-character-set=utf8
#
# include all files from the config directory
#
!includedir /etc/my.cnf.d
重啟mariadb
[root@zabbix-server ~]# systemctl restart mariadb
3、安裝php
[root@zabbix-server ~]# yum install php php-mysql -y
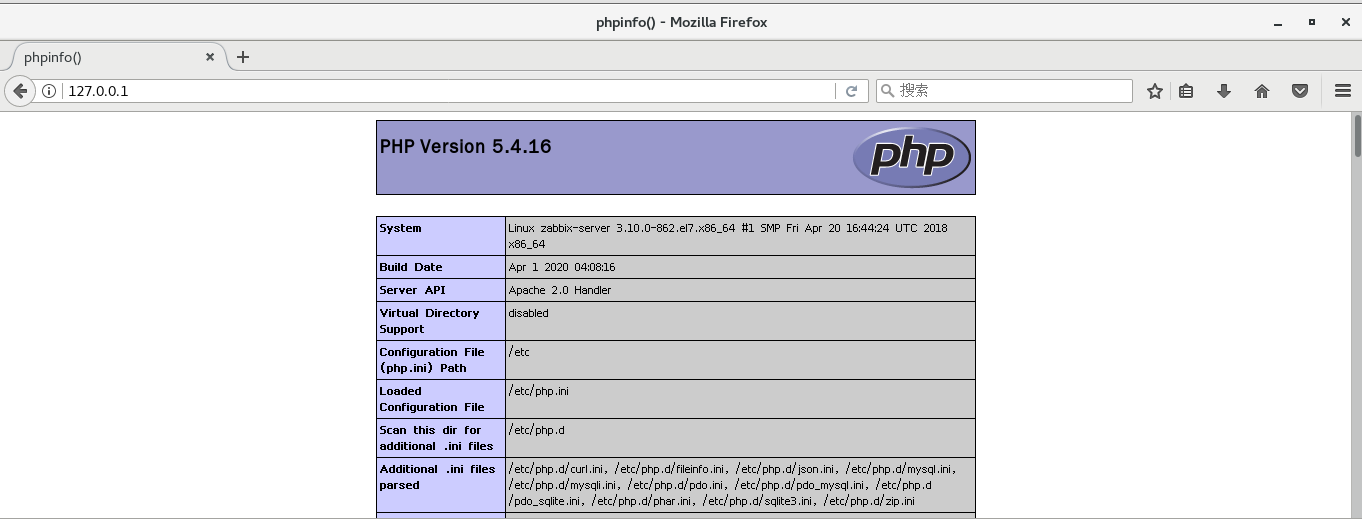
3.1 驗證php
在/var/www/html下創建index.php
[root@zabbix-server ~]# vim /var/www/html/index.php
<?php
phpinfo();
?>
重啟Apache
[root@zabbix-server ~]# systemctl restart httpd
訪問127.0.0.1進行驗證

三、安裝zabbix
1、下載zabbix
[root@zabbix-server ~]# wget https://cdn.zabbix.com/zabbix/sources/stable/4.0/zabbix-4.0.21.tar.gz -P /usr/src/
2、解壓
[root@zabbix-server ~]# tar -zxvf /usr/src/zabbix-4.0.21.tar.gz -C /opt/
3、創建運行zabbix賬戶
[root@zabbix-server ~]# groupadd zabbix
[root@zabbix-server ~]# useradd -g zabbix zabbix
4、創建zabbix資料庫
[root@zabbix-server mysql]# mysql -uroot -p
MariaDB [(none)]> create database zabbix;
MariaDB [(none)]> use zabbix;
MariaDB [zabbix]> source /opt/zabbix-4.0.21/database/mysql/schema.sql
MariaDB [zabbix]> source /opt/zabbix-4.0.21/database/mysql/data.sql
5、配置zabbix
[root@zabbix-server ~]# cd /opt/zabbix-4.0.21/
[root@zabbix-server zabbix-4.0.21]# ./configure --enable-server --enable-agent --with-mysql --enable-ipv6 --with-net-snmp --with-libcurl --with-libxml2
這時可能報如下錯誤:

原因是缺少mysql-devel ,安裝即可。
[root@zabbix-server zabbix-4.0.21]# yum install mysql-devel -y
安裝完成後再次進行配置
[root@zabbix-server zabbix-4.0.21]# ./configure --enable-server --enable-agent --with-mysql --enable-ipv6 --with-net-snmp --with-libcurl --with-libxml2
這時可能會報如下錯誤:

原因是缺少libxml,安裝即可。
[root@zabbix-server zabbix-4.0.21]# yum install libxml2 libxml2-devel -y
安裝完成後再次進行配置
[root@zabbix-server zabbix-4.0.21]# ./configure --enable-server --enable-agent --with-mysql --enable-ipv6 --with-net-snmp --with-libcurl --with-libxml2
這時可能會報如下錯誤:

原因是缺少 net-snmp-devel,安裝即可。
[root@zabbix-server zabbix-4.0.21]# yum install net-snmp-devel -y
安裝完成後再次進行配置
[root@zabbix-server zabbix-4.0.21]# ./configure --enable-server --enable-agent --with-mysql --enable-ipv6 --with-net-snmp --with-libcurl --with-libxml2
這時可能會報如下錯誤:

原因是缺少libevent-devel,安裝即可。
[root@zabbix-server zabbix-4.0.21]# yum install libevent-devel -y
安裝完成後再次進行配置
[root@zabbix-server zabbix-4.0.21]# ./configure --enable-server --enable-agent --with-mysql --enable-ipv6 --with-net-snmp --with-libcurl --with-libxml2
這時可能會報如下錯誤:

原因是缺少curl-devel,安裝即可。
[root@zabbix-server zabbix-4.0.21]# yum install curl-devel -y
安裝完成後再次進行配置
[root@zabbix-server zabbix-4.0.21]# ./configure --enable-server --enable-agent --with-mysql --enable-ipv6 --with-net-snmp --with-libcurl --with-libxml2
經過上面諸多錯誤,終於來到瞭如下所示:

6、安裝zabbix
[root@zabbix-server zabbix-4.0.21]# make install
7、編輯配置文件/usr/local/etc/zabbix_server.conf
[root@zabbix-server zabbix-4.0.21]# vim /usr/local/etc/zabbix_server.conf
DBHost=localhost
DBName=zabbix
DBUser=root
DBPassword=root的密碼
DBPort=3306
8、使用web界面安裝zabbix
8.1 創建zabbix在web中的工作目錄
[root@zabbix-server zabbix-4.0.21]# mkdir /var/www/html/zabbix
8.2 將/opt/zabbix-4.0.21/frontends/php/下的所有文件複製到/var/www/html/zabbix
[root@zabbix-server zabbix-4.0.21]# cd frontends/php/
[root@zabbix-server php]# cp -a . /var/www/html/zabbix/
8.3 在web上進行安裝
訪問http://127.0.0.1/zabbix我們會看到如下:

此時我們只能在centos本機上訪問http://127.0.0.1/zabbix,這樣操作不方便,並且其它主機將不能使用zabbix,所以調整httpd.conf文件。
[root@zabbix-server php]# vim /etc/httpd/conf/httpd.conf
Listen 192.168.10.100:80    # 將監聽地址改成伺服器的IP地址

# 修改完成後重啟Apache
[root@zabbix-server php]# systemctl restart httpd

# 停止防火牆
[root@zabbix-server php]# systemctl stop firewalld
此時我們便可以在宿主機上訪問Apache服務了。

點擊下一步後我們會看到一個提示信息,提示哪裡需要整改。

錯誤大致分為兩部分,一個是需要調整PHP的配置文件,一個缺少一些php組件。
8.4 調整php配置文件
[root@zabbix-server php]# vim /etc/php.ini
post_max_size = 16M
max_execution_time = 300
max_input_time = 300
date.timezone = Asia/Shanghai
重啟Apache
[root@zabbix-server php]# systemctl restart httpd
再次訪問http://192.168.10.100/zabbix/

我們可以看到關於php配置文件的錯誤沒了,現在只剩php組件了。
8.5 安裝php缺失的組件
[root@zabbix-server ~]# yum install php-bcmath php-mbstring php-gd libjpeg* php-ldap php-xml php-xmlrpc -y
安裝完成後,重啟Apache。
[root@zabbix-server ~]# systemctl restart httpd
再次訪問http://192.168.10.100/zabbix/,你會看到如下:

點擊下一步後,會進入到連接資料庫的界面:

如果下一步出現如下錯誤:

表示資料庫zabbix的字元集有問題。
刪除資料庫zabbix,並重新創建zabbix,導入數據。
[root@zabbix-server ~]# mysql -uroot -p
MariaDB [(none)]> drop database zabbix;
MariaDB [(none)]> create database zabbix character set utf8 collate utf8_bin;
MariaDB [(none)]> use zabbix;
MariaDB [zabbix]> source /opt/zabbix-4.0.21/database/mysql/schema.sql
MariaDB [zabbix]> source /opt/zabbix-4.0.21/database/mysql/images.sql
MariaDB [zabbix]> source /opt/zabbix-4.0.21/database/mysql/data.sql
設置完成後刷新頁面,我們會看到如下界面:

點擊下一步後,我們會看到如下界面:

下一步後我們會看到如下界面:

點擊下一步後來到安裝頁面:

造成該錯誤的原因是Apache的用戶對/var/www/html/zabbix/conf沒有寫入的許可權。
我們給寫入許可權即可,如下:
[root@zabbix-server ~]# chmod a+w /var/www/html/zabbix/conf
刷新頁面後你會看到如下:

點擊Finish後你會看到如下界面:

登錄成功後你會看到如下界面:

我們可以看到zabbix server並沒有運行,造成這種情況的原因很多,我們可以通過查看日誌文件來瞭解問題產生的原因,預設日誌文件在/tmp/zabbix_server.log。
如果是資料庫連接的問題,我們要確保/var/www/html/zabbix/conf/zabbix.conf.php和vim /usr/local/etc/zabbix_server.conf中的資料庫信息一致,並且資料庫用戶名和密碼正確。
我們這裡出現這個問題的原因是沒有開啟zabbix server服務。
[root@zabbix-server ~]# zabbix_server
刷新頁面我們會看到如下:

到此zabbix的安裝就簡單介紹到這裡。


