一 K3S概述 1.1 K3S介紹 K3S是一個輕量級Kubernetes發行版。易於安裝,記憶體消耗低,所有二進位文件不到40mb。 適用於: 邊緣計算-Edge 物聯網-IoT CI ARM 1.2 K3S特點 k3s是完全相容的Kubernetes發行版,有以下更改: 移除過時的功能、Alpha ...
一 K3S概述
1.1 K3S介紹
K3S是一個輕量級Kubernetes發行版。易於安裝,記憶體消耗低,所有二進位文件不到40mb。- 適用於:
- 邊緣計算-Edge
- 物聯網-IoT
- CI
- ARM
1.2 K3S特點
k3s是完全相容的Kubernetes發行版,有以下更改:- 移除過時的功能、Alpha功能、非預設功能,這些功能在大多數Kubernetes集群中已不可用。
- 刪除內置插件(比如雲供應商插件和存儲插件),可用外部插件程式替換。
- 添加SQLite3作為預設的數據存儲。etcd3仍然可用,但並非預設項。
- 包含在一個簡單的啟動程式當中,可以處理複雜的TLS和其他選項。
- 幾乎沒有操作系統依賴性(僅需要健全的內核和cgroup掛載)。k3s軟體包所需的依賴:
- containerd
- Flannel
- CoreDNS
- CNI
- 主機系統服務 (iptables, socat, etc)
1.3 K3S架構
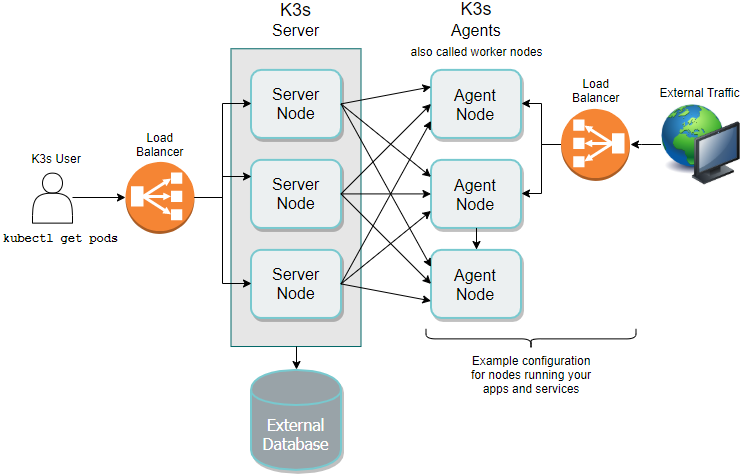
server節點被定義為運行k3s server命令的主機(裸機或虛擬機)。worker節點被定義為運行k3s agent命令的主機。 常見的K3S高可用架構如下:- 兩個或更多server節點;
- 一個外部數據存儲。

1.4 worker節點註冊
worker節點通過k3s agent啟動時發起的Websocket連接進行註冊。 worker節點將使用節點集群密鑰以及存儲在/etc/rancher/node/password的節點隨機密碼向server註冊。server將在單個節點的/var/lib/rancher/k3s/server/cred/node-passwd路徑存儲密碼,後續任何操作都必須使用相同的密碼。如果刪除了worker節點目錄/etc/rancher/node,則應該為該worker節點重新創建密碼文件,或者從伺服器中刪除該節點。 通過使用該--with-node-id標誌啟動K3s server或agent,可以將唯一的節點ID添加到hostname。二 K3S部署規劃
2.1 節點需求
所有節點不能具有相同的主機名。 如果節點具有相同的主機名,需要在運行K3S前修改主機名。或者通過--node-name或$K3S_NODE_NAME變數傳遞唯一的主機名稱。 無負載最小配置:RAM: 512 MB,CPU: 1C。 k3s server需要6443埠可被節點訪問,這些節點需要能夠通過UDP 8472埠來相互訪問組建Flannel VXLAN網路。 如果不使用Flannel VXLAN並提供自己的自定義CNI,則k3s不需要放行UDP 8472埠。k3s使用反向隧道,以便worker建立與server的出站連接,並且所有kubelet流量都通過該隧道通信。 如果要使用metrics server,則需要在每個節點上放行10250埠。2.2 節點規劃
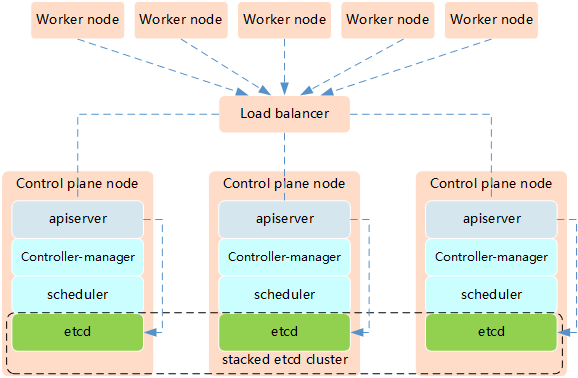
高可用架構一:etcd與Master節點組件混布在一起。
三 K3S部署準備
3.1 變數參數準備
[root@master01 ~]# vi environment.sh1 #!/bin/sh 2 #****************************************************************# 3 # ScriptName: environment.sh 4 # Author: xhy 5 # Create Date: 2020-05-13 12:21 6 # Modify Author: xhy 7 # Modify Date: 2020-05-13 12:21 8 # Version: 9 #***************************************************************# 10 11 # 集群 MASTER 機器 IP 數組 12 export MASTER_IPS=(172.24.12.11 172.24.12.12 172.24.12.13) 13 14 # 集群 MASTER IP 對應的主機名數組 15 export MASTER_NAMES=(master01 master02 master03) 16 17 # 集群 NODE 機器 IP 數組 18 export NODE_IPS=(172.24.12.21 172.24.12.22 172.24.12.23) 19 20 # 集群 NODE IP 對應的主機名數組 21 export NODE_NAMES=(worker01 worker02 worker03) 22 23 # 集群所有機器 IP 數組 24 export ALL_IPS=(172.24.12.11 172.24.12.12 172.24.12.13 172.24.12.21 172.24.12.22 172.24.12.23) 25 26 # 集群所有IP 對應的主機名數組 27 export ALL_NAMES=(master01 master02 master03 worker01 worker02 worker03) 28 29 # etcd 集群服務地址列表 30 export ETCD_ENDPOINTS="https://172.24.12.11:2379,https://172.24.12.12:2379,https://172.24.12.13:2379" 31 32 # etcd 集群間通信的 IP 和埠 33 export ETCD_NODES="master01=https://172.24.12.11:2380,master02=https://172.24.12.12:2380,master03=https://172.24.12.13:2380" 34 35 # 節點間互聯網路介面名稱 36 export IFACE="eth0" 37 38 # etcd 數據目錄 39 export ETCD_DATA_DIR="/data/k3s/etcd/data" 40 41 # etcd WAL 目錄,建議是 SSD 磁碟分區,或者和 ETCD_DATA_DIR 不同的磁碟分區 42 export ETCD_WAL_DIR="/data/k3s/etcd/wal"
3.2 相關優化
[root@master01 ~]# vi k3sinit.sh1 #!/bin/sh 2 #****************************************************************# 3 # ScriptName: k3sinit.sh 4 # Author: xhy 5 # Create Date: 2020-05-13 18:56 6 # Modify Author: xhy 7 # Modify Date: 2020-05-13 18:56 8 # Version: 9 #***************************************************************# 10 # Initialize the machine. This needs to be executed on every machine. 11 12 # Disable the SELinux. 13 sed -i 's/^SELINUX=.*/SELINUX=disabled/' /etc/selinux/config 14 15 # Turn off and disable the firewalld. 16 systemctl stop firewalld 17 systemctl disable firewalld 18 19 # Modify related kernel parameters & Disable the swap. 20 cat > /etc/sysctl.d/k3s.conf << EOF 21 net.ipv4.ip_forward = 1 22 net.bridge.bridge-nf-call-ip6tables = 1 23 net.bridge.bridge-nf-call-iptables = 1 24 net.ipv4.tcp_tw_recycle = 0 25 vm.swappiness = 0 26 vm.overcommit_memory = 1 27 vm.panic_on_oom = 0 28 net.ipv6.conf.all.disable_ipv6 = 1 29 EOF 30 sysctl -p /etc/sysctl.d/k8s.conf >&/dev/null 31 swapoff -a 32 sed -i '/ swap / s/^\(.*\)$/#\1/g' /etc/fstab 33 modprobe br_netfilter 34 35 # Add ipvs modules 36 cat > /etc/sysconfig/modules/ipvs.modules <<EOF 37 #!/bin/bash 38 modprobe -- ip_vs 39 modprobe -- ip_vs_rr 40 modprobe -- ip_vs_wrr 41 modprobe -- ip_vs_sh 42 modprobe -- nf_conntrack_ipv4 43 EOF 44 chmod 755 /etc/sysconfig/modules/ipvs.modules 45 bash /etc/sysconfig/modules/ipvs.modules 46 47 # Install rpm 48 yum install -y conntrack ntpdate ntp ipvsadm ipset jq iptables curl sysstat libseccomp wget
3.3 配置免秘鑰
  1 [root@master01 ~]# cat > etc/hosts << EOF
  2 172.24.12.11 master01
  3 172.24.12.12 master02
  4 172.24.12.13 master03
  5 172.24.12.21 worker01
  6 172.24.12.22 worker02
  7 172.24.12.23 worker03
  8 EOF
為了更方便遠程分發文件和執行命令,本實驗配置master節點到其它節點的 ssh 信任關係。
  1 [root@master01 ~]# source /root/environment.sh
  2 [root@master01 ~]# for all_ip in ${ALL_IPS[@]}
  3 do
  4 echo ">>> ${all_ip}"
  5 ssh-copy-id -i ~/.ssh/id_rsa.pub root@${all_ip}
  6 scp /etc/hosts root@${all_ip}:/etc/hosts
  7 scp environment.sh root@${all_ip}:/root/
  8 scp k3sinit.sh root@${all_ip}:/root/
  9 ssh root@${all_ip} "chmod +x /root/environment.sh"
 10 ssh root@${all_ip} "chmod +x /root/k3sinit.sh"
 11 ssh root@${all_ip} "bash /root/k3sinit.sh &"
 12 done
提示:此操作僅需要在master01節點操作。
四 自定義證書
4.1 安裝cfssl
  1 [root@master01 ~]# curl -L https://pkg.cfssl.org/R1.2/cfssl_linux-amd64 -o /usr/local/bin/cfssl		#下載cfssl軟體
  2 [root@master01 ~]# chmod u+x /usr/local/bin/cfssl
  3 [root@master01 ~]# curl -L https://pkg.cfssl.org/R1.2/cfssljson_linux-amd64 -o /usr/local/bin/cfssljson	#下載json模板
  4 [root@master01 ~]# chmod u+x /usr/local/bin/cfssljson
  5 [root@master01 ~]# curl -L https://pkg.cfssl.org/R1.2/cfssl-certinfo_linux-amd64 -o /usr/local/bin/cfssl-certinfo
  6 [root@master01 ~]# chmod u+x /usr/local/bin/cfssl-certinfo
  7 [root@master01 ~]# mkdir /opt/k3s/work
  8 [root@master01 ~]# cd /opt/k3s/work
  9 [root@master01 cert]# cfssl print-defaults config > config.json
 10 [root@master01 cert]# cfssl print-defaults csr > csr.json	#創建模版配置json文件
4.2 創建根證書
  1 [root@master01 ~]# cd /opt/k3s/work
  2 [root@master01 work]# cp config.json ca-config.json		#複製一份作為CA的配置文件
  3 [root@master01 work]# cat > ca-config.json <<EOF
  4 {
  5     "signing": {
  6         "default": {
  7             "expiry": "168h"
  8         },
  9         "profiles": {
 10             "kubernetes": {
 11                 "expiry": "87600h",
 12                 "usages": [
 13                     "signing",
 14                     "key encipherment",
 15                     "server auth",
 16                     "client auth"
 17                 ]
 18             }
 19         }
 20     }
 21 }
 22 EOF
欄位解釋: config.json:可以定義多個profiles,分別指定不同的過期時間、使用場景等參數;後續在簽名證書時使用某個profile;
- signing: 表示該證書可用於簽名其它證書;生成的ca.pem 證書中CA=TRUE;
- server auth: 表示client 可以用該CA 對server 提供的證書進行校驗;
- client auth: 表示server 可以用該CA 對client 提供的證書進行驗證。
  1 [root@master01 work]# cp csr.json ca-csr.json	#複製一份作為CA的證書簽名請求文件
  2 [root@master01 work]# cat > ca-csr.json <<EOF
  3 {
  4     "CN": "kubernetes",
  5     "key": {
  6         "algo": "rsa",
  7         "size": 2048
  8     },
  9     "names": [
 10         {
 11             "C": "CN",
 12             "ST": "Shanghai",
 13             "L": "Shanghai",
 14             "O": "k3s",
 15             "OU": "System"
 16         }
 17     ]
 18 }
 19 EOF
欄位解釋:
- CN: Common Name,kube-apiserver 從證書中提取該欄位作為請求的用戶名(User Name);瀏覽器使用該欄位驗證網站是否合法;
- C:country;
- ST:state;
- L:city;
- O: Organization,kube-apiserver 從證書中提取該欄位作為請求用戶所屬的組(Group);
- OU:organization unit。
4.3 分髮根證書
  1 [root@master01 ~]# cd /opt/k3s/work
  2 [root@master01 work]# source /root/environment.sh
  3 [root@master01 work]# for all_ip in ${ALL_IPS[@]}
  4   do
  5     echo ">>> ${all_ip}"
  6     ssh root@${all_ip} "mkdir -p /etc/kubernetes/cert"
  7     scp ca*.pem ca-config.json root@${all_ip}:/etc/kubernetes/cert
  8   done
五 安裝ETCD
5.1 安裝ETCD
  1 [root@master01 ~]# wget https://github.com/coreos/etcd/releases/download/v3.4.7/etcd-v3.4.7-linux-amd64.tar.gz
  2 [root@master01 ~]# tar -xvf etcd-v3.4.7-linux-amd64.tar.gz
5.2 分發ETCD
  1 [root@master01 ~]# for master_ip in ${MASTER_IPS[@]}
  2   do
  3     echo ">>> ${master_ip}"
  4     scp etcd-v3.4.7-linux-amd64/etcd* root@${master_ip}:/usr/local/bin
  5     ssh root@${master_ip} "chmod +x /usr/local/bin/*"
  6     ssh root@${master_ip} "mkdir -p /data/k3s/etcd/data"
  7     ssh root@${master_ip} "mkdir -p /data/k3s/etcd/wal"
  8   done
5.3 創建etcd證書和密鑰
  1 [root@master01 ~]# cd /opt/k3s/work
  2 [root@master01 cert]# cat > etcd-csr.json <<EOF
  3 {
  4     "CN": "etcd",
  5     "hosts": [
  6         "127.0.0.1",
  7         "localhost",
  8         "172.24.12.11",
  9         "172.24.12.12",
 10         "172.24.12.13"
 11     ],
 12     "key": {
 13         "algo": "rsa",
 14         "size": 2048
 15     },
 16     "names": [
 17         {
 18             "C": "CN",
 19             "ST": "Shanghai",
 20             "L": "Shanghai",
 21             "O": "k3s",
 22             "OU": "System"
 23         }
 24     ]
 25 }
 26 EOF
 27 #創建etcd的CA證書請求文件
解釋: hosts 欄位指定授權使用該證書的 etcd 節點 IP 或功能變數名稱列表,需要將 etcd 集群的三個節點 IP 都列在其中。
  1 [root@master01 ~]# cd /opt/k3s/work
  2 [root@master01 work]# cfssl gencert -ca=/opt/k3s/work/ca.pem \
  3 -ca-key=/opt/k3s/work/ca-key.pem -config=/opt/k3s/work/ca-config.json \
  4 -profile=kubernetes etcd-csr.json | cfssljson -bare etcd	#生成CA密鑰(ca-key.pem)和證書(ca.pem)
5.4 分發證書和私鑰
  1 [root@master01 ~]# cd /opt/k3s/work
  2 [root@master01 work]# source /root/environment.sh
  3 [root@master01 work]# for master_ip in ${MASTER_IPS[@]}
  4   do
  5     echo ">>> ${master_ip}"
  6     ssh root@${master_ip} "mkdir -p /etc/etcd/cert"
  7     scp etcd*.pem root@${master_ip}:/etc/etcd/cert/
  8   done
5.5 創建etcd的systemd
  1 [root@master01 ~]# cd /opt/k3s/work
  2 [root@master01 work]# source /root/environment.sh
  3 [root@master01 work]# cat > etcd.service.template <<EOF
  4 [Unit]
  5 Description=Etcd Server
  6 After=network.target
  7 After=network-online.target
  8 Wants=network-online.target
  9 Documentation=https://github.com/coreos
 10
 11 [Service]
 12 Type=notify
 13 WorkingDirectory=${ETCD_DATA_DIR}
 14 ExecStart=/usr/local/bin/etcd \\
 15   --data-dir=${ETCD_DATA_DIR} \\
 16   --wal-dir=${ETCD_WAL_DIR} \\
 17   --name=##MASTER_NAME## \\
 18   --cert-file=/etc/etcd/cert/etcd.pem \\
 19   --key-file=/etc/etcd/cert/etcd-key.pem \\
 20   --trusted-ca-file=/etc/kubernetes/cert/ca.pem \\
 21   --peer-cert-file=/etc/etcd/cert/etcd.pem \\
 22   --peer-key-file=/etc/etcd/cert/etcd-key.pem \\
 23   --peer-trusted-ca-file=/etc/kubernetes/cert/ca.pem \\
 24   --peer-client-cert-auth \\
 25   --client-cert-auth \\
 26   --listen-peer-urls=https://##MASTER_IP##:2380 \\
 27   --initial-advertise-peer-urls=https://##MASTER_IP##:2380 \\
 28   --listen-client-urls=https://##MASTER_IP##:2379,http://127.0.0.1:2379 \\
 29   --advertise-client-urls=https://##MASTER_IP##:2379 \\
 30   --initial-cluster-token=etcd-cluster-0 \\
 31   --initial-cluster=${ETCD_NODES} \\
 32   --initial-cluster-state=new \\
 33   --auto-compaction-mode=periodic \\
 34   --auto-compaction-retention=1 \\
 35   --max-request-bytes=33554432 \\
 36   --quota-backend-bytes=6442450944 \\
 37   --heartbeat-interval=250 \\
 38   --election-timeout=2000
 39 Restart=on-failure
 40 RestartSec=5


