
今天我們來畫折線圖 效果圖 以下為模擬數據 首先創建filterData方法 用於過濾數據 text文本 line線段 area圓 tag暫時用不到 今天說的是折線所以創建zrLine 方法 我們在新增一個文件夾創建utli.js這個文件夾的作用為我們把創建線創建圓的公共方法寫在這個js文件里 ut ...
今天我們來畫折線圖 效果圖

以下為模擬數據
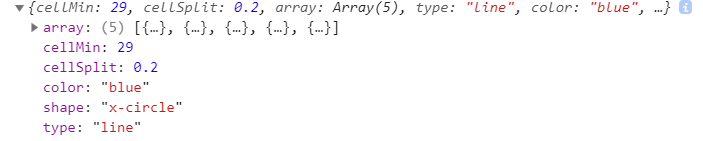
[{"time":19,"text":"入\n院\n19\n時\n11\n分","position":42,"cellMin":29.0,"cellSplit":0.2,"type":"text","color":"red","shape":null},{"time":22,"text":"手\n術","position":42,"cellMin":29.0,"cellSplit":0.2,"type":"text","color":"red","shape":null},{"time":129,"text":"手\n術","position":42,"cellMin":29.0,"cellSplit":0.2,"type":"text","color":"red","shape":null},{"cellMin":29.0,"cellSplit":0.2,"y":30.0,"type":"baseline","color":"#000","shape":null},{"cellMin":29.0,"cellSplit":0.2,"y":31.0,"type":"baseline","color":"#000","shape":null},{"cellMin":29.0,"cellSplit":0.2,"y":32.0,"type":"baseline","color":"#000","shape":null},{"cellMin":29.0,"cellSplit":0.2,"y":33.0,"type":"baseline","color":"#000","shape":null},{"cellMin":29.0,"cellSplit":0.2,"y":34.0,"type":"baseline","color":"#000","shape":null},{"cellMin":29.0,"cellSplit":0.2,"y":35.0,"type":"baseline","color":"#000","shape":null},{"cellMin":29.0,"cellSplit":0.2,"y":36.0,"type":"baseline","color":"#000","shape":null},{"cellMin":29.0,"cellSplit":0.2,"y":37.0,"type":"baseline","color":"#000","shape":null},{"cellMin":29.0,"cellSplit":0.2,"y":38.0,"type":"baseline","color":"#000","shape":null},{"cellMin":28.0,"cellSplit":0.2,"y":39.0,"type":"baseline","color":"red","shape":null},{"cellMin":29.0,"cellSplit":0.2,"y":40.0,"type":"baseline","color":"#000","shape":null},{"cellMin":29.0,"cellSplit":0.2,"y":41.0,"type":"baseline","color":"#000","shape":null},{"cellMin":29.0,"cellSplit":0.2,"y":42.0,"type":"baseline","color":"#000","shape":null},{"cellMin":29.0,"cellSplit":0.2,"array":[{"time":19,"tips":"體溫37.1","value":"37.1","shape":"x","Break":"false","type":"temperature","extraArr":[],"others":[]},{"time":21,"tips":"體溫36.9","value":"36.9","shape":"x","Break":"false","type":"temperature","extraArr":[],"others":[]},{"time":30,"tips":"體溫36.5","value":"36.5","shape":"x","Break":"false","type":"temperature","extraArr":[],"others":[]},{"time":38,"tips":"體溫36.6","value":"36.6","shape":"x","Break":"false","type":"temperature","extraArr":[],"others":[]},{"time":54,"tips":"體溫36.7","value":"36.7","shape":"x","Break":"false","type":"temperature","extraArr":[],"others":[]}],"type":"line","color":"blue","shape":"x-circle"},{"cellMin":-10.0,"cellSplit":2.0,"array":[{"time":19,"shape":"empty-circle","tips":"呼吸20","value":"20","Break":"false"},{"time":21,"shape":"empty-circle","tips":"呼吸20","value":"20","Break":"false"},{"time":30,"shape":"empty-circle","tips":"呼吸19","value":"19","Break":"false"},{"time":38,"shape":"empty-circle","tips":"呼吸18","value":"18","Break":"false"},{"time":54,"shape":"empty-circle","tips":"呼吸19","value":"19","Break":"false"}],"type":"line","color":"black","shape":"empty-circle"},{"cellMin":-2.0,"cellSplit":1.0,"array":[{"time":19,"tips":"疼痛7","value":"7","Break":"false","type":"pain","extraArr":[{"extra":"3","extraColor":"red","extraTips":"疼痛評價3"}],"others":[]},{"time":23,"tips":"疼痛3","value":"3","Break":"false","type":"pain","extraArr":[],"others":[]},{"time":27,"tips":"疼痛3","value":"3","Break":"false","type":"pain","extraArr":[],"others":[]},{"time":33,"tips":"疼痛3","value":"3","Break":"false","type":"pain","extraArr":[],"others":[]},{"time":39,"tips":"疼痛3","value":"3","Break":"false","type":"pain","extraArr":[{"extra":"3","extraColor":"red","extraTips":"疼痛評價3"}],"others":[]},{"time":44,"tips":"疼痛3","value":"3","Break":"false","type":"pain","extraArr":[],"others":[]},{"time":51,"tips":"疼痛3","value":"3","Break":"false","type":"pain","extraArr":[],"others":[]},{"time":58,"tips":"疼痛3","value":"3","Break":"false","type":"pain","extraArr":[{"extra":"3","extraColor":"red","extraTips":"疼痛評價3"}],"others":[]}],"type":"line","color":"red","shape":"empty-circle"},{"bgColor":"rgba(255,0,0,0.7)","cellMin":30.0,"cellSplit":2.0,"array":[{"time":19,"v1":69,"v1Tips":"心率69","v2":69,"v2Tips":"脈搏69","Break":"false"},{"time":21,"v1":70,"v1Tips":"心率70","v2":70,"v2Tips":"脈搏70","Break":"false"},{"time":30,"v1":83,"v1Tips":"心率83","v2":83,"v2Tips":"脈搏83","Break":"false"},{"time":38,"v1":78,"v1Tips":"心率78","v2":78,"v2Tips":"脈搏78","Break":"false"},{"time":54,"v1":77,"v1Tips":"心率77","v2":77,"v2Tips":"脈搏77","Break":"false"}],"type":"area","color":"red","shape":null},{"text":null,"y":"28","cellMin":-10.0,"cellSplit":2.0,"array":[],"type":"tag","color":"black","shape":null},{"text":null,"y":null,"cellMin":30.0,"cellSplit":2.0,"array":[],"type":"tag","color":"black","shape":null}]
首先創建filterData方法 用於過濾數據 text文本 line線段 area圓 tag暫時用不到 今天說的是折線所以創建zrLine 方法
filterData(){
      const data = chartData

      data.forEach(el => {
        switch (el.type) {
          case "text":
            // this.zrText(el)
            break;
          case "line":
            this.zrLine(el)
            break;
          case "area":
            this.zrPolyline(el)
            break;
          case "tag":
            this.zrTag(el)
            break;

          default:
            break;
        }
        });
    }
我們在新增一個文件夾創建utli.js這個文件夾的作用為我們把創建線創建圓的公共方法寫在這個js文件里
utli.js 我們先說 createLine createCircle
createLine 需要傳5個參數分別為開始點的橫縱坐標 結束點的橫縱坐標 還有線的樣式
createCircle 需要傳4個參數分別為 圓點的橫縱坐標 圓的半徑 和樣式
addHover 也需要 這時我們需要在init 方法里添加一段代碼(上一章創建的初始化方法) 這段代碼為創建一個div到時我們滑鼠移到圓上會彈出文本信息的時候回用到


var div = document.createElement("div")
      div.classList.add("tips")
      document.getElementById("main").append(div)
View Code
utli.js
//線段
export const createLine = (x1,y1,x2,y2,style)=>{
    return new zrender.Line({
        shape:{
            x1:x1,
            y1:y1,
            x2:x2,
            y2:y2
        },
        style:style,
    });
};
// cx 橫坐標 cy縱坐標 r半徑 空心圓
export const createCircle = (cx,cy,r,style)=>{
    return new zrender.Circle({
        shape:{
            cx:cx,
            cy:cy,
            r:r
        },
        style:style,
        zlevel:4
    })
}
//添加horver事件 el 元素對象 config 一些配置項 x x軸坐標 y y軸坐標 shapeOn滑鼠移入一些屬性配置 shapeOn滑鼠移出一些屬性配置 shape配置項看官網
export const addHover = (el,config,x,y,shapeOn,shapeOut) => {
    const domTips = document.getElementsByClassName("tips")
    el.on('mouseover',function(){
        domTips[0].innerHTML = config.tips
        domTips[0].setAttribute("style",`position:absolute;top:${y-13}px;left:${x}px;display:block;font-size:10px;background-color:rgba(0,0,0,.7);padding:3px;border-radius:3px;color:#fff`)
        el.animateTo({
            shape:shapeOn
        },100,0)
    }).on('mouseout',function () {
        domTips[0].setAttribute("style",`display:none`)
        el.animateTo({
            shape:shapeOut
          },100,0)
    })
}
//多邊形
export const createPolygon = (points,style) => {
    return new zrender.Polyline({
        shape:{
            points:points,
        },
        style:style
    })
}
zrLine方法里的第一段代碼 判斷這個折線拐點是需要空心圓還是實心圓還是其他的形狀 都通過shape決定 color為圓的邊框顏色填充色為白色 先定義一個style變數到時好實現自定義
   var style = {}
      switch (data.shape) {
        case "x-circle":
          style = {
            stroke:data.color,
            fill:"#fff",
            text:"x",
          }
          break;
        case "empty-circle":
          style = {
            stroke:data.color,
            fill:"#fff",
            text:"",
          }
          break;

        default:
          break;
      }
這裡需要在添加2個方法
getX
//獲取X坐標 data當前時間點
    getX(data){
      let XShareOne = this.XShareOne()
      return data * XShareOne
    },
View Code transformY
//轉換y軸坐標點為正確坐標點 因為y軸坐標是頂點為0遞增的 所有用總高度減去原來坐標的高度剩下的高度就是正確坐標點
    //i代表一個格子代表幾個高度
    transformY(data,i){
      let YHeight = this.YShareOne()

      //計算出剩餘高度
      let surplusHeight = this.canavsHeight - (YHeight/i) * data
      return surplusHeight
    },
這段代碼意思是先把數據遍歷出來 在通過time屬性計算出x坐標 value值計算出y坐標 x軸左邊基本是以time為基本來計算的 y軸坐標可能會隨數據變化而有所改變 Break屬性為是否斷線 如果需要斷線就位true
      data.array.forEach((el,i) =>{
        if (i > 0) {
          let XShareOne = this.XShareOne()

          let firstX = this.getX(data.array[i-1].time)
          let firstY = this.transformY(data.array[i-1].value,1)
          let x = this.getX(data.array[i].time)
          let y = this.transformY(data.array[i].value,1)

          if (data.array[i-1].Break == "false") {
            let line = createLine(firstX,firstY,x,y,{
                stroke:"#af2377",
                lineWidth:2,
            })
            this.zr.add(line)
          }
        }

        if (el.extraArr && el.extraArr.length > 0) {
            el.extraArr.forEach((item,a) => {
              let x = this.getX(el.time)
              let y = this.transformY(el.value,1)

              let lastY =  this.transformY(item.extra,1)
              let dottedLine = createLine(x,y,x,lastY,{
                  stroke:"#af2377",
                  lineWidth:2,
                  lineDash:[2,2]
              })
              this.zr.add(dottedLine)

              el.extraArr.forEach((item,a) => {
                let getY = this.transformY(item.extra,1)

                let Circle = createCircle(x,getY,5,{
                  stroke:item.extraColor,
                  fill:"#fff",
                })
                this.zr.add(Circle)
                addHover(Circle,{
                    tips:item.extraTips,
                },x,getY,{
                    r:8,
                  },{
                    r:5,
                })
              })
            })
         }
        let getX = this.getX(el.time)
        let getY = this.transformY(el.value,1)

        let Circle = createCircle(getX,getY,5,style)
        this.zr.add(Circle)
        addHover(Circle,el,getX,getY,{
            r:8,
          },{
             r:5,
        })
      })
這步完成折線圖應該就畫好了
下次我們講陰影的畫法 
https://gitee.com/hpr/Temperature.git git地址


