vsftpd文件傳輸協議 系統環境:CentOS Linux release 7.6.1810 (Core) 一、簡介 FTP(文件傳輸協議)全稱是:Very Secure FTP Server。 Vsftpd是linux類操作系統上運行的ftp伺服器軟體。 vsftp提供三種登陸方式:1.匿名登錄 ...
vsftpd文件傳輸協議
系統環境:CentOS Linux release 7.6.1810 (Core)
一、簡介
FTP(文件傳輸協議)全稱是:Very Secure FTP Server。 Vsftpd是linux類操作系統上運行的ftp伺服器軟體。
vsftp提供三種登陸方式:1.匿名登錄 2.本地用戶登錄 3.虛擬用戶登錄
vsftpd的特點:
1)較高的安全性需求
2)帶寬的限制
3)創建支持虛擬用戶
4)支持IPV6
5)中等偏上的性能
6)可分配虛擬IP
7)高速
Ftp會話時採用了兩種通道:
1)控制通道:與Ftp伺服器進行溝通的通道,鏈接Ftp發送ftp指令都是通過控制通道來完成的。
2)數據通道:數據通道和Ftp伺服器進行文件傳輸或則列表的通道
二、工作原理
Ftp協議中控制連接均是由客戶端發起,而數據連接有兩種工作方式:Port和Pasv方式
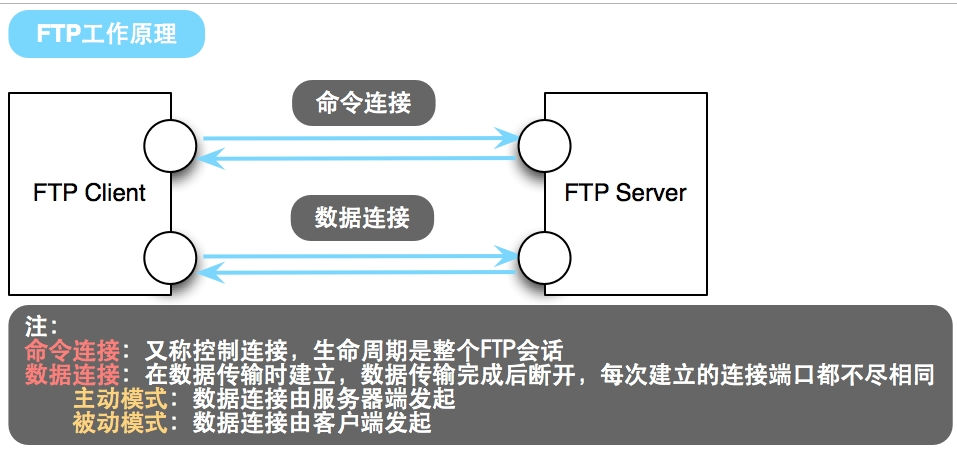
Port模式(主動模式)--> 預設
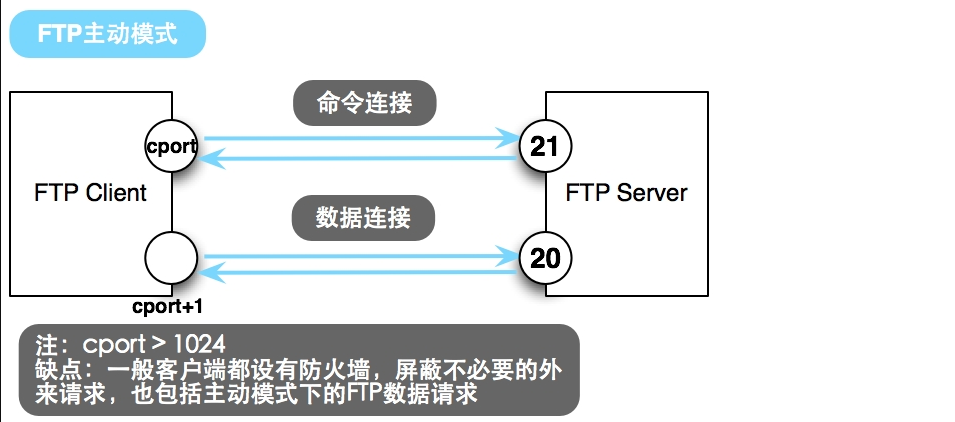
Ftp客戶端首先和Ftp server的tcp 21埠建立連接,通過這個通道發送命令,客戶端要接受數據的時候在這個通道上發送Port命令,Port命令包含了客戶端用什麼埠(一個大於1024的埠)接受數據,在傳送數據的時候,伺服器端通過自己的TCP 20埠發送數據。這個時候數據連接由server向client建立一個連接。
Port交互流程:
client端:client鏈接server的21埠,併發送用戶名密碼和一個隨機在1024上的埠及port命令給server,表明採用主動模式,並開放那個隨機的埠。
server端:server收到client發來的Port主動模式命令與埠後,會通過自己的20埠與client那個隨機的埠連接後,進行數據傳輸。
Pasv模式(被動方式)
建立控制通道和Port模式類似,當客戶端通過這個通道發送Pasv命令的時候,Ftp server打開了一個位於1024和5000之間的隨機埠並且通知客戶端在這個埠上進行傳輸數據請求,然後Ftp server將通過這個埠進行數據傳輸。這個時候數據連接由client向server建立連接。
Pasv交互流程
Clietn:client連接server的21號埠,發送用戶名密碼及pasv命令給server,表明採用被動模式。
server:server收到client發來的pasv被動模式命令之後,把隨機開放在1024上的埠告訴client,client再用自己的20 埠與server的那個隨機埠進行連接後進行數據傳輸。

如果從C/S模型這個角度來說,PORT對於伺服器來說是OUTBOUND,而PASV模式對於伺服器是INBOUND,這一點請特別註意,尤其是在使用防火牆的企業里,這一點非常關鍵,如果設置錯了,那麼客戶將無法連接。
三、安裝vsfpd
1.安裝vsftpd相關組件
[root@VM_0_10_centos shellScript]# yum -y install vsftpd*
2.安裝PAM服務相關組件
[root@VM_0_10_centos shellScript]# yum -y install pam*
安裝pam報錯:
--> Finished Dependency Resolution
Error: Package: 2:postfix-2.10.1-7.el7.x86_64 (@anaconda)
           Requires: libmysqlclient.so.18(libmysqlclient_18)(64bit)
Error: Package: libmapi-7.1.14-3.el7.x86_64 (epel)
           Requires: libmysqlclient.so.18(libmysqlclient_18)(64bit)
Error: Package: libmapi-7.1.14-3.el7.x86_64 (epel)
           Requires: libmysqlclient.so.18()(64bit)
Error: Package: 2:postfix-2.10.1-7.el7.x86_64 (@anaconda)
           Requires: libmysqlclient.so.18()(64bit)
 You could try using --skip-broken to work around the problem
** Found 2 pre-existing rpmdb problem(s), 'yum check' output follows:
2:postfix-2.10.1-7.el7.x86_64 has missing requires of libmysqlclient.so.18()(64bit)
2:postfix-2.10.1-7.el7.x86_64 has missing requires of libmysqlclient.so.18(libmysqlclient_18)(64bit)
解決:
缺少Percona-XtraDB-Cluster-shared-55-5.5.37-25.10.756.el6.x86_64.rpm這個包
[root@VM_0_10_centos tmp]# wget http://www.percona.com/redir/downloads/Percona-XtraDB-Cluster/5.5.37-25.10/RPM/rhel6/x86_64
/Percona-XtraDB-Cluster-shared-55-5.5.37-25.10.756.el6.x86_64.rpm
[root@VM_0_10_centos tmp]# rpm -ivh Percona-XtraDB-Cluster-shared-55-5.5.37-25.10.756.el6.x86_64.rpm
warning: Percona-XtraDB-Cluster-shared-55-5.5.37-25.10.756.el6.x86_64.rpm: Header V4 DSA/SHA1 Signature, key ID cd2efd2a: N
OKEYPreparing...                          ################################# [100%]
Updating / installing...
   1:Percona-XtraDB-Cluster-shared-55-################################# [100%]
參考網址:https://blog.csdn.net/debimeng/article/details/78143071
最後再運行安裝pam即可
# yum -y install pam*
3.安裝DB4部件包
用來支持文件資料庫
[root@VM_0_10_centos tmp]# yum -y install db4*
四、系統賬戶
1.建立Vsftpd服務的宿主用戶
預設的Vsftpd的服務宿主用戶是root,但不符合安全性的需要。這裡建立名字為vsftpd的用戶,用他來作為支持Vsftpd的服務宿主用戶。由於該用戶僅用來支持Vsftpd服務用,因此沒有許可他登陸系統的必要,並設定他為不能登陸系統的用戶。
nologin參考網址:https://blog.csdn.net/danson_yang/article/details/65629948
[root@VM_0_10_centos tmp]# useradd vsftpd -s /sbin/nologin
/sbin/nologin更改用戶是否可以使用ssh登錄
2.建立Vsftpd虛擬宿主用戶
[root@VM_0_10_centos tmp]# useradd vrvsftpd -s /sbin/nologin
虛擬用戶並不是系統用戶,也就是說這些FTP的用戶在系統中是不存在的。他們的總體許可權其實是集中寄托在一個在系統中的某一個用戶身上的,所謂Vsftpd的虛擬宿主用戶,就是這樣一個支持著所有虛擬用戶的宿主用戶。由於他支撐了FTP的所有虛擬的用戶,那麼他本身的許可權將會影響著這些虛擬的用戶,因此,處於安全性的考慮,也要非分註意對該用戶的許可權的控制,該用戶也絕對沒有登陸系統的必要,這裡也設定他為不能登陸系統的用戶。
五、修改vsftpd配置文件
1.編輯配置文件前先備份
[root@VM_0_10_centos tmp]# cp /etc/vsftpd/vsftpd.conf /etc/vsftpd/vsftpd.conf.backup
內容如下:
[root@VM_0_10_centos tmp]# cat /etc/vsftpd/vsftpd.conf

# Allow anonymous FTP? (Beware - allowed by default if you comment this out).
# anonymous_enable=YES
# 設置不允許匿名訪問
anonymous_enable=NO

#
# Uncomment this to allow local users to log in.
# When SELinux is enforcing check for SE bool ftp_home_dir
# 設置本地用戶可以訪問。PS:主要為虛擬宿主用戶,如該項目設定為No,那麼所有虛擬用戶將無法訪問
 local_enable=YES

#
# Uncomment this to enable any form of FTP write command.
# 設置可進行寫操作
write_enable=YES

#
# Default umask for local users is 077. You may wish to change this to 022,
# if your users expect that (022 is used by most other ftpd's)
# 設置上傳後文件的許可權掩碼
local_umask=022

#
# Uncomment this to allow the anonymous FTP user to upload files. This only
# has an effect if the above global write enable is activated. Also, you will
# obviously need to create a directory writable by the FTP user.
# When SELinux is enforcing check for SE bool allow_ftpd_anon_write, allow_ftpd_full_access
#anon_upload_enable=YES
# 禁止匿名用戶上傳文件
anonymous_enable=NO

#
# Uncomment this if you want the anonymous FTP user to be able to create
# new directories.
#anon_mkdir_write_enable=YES
# 禁止匿名用戶建立目錄
anon_mkdir_write_enable=NO

#
# Activate directory messages - messages given to remote users when they
# go into a certain directory.
# 設置開啟目錄標語功能
dirmessage_enable=YES

#
# Activate logging of uploads/downloads.
# 開啟日誌記錄功能
xferlog_enable=YES

#
# Make sure PORT transfer connections originate from port 20 (ftp-data).
# 設置埠20進行資料庫連接
connect_from_port_20=YES

#
# If you want, you can arrange for uploaded anonymous files to be owned by
# a different user. Note! Using "root" for uploaded files is not
# recommended!
#chown_uploads=YES
#chown_username=whoever
# 設置禁止上傳文件更改宿主
chown_uploads=NO

#
# You may override where the log file goes if you like. The default is shown
# below.
#xferlog_file=/var/log/xferlog
# 設置vsftpd服務日誌保存路徑。PS:該文件預設不存在,須手動創建。
# 由於這裡手動更改了vsftpd宿主用戶為vsftpd,須註意給與改用戶對日誌的寫入許可權
xferlog_file=/var/log/vsftpd.log

#
# If you want, you can have your log file in standard ftpd xferlog format.
# Note that the default log file location is /var/log/xferlog in this case.
# 設置日誌使用標準的記錄格式
xferlog_std_format=YES

#
# You may change the default value for timing out an idle session.
# 設置空閑連接超時時間,這裡使用預設。
# 將具體數值留給每個具體用戶具體指定,當然如果不指定的話,還是使用這裡的預設值600,單位秒
#idle_session_timeout=600

#
# You may change the default value for timing out a data connection.
# 設定單次最大連續傳輸時間,這裡使用預設。
# 將具體數值留給每個具體用戶具體指定,當然如果不指定的話,還是使用這裡的預設值120,單位秒。
#data_connection_timeout=120

#
# It is recommended that you define on your system a unique user which the
# ftp server can use as a totally isolated and unprivileged user.
#nopriv_user=ftpsecure
# 設定支撐Vsftpd服務的宿主用戶為手動建立的Vsftpd用戶。
# PS:一旦做出更改宿主用戶後,必須註意一起與該服務相關的讀寫文件的讀寫賦權問題。比如日誌文件就必須給與該用戶寫入許可權等。
nopriv_user=vsftpd

#
# Enable this and the server will recognise asynchronous ABOR requests. Not
# recommended for security (the code is non-trivial). Not enabling it,
# however, may confuse older FTP clients.
# 設置支持非同步傳輸功能
async_abor_enable=YES

#
# ASCII mangling is a horrible feature of the protocol.
# 設置支持ASCII模式上傳和下載功能
ascii_upload_enable=YES
ascii_download_enable=YES

#
# You may fully customise the login banner string:
#ftpd_banner=Welcome to blah FTP service.
# 設置vsftpd的登錄標語
ftpd_banner=This Vsftp server supports virtual users ^_^

#
# You may specify a file of disallowed anonymous e-mail addresses. Apparently
# useful for combatting certain DoS attacks.
#deny_email_enable=YES
# (default follows)
#banned_email_file=/etc/vsftpd/banned_emails
#
# You may specify an explicit list of local users to chroot() to their home
# directory. If chroot_local_user is YES, then this list becomes a list of
# users to NOT chroot().
# (Warning! chroot'ing can be very dangerous. If using chroot, make sure that
# the user does not have write access to the top level directory within the
# chroot)
#chroot_local_user=YES
#chroot_list_enable=YES
# 禁止用戶登出自己的ftp主目錄
chroot_list_enable=NO

# (default follows)
#chroot_list_file=/etc/vsftpd/chroot_list
#
# You may activate the "-R" option to the builtin ls. This is disabled by
# default to avoid remote users being able to cause excessive I/O on large
# sites. However, some broken FTP clients such as "ncftp" and "mirror" assume
# the presence of the "-R" option, so there is a strong case for enabling it.
#ls_recurse_enable=YES
# 禁止用戶登錄ftp後使用"ls -R"命令。該命令會對伺服器性能造成巨大開銷。如果該項被允許,那麼擋多用戶同時使用該命令時將會對該伺服器造成威脅。
ls_recurse_enable=NO

#
# When "listen" directive is enabled, vsftpd runs in standalone mode and
# listens on IPv4 sockets. This directive cannot be used in conjunction
# with the listen_ipv6 directive.
# listen=NO
# 設定該Vsftpd服務工作在StandAlone模式下。
# 順便展開說明一下,所謂StandAlone模式就是該服務擁有自己的守護進程支持,
# 在ps -A命令下我們將可用看到vsftpd的守護進程名。如果不想工作在StandAlone模式下,則可以選擇SuperDaemon模式,
# 在該模式下 vsftpd將沒有自己的守護進程,而是由超級守護進程Xinetd全權代理,與此同時,Vsftp服務的許多功能將得不到實現
listen=YES

#
# This directive enables listening on IPv6 sockets. By default, listening
# on the IPv6 "any" address (::) will accept connections from both IPv6
# and IPv4 clients. It is not necessary to listen on *both* IPv4 and IPv6
# sockets. If you want that (perhaps because you want to listen on specific
# addresses) then you must run two copies of vsftpd with two configuration
# files.
# Make sure, that one of the listen options is commented !!
# listen_ipv6=YES
# 設置pam服務下vsftpd的驗證配置文件名。因此,PAM驗證將參考/etc/pam.d/下的vsftpd文件配置
pam_service_name=vsftpd
# 設定userlist_file中的用戶將不得使用FTP。
userlist_enable=YES
# 設定支持TCP Wrappers。
tcp_wrappers=YES
# 以下這些是關於Vsftpd虛擬用戶支持的重要配置項目。預設Vsftpd.conf中不包含這些設定項目,需要自己手動添加配置。
# 設置啟用虛擬用戶功能
guest_enable=YES

# 指定虛擬用戶宿主用戶
guest_username=vrvsftpd

# 設定虛擬用戶的許可權符合他們的宿主用戶。
virtual_use_local_privs=YES

# 設定虛擬用戶個人Vsftp的配置文件存放路徑。
# 也就是說,這個被指定的目錄里,將存放每個Vsftp虛擬用戶個性的配置文件,一個需要註意的地方就是這些配置文件名必須和虛擬用戶名相同。
user_config_dir=/etc/vsftpd/vconf
3.建立Vsftpd的日誌文件,並更該屬主為Vsftpd的服務宿主用戶
[root@VM_0_10_centos tmp]# touch /var/log/vsftpd.log
[root@VM_0_10_centos tmp]# chown vsftpd.vsftpd /var/log/vsftpd.log
4.建立虛擬用戶配置文件存放路徑
[root@VM_0_10_centos tmp]# mkdir /etc/vsftpd/vconf
六、製作虛擬用戶資料庫文件
1.先建立虛擬用戶名單文件
建立了一個虛擬用戶名單文件,這個文件就是來記錄vsftpd虛擬用戶的用戶名和口令的數據文件,我這裡給它命名為virtusers。為了避免文件的混亂,我把這個名單文件就放置在/etc/vsftpd/下。
[root@VM_0_10_centos tmp]# touch /etc/vsftpd/virtusers
2.編輯虛擬用戶名單文件
格式為:“一行用戶名,一行口令”。
[root@VM_0_10_centos tmp]# cat /etc/vsftpd/virtusers
zs
設置的密碼
thy
設置的密碼
3.生成虛擬用戶數據文件
db_load主要用來生成db資料庫使用。在Vsftpd的虛擬用戶設置中先新建一個文件users.txt 把用戶名密碼放入其中
接著 db_load -T -t hash -f */users.txt */users.db
PS: * 表示目錄
這樣就生成了一個users.db文件(hash碼型的資料庫文件)
參考網址:http://blog.itpub.net/20943428/viewspace-661714/
[root@VM_0_10_centos tmp]# db_load -T -t hash -f /etc/vsftpd/virtusers /etc/vsftpd/virtusers.db
參數:
選項-T允許應用程式能夠將文本文件轉譯載入進資料庫。由於我們之後是將虛擬用戶的信息以文件方式存儲在文件里的,為了讓Vsftpd這個應用程式能夠通過文本來載入用戶數據,必須要使用這個選項。
子選項-t,追加在在-T選項後,用來指定轉譯載入的資料庫類型。擴展介紹下,-t可以指定的數據類型有Btree、Hash、Queue和Recon資料庫
PS:如果指定了選項-T,那麼一定要追跟子選項 -t
4.察看生成的虛擬用戶數據文件
[root@VM_0_10_centos tmp]# ll /etc/vsftpd/virtusers.db
-rw-r--r-- 1 root root 12288 Oct  9 11:02 /etc/vsftpd/virtusers.db
PS:以後再添加虛擬用戶的時候,只需要按照“一行用戶名,一行口令”的格式將新用戶名和口令添加進虛擬用戶名單文件。但是光這樣做還不夠,不會生效的哦!還要再執行一遍“ db_load -T -t hash -f 虛擬用戶名單文件 虛擬用戶資料庫文件.db ”的命令使其生效才可以!
七、設定PAM驗證文件,並指定虛擬用戶資料庫文件進行讀取
1.察看原來的Vsftp的PAM驗證配置文件
[root@VM_0_10_centos tmp]# cat /etc/pam.d/vsftpd
#%PAM-1.0
session    optional     pam_keyinit.so    force revoke
auth       required    pam_listfile.so item=user sense=deny file=/etc/vsftpd/ftpusers onerr=succeed
auth       required    pam_shells.so
auth       include    password-auth
account    include    password-auth
session    required     pam_loginuid.so
session    include    password-auth
2.在編輯前做好備份
[root@VM_0_10_centos tmp]# cp /etc/pam.d/vsftpd /etc/pam.d/vsftpd.backup
[root@VM_0_10_centos tmp]# vi /etc/pam.d/vsftpd
內容如下
[root@VM_0_10_centos tmp]# vi /etc/pam.d/vsftpd
#%PAM-1.0
session    optional     pam_keyinit.so    force revoke
# 以下兩條是手動添加的,內容是對虛擬用戶的安全和帳戶許可權進行驗證。
# 這裡的auth是指對用戶的用戶名口令進行驗證
auth    sufficient      /usr/lib64/security/pam_userdb.so     db=/etc/vsftpd/virtusers
# 這裡的accout是指對用戶的帳戶有哪些許可權哪些限制進行驗證。
# 其後的sufficient表示充分條件,也就是說,一旦在這裡通過了驗證,那麼也就不用經過下麵剩下的驗證步驟了。
# 相反,如果沒有通過的話,也不會被系統立即擋之門外,因為sufficient的失敗不決定整個驗證的失敗,意味著用戶還必須將經歷剩下來>的驗證審核。
account sufficient      /usr/lib64/security/pam_userdb.so     db=/etc/vsftpd/virtusers
# 後面的/lib/security/pam_userdb.so表示該條審核將調用pam_userdb.so這個庫函數進行。
# 最後的db=/etc/vsftpd/virtusers則指定了驗證庫函數將到這個指定的資料庫中調用數據進行驗證。
auth       required     pam_listfile.so item=user sense=deny file=/etc/vsftpd/ftpusers onerr=succeed
auth       required     pam_shells.so
auth       include      password-auth
account    include      password-auth
session    required     pam_loginuid.so
session    include      password-auth
八、虛擬用戶的配置
1.規劃好虛擬用戶的主路徑
[root@VM_0_10_centos tmp]# mkdir /opt/vsftpd
2.建立測試用戶的FTP用戶目錄
[root@VM_0_10_centos tmp]# mkdir /opt/vsftpd/{zs,thy}
[root@VM_0_10_centos tmp]# ls /opt/vsftpd/
thy  zs
3.建立虛擬用戶配置文件模版
[root@VM_0_10_centos tmp]# cp /etc/vsftpd/vsftpd.conf.backup /etc/vsftpd/vconf/vconf.tmp
4.定製虛擬用戶模版配置文件
[root@VM_0_10_centos tmp]# vi /etc/vsftpd/vconf/vconf.tmp
# 指定虛擬用戶的具體主路徑。
local_root=/opt/vsftpd/virtuser
# 設定不允許匿名用戶訪問。
anonymous_enable=NO
# 設定允許寫操作。
write_enable=YES
# 設定上傳文件許可權掩碼。
local_umask=022
# 設定不允許匿名用戶上傳。
anon_upload_enable=NO
# 設定不允許匿名用戶建立目錄。
anon_mkdir_write_enable=NO
# 設定空閑連接超時時間。
idle_session_timeout=600
# 設定單次連續傳輸最大時間。
data_connection_timeout=120
# 設定併發客戶端訪問個數。
max_clients=10
# 設定單個客戶端的最大線程數,這個配置主要來照顧Flashget、迅雷等多線程下載軟體。
max_per_ip=5
# 設定該用戶的最大傳輸速率,單位b/s。
local_max_rate=50000
這裡將原vsftpd.conf配置文件經過簡化後保存作為虛擬用戶配置文件的模版。將並不需要指定太多的配置內容,主要的框架和限制交由 Vsftpd的主配置文件vsftpd.conf來定義,即虛擬用戶配置文件當中沒有提到的配置項目將參考主配置文件中的設定。而在這裡作為虛擬用戶的配置文件模版只需要留一些和用戶流量控制,訪問方式控制的配置項目就可以了。這裡的關鍵項是local_root這個配置,用來指定這個虛擬用戶的FTP主路徑。
5.更改虛擬用戶的主目錄的屬主為虛擬宿主用戶:
[root@VM_0_10_centos tmp]# chown -R vrvsftpd.vrvsftpd /opt/vsftpd/
[root@VM_0_10_centos tmp]# ll /opt/vsftpd/
total 8
drwxr-xr-x 2 vrvsftpd vrvsftpd 4096 Oct  9 11:24 thy
drwxr-xr-x 2 vrvsftpd vrvsftpd 4096 Oct  9 11:24 zs
九、給測試用戶定製
1.從虛擬用戶模版配置文件複製
[root@VM_0_10_centos tmp]# cp /etc/vsftpd/vconf/vconf.tmp /etc/vsftpd/vconf/thy
2.針對具體用戶進行定製
[root@VM_0_10_centos tmp]# vi /etc/vsftpd/vconf/thy
# 指定虛擬用戶的具體主路徑。
local_root=/opt/vsftpd/thy
# 設定不允許匿名用戶訪問。
anonymous_enable=NO
# 設定允許寫操作。
write_enable=YES
# 設定上傳文件許可權掩碼。
local_umask=022
# 設定不允許匿名用戶上傳。
anon_upload_enable=NO
# 設定不允許匿名用戶建立目錄。
anon_mkdir_write_enable=NO
# 設定空閑連接超時時間。
idle_session_timeout=300
# 設定單次連續傳輸最大時間。
data_connection_timeout=90
# 設定併發客戶端訪問個數。
max_clients=1
# 設定單個客戶端的最大線程數,這個配置主要來照顧Flashget、迅雷等多線程下載軟體。
max_per_ip=1
# 設定該用戶的最大傳輸速率,單位b/s。
local_max_rate=25000
十、啟動服務
[root@VM_0_10_centos tmp]# systemctl restart vsftpd
[root@VM_0_10_centos tmp]# systemctl status vsftpd
十一、測試
1.在虛擬用戶目錄中預先放入文件
[root@VM_0_10_centos tmp]# touch /opt/vsftpd/thy/thy.test
2.從其他機器作為客戶端登陸FTP
前提這台機器安裝了ftp服務,能使用ftp命令
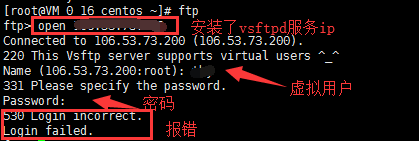
解決:
可能是pam問題,上面配置vsftpd.conf配置文件時,沒有開啟pam的驗證,將pam驗證開啟即可

參考網址:https://blog.csdn.net/junjunjiao/article/details/50738009
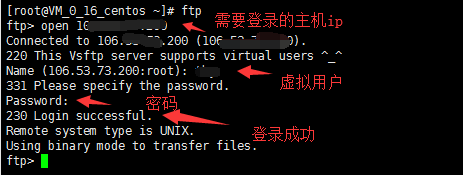
測試登錄:
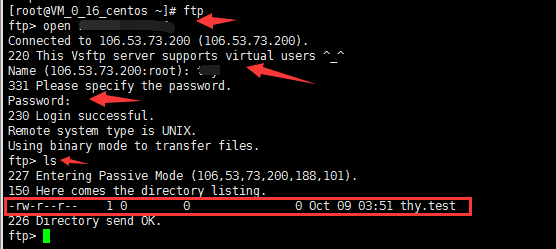
3.測試列單操作

解決:
將主動改為被動,然後重新登錄ftp
ftp> passive
Passive mode on.
參考網址:https://blog.csdn.net/indexman/article/details/42649329
4.測試上傳操作
參數使用格式參考網址:https://www.jb51.net/article/124033.htm
首先現在客戶端伺服器上當前目錄創建hello.txt文件,登錄ftp,測試上傳
[root@VM_0_16_centos ~]# touch hello.txt
[root@VM_0_16_centos ~]# ftp
ftp> ls
227 Entering Passive Mode (106,53,73,200,241,96).
150 Here comes the directory listing.
-rw-r--r--    1 0        0               0 Oct 09 03:51 thy.test
226 Directory send OK.
ftp> put
(local-file) hello.txt
(remote-file) ftp_hello.txt
local: hello.txt remote: ftp_hello.txt
227 Entering Passive Mode (106,53,73,200,91,237).
150 Ok to send data.
226 Transfer complete.
30 bytes sent in 3e-05 secs (1000.00 Kbytes/sec)

在vsftpd服務端就能看到剛剛上傳的文件了
[root@VM_0_10_centos tmp]# ls /opt/vsftpd/thy/
ftp_hello.txt  thy.test

5.測試建立目錄操作
ftp> mkdir ftp_test
257 "/opt/vsftpd/thy/ftp_test" created

6.測試下載操作
需要下載的文件,vsftpd服務端必須要有這個文件才行
ftp> get thy.test
local: thy.test remote: thy.test
227 Entering Passive Mode (106,53,73,200,245,241).
150 Opening BINARY mode data connection for thy.test (0 bytes).
226 Transfer complete.
在/etc/vsftpd/vsftpd.conf中,local_enable的選項必須打開為Yes,使得虛擬用戶的訪問成為可能,否則會出現以下現象:
[root@KcentOS5 ~]# ftp
ftp> open ip地址
Connected to ip地址.
500 OOPS: vsftpd: both local and anonymous access disabled!
原因:虛擬用戶再豐富,其實也是基於它們的宿主用戶overlord的,如果overlord這個虛擬用戶的宿主被限制住了,那麼虛擬用戶也將受到限制。
補充:
500 OOPS:錯誤
有可能是你的vsftpd.con配置文件中有不能被識別的命令,還有一種可能是命令的YES 或 NO 後面有空格。
550 許可權錯誤,不能創建目錄和文件
解決方法: 關閉selinux
# vi /etc/selinux/config
將 SELINUX=XXX -->XXX 代表級別
改為
SELINUX=disabled
修改配置文件需要重啟
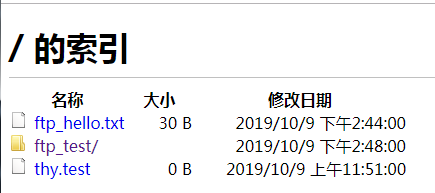
7、通過瀏覽器訪問
輸入配置的用戶名和密碼即可
參考網址:https://www.cnblogs.com/hhuai/archive/2011/02/12/1952647.html
參數使用格式參考網址:https://www.jb51.net/article/124033.htm


