一、使用限定註解;二、自定義限定註解;三、自定義bean的生命周期; ...
目錄:
1、使用限定註解;
2、自定義限定註解;
3、自定義bean的生命周期;
開發環境:IntelliJ IDEA 2019.2.2
Spring Boot版本:2.1.8
新建一個名稱為demo的Spring Boot項目。
一、限定註解
當存在多個同類型的bean時,可以使用Primary註解指定優先註入的bean。如果對bean的註入選擇做進一步的控制,則可以使用限定註解。
限定註解可以與特定的參數關聯起來,縮小類型匹配的範圍,最後選擇一個符合條件的bean來註入。
1、新建類 MyBean.java
package com.example.demo;

public class MyBean {

    public MyBean(String id){
       this.id = id;
    }

    private String id;

    public String getId() {
        return id;
    }

    public void setId(String id) {
        this.id = id;
    }
}
2、新建類 MyConfig.java
package com.example.demo;

import org.springframework.context.annotation.Bean;
import org.springframework.context.annotation.Configuration;

@Configuration
public class MyConfig {

    @Bean
    public MyBean bean1(){
        return new MyBean("1");
    }

    @Bean
    public MyBean bean2(){
        return new MyBean("2");
    }
}
3、新建一個控制器 DemoController.java
package com.example.demo;

import org.springframework.beans.factory.annotation.Autowired;
import org.springframework.beans.factory.annotation.Qualifier;
import org.springframework.web.bind.annotation.RequestMapping;
import org.springframework.web.bind.annotation.RestController;

@RestController
public class DemoController {

    @Autowired
    @Qualifier("bean1")
    MyBean bean;

    @RequestMapping(value = "/")
    public String index(){
        return bean.getId();
    }
}
運行項目後,瀏覽器訪問:http://localhost:8080/,頁面顯示:
1
二、自定義限定註解
如果需要根據特定的屬性來指定註入的bean,則可以自定義限定註解。
1、繼續使用上面例子的類 MyBean.java
2、新建一個介面 MyBeanQualifier.java
package com.example.demo;

import org.springframework.beans.factory.annotation.Qualifier;

import java.lang.annotation.ElementType;
import java.lang.annotation.Retention;
import java.lang.annotation.RetentionPolicy;
import java.lang.annotation.Target;

@Target({ElementType.FIELD, ElementType.METHOD})
@Retention(RetentionPolicy.RUNTIME)
@Qualifier
public @interface MyBeanQualifier {
    String type();
}
3、修改上面例子代碼 MyConfig.java
在配置bean時,需要為相應的bean設置不同的類型。
package com.example.demo;

import org.springframework.context.annotation.Bean;
import org.springframework.context.annotation.Configuration;

@Configuration
public class MyConfig {

    @Bean
    @MyBeanQualifier(type = "bean1")
    public MyBean bean1(){
        return new MyBean("1");
    }

    @Bean
    @MyBeanQualifier(type = "bean2")
    public MyBean bean2(){
        return new MyBean("2");
    }
}
4、修改上面例子控制器代碼 DemoController.java
package com.example.demo;

import org.springframework.beans.factory.annotation.Autowired;
import org.springframework.web.bind.annotation.RequestMapping;
import org.springframework.web.bind.annotation.RestController;

@RestController
public class DemoController {

    @Autowired
    @MyBeanQualifier(type = "bean2")
    MyBean bean;

    @RequestMapping(value = "/")
    public String index(){
        return bean.getId();
    }
}
運行項目後,瀏覽器訪問:http://localhost:8080/,頁面顯示:
2
三、自定義bean的生命周期
Scope註解主要用於配置bean在容器中的生命周期,除了可以配置為singleton和prototype,在Web環境還可以配置為request、session等
值,表示容器會為一次請求或一個會話分配一個bean的實例。
如果對bean的生命周期有特殊需求,可以使用自定義的Scope。
例子:一個bean被使用3次後,就獲取新的bean實例。
1、繼續使用上面例子的類 MyBean.java
2、新建一個自定義的Scope類 MyScope.java
package com.example.demo;


import org.springframework.beans.factory.ObjectFactory;
import org.springframework.beans.factory.config.Scope;

import java.util.HashMap;
import java.util.Map;

public class MyScope implements Scope {
    //記錄bean的使用次數
    private Map<String,Integer> beanCounts = new HashMap<String,Integer>();
    //保存實例
    private Map<String,Object> beans = new HashMap<String,Object>();

    @Override
    public Object get(String s, ObjectFactory<?> objectFactory) {
        if(beanCounts.get(s) == null){
            beanCounts.put(s, 0);
        }
        //第一次使用,放到實例的Map中
        Integer beanCount = beanCounts.get(s);
        if(beanCount == 0){
            Object newObject = objectFactory.getObject();
            beans.put(s, newObject);
        }
        Object bean = beans.get(s);
        //計數器加1
        Integer newBeanCount = beanCount + 1;
        if(newBeanCount >= 3){
            newBeanCount = 0;
        }
        //設置新的次數
        beanCounts.put(s, newBeanCount);
        return bean;
    }

    @Override
    public Object remove(String s) {
        return null;
    }

    @Override
    public void registerDestructionCallback(String s, Runnable runnable) {

    }

    @Override
    public Object resolveContextualObject(String s) {
        return null;
    }

    @Override
    public String getConversationId() {
        return null;
    }
}
3、修改上面例子代碼 MyConfig.java
將自定義Scope註冊到容器中。
package com.example.demo;

import org.springframework.beans.factory.BeanFactory;
import org.springframework.beans.factory.annotation.Autowired;
import org.springframework.beans.factory.config.ConfigurableListableBeanFactory;
import org.springframework.beans.factory.config.CustomScopeConfigurer;
import org.springframework.context.annotation.Bean;
import org.springframework.context.annotation.Configuration;
import org.springframework.context.annotation.Scope;

import javax.annotation.PostConstruct;

@Configuration
public class MyConfig {

    @Autowired
    BeanFactory factory;

    @PostConstruct
    public void customScopeConfigurer(){
        CustomScopeConfigurer config = new CustomScopeConfigurer();
        config.addScope("three", new MyScope());
        config.postProcessBeanFactory((ConfigurableListableBeanFactory)factory);
    }

    @Bean
    @Scope(scopeName = "three")
    public MyBean bean1(){
        return new MyBean("1");
    }

}
4、修改上面例子控制器代碼 DemoController.java
package com.example.demo;

import org.springframework.beans.factory.annotation.Autowired;
import org.springframework.context.ApplicationContext;
import org.springframework.web.bind.annotation.RequestMapping;
import org.springframework.web.bind.annotation.RestController;

@RestController
public class DemoController {

    @Autowired
    ApplicationContext ctx;

    @RequestMapping(value = "/")
    public String index(){
        for(int i=0;i<5;i++){
            System.out.println(ctx.getBean("bean1"));
        }
        return "";
    }
}
運行項目後,瀏覽器訪問:http://localhost:8080/,IDEA控制台輸出:
com.example.demo.MyBean@61f13a02
com.example.demo.MyBean@61f13a02
com.example.demo.MyBean@61f13a02
com.example.demo.MyBean@54094334
com.example.demo.MyBean@54094334
可見前3次得到同一個bean實例。
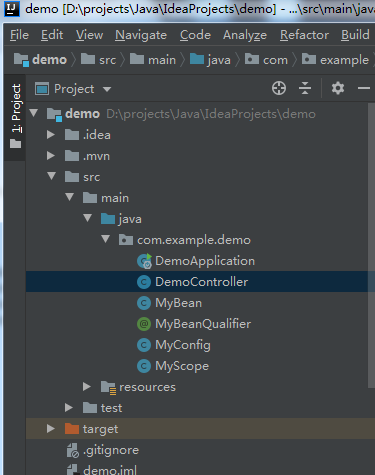
附,項目結構圖


