一、流的概念 流:數據在數據源(文件)和程式(記憶體)之間經歷的路徑。 輸入流:數據從數據源(文件)到程式(記憶體)的路徑。 輸出流:數據從程式(記憶體)到數據源(文件)的路徑。 以記憶體為參照,如果數據向記憶體流動,則是輸入流,反之則是輸出流 位元組流:FileInputStream用來讀取文件 FileOu ...
一、流的概念
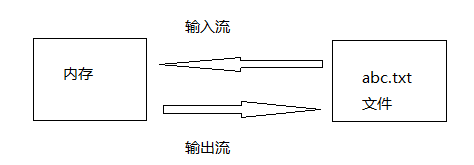
流:數據在數據源(文件)和程式(記憶體)之間經歷的路徑。
輸入流:數據從數據源(文件)到程式(記憶體)的路徑。
輸出流:數據從程式(記憶體)到數據源(文件)的路徑。
以記憶體為參照,如果數據向記憶體流動,則是輸入流,反之則是輸出流

位元組流:FileInputStream用來讀取文件
FileOutputStream用來寫入到文件
字元流:FileReader\BufferedReader用來讀取文件
FileWrite\BufferedWrite用來寫入到文件
二、操作用法
1.獲取文件對象,針對該對象進行一些基本操作

1         //創建一個文件對象
2         File f = new File("F:\\test\\sheet.xls");
3         //得到文件的路徑
4         System.out.println("文件路徑"+f.getAbsolutePath());
5         //得到文件的大小,位元組數
6         System.out.println("文件大小"+f.length());
7         //可讀屬性
8         System.out.println("可讀"+f.canRead());
View Code
2.創建文件(判斷該文件是否存在,若存在則彈出提示,若不存在則進行創建)

 1 //創建文件
 2         File f = new File("F:\\test\\test.txt");
 3         //判斷該文件是否存在
 4         if(!f.exists())
 5         {
 6             //可以創建
 7             try {
 8                 f.createNewFile();
 9             } catch (IOException e) {
10                 e.printStackTrace();
11             }
12         }
13         else
14         {
15             System.out.println("改文件已存在,創建失敗!");
16         }
View Code
3.創建文件夾(條件同上)

1  //創建文件夾
2         File f = new File("F:\\test");
3         if (f.isDirectory())//判斷是不是一個文件夾
4         {
5             System.out.println("創建失敗");
6         } else {
7             f.mkdir();
8         }
View Code
Tips:這裡寫明一下isFile()、exists()和isDirectory()的區別
isFile():判斷是否文件,也許可能是文件或者目錄。
exists():判斷是否存在,可能不存在。
isDirectory(): 判斷該對象是否是一個文件夾。
4.列出某文件夾下麵的所有文件(此時對象還是File,File沒有文件和文件夾之分,對電腦來講,文件夾只是一種特殊的文件)

1 File f = new File("F:\\testt");
2         if (f.isDirectory()) {
3             File filelists[] = f.listFiles();
4             for (int i = 0; i < filelists.length; i++)
5         {
6             System.out.println("文件名是:"+filelists[i].getName());
7         }
8         }
View Code
5.FileInputStream的使用

 1 /**
 2  * 演示FileInputStream類的使用
 3  */
 4 package com.test2;
 5
 6 import java.io.*;
 7
 8 public class Demo11_2 {
 9     public static void main(String[] args) {
10
11         //得到一個文件對象
12         File f = new File("F:\\tt\\test.txt");
13         FileInputStream fis = null;
14         //因為file沒用讀寫的能力,所以需要使用FileInputStream
15         try {
16             fis = new FileInputStream(f);
17
18             //定義一個位元組數組(相當於一個緩存,如果你的對象"f"是一個很大的文件,記憶體不夠用,所以只能一點一點地讀取)
19             byte[] bytes = new byte[1024];
20             //實際讀取到的位元組數
21             int n = 0;
22             //迴圈讀取
23             //如果read()返回-1,則說明讀取完畢
24             while ((n = fis.read(bytes)) != -1) {
25                 //將位元組轉換成string
26                 //此時實例化s時,要註意指定編碼格式,電腦上文檔預設的是GBK,而我這邊預設的是utf-8,
27                 //所以如果不指定格式的話,最後輸出的中文會出現亂碼
28                 String s = new String(bytes, 0, n,"GBK");
29                 System.out.println(s);
30             }
31         } catch (Exception e) {
32             e.printStackTrace();
33         } finally {
34             //關閉文件流(關鍵)
35             try {
36                 if (fis != null) {
37                     fis.close();
38                 }
39             } catch (IOException e) {
40                 e.printStackTrace();
41             }
42         }
43     }
44 }
View Code
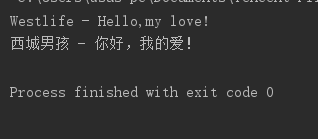
讀取成功..
6.FileOutputStream的使用

 1 /**
 2  * 演示FileOutputStream的使用
 3  */
 4 package com.test2;
 5
 6 import java.io.*;
 7
 8 public class Demo11_3 {
 9     public static void main(String[] args) {
10         File f = new File("F:\\tt\\test.txt");
11         //位元組輸出流
12         FileOutputStream fos = null;
13
14         try {
15             fos = new FileOutputStream(f);
16
17             String s = "Westlife - Better man\r\n西城男孩 - 更完美的人";
18
19             fos.write(s.getBytes());
20         } catch (Exception e) {
21             e.printStackTrace();
22         } finally {
23             try {
24                 if (fos != null) {
25                     fos.close();
26                 }
27             } catch (IOException e) {
28                 e.printStackTrace();
29             }
30         }
31
32     }
33 }
View Code

寫入成功..
7.位元組流的操作(通過寫入寫出來實現圖片的拷貝,操作byte)

 1 /**
 2  * 圖片拷貝
 3  */
 4 package com.test2;
 5
 6 import java.io.*;
 7
 8 public class Demo11_4 {
 9     public static void main(String[] args) {
10         //先把圖片讀入到記憶體,再寫到某個文件
11         //因為是二進位文件,因此只能用位元組流完成
12         File f = new File("F:\\tt\\Westlife.jpg");
13         //輸入流
14         FileInputStream fis = null;
15         //輸出流
16         FileOutputStream fos = null;
17
18         try {
19             fis = new FileInputStream(f);
20             //或者省略上面實例化File,直接在這裡fis = new FileInputStream("F:\tt\Westlife.jpg");也可以
21
22             fos = new FileOutputStream("D:\\練習\\Westlife.jpg");
23             byte[] bytes = new byte[1024];
24             int n = 0;//記錄實際讀取到的位元組數
25             //迴圈讀取
26             while ((n = fis.read(bytes)) != -1) {
27                 //輸出到指定文件
28                 fos.write(bytes);
29             }
30         } catch (Exception e) {
31             e.printStackTrace();
32         } finally {
33             //關閉打開的文件流
34             if (fos != null) {
35                 try {
36                     fos.close();
37                 } catch (IOException e) {
38                     e.printStackTrace();
39                 }
40             }
41
42             if (fis != null) {
43                 try {
44                     fis.close();
45                 } catch (IOException e) {
46                     e.printStackTrace();
47                 }
48             }
49         }
50     }
51 }
View Code
8.字元流的操作(操作char)

 1 /**
 2  * 字元流操作
 3  */
 4 package com.test2;
 5
 6 import java.io.*;
 7
 8 public class Demo11_5 {
 9     public static void main(String[] args) {
10         //文件取出字元流對象(輸入流)
11         FileReader fr = null;
12         //寫入到文件(輸出流)
13         FileWriter fw = null;
14
15         //創建一個fr對象
16         try {
17             //創建輸入對象
18             fr = new FileReader("F:\\tt\\test.txt");
19             //創建輸出對象
20             fw = new FileWriter("D:\\練習\\test2.txt");
21
22
23             //讀入到記憶體
24             int n = 0;//記錄實際讀取到的字元數
25             char c[] = new char[1024];
26             while ((n = fr.read(c)) != -1) {
27                 //輸入
28 //                String s = new String(c,0,n);
29 //                System.out.println(s);
30                 //輸出
31                 //方法一:fw.write(c);
32                 方法二://指定輸出的起始位置
33                 fw.write(c, 0, n);
34             }
35         } catch (Exception e) {
36             e.printStackTrace();
37         } finally {
38             //關閉文件流
39             if (fr != null) {
40                 try {
41                     fr.close();
42                 } catch (IOException e) {
43                     e.printStackTrace();
44                 }
45             }
46
47             if (fw != null) {
48                 try {
49                     fw.close();
50                 } catch (IOException e) {
51                     e.printStackTrace();
52                 }
53             }
54         }
55
56     }
57 }
View Code
9.緩衝字元流(提高了效率,直接操作String)

 1 /**
 2  * 緩衝字元流操作
 3  */
 4 package com.test2;
 5
 6 import java.io.*;
 7
 8 public class Demo11_6 {
 9     public static void main(String[] args) {
10         BufferedReader br = null;
11         BufferedWriter bw = null;
12
13         //先創建FileReader對象
14         FileReader fr = null;
15
16         //創建FileWriter對象
17         FileWriter fw = null;
18         try {
19             fr = new FileReader("F:\\tt\\test.txt");
20             br = new BufferedReader(fr);
21
22
23             fw = new FileWriter("D:\\練習\\test3.txt");
24             bw = new BufferedWriter(fw);
25
26             //迴圈讀取文件
27             String s = "";
28             while ((s = br.readLine()) != null) {
29                 //讀取到記憶體
30                 //System.out.println(s);
31
32                 //輸出到磁碟
33                 bw.write(s+"\r\n");
34             }
35         } catch (Exception e) {
36             e.printStackTrace();
37         } finally {
38             //註:如果文件流不關閉的話會影響後續對該文件的操作,比如可能讀不到該文件的數據
39             if (br != null) {
40                 try {
41                     {
42                         br.close();
43                     }
44                 } catch (IOException e) {
45                     e.printStackTrace();
46                 }
47             }
48
49             if (bw != null) {
50                 try {
51                     {
52                         bw.close();
53                     }
54                 } catch (IOException e) {
55                     e.printStackTrace();
56                 }
57             }
58         }
59     }
60 }
View Code


