前言 開心一刻 我和兒子有個共同的心愿,出國旅游。昨天兒子考試得了全班第一,我跟媳婦合計著帶他出國見見世面,吃晚飯的時候,一家人開始了討論這個。我:“兒子,你的心愿是什麼?”,兒子:“吃漢堡包”,我:“往大了說”,兒子:“變形金剛”,我:“今天你爹說了算,想想咱倆共同的心愿”,兒子怯生生的瞅了媳婦一 ...
前言
開心一刻
我和兒子有個共同的心愿,出國旅游。昨天兒子考試得了全班第一,我跟媳婦合計著帶他出國見見世面,吃晚飯的時候,一家人開始了討論這個。我:“兒子,你的心愿是什麼?”,兒子:“吃漢堡包”,我:“往大了說”,兒子:“變形金剛”,我:“今天你爹說了算,想想咱倆共同的心愿”,兒子怯生生的瞅了媳婦一眼說:“換個媽?",我心裡咯噔一下:“這虎犢子,坑自己也就算了,怎麼還坑爹呢”。
 牛:小子,你的殺氣太重,我早就看穿一切,吃我一腳!
路漫漫其修遠兮,吾將上下而求索!
github:https://github.com/youzhibing
碼雲(gitee):https://gitee.com/youzhibing
前情回顧與補充
回顧
在上篇博文中,我們講到了SpringShiroFilter是如何註冊到servlet容器的:SpringShiroFilter首先註冊到spring容器,然後被包裝成FilterRegistrationBean,最後通過FilterRegistrationBean註冊到servlet容器,至此shiro的Filter加入到了servlet容器的FilterChain中。另外還講到了shiro的代理FilterChain:ProxiedFilterChain,請求來到shiro的Filter後,會先經過shiro的Filter鏈,再接著走servlet容器的Filter鏈,如下圖所示

如果請求經PathMatchingFilterChainResolver匹配成功,那麼請求會先經過shiro Filter鏈(ProxiedFilterChain),之後再走剩下的servlet Filter鏈,如果匹配不成功,則直接走剩下的servlet Filter鏈。每一次請求都會經過shiro Filter,shiro Filter來控制filter鏈的走向(有點類似springmvc的DispatcherServlet),先生成ProxiedFilterChain,請求先走ProxiedFilterChain,然後再走接著走servlet filter鏈。
上圖中,在單獨的shiro工程中,shiro Filter是ShiroFilter,而在與spring的集成工程中則是SpringShiroFilter。
補充
shiro的Filter關係圖
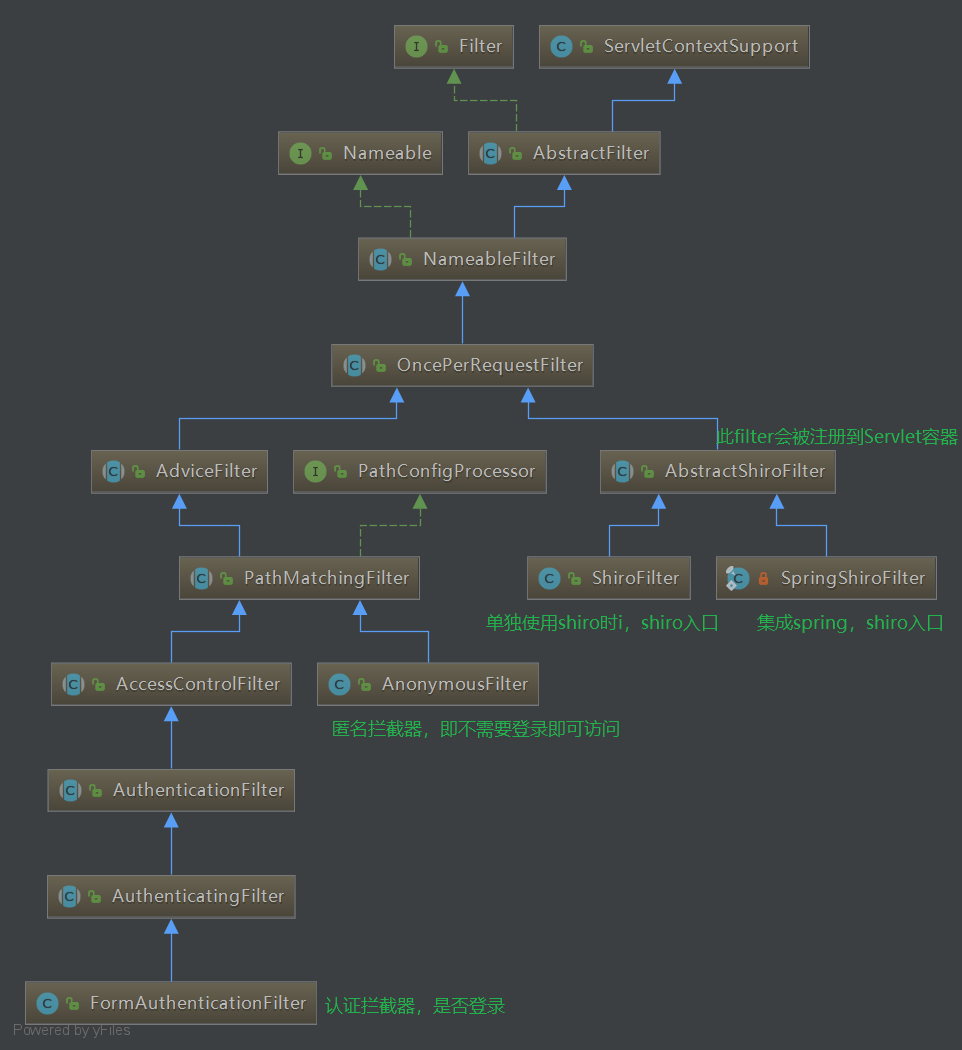
shiro filter關係圖
此關係圖中涉及到了shiro的入口:ShiroFilter或SpringShiroFilter,認證攔截器:FormAuthenticationFilter,沒有涉及授權Filter(PermissionsAuthorizationFilter、RolesAuthorizationFilter),因為shiro的授權我們一般用的是註解的方式,而不是Filter方式。
ShiroFilterFactoryBean中的createFilterChainManager()

protected FilterChainManager createFilterChainManager() {

    DefaultFilterChainManager manager = new DefaultFilterChainManager();
    Map<String, Filter> defaultFilters = manager.getFilters();
    //apply global settings if necessary:    應用全局設置
    for (Filter filter : defaultFilters.values()) {
        applyGlobalPropertiesIfNecessary(filter);
    }

    //Apply the acquired and/or configured filters: 應用和配置filter,一般沒有
    Map<String, Filter> filters = getFilters();
    if (!CollectionUtils.isEmpty(filters)) {
        for (Map.Entry<String, Filter> entry : filters.entrySet()) {
            String name = entry.getKey();
            Filter filter = entry.getValue();
            applyGlobalPropertiesIfNecessary(filter);
            if (filter instanceof Nameable) {
                ((Nameable) filter).setName(name);
            }
            //'init' argument is false, since Spring-configured filters should be initialized
            //in Spring (i.e. 'init-method=blah') or implement InitializingBean:
            manager.addFilter(name, filter, false);
        }
    }

    //build up the chains:  構建shiro filter鏈
    Map<String, String> chains = getFilterChainDefinitionMap();
    if (!CollectionUtils.isEmpty(chains)) {
        for (Map.Entry<String, String> entry : chains.entrySet()) {
            String url = entry.getKey();
            String chainDefinition = entry.getValue();
            manager.createChain(url, chainDefinition);
        }
    }

    return manager;
}
View Code
1、給shiro預設的filter應用全局配置

//apply global settings if necessary:
for (Filter filter : defaultFilters.values()) {
    applyGlobalPropertiesIfNecessary(filter);
}


private void applyGlobalPropertiesIfNecessary(Filter filter) {
    applyLoginUrlIfNecessary(filter);            // 設置filter的loginUrl
    applySuccessUrlIfNecessary(filter);            // 設置filter的successUrl
    applyUnauthorizedUrlIfNecessary(filter);    // 這個我們一般沒有配置
}

private void applyLoginUrlIfNecessary(Filter filter) {
    String loginUrl = getLoginUrl();    // shiroFilterFactoryBean.setLoginUrl("/login"); 設置的loginUrl
    if (StringUtils.hasText(loginUrl) && (filter instanceof AccessControlFilter)) {
        AccessControlFilter acFilter = (AccessControlFilter) filter;
        //only apply the login url if they haven't explicitly configured one already:
        String existingLoginUrl = acFilter.getLoginUrl();
        if (AccessControlFilter.DEFAULT_LOGIN_URL.equals(existingLoginUrl)) {
            acFilter.setLoginUrl(loginUrl);
        }
    }
}

private void applySuccessUrlIfNecessary(Filter filter) {
    String successUrl = getSuccessUrl();    // shiroFilterFactoryBean.setSuccessUrl("/index"); 設置的successUrl
    if (StringUtils.hasText(successUrl) && (filter instanceof AuthenticationFilter)) {
        AuthenticationFilter authcFilter = (AuthenticationFilter) filter;
        //only apply the successUrl if they haven't explicitly configured one already:
        String existingSuccessUrl = authcFilter.getSuccessUrl();
        if (AuthenticationFilter.DEFAULT_SUCCESS_URL.equals(existingSuccessUrl)) {
            authcFilter.setSuccessUrl(successUrl);
        }
    }
}

private void applyUnauthorizedUrlIfNecessary(Filter filter) {
    String unauthorizedUrl = getUnauthorizedUrl();
    if (StringUtils.hasText(unauthorizedUrl) && (filter instanceof AuthorizationFilter)) {
        AuthorizationFilter authzFilter = (AuthorizationFilter) filter;
        //only apply the unauthorizedUrl if they haven't explicitly configured one already:
        String existingUnauthorizedUrl = authzFilter.getUnauthorizedUrl();
        if (existingUnauthorizedUrl == null) {
            authzFilter.setUnauthorizedUrl(unauthorizedUrl);
        }
    }
}
View Code

shiro 預設11個filter
標紅的的filter的loginUrl和successUrl會被設置成我們在ShiroFilterFactoryBean配置的,loginUrl會被設置成"/login",successUrl被設置成"index";這裡我們需要關註下AnonymousFilter、LogoutFilter和FormAuthenticationFilter,我們目前只用到了這三個filter。
2、應用和配置我們在ShiroFilterFactoryBean設置的Filters
ShiroFilterFactoryBean類有個setFilters(Map<String,Filter> filters>方法,可以通過此方法向shiro註冊filter,不過我們一般沒有用到。
3、構建filter鏈
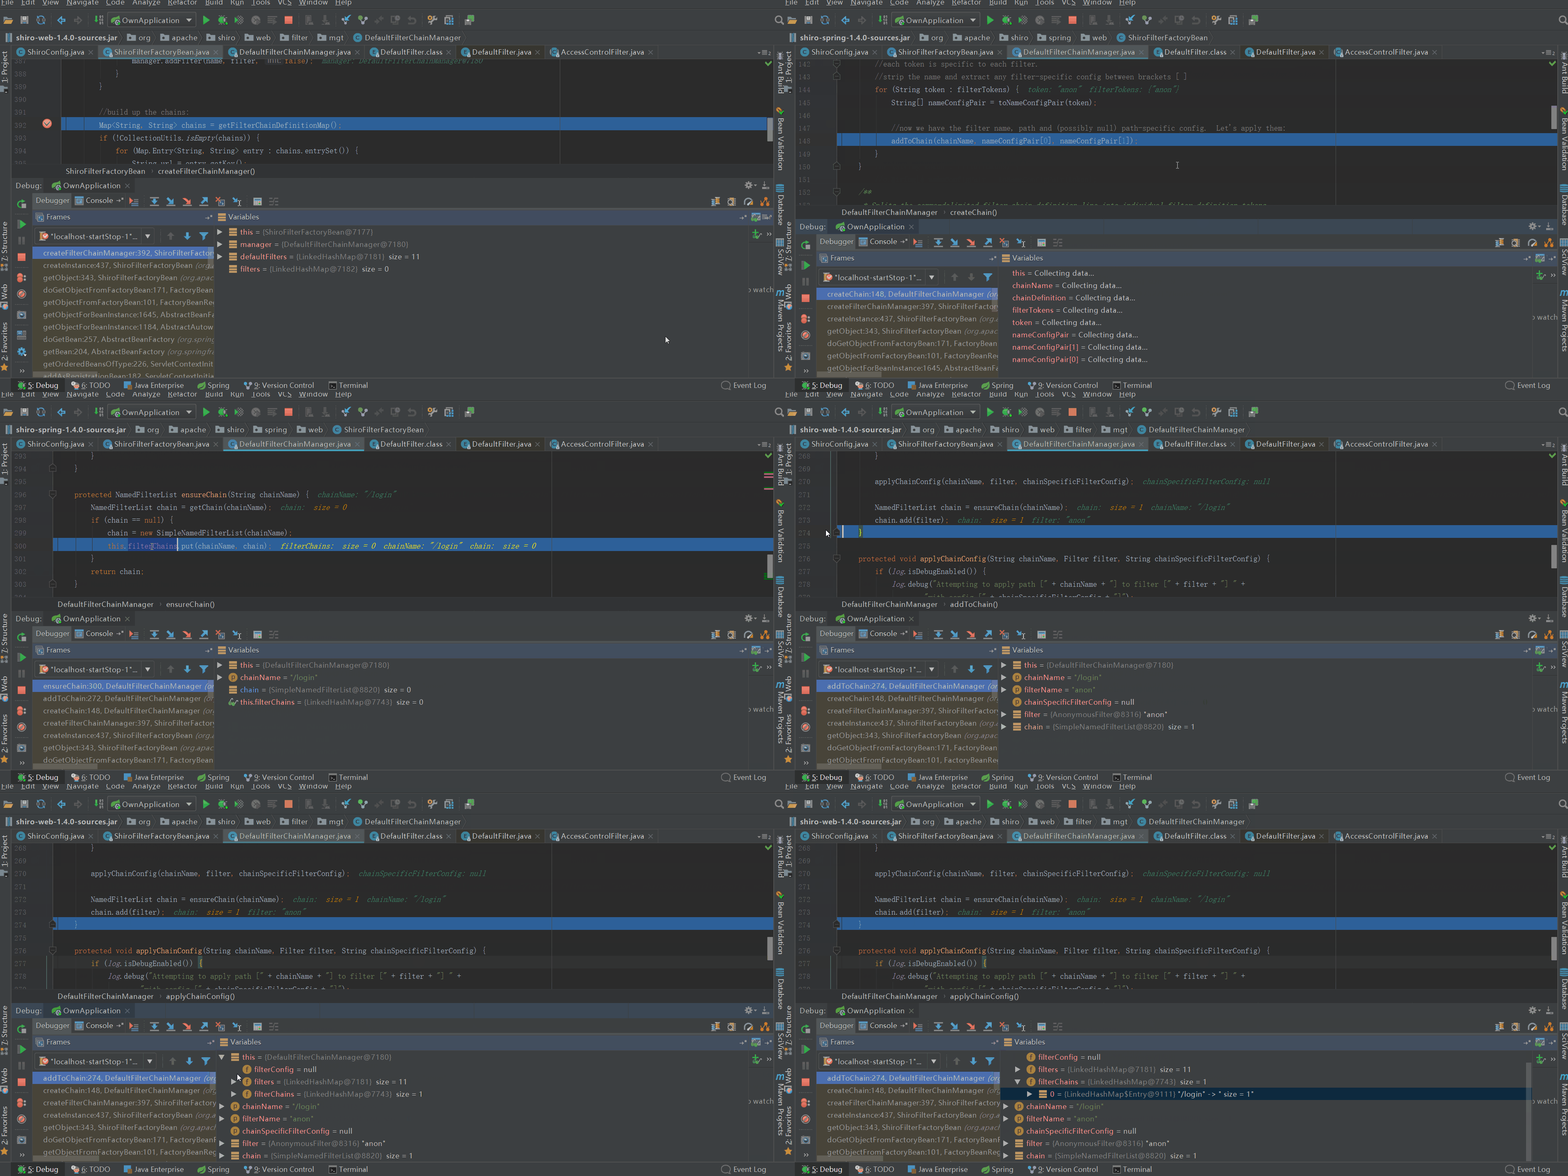 會將ShiroFilterFactoryBean中private Map<String, String> filterChainDefinitionMap的元素逐個放到DefaultFilterChainManager的private Map<String, NamedFilterList> filterChains中,最終filterChains的內容如下
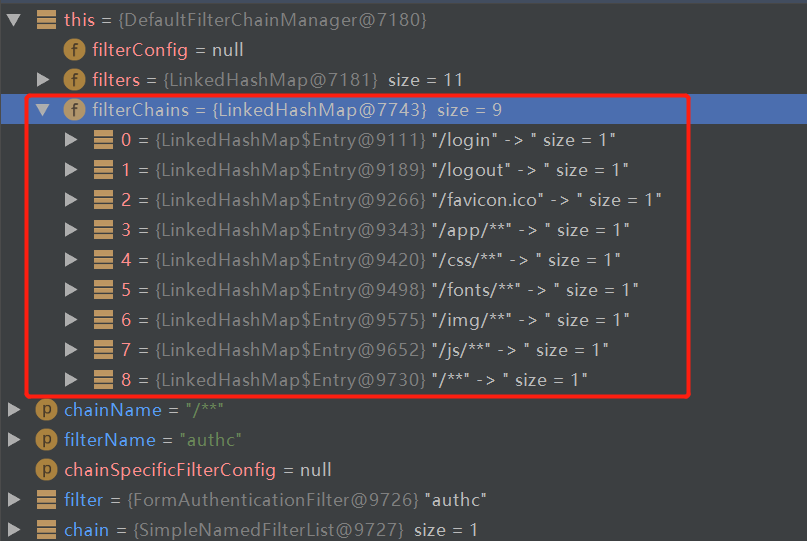
我們配置的filterChainDefinitionMap中涉及到3個Filter,LogoutFilter負責/logout,AnonymousFilter負責(/login,/favicon.ico,/js/**,/css/**,/img/**,/fonts/**),FormAuthenticationFilter負責/**。至此,filter鏈準備工作完成。
認證
身份認證,即在應用中誰能證明他就是他本人。認證方式有很多,用的最多的就是用戶名/密碼來證明。shiro中,用戶需要提供pricipals(身份)和credentials(證明)給shiro,從而應用能夠驗證用戶身份。一個主體(Subject)可以有多個principals,但只有一個Primary principals,一般是用戶名/手機號,credentials是一個只有主體知道的安全值,一般是用戶名/數字證書。最常見的principals和credentials組合就是用戶名 / 密碼了。
接下來我們來看看一次完整的請求 :未登錄 - 登錄 - 登錄成功 。還記得是哪個filter註冊到了servlet filter鏈嗎?,就是SpringShiroFilter,每次請求都會經過SpringShiroFilter;從shiro filter關係圖中可知,請求肯定會經過OncePerRequestFilter的doFilter方法,我們就從此方法開始
未登錄
url請求:http://localhost:8881/
那麼此時的url與我們配置的哪個filterChainDefinition匹配呢?很顯然是filterChainDefinitionMap.put("/**", "authc")。authc是shiro中預設11個filter中FormAuthenticationFilter的名字,那麼也就是說生成的ProxiedFilterChain如下所示

也就是請求會先經過FormAuthenticationFilter,之後再回到servlet filter鏈:orig。那我們接著看請求到FormAuthenticationFilter中後做了些什麼處理(註意看shiro filter關係圖)
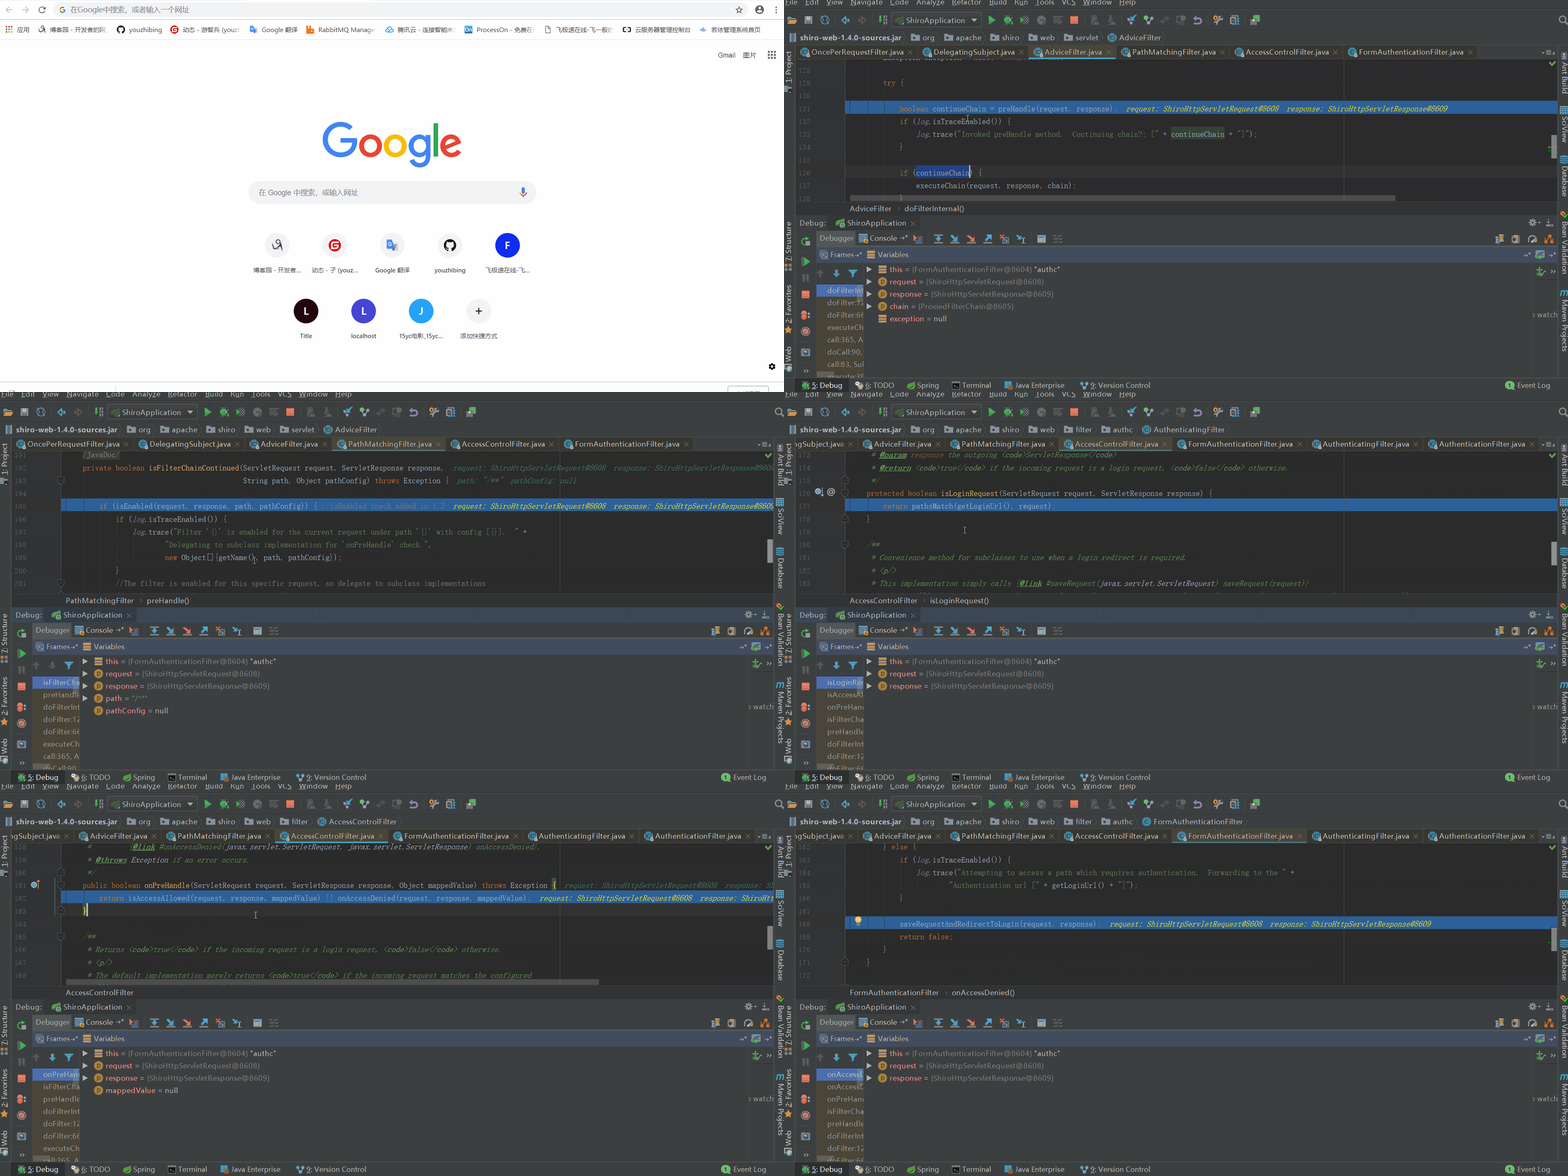
executeChain(request, response, chain)繼續執行filter鏈之前有個preHandle(request, response)處理,來判斷時候需要繼續執行filter鏈。跟進去會來到onPreHandle方法

public boolean onPreHandle(ServletRequest request, ServletResponse response, Object mappedValue) throws Exception {
        return isAccessAllowed(request, response, mappedValue) || onAccessDenied(request, response, mappedValue);
    }

protected boolean isAccessAllowed(ServletRequest request, ServletResponse response, Object mappedValue) {
    return super.isAccessAllowed(request, response, mappedValue) ||
            (!isLoginRequest(request, response) && isPermissive(mappedValue));
}

// super.isAccessAllowed判斷時候已經認證過,有個標誌欄位:authenticated
// isLoginRequest判斷是否是登錄請求,很顯然不是,登錄請求是/login,目前是/
// isPermissive 沒搞明白,可能應對一些特殊的filter


protected boolean onAccessDenied(ServletRequest request,
    ServletResponse response, Object mappedValue) throws Exception {
    return onAccessDenied(request, response);
}

protected boolean onAccessDenied(ServletRequest request, ServletResponse response) throws Exception {
    if (isLoginRequest(request, response)) {    // 是否是登錄請求
        if (isLoginSubmission(request, response)) {    // 是否是post請求
            if (log.isTraceEnabled()) {
                log.trace("Login submission detected.  Attempting to execute login.");
            }
            return executeLogin(request, response);    // 執行登錄
        } else {
            if (log.isTraceEnabled()) {
                log.trace("Login page view.");
            }
            //allow them to see the login page ;)
            return true;    // get方式的登錄請求則繼續執行filter鏈,最終會來到我們的controller的登錄get請求
        }
    } else {
        if (log.isTraceEnabled()) {
            log.trace("Attempting to access a path which requires authentication.  Forwarding to the " +
                    "Authentication url [" + getLoginUrl() + "]");
        }

        saveRequestAndRedirectToLogin(request, response); // 重定向到/login
        return false;    // 返回false,表示filter鏈不繼續執行了
    }
}
View Code
最終會重定向到/login,這又是一次新的get請求,會重新將上面的流程走一遍,只是url變成了:http://localhost:8881/login。此時的ProxiedFilterChain如下所示

請求來到AnonymousFilter之後,onPreHandler直接返回true,接著走剩下的servlet Filter鏈,最終來到我們的controller
@GetMapping("/login")
public String loginPage() {
    return "login";
}
將登錄頁返回回去
登錄
url請求:http://localhost:8881/login,請求方式是post
流程與上面未登錄差不多,此時的ProxiedFilterChain如下所示

AnonymousFilter的onPreHandler方法直接返回的true,請求會接著走剩下的servlet Filter鏈,最終來到我們的controller

@PostMapping("/login")
@ResponseBody
public OwnResult dologin(String username, String password) {
    username = username.trim();
    // 判斷當前用戶是否可用
    User user = userService.findUserByUsername(username);
    if(user == null) {
        return OwnResult.build(RespCode.ERROR_USER_NOT_EXIST.getCode(), username + " 用戶不存在");
    }
    if (user.getStatus() == Constants.USER_DISABLED) {
        return OwnResult.build(RespCode.ERROR_USER_DISABLED.getCode(), "賬號已被禁用, 請聯繫管理員");
    }

    UsernamePasswordToken token = new UsernamePasswordToken(username, password);
    Subject subject = SecurityUtils.getSubject();
    try {
        subject.login(token);        // 登錄認證交給shiro
        return OwnResult.ok();
    } catch (AuthenticationException e) {
        return OwnResult.build(RespCode.ERROR_USERNAME_PASSWORD.getCode(), "用戶名或密碼錯誤");
    }
}
View Code
登錄認證過程委托給了shiro,我們來看看具體的認證過程
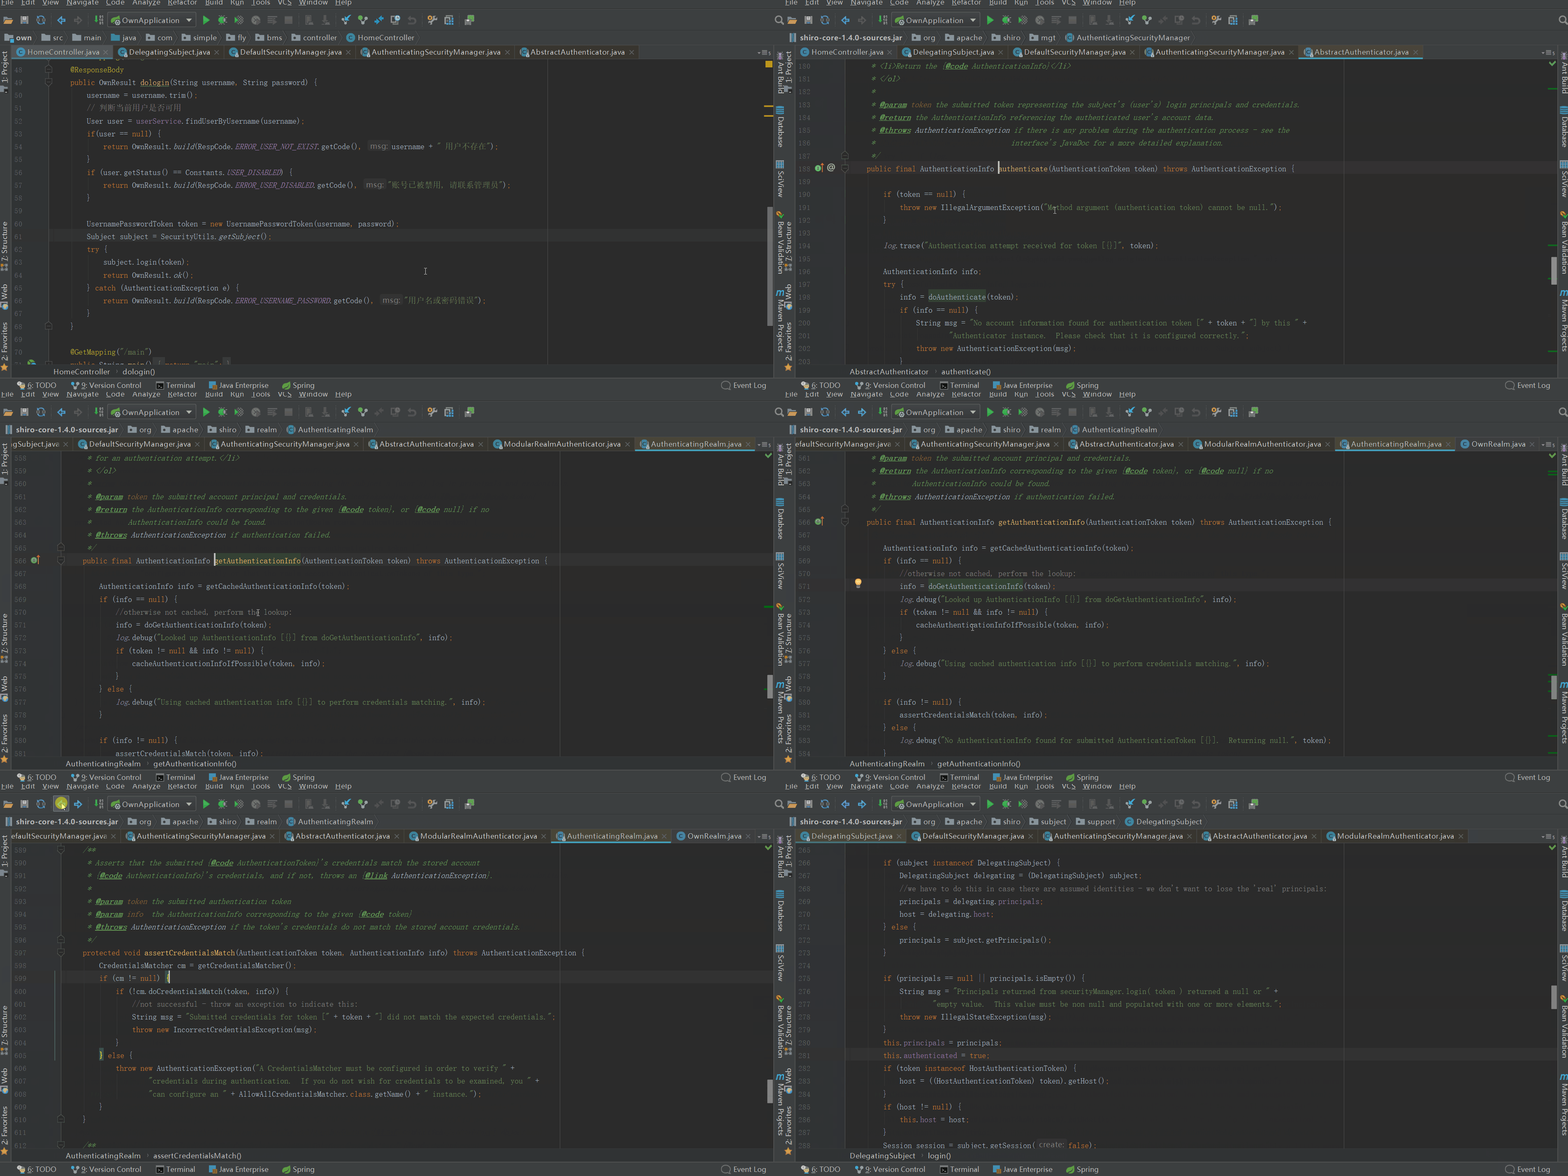
如果開啟了認證緩存(authenticationCachingEnabled=true),則會先從緩存中獲取authenticationInfo,若沒有則調用我們自定義Realm的doGetAuthenticationInfo方法獲取資料庫中用戶的信息,並緩存起來;然後將authenticationInfo與登錄頁面輸入的用戶信息(封裝成UsernamePasswordToken)進行匹配驗證。登錄認證失敗會拋出AuthenticationException;登錄成功則會將subject的authenticated設置成true,表示已經認證過了。
註意:登錄認證沒有完全交給shiro,而是在我們的controller中委托給shiro了,這與完全交由shiro還是有區別的(具體可以看下FormAuthenticationFilter的onAccessDenied方法)。
登錄成功
登錄成功後,我們往往會請求主頁,url請求:http://localhost:8881/index
流程與上面兩個差不多,此時的ProxiedFilterChain如下所示

此時authenticated已經為true,會接著走餘下的servlet Filler鏈,最終請求會來到我們的controller

@RequestMapping({"/","/index"})
public String index(Model model){

    List<Menu> menus = menuService.listMenu();
    model.addAttribute("menus", menus);
    model.addAttribute("username", getUsername());
    return "index_v1";
}
View Code
將index_v1.html返回回去
授權
授權,也叫訪問控制,即在應用中控制誰能訪問哪些資源(如訪問頁面/編輯數據/頁面操作等)。授權中有幾個需要瞭解的關鍵對象:主體(Subject)、資源(Resource)、許可權(Permission)、角色(Role)。主體:即訪問應用的用戶,shiro中使用Subject代表該用戶;資源:應用中用戶可以訪問的任何東西,比如訪問JSP頁面、查看/編輯某些數據、訪問某個業務方法等;許可權:表示在應用中用戶有沒有操作某個資源的權力,能不能訪問某個資源;角色:可以理解成許可權的集合,一般情況下我們會賦予用戶角色而不是許可權,這樣用戶可以擁有一組許可權,賦予許可權時比較方便。
shiro支持三種方式的授權
1、編程式,通過寫if/else授權代碼塊
Subject subject = SecurityUtils.getSubject();
if(subject.hasRole("admin")) {
    // 有許可權,執行相關業務
} else {
    // 無許可權,給相關提示
}
2、註解式,通過在執行的Java方法上放置相應的註解完成
@RequiresPermissions("sys:user:user")
public List<User> listUser() {
    // 有許可權,獲取數據
}
3、JSP/GSP標簽,在JSP/GSP頁面通過相應的標簽完成
<shiro:hasRole name="admin">
    <!-- 有許可權 -->
</shiro:hashRole>
一般而言,編程式基本不用,註解方式比較普遍,標簽方式用的不多;那麼我們就來看看註解方式,它是如何實現許可權控制的。一看到註解,我們就要想到aop(動態代理),在目標對象的前後可以織入增強處理,具體我們往下看。
註解許可權控制
authorizationInfo獲取

執行目標方法前(也就是@RequiresPermissions("xxx")修飾的方法),會先調用assertAuthorized(methodInvocation)進行許可權的驗證,分兩步:先獲取authorizationInfo,再進行許可權的檢查。上圖展示了authorizationInfo,許可權的檢查請往下看。
先從緩存中獲取authorizationInfo,若沒有則調用我們自定義Realm的doGetAuthorizationInfo方法來獲取authorizationInfo(設置了roles與stringPermissions),並將其放入緩存中,然後返回authorizationInfo;若從緩存中獲取到了authorizationInfo,則直接返回,而不需要通過Realm從資料庫中獲取了。一般情況下,許可權緩存是開啟的:myShiroRealm.setAuthorizationCachingEnabled(true);
許可權檢查
當authorizationInfo獲取到之後,進行來就是需要檢查authorizationInfo中是否含有@RequiresPermissions("xxx")中的xxx了,我們往下看
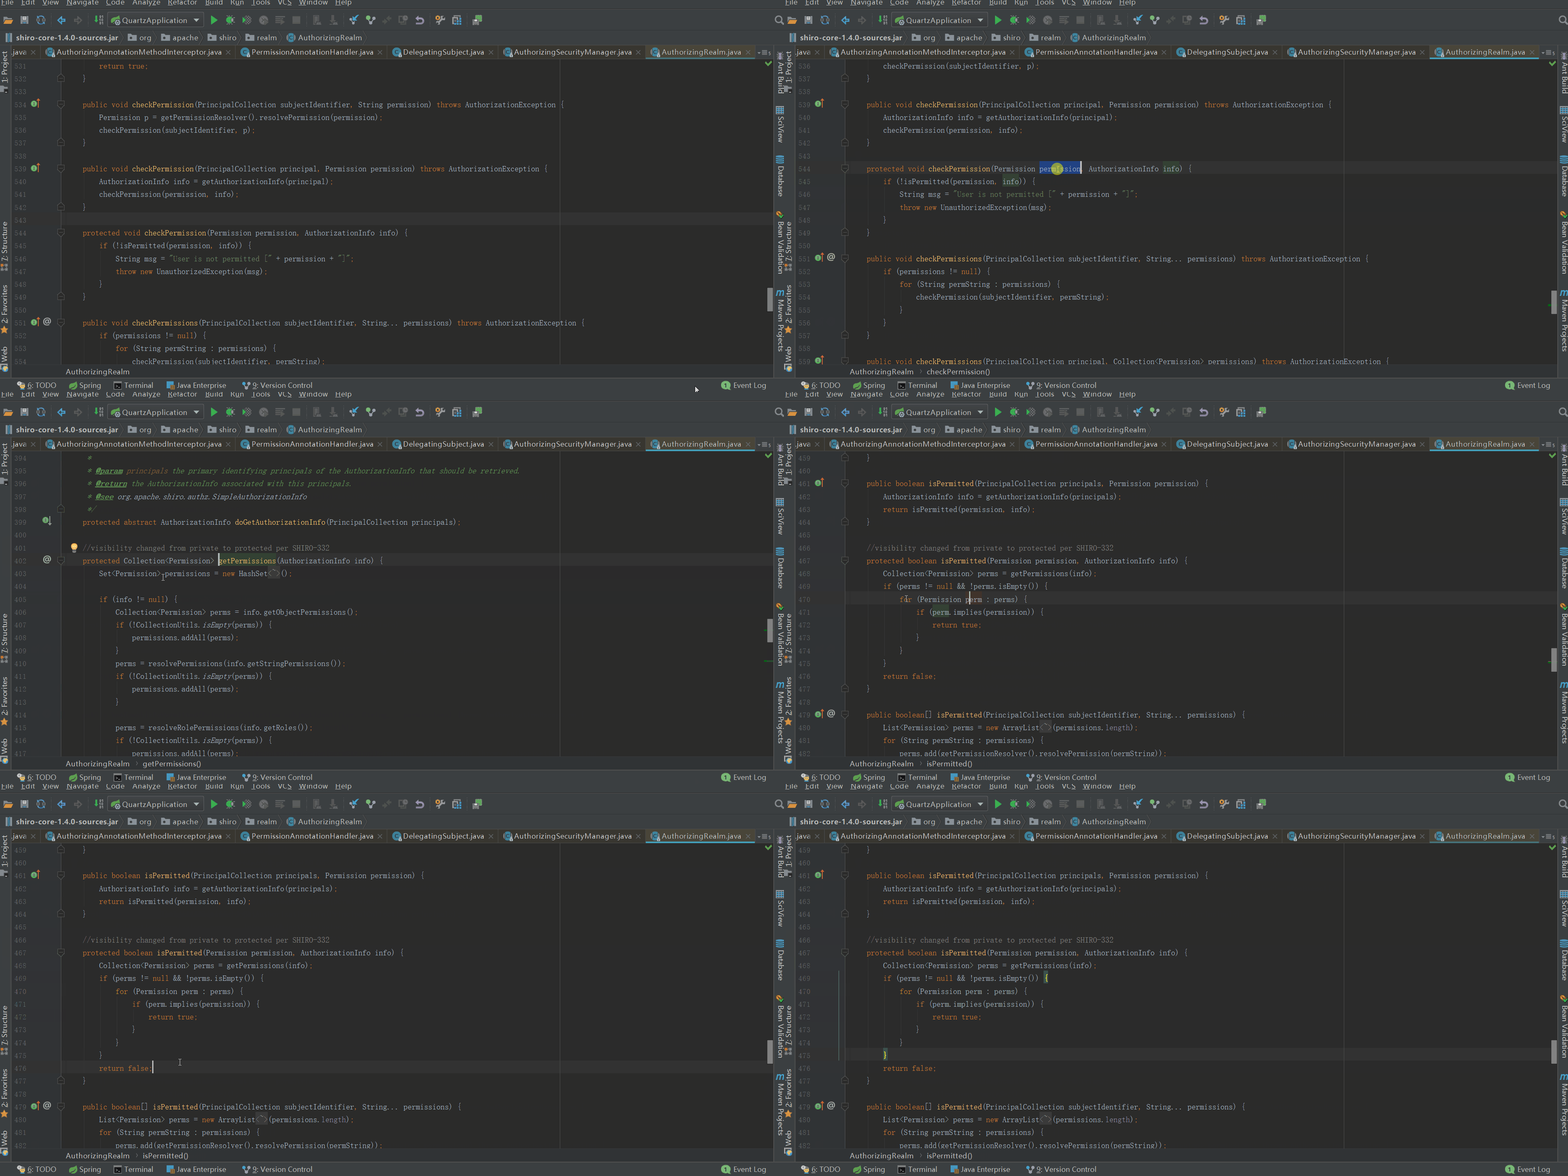
可以看到,檢查過程過程就是將authorizationInfo中的Permission集合組個與xxx進行匹對,一旦匹對成功,則許可權檢查通過,流程往下走即執行目標方法(也就是我們的業務方法),如果一個都沒匹對成功,則會拋出UnauthorizedException異常
上述講了Permission的方式進行許可權的控制,通過Role控制的方式大同小異,有興趣的朋友可以自己去跟一跟。當然還有其他的方式,但用的最多的是Permission和Role。
總結
1、SpringShiroFilter作用就是生成shiro的代理filter鏈:ProxiedFilterChain,並將請求交給ProxiedFilterChain;
2、anon:匿名訪問,不需要認證,一般就是針對游客可以訪問的資源;authc:登錄認證;
3、我們所有的請求一般由shiro中3個Filter:LogoutFilter、AnonymousFilter、FormAuthenticationFilter分攤了,LogoutFilter負責/logout,AnonymousFilter負責/login和靜態資源,FormAuthenticationFilter則負責剩下的(/**);
4、未登錄的請求會由FormAuthenticationFilter重定向/login,登錄成功後會將authenticated設置成true,那麼之後的請求會正常走剩下的servlet filter鏈,最終來到我們的controller;登錄認證過程會先從緩存獲取authenticationInfo,沒有則通過realm從資料庫獲取並放入緩存,然後將頁面輸入的用戶信息UsernamePasswordToken與authenticationInfo進行匹配驗證。個人不建議開啟認證緩存,當修改用戶信息後刷新緩存中的認證信息,不好處理,另外認證頻率本來就不高,緩存的意義不大;
5、授權一般採用註解方式,註解往往配合aop來實現目標方法前後的增強織入,shiro的許可權註解就是在目標方法前的增強處理。校驗過程與認證過程類似,先從緩存中獲取authorizationInfo,沒有則通過realm從資料庫獲取,然後放入緩存,看authorizationInfo中是否有@RequiresPermissions("xxx")中的xxx來完成許可權的驗證。個人建議開啟許可權緩存,許可權的驗證還是挺多的,如果不開啟緩存,那麼會給資料庫造成一定的壓力;
留個疑問,有興趣的朋友可以去查看下源碼:假如session過期後,我們再請求,shiro是如何處理並跳轉到登錄頁的
參考
《跟我學shiro》


