KeepAlived系列文章:http://www.cnblogs.com/f-ck-need-u/p/7576137.html 本文目錄:1. keepalived+lvs:健康狀況檢查示例2. keepalived+lvs:高可用+健康檢查示例3. keepalived+lvs:多實例+高可用( ...
KeepAlived系列文章:http://www.cnblogs.com/f-ck-need-u/p/7576137.html
本文目錄:
1. keepalived+lvs:健康狀況檢查示例
2. keepalived+lvs:高可用+健康檢查示例
3. keepalived+lvs:多實例+高可用(雙主)
4. 提供sorry server和local RS
本文只給出幾個keepalived+lvs(VS/DR模式)的配置示例,關於keepalived的配置文件說明見:高可用之KeepAlived(一):基本概念和配置文件分析。
在實驗開始前,需要說明幾點:
- 使用keepalived配置lvs的VS/DR模式時,vip建議綁定在別名介面上。如果VIP使用單獨的網卡,在lvs的高可用問題上就會出現問題:使用獨立網卡配置VIP的vrrp實例將總是master角色,除非它完全死機。
- 既然VIP要綁定在某個介面別名上,那麼VIP必須和這個介面在同一網段,否則無法正確配置VIP相關的路由。因此對於keepalived+lvs來說,VIP和rip應該設置在同一網段。除非已經考慮清楚不使用vrrp的高可用功能,這樣VIP不用綁定在網卡別名上,也就可以和rip在不同網段。
- 既然VIP和RIP在同一網段,那麼內網路由器上就無需設置rp_filter。
1.keepalived+lvs:健康狀況檢查示例
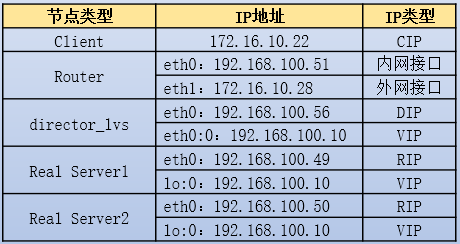
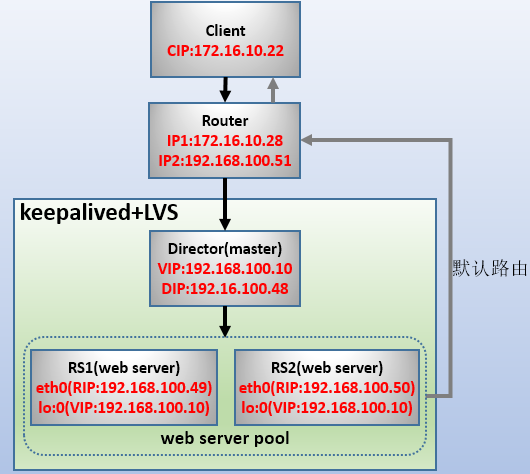
實驗環境如下:


RS上操作:
yum -y install httpd
echo "rs1:192.168.100.49" > /var/www/html/index.html  # RS1上操作
echo "rs1:192.168.100.50" > /var/www/html/index.html  # RS2上操作
service httpd start

echo 1 >/proc/sys/net/ipv4/conf/all/arp_ignore
echo 2 >/proc/sys/net/ipv4/conf/all/arp_announce

ifconfig lo:0 192.168.100.10/32 up
route add -host 192.168.100.10 dev lo

route add default gw 192.168.100.51
Router上操作:
echo 1 >/proc/sys/net/ipv4/ip_forward
Director上操作:
[root@xuexi ~]# route del default
[root@xuexi ~]# route add default gw 192.168.100.51
[root@xuexi ~]# cp /etc/keepalived/keepalived.conf /etc/keepalived/keepalived.conf.bak
[root@xuexi ~]# vim /etc/keepalived/keepalived.conf
! Configuration File for keepalived

global_defs {
   router_id LVS_1
}

vrrp_instance VI_1 {
    state MASTER
    interface eth0
    virtual_router_id 51
    priority 100
    advert_int 1
    authentication {
        auth_type PASS
        auth_pass 12345678
    }
    virtual_ipaddress {
        192.168.100.10/32 dev eth0 label eth0:0
    }
}

virtual_server 192.168.100.10 80 {
        delay_loop 6
        lb_algo wrr
        lb_kind DR
        protocol TCP

        real_server 192.168.100.49 80 {
                weight 2
                TCP_CHECK {
                        connect_port 80
                        connect_timeout 1
                        nb_get_retry 2
                        delay_before_retry 1
                }
        }

        real_server 192.168.100.50 80 {
                weight 1
                TCP_CHECK {
                        connect_port 80
                        connect_timeout 1
                        nb_get_retry 2
                        delay_before_retry 1
                }
        }
}
測試是否能實現連接的負載均衡。
2.keepalived+lvs:高可用+健康檢查示例
KeepAlived通過vrrp的冗餘路由切換協議實現高可用功能,主要用於lvs Director的高可用。
在配置KeepAlived高可用功能時,需要註意以下幾點:
- 兩台(或多台)Director上的vrrp實例名稱要一致,vrid(virtual_router_id)要一致,認證機制以及認證密碼要一致,global定義的伺服器標識router_id不能一致。
- 不同機器上的優先順序priority的值不能一致。priority直接決定誰是master,誰是backup,而無論vrrp實例的state值是MASTER還是BACKUP。
- VIP不能使用獨立的網卡,而應該綁定在別名介面上。如果使用獨立的網卡地址作為VIP,則這個vrrp實例將總是master角色,直至它死機或者該網卡down掉。
- keepalived的vrrp組件不依賴於lvs,它可以獨立提供高可用服務。
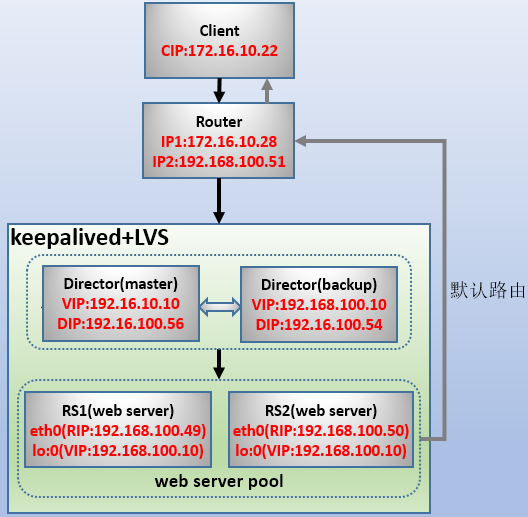
實驗環境如下:


RS1、RS2、Router、director_lvs(master)和前文實驗的配置一致,不需修改。因此,只需提供director_lvs(backup)的配置文件即可。
以下是master上的操作。
[root@xuexi ~]# route del default
[root@xuexi ~]# route add default gw 192.168.100.51
[root@xuexi ~]# cp /etc/keepalived/keepalived.conf /etc/keepalived/keepalived.conf.bak
[root@xuexi ~]# vim /etc/keepalived/keepalived.conf
! Configuration File for keepalived

global_defs {
   router_id LVS_2           # 和master不同
}

vrrp_instance VI_1 {         # 和master相同
    state BACKUP             # 和master不同
    interface eth0
    virtual_router_id 51     # 和master相同
    priority 50              # 和maste不同
    advert_int 1
    authentication {
        auth_type PASS       # 和master相同
        auth_pass 12345678   # 和master相同
    }
    virtual_ipaddress {
        192.168.100.10/32 dev eth0 label eth0:0
    }
}

virtual_server 192.168.100.10 80 {
        delay_loop 6
        lb_algo wrr
        lb_kind DR
        protocol TCP

        real_server 192.168.100.49 80 {
                weight 2
                TCP_CHECK {
                        connect_port 80
                        connect_timeout 1
                        nb_get_retry 2
                        delay_before_retry 1
                }
        }

        real_server 192.168.100.50 80 {
                weight 1
                TCP_CHECK {
                        connect_port 80
                        connect_timeout 1
                        nb_get_retry 2
                        delay_before_retry 1
                }
        }
}
啟動兩Director,查看是否只有master上設置了VIP。註意:ipvs規則在master和backup上都設置了,但由於backup沒有VIP,因此backup設置的ipvs規則暫時是沒有意義的。當backup切換為master狀態時,只會設置VIP。
然後查看master是否已經生效。生效後,將master斷開。觀察原來的backup切換為master的日誌:
Mar  1 20:52:19 xuexi Keepalived_vrrp[4709]: VRRP_Instance(VI_1) Transition to MASTER STATE
Mar  1 20:52:20 xuexi Keepalived_vrrp[4709]: VRRP_Instance(VI_1) Entering MASTER STATE
Mar  1 20:52:20 xuexi Keepalived_vrrp[4709]: VRRP_Instance(VI_1) setting protocol VIPs.
Mar  1 20:52:20 xuexi Keepalived_vrrp[4709]: Sending gratuitous ARP on eth0 for 192.168.100.10
Mar  1 20:52:20 xuexi Keepalived_vrrp[4709]: VRRP_Instance(VI_1) Sending/queueing gratuitous ARPs on eth0 for 192.168.100.10
Mar  1 20:52:20 xuexi Keepalived_vrrp[4709]: Sending gratuitous ARP on eth0 for 192.168.100.10
Mar  1 20:52:20 xuexi Keepalived_vrrp[4709]: Sending gratuitous ARP on eth0 for 192.168.100.10
Mar  1 20:52:20 xuexi Keepalived_vrrp[4709]: Sending gratuitous ARP on eth0 for 192.168.100.10
Mar  1 20:52:20 xuexi Keepalived_vrrp[4709]: Sending gratuitous ARP on eth0 for 192.168.100.10
Mar  1 20:52:25 xuexi Keepalived_vrrp[4709]: Sending gratuitous ARP on eth0 for 192.168.100.10
Mar  1 20:52:25 xuexi Keepalived_vrrp[4709]: VRRP_Instance(VI_1) Sending/queueing gratuitous ARPs on eth0 for 192.168.100.10
Mar  1 20:52:25 xuexi Keepalived_vrrp[4709]: Sending gratuitous ARP on eth0 for 192.168.100.10
Mar  1 20:52:25 xuexi Keepalived_vrrp[4709]: Sending gratuitous ARP on eth0 for 192.168.100.10
Mar  1 20:52:25 xuexi Keepalived_vrrp[4709]: Sending gratuitous ARP on eth0 for 192.168.100.10
Mar  1 20:52:25 xuexi Keepalived_vrrp[4709]: Sending gratuitous ARP on eth0 for 192.168.100.10
可以看到,切換速度極快(1秒以內)。
再測試將原來的master(高優先順序)啟動,發現它再次成為master,切換速度也是極快。
將RS1上的httpd停止。再查看主、備director上的ipvs規則。
[root@xuexi ~]# ipvsadm -ln
IP Virtual Server version 1.2.1 (size=4096)
Prot LocalAddress:Port Scheduler Flags
  -> RemoteAddress:Port           Forward Weight ActiveConn InActConn
TCP  192.168.100.10:80 wrr
  -> 192.168.100.50:80            Route   1      0          0
發現master和backup兩邊都把不健康的RealServer1節點給踢出去了。由此可以知道,健康檢查是master和backup都會迴圈進行的,並不是只有master進行檢查。
再將RS1上的httpd啟動。然後查看ipvs規則。發現沒過幾秒鐘就把規則添加回來了。
3.keepalived+lvs:多實例+高可用(雙主)
keepalive的vrrp多實例可以管理多個director和vip,進而可以實現"雙主模型"的高可用。
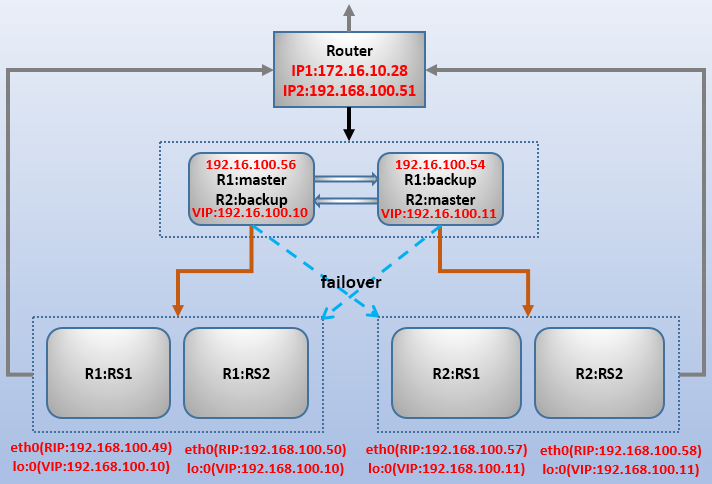
實驗環境如下圖:

其中Director1的vrrp實例1上是R1的master,vrrp實例2是R2的backup,Director2的vrrp實例1是R1的backup,vrrp實例2是R2的master。
這裡略過4個RS的配置步驟(如有問題,參照前文配置RS1、RS2的過程)。
以下是Director1和Director2的keepalived.conf不同部分和相同部分的內容:
# 以下是兩台Director上相同部分的內容
! Configuration File for keepalived                |! Configuration File for keepalived
                                                   |
global_defs {                                      |global_defs {
   router_id LVS_1                                 |   router_id LVS_2
}                                                  |}
                                                   |
vrrp_instance VI_1 {                               |vrrp_instance VI_1 {
    state MASTER                                   |    state BACKUP
    interface eth0                                 |    interface eth0
    virtual_router_id 51                           |    virtual_router_id 51
    priority 100                                   |    priority 50
    advert_int 1                                   |    advert_int 1
    authentication {                               |    authentication {
        auth_type PASS                             |        auth_type PASS
        auth_pass 12345678                         |        auth_pass 12345678
    }                                              |    }
    virtual_ipaddress {                            |    virtual_ipaddress {
        192.168.100.10/32 dev eth0 label eth0:0    |        192.168.100.10/32 dev eth0 label eth0:0
    }                                              |    }
}                                                  |}
# 不同vrrp實例綁定在同一介面上,vrid必須不能相同        |# 不同vrrp實例綁定在同一介面上,vrid必須不能相同
vrrp_instance VI_2 {                               |vrrp_instance VI_2 {
    state BACKUP                                   |    state MASTER
    interface eth0                                 |    interface eth0
    virtual_router_id 55                           |    virtual_router_id 55
    priority 50                                    |    priority 100
    advert_int 1                                   |    advert_int 1
    authentication {                               |    authentication {
        auth_type PASS                             |        auth_type PASS
        auth_pass 12345678                         |        auth_pass 12345678
    }                                              |    }
    virtual_ipaddress {                            |    virtual_ipaddress {
        192.168.100.11/32 dev eth0 label eth0:1    |        192.168.100.11/32 dev eth0 label eth0:1
    }                                              |    }
}                                                  |}
#########################################################################################
# 以下是兩台Director上相同部分的內容
virtual_server 192.168.100.10 80 {
        delay_loop 6
        lb_algo wrr
        lb_kind DR
        protocol TCP

        real_server 192.168.100.49 80 {
                weight 2
                TCP_CHECK {
                        connect_port 80
                        connect_timeout 1
                        nb_get_retry 2
                        delay_before_retry 1
                }
        }

        real_server 192.168.100.50 80 {
                weight 1
                TCP_CHECK {
                        connect_port 80
                        connect_timeout 1
                        nb_get_retry 2
                        delay_before_retry 1
                }
        }
}

virtual_server 192.168.100.11 80 {
        delay_loop 6
        lb_algo wrr
        lb_kind DR
        protocol TCP

        real_server 192.168.100.57 80 {
                weight 2
                TCP_CHECK {
                        connect_port 80
                        connect_timeout 1
                        nb_get_retry 2
                        delay_before_retry 1
                }
        }

        real_server 192.168.100.58 80 {
                weight 1
                TCP_CHECK {
                        connect_port 80
                        connect_timeout 1
                        nb_get_retry 2
                        delay_before_retry 1
                }
        }
}
分別測試訪問兩個VIP:http://192.168.100.10和http://192.168.100.11。其中前者目前只能調度R1:RS1和R1:RS2,後者只能調度R2:RS1和R2:RS2。將任一Director斷開,測試4個RS是否仍能繼續提供服務。
4.提供sorry server和local RS
如果所有RS都宕了,對於外界來說就真的無法再訪問網站了,這顯然不適合。這時可以通過keepalived來配置一個服務頁面。例如告訴外界客戶端網站正在維護狀態,或者只提供一個網站的一個主頁面。
一般來說,因為是在所有RS都宕機的情況下sorry server提供的臨時服務才生效,因此通常將sorry server配置在virtual_server中而非real_server中。
配置時,只需在keepalived配置文件的virtual_server段落中添加sorry_server指令即可。並且,如果啟用了vrrp的高可用,應該在master和backup節點上都加上sorry server。
virtual_server 192.168.100.10 80 {
        delay_loop 6
        lb_algo wrr
        lb_kind DR
        protocol TCP

        sorry_server 127.0.0.1 80
重啟keepalived後,再在每個vrrp機器上配置好httpd。
yum -y install httpd
echo "web Maintenancing" >/var/www/html/index.html
service httpd start
然後將所有的RS節點的httpd服務停掉。再看keepalived上的ipvs規則,發現已經將VIP作為規則添加進來了,於是下次訪問VIP時將調度這台sorry server。當某一臺RS恢復的時候,ipvs規則又會變更為RS的節點。
對於集群系統不大的情況下,LVS Director一般會比較空閑,這樣就比較浪費資源。這時通常會將LVS Director自身也作為一個RS,一邊提供web服務,一邊提供調度功能,不過應該將它的調度權重設置低一點,以免影響負載均衡的性能。這稱為local RS,local RS的RIP可以寫Director上的任意地址(127.0.0.1都可以)。例如:
real_server 127.0.0.1 80 {
        weight 1
        TCP_CHECK {
                connect_port 80
                connect_timeout 1
                nb_get_retry 2
                delay_before_retry 1
        }
}
local RS和sorry server不應該同時設置,因為如果local RS壞了,sorry server肯定無法被調度到。
回到Linux系列文章大綱:http://www.cnblogs.com/f-ck-need-u/p/7048359.html
回到網站架構系列文章大綱:http://www.cnblogs.com/f-ck-need-u/p/7576137.html
回到資料庫系列文章大綱:http://www.cnblogs.com/f-ck-need-u/p/7586194.html
轉載請註明出處:http://www.cnblogs.com/f-ck-need-u/p/8492298.html
註:若您覺得這篇文章還不錯請點擊右下角推薦,您的支持能激發作者更大的寫作熱情,非常感謝!


