
上一節生成Compilation實例後,添加了一些屬性,隨後觸發this-compilation事件流,如下: 事件流的名字this-compilation我想了半天也不懂啥意思,從其內容來看其實也只算是一個預編譯,叫pre-compilation似乎更好。 總之先不管那麼多,繼續跑流程,流程圖如下 ...
上一節生成Compilation實例後,添加了一些屬性,隨後觸發this-compilation事件流,如下:
Compiler.prototype.newCompilation = (params) => {
    // new Compilation()
    const compilation = this.createCompilation();
    compilation.fileTimestamps = this.fileTimestamps;
    compilation.contextTimestamps = this.contextTimestamps;
    compilation.name = this.name;
    compilation.records = this.records;
    compilation.compilationDependencies = params.compilationDependencies;
    // Go!
    this.applyPlugins("this-compilation", compilation, params);
    this.applyPlugins("compilation", compilation, params);
    return compilation;
}
事件流的名字this-compilation我想了半天也不懂啥意思,從其內容來看其實也只算是一個預編譯,叫pre-compilation似乎更好。
總之先不管那麼多,繼續跑流程,流程圖如下:
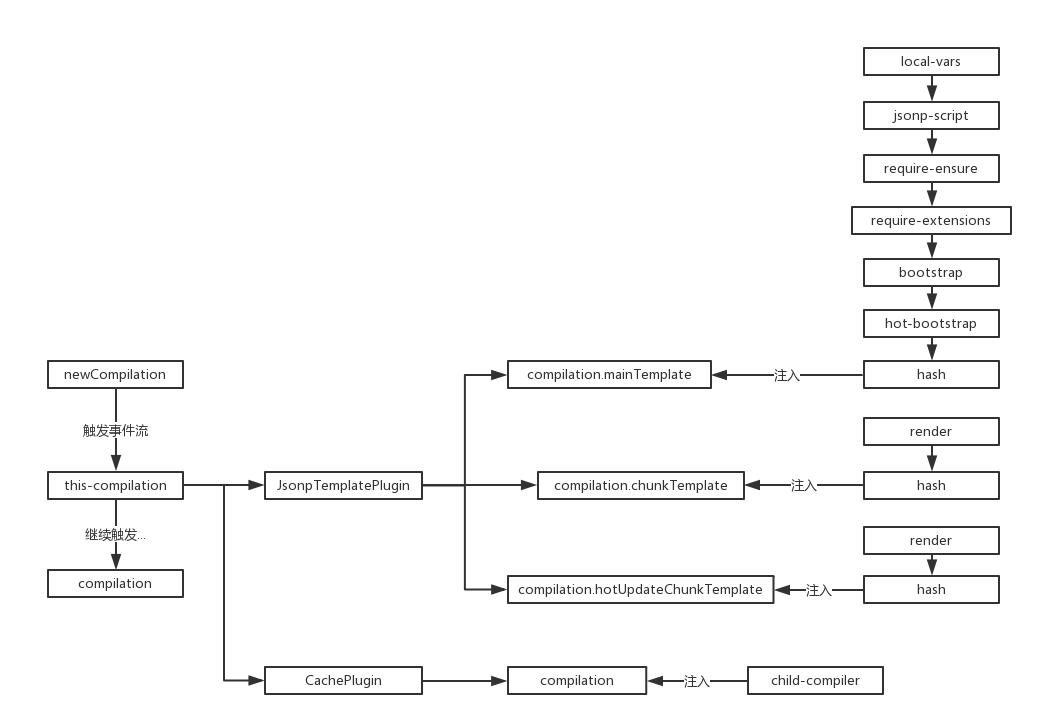
this-compilation事件流的plugin來源有兩個地方,分別是:
// JsonpTemplatePlugin
class JsonpTemplatePlugin {
    apply(compiler) {
        compiler.plugin("this-compilation", (compilation) => {
            compilation.mainTemplate.apply(new JsonpMainTemplatePlugin());
            compilation.chunkTemplate.apply(new JsonpChunkTemplatePlugin());
            compilation.hotUpdateChunkTemplate.apply(new JsonpHotUpdateChunkTemplatePlugin());
        });
    }
}
// CachePlugin
compiler.plugin("this-compilation", compilation => {
    // TODO remove notCacheable for webpack 4
    if (!compilation.notCacheable) {
        compilation.cache = cache;
        compilation.plugin("child-compiler", (childCompiler, compilerName, compilerIndex) => { /**/ });
    } else if (this.watching) {
        compilation.warnings.push(
            new Error(`CachePlugin - Cache cannot be used because of: ${compilation.notCacheable}`)
        );
    }
});
兩者都出現在WebpackOptionsApply模塊中,依次看具體內容。
JsonpTemplatePlugin
這裡依次在上節中提到的Compilation幾個屬性上載入插件(Tapable),首先是:
compilation.mainTemplate.apply(new JsonpMainTemplatePlugin());
該插件源碼整理如下:
"use strict";
const Template = require("./Template");
class JsonpMainTemplatePlugin {
    apply(mainTemplate) {
        // this.plugin("startup", (source, chunk, hash) => { /**/ });
        // this.plugin("render", (bootstrapSource, chunk, hash, moduleTemplate, dependencyTemplates) => { /**/ });
        // this.plugin("local-vars", (source, chunk, hash) => { /**/ });
        // this.plugin("require", (source, chunk, hash) => { /**/ });
        // this.plugin("module-obj", (source, chunk, hash, varModuleId) => { /**/ });
        // this.plugin("require-extensions", (source, chunk, hash) => { /**/ });
        mainTemplate.plugin("local-vars", function(source, chunk) { /**/ });
        mainTemplate.plugin("jsonp-script", function(_, chunk, hash) { /**/ });
        mainTemplate.plugin("require-ensure", function(_, chunk, hash) { /**/ });
        mainTemplate.plugin("require-extensions", function(source, chunk) { /**/ });
        mainTemplate.plugin("bootstrap", function(source, chunk, hash) { /**/ });
        mainTemplate.plugin("hot-bootstrap", function(source, chunk, hash) { /**/ });
        mainTemplate.plugin("hash", function(hash) { /**/ });
    }
}
module.exports = JsonpMainTemplatePlugin;
可見,這裡只是註入對應的事件流,這裡我在註釋同時給出了該屬性初始化時的plugin,可以對比一下,只有local-vars是重覆的。
既然沒有任何的apply操作,就暫時先跳過。
然後是第二個:
compilation.chunkTemplate.apply(new JsonpChunkTemplatePlugin());
源碼如下:
"use strict";
const ConcatSource = require("webpack-sources").ConcatSource;
class JsonpChunkTemplatePlugin {
    apply(chunkTemplate) {
        chunkTemplate.plugin("render", function(modules, chunk) { /**/ });
        chunkTemplate.plugin("hash", function(hash) { /**/ });
    }
}
module.exports = JsonpChunkTemplatePlugin;
同樣只是註入事件流,該屬性在初始化沒有做操作,所有事件流只有這兩。
第三個:
compilation.hotUpdateChunkTemplate.apply(new JsonpHotUpdateChunkTemplatePlugin());
"use strict";
const ConcatSource = require("webpack-sources").ConcatSource;
class JsonpHotUpdateChunkTemplatePlugin {
    apply(hotUpdateChunkTemplate) {
        hotUpdateChunkTemplate.plugin("render", function(modulesSource, modules, removedModules, hash, id) { /**/ });
        hotUpdateChunkTemplate.plugin("hash", function(hash) { /**/ });
    }
}
module.exports = JsonpHotUpdateChunkTemplatePlugin;
與上面那個類似。
該模塊註入完結。
CachePlugin
該插件註入了多個事件流,直接上與this-compilation事件流相關的代碼:
compiler.plugin("this-compilation", compilation => {
    // TODO remove notCacheable for webpack 4
    // 這個屬性我從頭到尾找不到哪出現的
    // 反正註釋說webpack4會將其移除
    if (!compilation.notCacheable) {
        // cache => {}
        compilation.cache = cache;
        // 註入事件流
        compilation.plugin("child-compiler", (childCompiler, compilerName, compilerIndex) => { /**/ });
    }
    // 不可能到達的else
    else if (this.watching) {
        compilation.warnings.push(
            new Error(`CachePlugin - Cache cannot be used because of: ${compilation.notCacheable}`)
        );
    }
});
果然是只是註入事件流,這裡的notCacheable不知道在哪定義的,也不知道如何修改。
總之this-compilation也並不是編譯,只是為一些輔助模塊註入事件流。


