LAMP安裝各種問題解決方案

来源:http://www.cnblogs.com/lovebing/archive/2016/10/22/5988768.html
-Advertisement-
Play Games

LAMP環境配置安裝註意安裝步驟及說明事項。 LAMP安裝各種問題解決 1. 訪問ftp報錯 解決: 關閉selinux vi /etc/selinux/config 內容修改為: selinux=disable 之後重啟reboot。 下圖分別為selinux關閉前 和 關閉後: 2. 依賴軟體查... ...


LAMP環境配置安裝註意安裝步驟及說明事項。

LAMP安裝各種問題解決

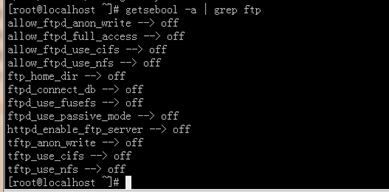
1. 訪問ftp報錯

解決:

關閉selinux

vi /etc/selinux/config

內容修改為: selinux=disable

之後重啟reboot。

下圖分別為selinux關閉前 和 關閉後:
2. 依賴軟體查詢

http://rpmfind.net

一.安裝gcc

gcc

    cloog-ppl

        ppl(libppl.so.7/libppl_c.so.2)

    cpp

mpfr(libmpfr.so.1)

gcc-c++

    libstdc++-devel

mpfr-2.4.1-6.el6.i686.rpm和ppl-0.10.2-11.el6.i686.rpm


快捷鍵rz sz:

rz、sz命令沒找到?

安裝lrzsz即可:

shell># yum -y install lrzsz


二.安裝zlib壓縮庫

shell>## cd /home/jinnan/tar

shell># tar –zxvf zlib-1.2.5.tar.gz

shell># cd zlib-1.2.5

shell># ./configure     //這個配置編譯命令不要加目錄參數

shell># make && make install


三.安裝apache

shell># cd /home/jinnan/tar

shell># tar -jxvf httpd-2.2.19.tar.bz2

shell># cd httpd-2.2.19

shell>#./configure --prefix=/usr/local/http2 \

        --enable-modules=all \

        --enable-mods-shared=all \

        --enable-so

shell># make && make install


啟動Apache

shell># /usr/local/http2/bin/apachectl start


#測試apache

瀏覽器打開: http://虛擬機IP

看到 "it works!",即為成功


配置虛擬主機

1)配置host文件

打開C:/windows/system32/drivers/etc/hosts 文件

增加功能變數名稱記錄

如:

192.168.9.38    www.ec1.com

192.168.9.38    www.ec2.com

2) 增加虛擬主機

vi /usr/local/http2/conf/httpd.conf

取消# Include conf/extra/httpd-vhosts.conf

這一行前面的#號

保存退出


vi /usr/local/http2/conf/extra/httpd-vhosts.conf

增加虛擬主機記錄


<VirtualHost *:80>

    ServerAdmin [email protected]

    DocumentRoot "/usr/local/http2/htdocs/ec1"

    ServerName www.ec1.com

    ServerAlias www.dummy-host.example.com

    ErrorLog "logs/dummy-host.example.com-error_log"

    CustomLog "logs/dummy-host.example.com-access_log" common

</VirtualHost>

<VirtualHost *:80>

    ServerAdmin [email protected]

        DocumentRoot "/usr/local/http2/htdocs/ec2"

    ServerName www.ec2.com

    ErrorLog "logs/dummy-host2.example.com-error_log"

    CustomLog "logs/dummy-host2.example.com-access_log" common

</VirtualHost>

<VirtualHost *:80>

        DocumentRoot "/var/www/shop"

    ServerName www.ec1.com

</VirtualHost>

註意:/var/www/shop 以上三個目錄var www shop 的其他用戶必須有x可執行許可權


3)

    shell># cd /usr/local/http2/htdocs

    shell># mkdir ec1 ec2

    shell># echo this is ec1.com > ec1/index.html

    shell># echo this is ec2.com > ec2/index.html


4)重啟apache

/usr/local/http2/bin/apachectl restart


5)瀏覽器打開www.ec1.com,和www.ec2.com

看到不同的網站內容,虛擬主機創建完畢!


安裝圖形庫,為編譯PHP做準備

libxml2-2.7.2.tar.gz

jpegsrc.v8b.tar.gz

libpng-1.4.3.tar.gz

freetype-2.4.1.tar.gz

gd-2.0.35.tar.gz


四.安裝libxml2

shell># cd /home/jinnan/tar

shell># tar zxvf libxml2-2.7.2.tar.gz

shell># cd libxml2-2.7.2

shell>#./configure --prefix=/usr/local/libxml2 \

--without-zlib

shell># make && make install


五.安裝jpeg8

shell># cd /home/jinnan/tar

shell># tar -zxvf jpegsrc.v8b.tar.gz

shell># cd jpeg-8b

shell>#./configure --prefix=/usr/local/jpeg \

--enable-shared --enable-static

shell># make && make install

--enable-shared 把jpeg需要的函數庫程式都編譯到該軟體裡邊

優點:函數調用速度快

                 缺點:軟體本身比較大

--enable-static 靜態方式函數處理,需要什麼函數,馬上include來

優點:軟體本身比較小

缺點:函數調用速度慢

六.安裝libpng

shell># cd /home/jinnan/tar

shell># tar zxvf libpng-1.4.3.tar.gz

shell># cd libpng-1.4.3

shell>#./configure #zlib一樣不要帶參數,讓它預設安裝到相應目錄

shell># make && make install


七.安裝freetype(字體庫)

shell># cd /home/jinnan/tar

shell># tar zxvf freetype-2.4.1.tar.gz

shell># cd freetype-2.4.1

shell>#./configure --prefix=/usr/local/freetype

shell># make && make install


八.安裝GD庫

shell># cd /home/jinnan/tar

shell># tar -zvxf gd-2.0.35.tar.gz

shell># mkdir -p /usr/local/gd

shell># cd gd-2.0.35

shell>#./configure --prefix=/usr/local/gd \

            --with-jpeg=/usr/local/jpeg/     \

            --with-png --with-zlib \

            --with-freetype=/usr/local/freetype

shell># make && make install


九.安裝 php5

shell># cd /home/jinnan/tar

shell># tar -jxvf php-5.3.6.tar.bz2

shell># cd php-5.3.6

shell>#./configure --prefix=/usr/local/php \

            --with-apxs2=/usr/local/http2/bin/apxs \

            --with-mysql=mysqlnd \

            --with-pdo-mysql=mysqlnd \

            --with-mysqli=mysqlnd \

            --with-freetype-dir=/usr/local/freetype \

            --with-gd=/usr/local/gd \

            --with-zlib --with-libxml-dir=/usr/local/libxml2 \

            --with-jpeg-dir=/usr/local/jpeg \

            --with-png-dir \

            --enable-mbstring=all \

            --enable-mbregex \

            --enable-shared

shell># make && make install

複製php.ini配置文件到指定目錄

shell># cp php.ini-development /usr/local/php/lib/php.ini


配置Apache使其支持php

vi /usr/local/http2/conf/httpd.conf

  1. 在httpd.conf(Apache主配置文件)中增加:

AddType application/x-httpd-php .php    


  1. 找到下麵這段話:

<IfModule dir_module>

DirectoryIndex index.html

</IfModule>

在index.html 前面添加index.php


  1. 建立php測試網頁

vi /usr/local/apache2/htdocs/index.php    

輸入如下內容:

<?php

phpinfo();

?>


  1. 重啟apache

shell># /usr/local/http2/bin/apachectl restart


  1. 再次瀏覽器查看http://虛擬機IP

如果看到php信息,工作就完成了!


  1. 安裝MySQL

    1.安裝cmake

    shell># cd /home/jinnan/tar

    shell># tar zxvf cmake-2.8.5.tar.gz

    shell># cd cmake-2.8.5

    shell># ./bootstrap

    shell># make && make install

    2.編譯安裝MySQL

    shell># cd /home/jinnan/tar

    shell># tar zxvf mysql-5.5.17.tar.gz

    shell># cd mysql-5.5.17

    shell># cmake \

    -DCMAKE_INSTALL_PREFIX=/usr/local/mysql \

    -DMYSQL_DATADIR=/usr/local/mysql/data \

    -DDEFAULT_CHARSET=utf8 \

    -DDEFAULT_COLLATION=utf8_general_ci

    (準備安裝到那裡

    數據存儲目錄

    預設的字元集

    校對字元集)

    (報錯就安裝ncurses-devel)

    shell># mount .....掛載光碟/


    shell># rpm -ivh ncurses-devel-5.7-3.20090208.el6.i686.rpm

    shell># rm -f CMakeCache.txt //刪除該文件

    shell># cmake 。。。 。。。 //重新cmake

    shell># make && make install

    shell># cp support-files/my-medium.cnf /etc/my.cnf

    3.配置並初始化MySQL

    shell># useradd mysql    (mysql用戶會存在於同名的組下)

    shell># chmod +x /usr/local/mysql

    (資料庫用戶信息不小心刪除光了,刪除data目錄,從此開始執行以下指令,直至結束)

    shell># chown -R mysql.mysql /usr/local/mysql


    初始化mysql資料庫

    shell># /usr/local/mysql/scripts/mysql_install_db \

    --user=mysql \

    --basedir=/usr/local/mysql \

    --datadir=/usr/local/mysql/data &


    mysql安裝文件(除了data)的主人都改為root,避免資料庫恢復為出廠設置。

    shell># chown -R root /usr/local/mysql

    shell># chown -R mysql /usr/local/mysql/data


    & 後臺運行mysql服務

    shell># /usr/local/mysql/bin/mysqld_safe --user=mysql &


    //查看mysql是否有啟動

    shell># ps –A | grep mysql


    測試資料庫

    shell># /usr/local/mysql/bin/mysql –u root

    mysql> show databases;    


    接上步,修改mysql密碼(可不做此步,預設無密碼)

    mysql> UPDATE user SET Password=password('123456') WHERE user='root';

    mysql> flush privileges;

  2. 配置開機自啟動服務項

    shell># cp 安裝包解壓目錄/support-files/mysql.server /etc/init.d/mysqld

    shell># chmod +x /etc/init.d/mysqld

    shell># chkconfig --add mysqld

    shell># chkconfig mysqld on //設置開機自啟動


    配置文件路徑:

    shell># vi /etc/rc.d/rc.local

    文件中增加啟動相關服務的命令如下:

    /usr/local/http2/bin/apachectl start

    /usr/local/mysql/bin/mysqld_safe --user=mysql &

    service vsftpd start


    重新安裝apache啟動失敗

    [root@localhost httpd-2.2.19]# /usr/local/http2/bin/apachectl restart

    httpd not running, trying to start

    (98)Address already in use: make_sock: could not bind to address [::]:80

    (98)Address already in use: make_sock: could not bind to address 0.0.0.0:80

    no listening sockets available, shutting down

    Unable to open logs


    原因是80埠被占用

    解決:


    查看80埠使用情況

    [root@localhost httpd-2.2.19]# netstat -lnp|grep 80

    tcp 0 0 :::80 :::* LISTEN 28195/httpd

    unix 2 [ ACC ] STREAM LISTENING 6580 1957/gpm /dev/gpmctl

    unix 2 [ ACC ] STREAM LISTENING 5422 1800/pcscd /var/run/pcscd.comm

    查看80的使用者是誰埠

    [root@localhost httpd-2.2.19]# ps 28195

    PID TTY STAT TIME COMMAND

    28195 ? Ss 0:00 /usr/local/http2/bin/httpd -k restart

    經過分析知道了80埠被系統的一個進程占用,這個進程是舊的apache服務


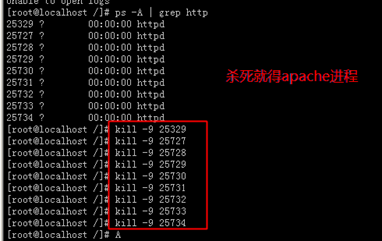
    將這個進程殺之

    [root@localhost httpd-2.2.19]# kill -9 28195

    [root@localhost httpd-2.2.19]#


    十一.卸載操作系統自帶apache


    1. 刪除預設apache進程

killall httpd 殺死全部的httpd進程

  1. 把預設apache服務給刪除

  2. 啟動自己的apache


您的分享是我們最大的動力!

-Advertisement-
Play Games
更多相關文章
  • 1. 新建項目 項目名稱:MFCBaseMessage 2. 選擇基本對話框模式,如圖 ,點擊完成3. 最終如圖 4.右鍵添加類嚮導<!--StartFragment --> 5.添加滑鼠事件 6.在ON_LButtonDown添加如下代碼: 7。查看效果 8.模擬發送事件 9.查看效果 ...
  • Git分支管理簡介 幾乎每一種版本控制系統都以某種形式支持分支。使用分支意味著你可以從開發主線上分離開來,然後在不影響主線的同時繼續工作。 有人把 Git 的分支模型稱為"必殺技特性",而正是因為它,將 Git 從版本控制系統家族裡區分出來。 創建分支命令: git branch (branchna ...
  • Git 的工作就是創建和保存你項目的快照及與之後的快照進行對比,簡單的說Git就是源代碼管理工具。下麵是工作中經常用到的簡單的Git命令,如有不足,希望提出交流,謝謝。 一.獲取與創建項目命令 1.git init 用 git init 在目錄中創建新的 Git 倉庫。 你可以在任何時候、任何目錄中 ...
  • 理解I2C設備驅動框架,主要圍繞四個結構體去分析就容易了。 struct i2c_algorithm:提供I2C協議的實現的操作,如:master_xfer實現數據收發的最基本方法。 struct i2c_adapter:每一個i2c_adapter都代表一個I2C物理介面,一個cpu可以有多個I2 ...
  • 一、MSMQ是什麼 Message Queuing(MSMQ) 是微軟開發的消息中間件,可應用於程式內部或程式之間的非同步通信。主要的機制是:消息的發送者把自己想要發送的信息放入一個容器中(我們稱之為Message),然後把它保存至一個系統公用空間的消息隊列(Message Queue)中;本地或者是 ...
  • /* * (un)comment correct payload first (x86 or x64)! * * $ gcc cowroot.c -o cowroot -pthread * $ ./cowroot * DirtyCow root privilege escalation * Back ...
  • 版權聲明:本文發佈於http://www.cnblogs.com/yumiko/,版權由Yumiko_sunny所有,歡迎轉載。轉載時,請在文章明顯位置註明原文鏈接。若在未經作者同意的情況下,將本文內容用於商業用途,將保留追究其法律責任的權利。如果有問題,請以郵箱方式聯繫作者(793113046@q ...
  • 在使用系統時,我們或多或少的有一些搜索、查找的需求,必須要在文本中搜索某個關鍵字,或者過濾出文本中某些特定的行。grep 命令就為我們提供了這樣一個功能,同時,grep 還可以使用正則表達式進行匹配,這是一個強大的功能,有必要好好掌握。 1.grep 初體驗 grep PATTERN [OPTION ...
一周排行
    -Advertisement-
    Play Games
  • 示例項目結構 在 Visual Studio 中創建一個 WinForms 應用程式後,項目結構如下所示: MyWinFormsApp/ │ ├───Properties/ │ └───Settings.settings │ ├───bin/ │ ├───Debug/ │ └───Release/ ...
  • [STAThread] 特性用於需要與 COM 組件交互的應用程式,尤其是依賴單線程模型(如 Windows Forms 應用程式)的組件。在 STA 模式下,線程擁有自己的消息迴圈,這對於處理用戶界面和某些 COM 組件是必要的。 [STAThread] static void Main(stri ...
  • 在WinForm中使用全局異常捕獲處理 在WinForm應用程式中,全局異常捕獲是確保程式穩定性的關鍵。通過在Program類的Main方法中設置全局異常處理,可以有效地捕獲並處理未預見的異常,從而避免程式崩潰。 註冊全局異常事件 [STAThread] static void Main() { / ...
  • 前言 給大家推薦一款開源的 Winform 控制項庫,可以幫助我們開發更加美觀、漂亮的 WinForm 界面。 項目介紹 SunnyUI.NET 是一個基於 .NET Framework 4.0+、.NET 6、.NET 7 和 .NET 8 的 WinForm 開源控制項庫,同時也提供了工具類庫、擴展 ...
  • 說明 該文章是屬於OverallAuth2.0系列文章,每周更新一篇該系列文章(從0到1完成系統開發)。 該系統文章,我會儘量說的非常詳細,做到不管新手、老手都能看懂。 說明:OverallAuth2.0 是一個簡單、易懂、功能強大的許可權+可視化流程管理系統。 有興趣的朋友,請關註我吧(*^▽^*) ...
  • 一、下載安裝 1.下載git 必須先下載並安裝git,再TortoiseGit下載安裝 git安裝參考教程:https://blog.csdn.net/mukes/article/details/115693833 2.TortoiseGit下載與安裝 TortoiseGit,Git客戶端,32/6 ...
  • 前言 在項目開發過程中,理解數據結構和演算法如同掌握蓋房子的秘訣。演算法不僅能幫助我們編寫高效、優質的代碼,還能解決項目中遇到的各種難題。 給大家推薦一個支持C#的開源免費、新手友好的數據結構與演算法入門教程:Hello演算法。 項目介紹 《Hello Algo》是一本開源免費、新手友好的數據結構與演算法入門 ...
  • 1.生成單個Proto.bat內容 @rem Copyright 2016, Google Inc. @rem All rights reserved. @rem @rem Redistribution and use in source and binary forms, with or with ...
  • 一:背景 1. 講故事 前段時間有位朋友找到我,說他的窗體程式在客戶這邊出現了卡死,讓我幫忙看下怎麼回事?dump也生成了,既然有dump了那就上 windbg 分析吧。 二:WinDbg 分析 1. 為什麼會卡死 窗體程式的卡死,入口門檻很低,後續往下分析就不一定了,不管怎麼說先用 !clrsta ...
  • 前言 人工智慧時代,人臉識別技術已成為安全驗證、身份識別和用戶交互的關鍵工具。 給大家推薦一款.NET 開源提供了強大的人臉識別 API,工具不僅易於集成,還具備高效處理能力。 本文將介紹一款如何利用這些API,為我們的項目添加智能識別的亮點。 項目介紹 GitHub 上擁有 1.2k 星標的 C# ...