資料庫設置 在上一章節中學習瞭如何創建Django項目,在Django項目中創建web應用,以及如何在Django主程式的URL中引用web應用中的URL。下麵來瞭解如何在Django中使用資料庫。Django中想要使用資料庫, 首先要瞭解mysite/mysite/settings.py中關於數據 ...
資料庫設置
在上一章節中學習瞭如何創建Django項目,在Django項目中創建web應用,以及如何在Django主程式的URL中引用web應用中的URL。下麵來瞭解如何在Django中使用資料庫。Django中想要使用資料庫, 首先要瞭解mysite/mysite/settings.py中關於資料庫連接信息選項的設置。
Django預設使用的是sqlite3資料庫,sqlite是一個輕量級的基於文件的資料庫,因此數據遷移非常方便。多用於單機程式,嵌入式,開發測試demo等。但它不支持資料庫用戶管理,在同一時間只允許一個寫操作所以像一些要求數據用戶對資料庫的許可權設置,對資料庫進行併發操作時sqlite就不是我們想要的了,這時我們可以使用MySQL,postgresqlm,Oracle等大型資料庫。因為我們要寫的是一個投票系統,理論上會有很多用戶可以進行投票(哈哈),因此這裡我們使用mariadb資料庫,它是在MySQL基礎上的一個開源的資料庫,與MySQL完全相容。關於mariadb請自行百度。
1、設置mariadb資料庫
這裡我使用的是yum的方式進行安裝的,方便快捷,Django需要MySQL5.6以上的版本,所以這裡使用mariadb10.2.31。該版本包含MySQL5.6,MySQL5.7以及一些自有的新的特性。
1.1 設置mariadb的官方yum源
[root@localhost mysite]# vi /etc/yum.repos.d/MariaDB.repo  # 添加官方mariadb10.2.31的源
[mariadb]
name = MariaDB
baseurl = http://yum.mariadb.org/10.2.31/centos7-amd64/
gpgkey=https://yum.mariadb.org/RPM-GPG-KEY-MariaDB
gpgcheck=1
如果想要使用其它版本請到官網https://downloads.mariadb.org/自行下載對應版本。
1.2 安裝mariadb10.2.31
[root@localhost mysite]# yum install MariaDB-server MariaDB-client -y
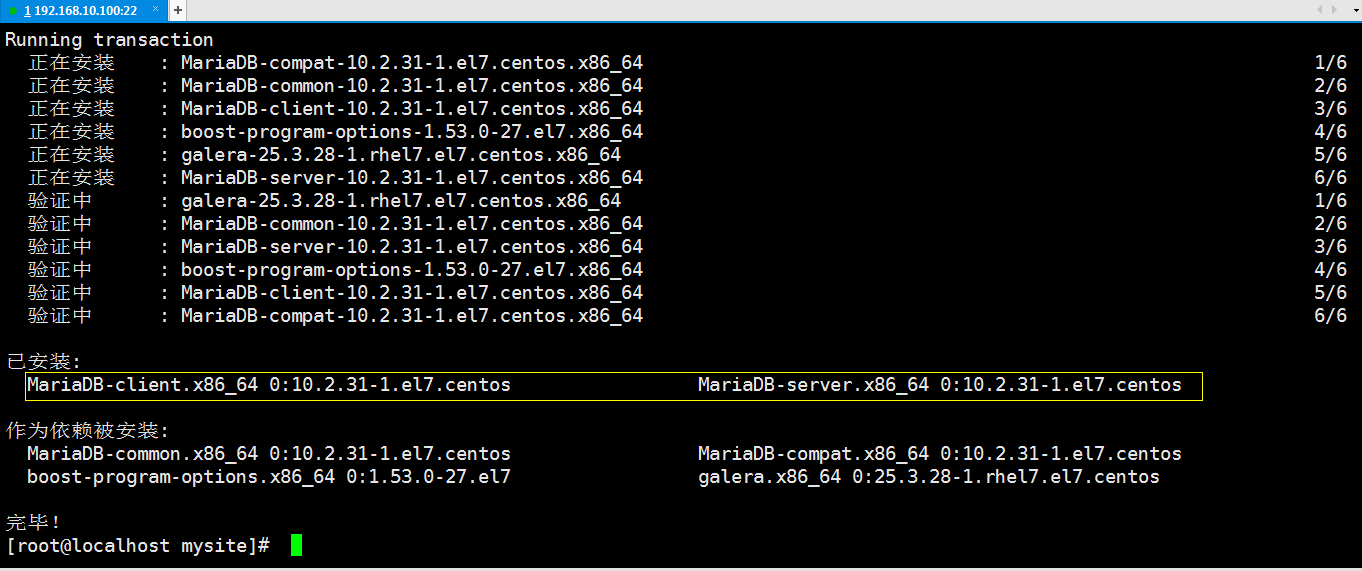
安裝完成後,你應該能看到如下界面:
1.3 mariadb服務管理
在centos 7中通過yum安裝的程式我們都可以使用systemctl工具來對其服務進行管理
[root@localhost ~]# systemctl start mariadb     // 開啟mysql服務
[root@localhost ~]# systemctl stop mariadb      // 停止mysql服務
[root@localhost ~]# systemctl restart mariadb   // 重啟mysql服務
[root@localhost ~]# systemctl enable mariadb    // 設置開機啟動
[root@localhost ~]# systemctl disable mariadb   // 禁止開機啟動
1.4 初始化mariadb資料庫
MariaDB 安裝完畢併成功啟動後為了確保資料庫的安全性和正常運轉,需要先對資料庫程式進行初始化操作。

 1 [root@localhost ~]# systemctl start mariadb     // 啟動mysql服務
 2 [root@localhost ~]# mysql_secure_installation   // 初始化mysql資料庫
 3
 4 // 進入mariadb的初始化配置模式
 5 NOTE: RUNNING ALL PARTS OF THIS SCRIPT IS RECOMMENDED FOR ALL MariaDB
 6       SERVERS IN PRODUCTION USE!  PLEASE READ EACH STEP CAREFULLY!
 7
 8 In order to log into MariaDB to secure it, we'll need the current
 9 password for the root user.  If you've just installed MariaDB, and
10 you haven't set the root password yet, the password will be blank,
11 so you should just press enter here.
12
13 ERROR 1045 (28000): Access denied for user 'root'@'localhost' (using password: YES)
14 Enter current password for root (enter for none):    // 這裡輸入mysql資料庫root密碼,預設沒有密碼
15 OK, successfully used password, moving on...
16
17 Setting the root password ensures that nobody can log into the MariaDB
18 root user without the proper authorisation.
19
20 Set root password? [Y/n] y     //  是否為mysql資料庫root用戶設置密碼,這裡我們設置密碼
21 New password:    // 輸入要設置的密碼
22 Re-enter new password:   // 確認輸入的密碼
23 Password updated successfully!
24 Reloading privilege tables..
25  ... Success!
26
27
28 By default, a MariaDB installation has an anonymous user, allowing anyone
29 to log into MariaDB without having to have a user account created for
30 them.  This is intended only for testing, and to make the installation
31 go a bit smoother.  You should remove them before moving into a
32 production environment.
33
34 Remove anonymous users? [Y/n] y   //  是否要刪除匿名用戶,這裡刪除掉。要不然可以在不輸入用戶名和密碼的情況下登陸資料庫
35  ... Success!
36
37 Normally, root should only be allowed to connect from 'localhost'.  This
38 ensures that someone cannot guess at the root password from the network.
39
40 Disallow root login remotely? [Y/n] n   // 是否拒絕root用戶從遠程登陸資料庫,這裡允許root用戶遠程登陸資料庫
41  ... skipping.
42
43 By default, MariaDB comes with a database named 'test' that anyone can
44 access.  This is also intended only for testing, and should be removed
45 before moving into a production environment.
46
47 Remove test database and access to it? [Y/n] y   // 是否刪除mysql自帶的test測試資料庫,這裡沒什麼用就刪除了吧
48  - Dropping test database...
49  ... Success!
50  - Removing privileges on test database...
51  ... Success!
52
53 Reloading the privilege tables will ensure that all changes made so far
54 will take effect immediately.
55
56 Reload privilege tables now? [Y/n] y   // 是否立即生效,這裡立即生效
57  ... Success!
58
59 Cleaning up...
60
61 All done!  If you've completed all of the above steps, your MariaDB
62 installation should now be secure.
63
64 Thanks for using MariaDB!
65
66 mariadb資料庫的初始化
初始化mariadb
1.5 配置mariadb資料庫的編碼
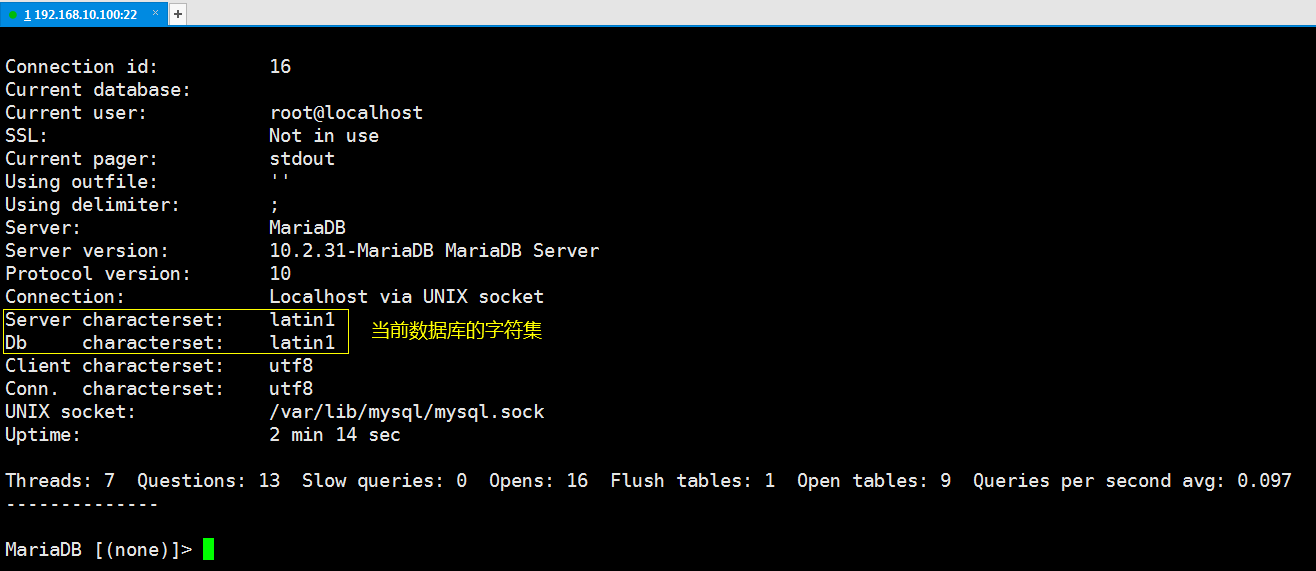
mariadb的預設資料庫編碼是拉丁文,如果你不信我們登陸資料庫看一下:
[root@localhost mysite]# mysql -uroot -p  # 登錄資料庫
MariaDB [(none)]> \s     # 登錄資料庫後輸入\s查看mariadb服務的狀態信息
我們需要調整下my.cnf的配置文件
[root@localhost bin]# vim /etc/my.cnf

[mysqld]

character-set-server=utf8           // 設置服務端的字元集
collation-server=utf8_general_ci    // 設置服務端的字元集

datadir=/var/lib/mysql
socket=/var/lib/mysql/mysql.sock
# Disabling symbolic-links is recommended to prevent assorted security risks
symbolic-links=0
# Settings user and group are ignored when systemd is used.
# If you need to run mysqld under a different user or group,
# customize your systemd unit file for mariadb according to the
# instructions in http://fedoraproject.org/wiki/Systemd

[mysqld_safe]
log-error=/var/log/mariadb/mariadb.log
pid-file=/var/run/mariadb/mariadb.pid

[client]                //  設置客戶端的字元集
default-character-set=utf8
[mysql]                //  設置客戶端的字元集
default-character-set=utf8
#
# include all files from the config directory
#
!includedir /etc/my.cnf.d
my.cnf
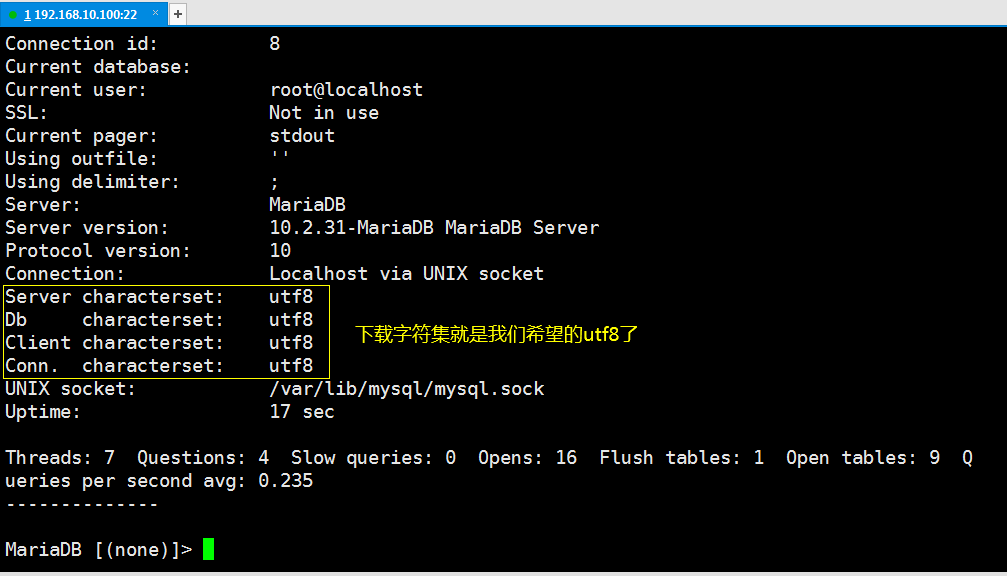
設置好字元集後,重啟mariadb,登錄資料庫驗證字元集
[root@localhost mysite]# systemctl restart mariadb
[root@localhost mysite]# mysql -uroot -p  # 登錄資料庫
MariaDB [(none)]> \s     # 登錄資料庫後輸入\s查看mariadb服務的狀態信息
資料庫設置到這裡算是告一段落,但事情並沒有結束,我們還需要為我們的Django程式創建一個 資料庫,以及操作這個資料庫的用戶。
1.6 創建資料庫mysqite,並未資料庫分配用戶。
MariaDB [(none)]> create database mysite;  # 為我們的Django程式創建mysite資料庫

# 為mysite資料庫創建一個mysite_user用戶,該用戶對資料庫擁有所有許可權,並且可以在任意主機訪問該資料庫
# 雖然這麼做是不安全的,但現在是初學暫且就這麼設置吧
MariaDB [(none)]> grant all on mysite.* to mysite_user@'%' identified by '用戶密碼';  # 為資料庫分配用戶
MariaDB [(none)]> flush privileges;   # 更新許可權,使設置生效
好了我們已經創建好了資料庫:mysite,資料庫用戶:mysite_user 並且允許該用戶在任意主機訪問該資料庫。
1.7 驗證是否可以遠程連接資料庫mysite
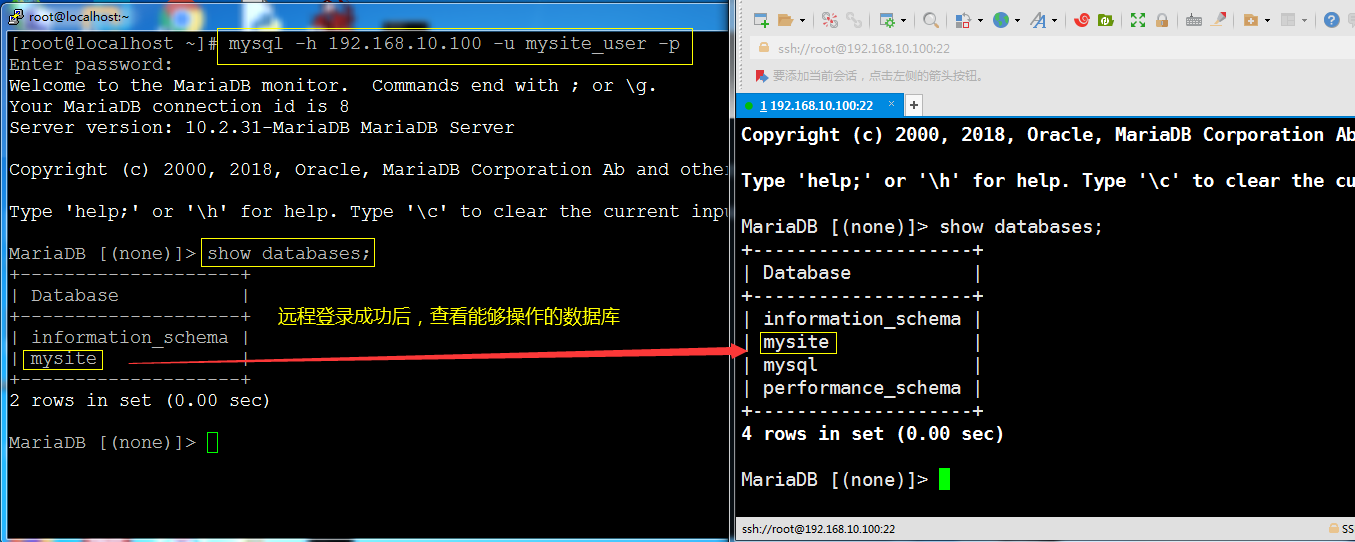
在運行一臺主機嘗試遠程登錄資料庫查看,是否可以登錄,為確保可以登錄建議關閉防火牆,如果一切順利你會看到:
到目前為止,資料庫操作就到這裡。下麵到settings.py中進行設置
2、設置mysite/mysite/settings.py
[root@localhost mysite]# vim mysite/settings.py

如果我們使用的是sqlite3資料庫,那麼就不需要像上面那樣設置資料庫及修改settings.py就可以直接使用資料庫了,但我們要使用的是mariadb,所以我們還需要修改這段配置。

 1 [root@localhost mysite]# vim mysite/settings.py
 2 DATABASES = {
 3     'default': {
 4         'ENGINE': 'django.db.backends.mysql',
 5         'HOST': '192.168.10.100',
 6         'PORT': 3306,
 7         'NAME': 'mysite',
 8         'USER': 'mysite_user',
 9         'PASSWORD': '123.abc',
10     }
11 }
settings.py資料庫部分設置
修改後的settings.py看起來像下麵這樣:
[root@localhost mysite]# vim mysite/settings.py # 設置資料庫連接選項

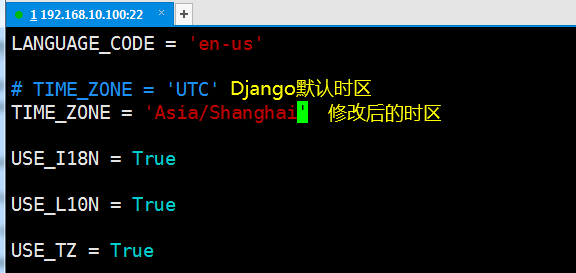
資料庫連接設置好後,你還需要做一件事,那就是設置Django的時區,Django預設的時區是UTC,我們需要將時區改成中國的,所以你需要在settings.py中找到TIME_ZONE選項並改正。修改後的樣子如下:
到此settings.py配置就告一段落。我們通過Django以ORM的方式在資料庫中創建表。
3、創建models(在資料庫中建表)
我們在來看一下mysite項目的結構:

再來看一下web應用polls的結構:
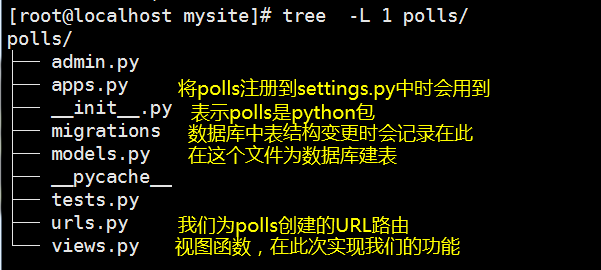
上一章節我們只是簡單的創建了應用polls,並對其進行訪問,如果我們想要polls能夠在資料庫中創建表,還需要在主程式的settings.py中將我們的polls註冊進去才可以。
因為Django是通過 python manage.py migrate來創建表的,該命令會將settings.py中的INSTALLED_APPS中註冊的應用結合DATABASES中的資料庫連接信息,並根據INSTALLED_APPS中註冊應用的models.py進行數據的遷移(也就是創建表)。所以我們需要將polls應用註冊到settings.py的INSTALLED_APPS選項中。
[root@localhost mysite]# vim mysite/settings.py # 像配置文件中註冊polls應用
註冊後的文件看起來像下麵這樣:

好了現在我們可以到polls/models.py中去創建表了,
創建表前先簡單的設計一下我們的這個投票程式。我們將創建兩個模型:問題和選擇。
問題模型中有兩個欄位:問題欄位和問題的發佈日期欄位。
選擇模型中有三個欄位:一個關聯問題模型的外鍵(一個問題對應一個選擇投票的權利),選擇的文本和投票計數。
當我們設計好表結構後就可以動手在models中去創建表了,如果沒有接觸過ORM也許會對這種創建表的方式感到不解,不過隨著不斷的學習我相信會慢慢習慣的。
我的models.py看起來像下麵這樣
[root@localhost mysite]# vim polls/models.py   # 在此處創建表

from django.db import models

# Create your models here.
class Question(models.Model):  # 問題表
    question_text = models.CharField(max_length=200)
    pub_data = models.DateTimeField('date published')

class Choice(models.Model):   # 選擇表
    question = models.ForeignKey(Question,on_delete=models.CASCADE)
    choice_text = models.CharField(max_length=200)
    votes = models.IntegerField(default=0)
到這裡我們不要停歇還差一步就可以了,雖然前邊又是配置資料庫連接信息,又是註冊應用的,但我們現在還是無法連接資料庫,因為python使用mariadb資料庫還需要一些第三方模塊的輔助,這裡我們使用mysqlclient模塊。安裝過程中可能會遇到很多問題,不過我這裡都解決了,我就不帶著大家一步步入坑了。直接把坑填好:
[root@localhost ~]# pip3 install --upgrade pip  # 先升級pip
[root@localhost ~]# yum install MariaDB-shared MariaDB-devel python3-devel -y  # 安裝mariadb的動態庫和靜態庫和python3對應的庫
[root@localhost ~]# pip3 install mysqlclient
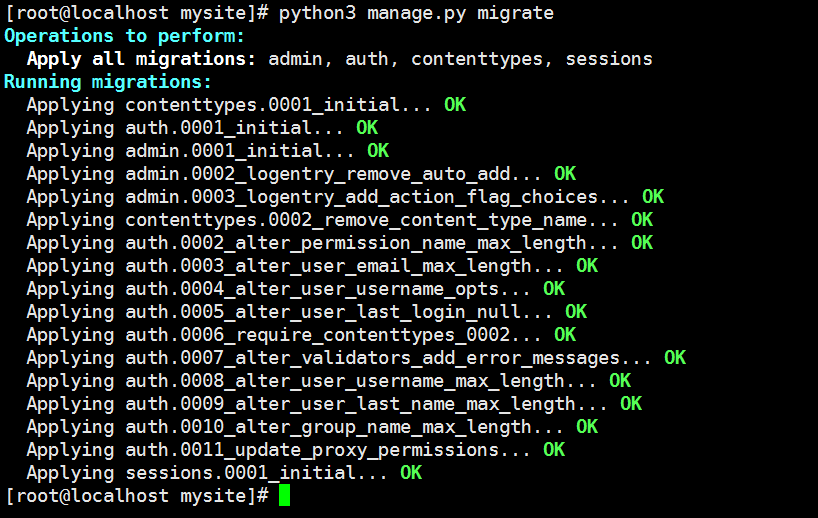
現在可以說是萬事俱備只欠東風了,在資料庫mysite中創建表(執行數據遷移)
[root@localhost mysite]# python3 manage.py migrate # 執行數據遷移(創建Django所需的表,而不是我們models.py中的表)
如果一切順利,你會看到如下:
[root@localhost mysite]# python3 manage.py makemigrations # 將models.py中更新的數據寫入到polls/migrations/xxxx_initial.py中)

我們可以執行如下命令來查看Django剛剛都為我們都做了什麼:
[root@localhost mysite]# python3 manage.py sqlmigrate polls 0001

執行數據遷移(在資料庫中建表)
[root@localhost mysite]# python3 manage.py migrate #該命令會讀取polls/migrations/xxxx_initial.py中的內容,連接資料庫執行裡面更新後的sql語句
驗證:到資料庫中驗證是否創建了表
[root@localhost mysite]# mysql -uroot -p   # 登錄資料庫
MariaDB [(none)]> use mysite;
MariaDB [mysite]> show tables;
你會看到如下表:

好啦,關於資料庫就先到這裡吧,下一章節將瞭解Django為我們提供的admin後臺。
本文參考文檔:https://docs.djangoproject.com/en/2.2/intro/tutorial02/


