目的: 瞭解linux的啟動過程 主要內容: 1.grub 是啟動程式的bootloader 2.linux kernel 是linux的開源內核 3.busybox 是linux的工具集合 啟動順序: grub bzimage initrd init chroot sbin/init (從記憶體鏡像 ...
目的:
瞭解linux的啟動過程
主要內容:
1.grub 是啟動程式的bootloader
2.linux-kernel 是linux的開源內核
3.busybox 是linux的工具集合
啟動順序:
grub-> bzimage > initrd > init > chroot sbin/init (從記憶體鏡像轉換成rootfs)>/etc/inittab > fstab>etc/init.d/rcS
實驗環境:
操作系統(編譯使用): CentOS 7.4Kernel 版本 :5.5.2
1.編譯linux kernel
1) 下載及解壓:
https://www.kernel.org/

目前最新版本5.5.2

https://cdn.kernel.org/pub/linux/kernel/v5.x/linux-5.5.2.tar.xz

複製文件到 /usr/src/linux-5.5.2.tar.xz

解壓 tar -xvf linux-5.5.2.tar.xz
2)編譯linux kernel:
1 yum install ncusres‐devel # 按照需要編譯的一些包

2 cd /usr/src/linux‐5.5.2 # 切換到linux源代碼目錄

3 make menuconfig #配置內核編譯內容,配置一些信息 ,由於是演示,預設就可以了

4 make ‐j4 #執行多cpu方式編譯

5 midir /usr/src/modules

6 make modules_install INSTALL_MOD_PATH=/usr/src/modules #將modules安裝在這裡
2.編譯busybox
1) 下載及解壓:
https://busybox.net/

目前最新版本1.31.1

https://busybox.net/downloads/busybox-1.31.1.tar.bz2

複製文件到 /usr/src/busybox-1.31.1.tar.bz2

解壓 tar -jxvf busybox-1.31.1.tar.bz2
2) 編譯busybox
1 yum install glibc‐static # 按照需要編譯的靜態庫包

2 cd /usr/src/busybox‐1.31.1 # 切換到busybox源代碼目錄

3 make menuconfig # 配置 Settings‐>Build Options‐>Build static binary

4 make install
3.根據busybox 製作initrd.gz文件
1 make /usr/src/initrd # 創建初始化目錄

2 cd /usr/src/initrd # 進入工作目錄

3 cp /usr/src/busybox‐1.31.1/_install/* ‐a . #複製所有busybox文件

4 mkdir proc sys mnt/sysroot dev tmp etc ‐pv #創建必要的目錄

5 mknod dev/console c 5 1 # 創建console設備

6 mknod dev/null c 1 3 # 創建null設備

7 rm linuxrc # 刪除軟連接,這個文件沒啥用看著不舒服而已

8 touch init # 創建init 引導程,具體內容見下麵信息

9 chmod +x init # 設置可運行程式

10 find . | cpio ‐H newc ‐‐quiet ‐o | gzip ‐9 > /usr/src/initrd.gz #打包initrd
init 文件內容:
1 #!/bin/sh

2

3 echo "Mounting proc and sys..."

4 mount ‐t sysfs sysfs /sys

5 mount ‐t proc proc /proc

6

7 echo "Detect and export hardware infomation..."

8 mdev ‐s

9

10 echo "Mount real rootfs to /mnt/sysroot..."

11 mount ‐t ext4 ‐o ro /dev/sda2 /mnt/sysroot

12

13 echo "Switch to real rootfs..."

14 exec chroot /mnt/sysroot /sbin/init
4.根據linux kernel 編譯輸出整理成 vmlinuz
1 cp /usr/src/linux‐5.5.2/arch/x86/boot/bzImage /usr/src/vmlinuz #複製內核5.根據busybox 製作rootfs 系統真正的linux目錄
1 make /usr/src/sysroot #創建工作目錄

2 cd sysroot #進入工作目錄

3 cp /usr/src/busybox‐1.31.1/_install/* ‐a . #複製所有busybox文件

4 rm linuxrc # 刪除軟連接,這個文件沒啥用看著不舒服而已

5 # 創建目錄

6 mkdir dev var sys mnt etc proc lib home tmp root boot

7 mkdir var/{log,run,lock}

8 mkdir lib/modules

9 mknod dev/console c 5 1 # 創建console設備

10 mknod dev/null c 1 3 # 創建null設備

11 vim etc/inittab #創建rootfs啟動文件,內容見下圖

12 vim etc/init.d/rcS #創建啟動腳本

13 chmod +x rcS

14 vim etc/fstab #當執行mount ‐a 的時候就會執行這個文件里的掛載
inittab 文件內容:
1 ::sysinit:/etc/init.d/rcS

2 ::askfirst:‐/bin/sh

3 ::ctrlaltdel:/sbin/reboot

4 ::shutdown:/bin/umount ‐a ‐r

5 ::restart:/sbin/init
rcS 文件內容:
1 #!/bin/sh

2

3 echo ‐e "Welcome To My Linux"

4

5 echo "Remount the rootfs..."

6 mount ‐t ext4 ‐o remount,rw /dev/sda2 /

7 echo "Detect and export hardware infomation..."

8 mdev ‐s

9 echo "Mount the other filesystem...fstab"

10 mount ‐a
fstab:
1 # device mount‐point type options dump fsck

2 sysfs /sys sysfs defaults 0 0

3 proc /proc proc defaults 0 0

4 /dev/sda1 /boot ext4 defaults 0 0

5 /dev/sda2 / ext4 defaults 1 1
6.經過上面的步驟已經實現了 vmlinuz(linux 內核) initrd.gz(記憶體系統盤) sysroot (真正的linux rootfs系統) 都已經準備好了,接下來開始準備一塊磁碟。
通過virtual box 創建一塊sata磁碟10G 並分成兩個區.
1 [root@centos ~]# lsblk

2 NAME MAJ:MIN RM SIZE RO TYPE MOUNTPOINT

3 sda 8:0 0 100G 0 disk

4 ├─sda1 8:1 0 1G 0 part /boot

5 └─sda2 8:2 0 99G 0 part

6 ├─cl‐root 253:0 0 50G 0 lvm /

7 ├─cl‐swap 253:1 0 2G 0 lvm [SWAP]

8 └─cl‐home 253:2 0 47G 0 lvm /home

9 sdb 8:16 0 10G 0 disk

10 sr0 11:0 1 1024M 0 rom

11 ###############################################

12 [root@centos ~]# fdisk /dev/sdb #開始格式化

13 Welcome to fdisk (util‐linux 2.23.2).

14

15 Changes will remain in memory only, until you decide to write them.

16 Be careful before using the write command.

17

18 Device does not contain a recognized partition table

19 Building a new DOS disklabel with disk identifier 0x3f5d5436.

20

21 Command (m for help): n

22 Partition type:

23 p primary (0 primary, 0 extended, 4 free)

24 e extended

25 Select (default p): p

26 Partition number (1‐4, default 1): 1

27 First sector (2048‐20971519, default 2048): 2048

28 Last sector, +sectors or +size{K,M,G} (2048‐20971519, default 20971519):

+5G

29 Partition 1 of type Linux and of size 5 GiB is set

30

31 Command (m for help): n

32 Partition type:

33 p primary (1 primary, 0 extended, 3 free)

34 e extended

35 Select (default p): p

36 Partition number (2‐4, default 2):

37 First sector (10487808‐20971519, default 10487808):

38 Using default value 10487808

39 Last sector, +sectors or +size{K,M,G} (10487808‐20971519, default 209715

19):

40 Using default value 20971519

41 Partition 2 of type Linux and of size 5 GiB is set

42

43 Command (m for help): p

44

45 Disk /dev/sdb: 10.7 GB, 10737418240 bytes, 20971520 sectors

46 Units = sectors of 1 * 512 = 512 bytes

47 Sector size (logical/physical): 512 bytes / 512 bytes

48 I/O size (minimum/optimal): 512 bytes / 512 bytes

49 Disk label type: dos

50 Disk identifier: 0x3f5d5436

51

52 Device Boot Start End Blocks Id System

53 /dev/sdb1 2048 10487807 5242880 83 Linux

54 /dev/sdb2 10487808 20971519 5241856 83 Linux

55

56 Command (m for help): w

57 The partition table has been altered!

58

59 Calling ioctl() to re‐read partition table.

60 Syncing disks.

61 [root@centos ~]#
開始掛載分好區的盤,並將文件複製到這兩分區中,第一個分區定義為boot,第二個分區定義為sysroot ;
1 mkdir /mnt/boot /mnt/sysroot # 在centos系統上創建兩個目錄

2 [root@centos src]# lsblk # 查看剛剛分好區的sdb 盤

3 NAME MAJ:MIN RM SIZE RO TYPE MOUNTPOINT

4 sda 8:0 0 100G 0 disk

5 ├─sda1 8:1 0 1G 0 part /boot

6 └─sda2 8:2 0 99G 0 part

7 ├─cl‐root 253:0 0 50G 0 lvm /

8 ├─cl‐swap 253:1 0 2G 0 lvm [SWAP]

9 └─cl‐home 253:2 0 47G 0 lvm /home

10 sdb 8:16 0 10G 0 disk

11 ├─sdb1 8:17 0 5G 0 part

12 └─sdb2 8:18 0 5G 0 part

13 sr0 11:0 1 1024M 0 rom

14

15 [root@centos mnt]# mkfs.ext4 /dev/sdb1 #創建文件系統格式

16 mke2fs 1.42.9 (28‐Dec‐2013)

17 Filesystem label=

18 OS type: Linux

19 Block size=4096 (log=2)

20 Fragment size=4096 (log=2)

21 Stride=0 blocks, Stripe width=0 blocks

22 327680 inodes, 1310720 blocks

23 65536 blocks (5.00%) reserved for the super user

24 First data block=0

25 Maximum filesystem blocks=1342177280

26 40 block groups

27 32768 blocks per group, 32768 fragments per group

28 8192 inodes per group

29 Superblock backups stored on blocks:

30 32768, 98304, 163840, 229376, 294912, 819200, 884736

31

32 Allocating group tables: done

33 Writing inode tables: done

34 Creating journal (32768 blocks): done

35 Writing superblocks and filesystem accounting information: done

36

37 [root@centos mnt]# mkfs.ext4 /dev/sdb2

38 mke2fs 1.42.9 (28‐Dec‐2013)

39 Filesystem label=

40 OS type: Linux

41 Block size=4096 (log=2)

42 Fragment size=4096 (log=2)

43 Stride=0 blocks, Stripe width=0 blocks

44 327680 inodes, 1310464 blocks

45 65523 blocks (5.00%) reserved for the super user

46 First data block=0

47 Maximum filesystem blocks=1342177280

48 40 block groups

49 32768 blocks per group, 32768 fragments per group

50 8192 inodes per group

51 Superblock backups stored on blocks:

52 32768, 98304, 163840, 229376, 294912, 819200, 884736

53

54 Allocating group tables: done

55 Writing inode tables: done

56 Creating journal (32768 blocks): done

57 Writing superblocks and filesystem accounting information: done

58

59 [root@centos mnt]# blkid

60 /dev/sda1: UUID="cbf299b0‐d76d‐4efe‐8643‐c900502683d4" TYPE="xfs"

61 /dev/sda2: UUID="L416ib‐7Z3D‐rtXt‐FqTb‐ChsW‐j6zH‐heeuF2" TYPE="LVM2_memb

er"

62 /dev/mapper/cl‐root: UUID="12c02980‐3012‐4884‐8a7d‐437195398fdb" TYPE="x

fs"

63 /dev/mapper/cl‐swap: UUID="c4ea26e2‐7424‐4a52‐aa34‐8d9fb4f3fbd2" TYPE="s

wap"

64 /dev/mapper/cl‐home: UUID="7be941f2‐fcf6‐44b7‐b673‐f999f1c876b0" TYPE="x

fs"

65 /dev/sdb1: UUID="78df7716‐e32f‐421e‐a756‐8fe89407e9ec" TYPE="ext4"

66 /dev/sdb2: UUID="c905f4d2‐ae58‐41f8‐85e6‐69d1f0237ad2" TYPE="ext4"

67 [root@centos mnt]#

68 [root@centos mnt]# mount /dev/sdb1 /mnt/boot

69 [root@centos mnt]# mount /dev/sdb2 /mnt/sysroot

70 [root@centos mnt]# df ‐h

71 Filesystem Size Used Avail Use% Mounted on

72 /dev/mapper/cl‐root 50G 27G 24G 53% /

73 devtmpfs 910M 0 910M 0% /dev

74 tmpfs 920M 0 920M 0% /dev/shm

75 tmpfs 920M 8.5M 912M 1% /run

76 tmpfs 920M 0 920M 0% /sys/fs/cgroup

77 /dev/sda1 1014M 185M 830M 19% /boot

78 /dev/mapper/cl‐home 47G 33M 47G 1% /home

79 tmpfs 184M 0 184M 0% /run/user/0

80 /dev/sdb1 4.8G 20M 4.6G 1% /mnt/boot

81 /dev/sdb2 4.8G 20M 4.6G 1% /mnt/sysroot
開始複製之前編譯好的文件
1 cp /usr/src/vmlinuz /mnt/boot/ #linux kernel

2 cp /usr/src/initrd.gz /mnt/boot/ #ramdisk 記憶體鏡像(來自於busybox改造)

3 cp ‐a /usr/src/sysroot/* /mnt/sysroot/ #系統目錄集合(來自於busybox改造)

4 [root@centos /]# tree mnt ‐L 2

5 mnt

6 ├── boot

7 │ ├── initrd.gz

8 │ └── vmlinuz

9 └── sysroot

10 ├── bin

11 ├── boot

12 ├── dev

13 ├── etc

14 ├── home

15 ├── lib

16 ├── mnt

17 ├── proc

18 ├── root

19 ├── sbin

20 ├── sys

21 ├── tmp

22 ├── usr

23 └── var
7.安裝grub引導程式到sdb1中
1 yum install grub2‐install #由於centos7以後採用的是grub2 所以直接安裝了這個

2 [root@centos mnt]# grub2‐install ‐‐boot‐directory=/mnt/boot /dev/sdb #安裝

到boot目錄下

3 Installing for i386‐pc platform.

4 Installation finished. No error reported.

5 [root@centos boot]# ll

6 total 9248

7 drwxr‐xr‐x. 5 root root 4096 Feb 6 08:25 grub2

8 ‐rw‐r‐‐r‐‐. 1 root root 1484989 Feb 6 08:03 initrd.gz

9 ‐rw‐r‐‐r‐‐. 1 root root 7975904 Feb 6 08:04 vmlinuz

10 [root@centos boot]#grub2‐mkconfig ‐o /mnt/boot/grub2/grub.cfg #為了方便我採用了先根據系統自動生成,然後再編輯這個文件

11 [root@centos boot]# vim /mnt/boot/grub2/grub.cfg #編輯內容見下圖,去掉很多用不到的內容
grub.cfg 文件內容,僅僅保留了幾個核心的信息
1 # relay display

2 set timeout=5

3 # entry

4 menuentry 'My Linux' {

5 insmod gzio

6 insmod part_msdos

7 insmod xfs

8 set root='hd0,msdos1'

9 linux16 /vmlinuz root=/dev/sda2

10 initrd16 /initrd.gz

11 }
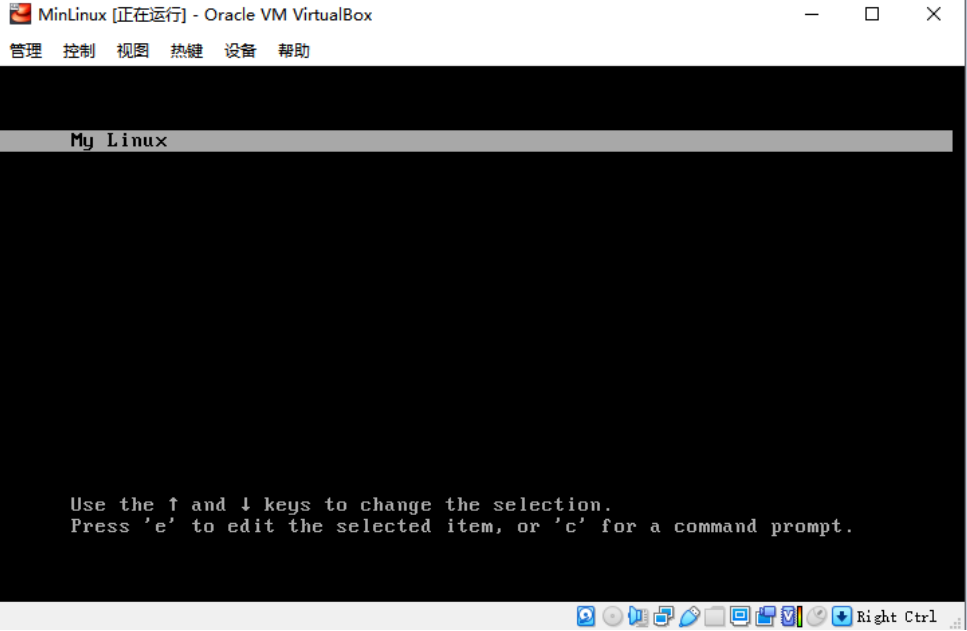
8.通過virtual 將剛剛創建的虛擬硬碟載入進來,並啟動虛擬機。。。開始見證奇跡的時候。
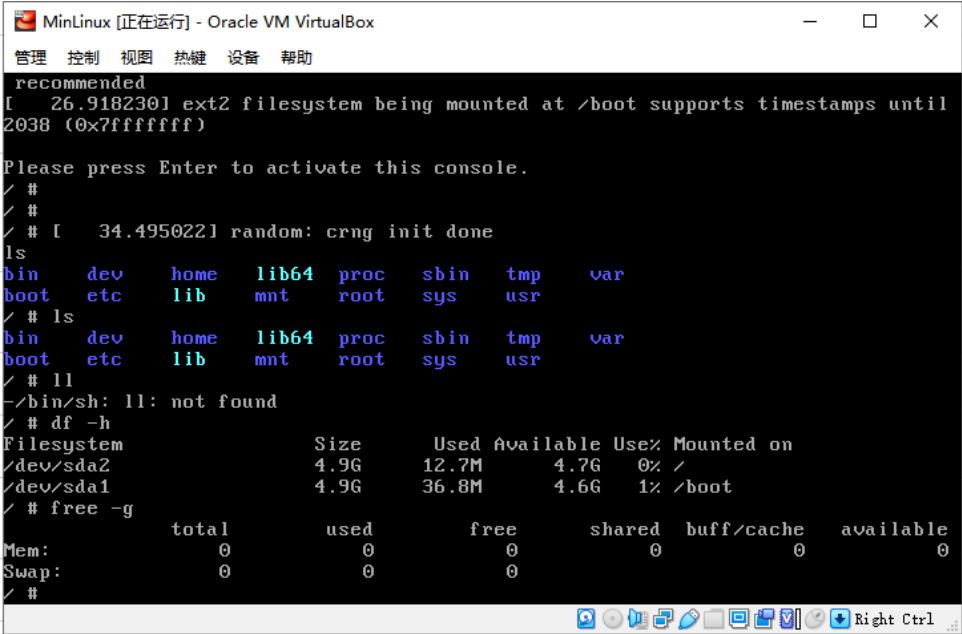
歡迎界面出現,成功引導系統。
出錯啦。。。
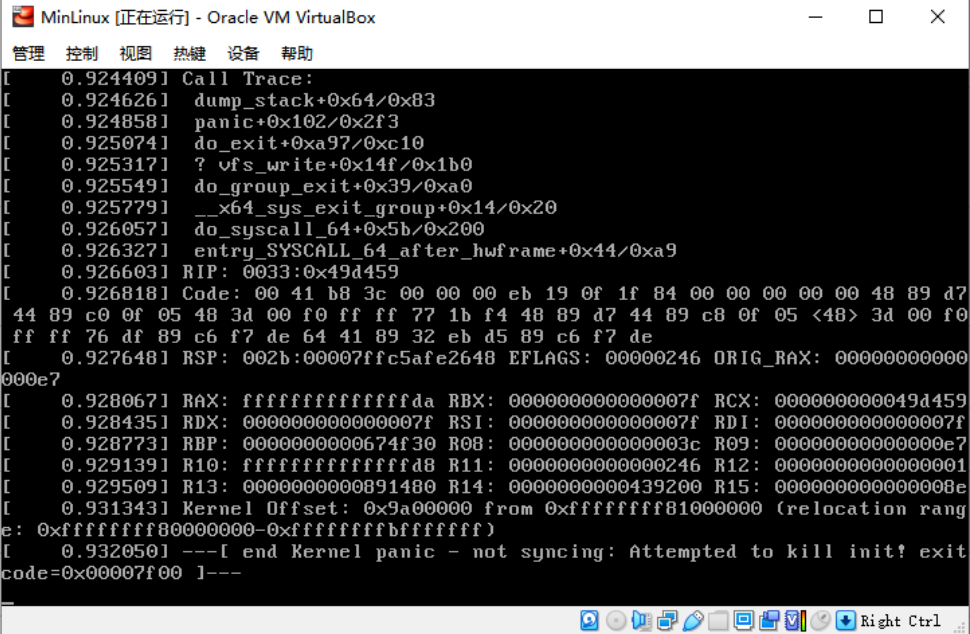
估計猜測分析:
由於系統啟動的時候需要掛載/dev/sda2 這塊真正的rootfs 系統,可是在載入記憶體鏡像initrd.gz 後,想啟動掛載rootfs的時候,找不到硬碟分區了。
這裡有個我們打包的時候,在涉及 第三方模塊如ext4 驅動的時候,是沒有打包到內核中的,但是預設是支持擴展掛載的,所以採用修改initrd.gz 這個文件,這個時候就需要用到modules了(前面只是生成了,還沒有用到,所以需要先把這個modules打包進initrd.gz中,讓他能找到ext4驅動)同時也順便把rootfs 的目錄中也一併處理成鏡像的樣子。
sysroot 和initrd 兩個目錄一樣操作:
1 cd /mnt/sysroot

2 cp ‐a /usr/src/modules/lib usr/ #複製modules進入這個文件夾

3 mkdir usr/lib64 #創建空文件夾,只是為了規範一點

4 ln ‐s usr/lib64 lib64

5 ln ‐s usr/lib lib

6 #initrd 同樣操作

7 cd /usr/src/initrd

8 cp ‐a /usr/src/modules/lib usr/ #複製modules進入這個文件夾

9 mkdir usr/lib64 #創建空文件夾,只是為了規範一點

10 ln ‐s usr/lib64 lib64

11 ln ‐s usr/lib lib

12 # 重新生成initrd.gz 由於模塊我沒有精簡所以耗時比較久

13 find . | cpio ‐H newc ‐‐quiet ‐o | gzip ‐9 > /usr/src/initrd.gz

14 # 替換 舊的initrd.gz

15 cp initrd.gz /mnt/boot/
通過修改init文件,我雖然進去了鏡像系統,但是由於始終沒有找到硬碟,導致rootfs沒有能進入,也請各位大神幫忙解開這個結,我不知道哪裡出了問題。
開始修改 init 不進行rootfs轉換,直接進入記憶體系統:
1 #!/bin/sh

2

3 echo "Mounting proc and sys..."

4 mount ‐t sysfs sysfs /sys

5 mount ‐t proc proc /proc

6

7 echo "Detect and export hardware infomation..."

8 mdev ‐s

9

10 exec /bin/sh

11 把項目兩句話註釋掉,改成直接執行 exec /bin/sh 作為主進程

12

13 echo "Mount real rootfs to /mnt/sysroot..."

14 #mount ‐t ext4 ‐o ro /dev/sda2 /mnt/sysroot

15

16 echo "Switch to real rootfs..."

17 # exec chroot /mnt/sysroot /sbin/init
這個時候記憶體系統進去了:
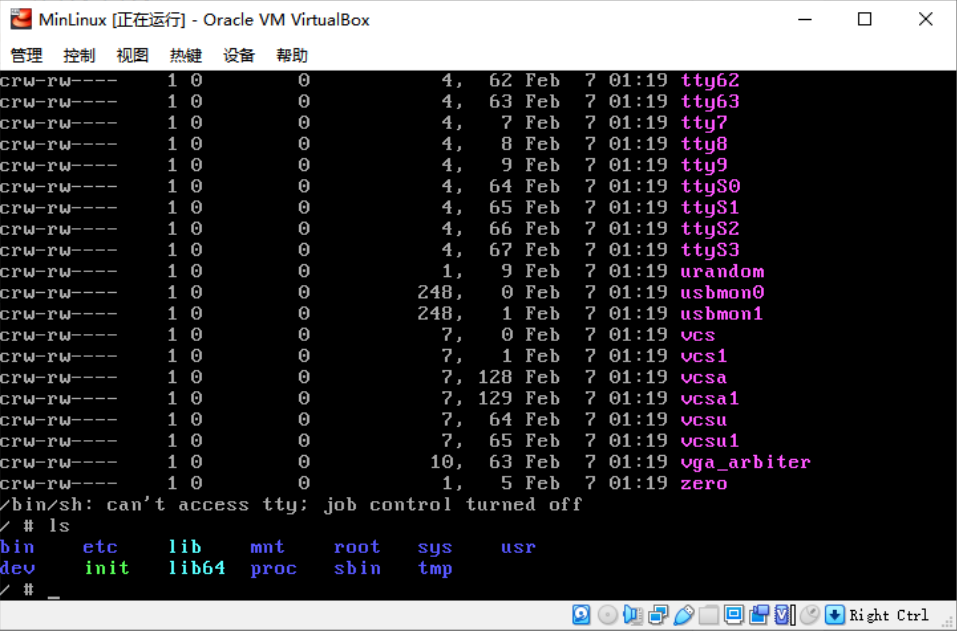
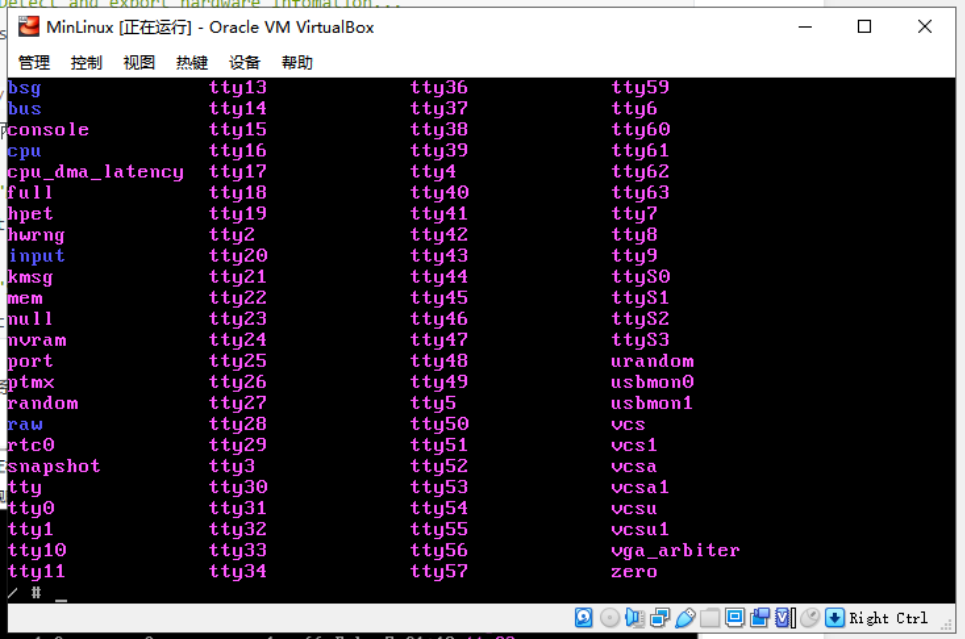
但是根本但是在/dev/ 下根本沒有sdaX的硬碟分區。首先驅動也是有的,通過grub也是能看到的。
cat /proc/filesystems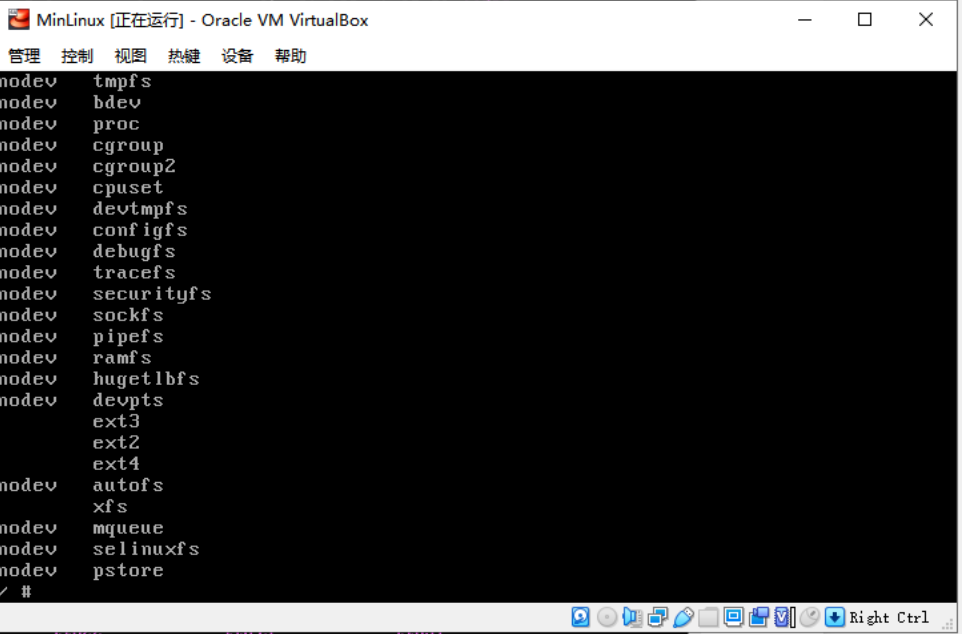
進入剛剛啟動時候的grub界面,是能看到硬碟分區的:
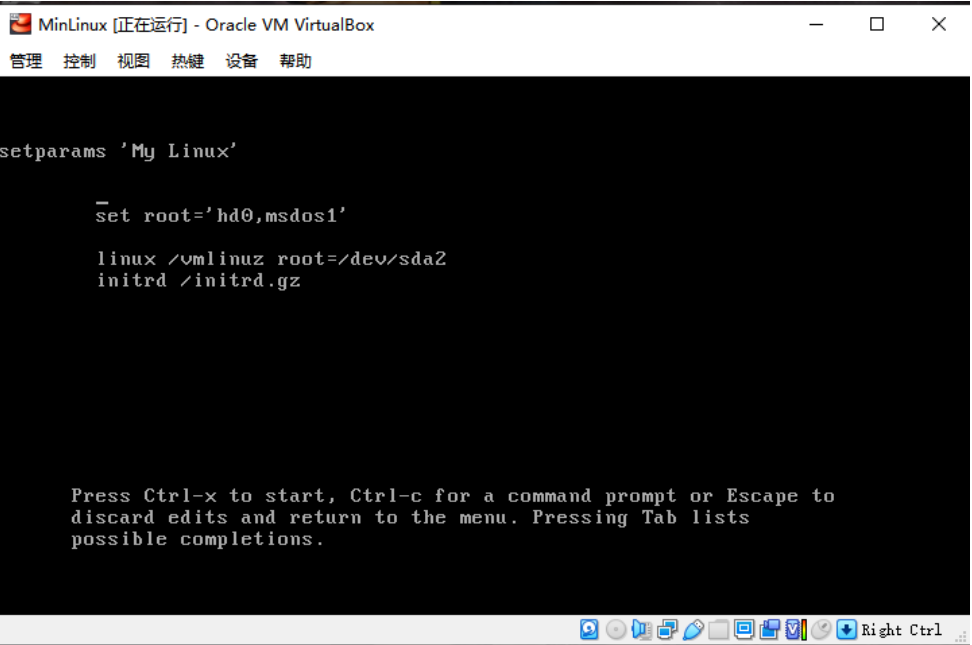
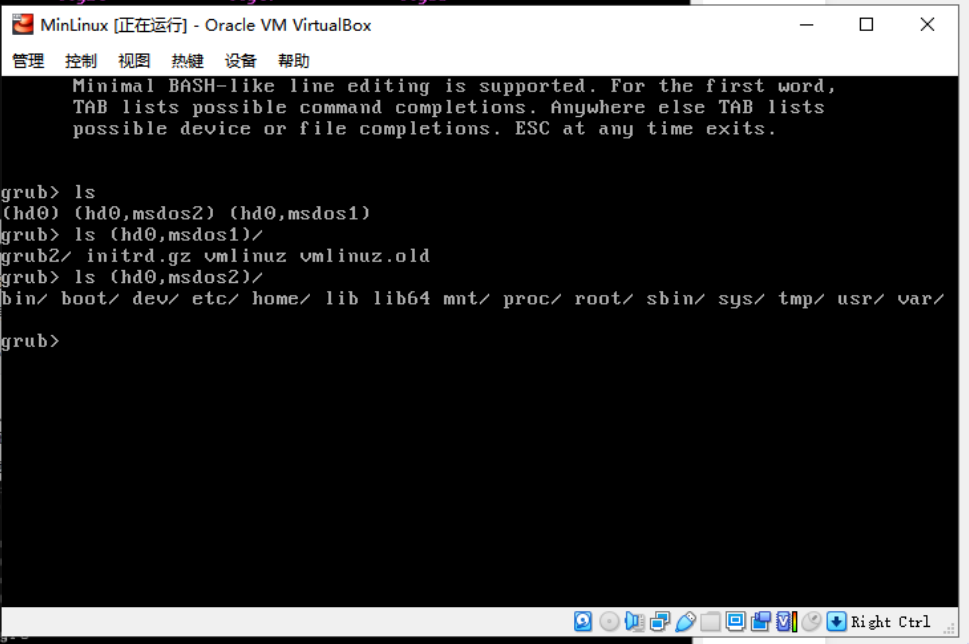
---硬碟找不到的問題已經解決,補充進去:
通過修改配置linux kernel 已經解決硬碟找不到的問題:
Device Drivers > SCSI device Support >SCSI Disk Support

SCSI generic support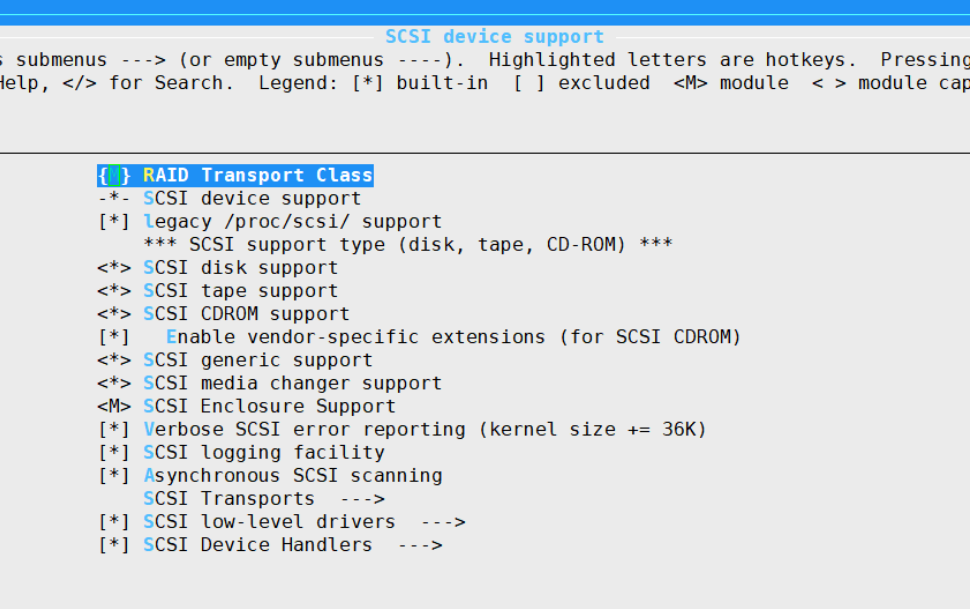
以上通過修改內核kernel配置後,終於找到了硬碟:
