原創發佈在 https://blog.csdn.net/qq_21484935/article/details/103461778 思路:請求小說的url並對內容進行解析,找到帶有更新時間的span標簽。然後配置郵箱,將內容作為發送。 我選擇的是網易的126郵箱,在官網登錄賬號,設置中,打開“POP ...
原創發佈在 https://blog.csdn.net/qq_21484935/article/details/103461778
思路:請求小說的url並對內容進行解析,找到帶有更新時間的span標簽。然後配置郵箱,將內容作為發送。
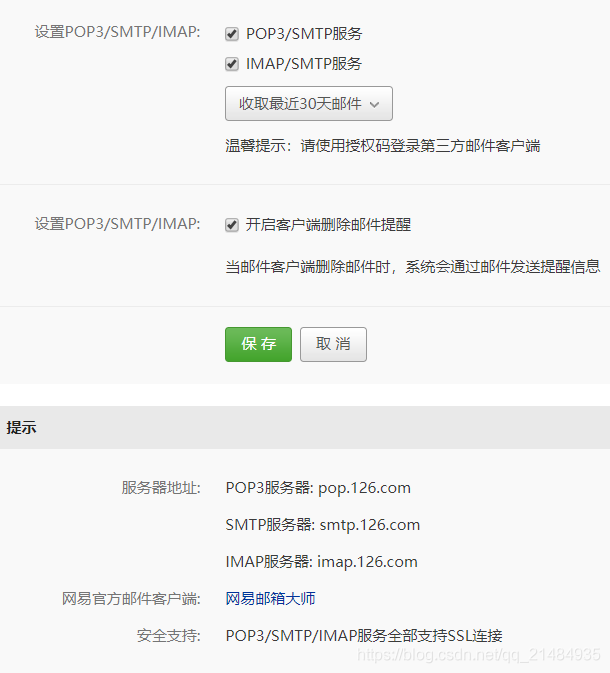
我選擇的是網易的126郵箱,在官網登錄賬號,設置中,打開“POP3/SMTP/IMAP”,(此處需要手機發送驗證消息
設置成功後如圖所示:

埠信息如下:

接下來的步驟很簡單,python的SMTP操作(不會請百度一下
廢話不多說,直接上代碼了
import logging
import smtplib
from email.mime.text import MIMEText
import requests
from bs4 import BeautifulSoup


server = 'smtp.126.com'
sender = '[email protected]' #發送郵箱
mailpass = 'xxxxx' #客戶端授權碼
receivers =['[email protected]'] #接收郵箱

def getUrl(url , header):
    req = requests.get(url , header)
    bs = BeautifulSoup(req.text , 'html5lib')
    time = bs.select('body > div.wrap.cf > div.main > div.chapterlist > div.chapterlist_box > div > div > span')[0]
    return time.string  #返回更新時間

def send(text):
    snd_msg = MIMEText(text,'plain' ,'utf-8')
    snd_msg['From'] = "{}".format(sender)
    snd_msg['To'] = ",".join(receivers)
    snd_msg['Subject'] = '<鬼刀>更新信息'
    try:
        smtp = smtplib.SMTP_SSL(server, 465) #ssl協議 埠465
        smtp.login(sender , mailpass) #發送者郵箱 客戶端授權碼
        smtp.sendmail(sender , receivers , snd_msg.as_string())
        print('發送成功!')
    except smtplib.SMTPException:
        logging.error('failed to send email!')


def init(url):
    header = {
        'User-Agent': 'Mozilla/5.0 (Windows NT 10.0; Win64; x64)'
    }
    try:
        text = getUrl(url , header)
        return text
    except Exception as e:
        print(e)


if __name__ == "__main__":
    url = 'http://www.u17.com/comic/68471.html'
    text = init(url)
    send(text)
後續步驟就不過多說明瞭。可以設置什麼時間去申請,掛載到伺服器上,每隔一段時間檢測一下更新沒有,然後發送到郵箱。是不是很美滋滋。(這個漫畫沒看過,看多的小伙伴可以吐槽一下呦


