
Selenium是一個自動化測試工具,利用它我們可以驅動瀏覽器執行特定的動作,如點擊、下拉等操作。 本文將從環境部署到項目開發一步步講解,包括這個過程所可能遇到的一些問題,都會一一解答,有不會的問題可以在下方評論留言一起思考解決。 一.環境部署 環境部署包括mac和linux 1.安裝Seleniu ...
Selenium是一個自動化測試工具,利用它我們可以驅動瀏覽器執行特定的動作,如點擊、下拉等操作。
本文講述的是通過自動化的方式登陸某一網站,其中包含Selenium+python自動化項目環境如何部署, 獲取圖形驗證碼登錄,元素獲取方法,項目中遇到的問題,看完你會發現原來Selenium自動化輕鬆入門,是多麼的簡單,Selenium+python也可以用於爬蟲。
本文將從環境部署到項目開發一步步講解,包括這個過程所可能遇到的一些問題,都會一一解答,有不會的問題可以在下方評論留言一起思考解決。
一.環境部署
環境部署包括mac和linux
1.安裝Selenium
pip3 install selenium這裡推薦大家使用Anaconda管理python包及環境,Anaconda是一個方便的python包管理和環境管理軟體,一般用來配置不同的項目環境。如果你的電腦只能安裝一個環境,而兩個項目卻用著不同的環境,那麼你可以使用Anaconda創建多個互不幹擾的環境,分別運行不同版本的軟體包,以達到相容的目的。
Anaconda通過管理工具包、開發環境、Python版本,大大簡化了你的工作流程。不僅可以方便地安裝、更新、卸載工具包,而且安裝時能自動安裝相應的依賴包,同時還能使用不同的虛擬環境隔離不同要求的項目。
Anaconda的安裝流程及使用
https://www.cnblogs.com/trotl/p/11863544.html
2.安裝ChromeDriver
2.1.查看瀏覽器版本
2.2.在瀏覽器的幫助/關於Google Chrome 查看瀏覽器版本
2.3.下載相應的ChromeDriver(兩種方法)
方法一 :
- 打開ChromeDriver官方網站,根據上面的瀏覽器版本,下載相應版本的ChromeDriver
- 將解壓好的文件放入/usr/local/bin目錄中,由於mac的很多目錄都是隱藏的,所以我們按快捷鍵command+shift+g,在彈出的視窗輸入/usr/local/bin,就可以打開這個目錄,接著將解壓好的驅動放入此目錄即可。
- 進行測試(在終端輸入: chromedriver --version,可以查看到版本)
方法二 :
1.安裝brew及使用可能遇到的問題
https://www.cnblogs.com/trotl/p/11862796.html
2.下載chromedriver
通過命令brew cask install chromedriver去下載
3.測試
在終端輸入: chromedriver --version,可以查看到版本
3.安裝識別驗證碼的包
1.用homebrew 在電腦上安裝tesseract庫
brew install tesseract2.用pip安裝支持python的tesseract
pip install pytesseract如果是識別中文
去往https://github.com/tesseract-ocr/tessdata下載中文數據集chi_sim.traineddata,把它放到這目錄下:
/usr/local/Cellar/tesseract/3.05.01/share/tessdata
3.安裝容易遇到的問題:
- 提示brew update,代表homebrew需要更新
- 提示must be writable!或者Permission denied之類問題,試試前面加sudo
- 提示Please check the permissions and owner of that directory,說明許可權有問題,那麼使用sudo chown root 文件路徑命令獲得臨時root許可權
- 提示Xcode alone is not sufficient on Sierra,使用xcode-select --install
二.實現邏輯
開始想的邏輯是,獲取到驗證碼的地址,然後爬取下來並請求,下載驗證碼圖片並識別再填上去,發現這樣行不通,每次請求獲得的驗證碼圖片不一致,這得從會話角度去解決問題。這裡我換了種思維更簡單的去解決這個問題,通過截圖的方式把頁面上的驗證碼截圖下來保存為圖片並識別出文字。
1. 實現中所遇到的問題
chromedriver的截圖只能截取當前頁面的圖片,不能得到整個頁面的圖片,這樣就不能通過定位驗證碼圖片的位置去截取驗證碼圖片,對於頁面有滑動的只能手動調試位置。
- 處理驗證碼失敗的提示框
- 當從a頁面跳轉到b網頁,然後獲取b頁面的某個元素時,容易出錯。因為代碼執行速度比網頁載入速度快,通常會出現無法找到該元素的錯誤。遇到無法找到頁面元素的情況,要考慮是否是代碼載入過快的原因,處理方法:在獲取元素前➕time.sleep(2)
快速獲取元素路徑的方式:網頁->檢查->選中對應標簽->右鍵選擇copy->copy xpath
2. 用到的一些方法
2.1 處理Windows彈出框(三種情況)
使用 driver.switch_to.alert 切換到Windows彈出框
Alert類提供了一系列操作方法:
accept() 確定
dismiss() 取消
text() 獲取彈出框裡面的內容
send_keys(keysToSend) 輸入字元串
A.定位alert彈出框
#點擊頁面元素,觸發alert彈出框
driver.find_element_by_xpath('//*[@id="alert"]').click()
time.sleep(3)
#等待alert彈出框可見
WebDriverWait(driver,20).until(EC.alert_is_present())
#從html頁面切換到alert彈框
alert = driver.switch_to.alert
#獲取alert的文本內容
print(alert.text)
#接受--選擇“確定”
alert.accept()
B.定位confirm彈出框
driver.find_element_by_xpath('//*[@id="confirm"]').click()
time.sleep(3)
WebDriverWait(driver,20).until(EC.alert_is_present())
alert =driver.switch_to.alert
print(alert.text)
# 接受--選擇“取消”
alert.dismiss()
C.定位prompt彈出框
driver.find_element_by_id("prompt").click()
time.sleep(3)
WebDriverWait(driver,20).until(EC.alert_is_present())
alert =driver.switch_to.alert
alert.send_keys("jaja")
time.sleep(5)
print(alert.text)
# alert.dismiss()
alert.accept()
2.2 python+selenium調用js方法
from selenium import webdriver
js = '''var str="聯想詞:%s===>車系:%s";window.alert(str);''' % (alias, name)
driver.execute_script(js)

execute_script(js)和execute_async_script(js)分別是是同步和非同步方法,前者會等待js代碼執行完畢後主線程執行,後者它不會阻塞主線程執行。
execute_script(js) 方法如果有返回值,有以下幾種情況:
    * 如果返回一個頁面元素(document element), 這個方法就會返回一個WebElement
    * 如果返回浮點數字,這個方法就返回一個double類型的數字
    * 返回非浮點數字,方法返回Long類型數字
    * 返回boolean類型,方法返回Boolean類型
    * 如果返回一個數組,方法會返回一個List<Object>
    * 其他情況,返回一個字元串
    * 如果沒有返回值,此方法就會返回null
2.3selenium+python的常用方法
1.創建webdriver對象
browser=webdriver.Chrome()
2.打開百度頁面
browser.get('https://www.baidu.com')
3.獲取網頁源碼
browser.page_source
4.在百度頁面id為kw的輸入框中輸入book
driver.find_element_by_id('kw').send_keys('book’)
5.在百度頁面id為kw的輸入框中清除book
driver.find_element_by_id('kw’).clear()
6.在百度頁面id為search的按鈕點擊搜索
a.driver.find_element_by_id('search').click()
b.action3 = self.driver.find_element_by_class_name('next')
  ActionChains(self.driver).move_to_element(action3).double_click(action3).perform()
7.向前跳轉回上一個頁面
driver.back()
8.向後跳轉回上一個頁面
driver.forward()
9.關閉瀏覽器
browser.close()   關閉當前視窗
browser.quit()   退出並關閉視窗的每一個相關的驅動程式
10.獲取某個元素的文本內容
driver.find_element_by_class_name("loading_btn").text
11.將瀏覽器視窗最大化顯示
driver.maximize_window()
12.設置瀏覽器寬480、高800顯示:
driver.set_window_size(480, 800)
13.獲取驗證碼圖片的大小
codeEelement = driver.find_element_by_id(‘code')
imgSize = codeEelement.size
14.獲取驗證碼元素坐標
imgLocation = imgElement.location
15.計算驗證碼整體坐標
rangle = (int(imgLocation['x']),int(imgLocation['y']),int(imgLocation['x'] + imgSize['width']),int(imgLocation['y']+imgSize['height']))
註意:submit和click的區別。Click方法只適用於button,而submit可以用於提交表單。
2.4 獲取元素的方法之find_element_by_css_selector
-----------------通過類class獲取---------------
<h1 class="important">This heading is very important.</h1>
<p class="important">This paragraph is very important.</p>
<p class="important warning">This paragraph is a very important warning.</p>
1.獲取class值為important的h1標簽
find_element_by_css_selector(h1.importane)
2.獲取所有class值為important的標簽
find_element_by_css_selector(*.importane)或者find_element_by_css_selector(.importane)
3.獲取class值為important warning的標簽
find_element_by_css_selector(.importane.warning)

-----------------通過類ID獲取---------------
<p id="intro">This is a paragraph of introduction.</p>
 find_element_by_css_selector(#"intro")

 -----------------屬性選擇器---------------
1.<a title="W3School Home" href="http://w3school.com.cn">W3School</a>
 屬性中包含了title和href,find_element_by_css_selector('a[title][href]’)
2<a href="http://www.w3school.com.cn/about_us.asp">About W3School</a>
 定位屬性中href="http://www.w3school.com.cn/about_us.asp"的元素,
find_element_by_css_selector('a[href="http://www.w3school.com.cn/about_us.asp"]’)
3.<a href="http://www.w3school.com.cn/" title="W3School">W3School</a>
 通過href和title來定位
find_element_by_css_selector("a[href='http://www.w3school.com.cn/about_us.asp'][title='W3School']”)

 -----------------部分屬性定位---------------
<h1>可以應用樣式:</h1>
<img title="Figure 1" src="/i/figure-1.gif" />
<img title="Figure 2" src="/i/figure-2.gif" />

<hr />

<h1>無法應用樣式:</h1>
<img src="/i/figure-1.gif" />
<img src="/i/figure-2.gif" />
 定位title中包含有figure的元素:
find_element_by_css_selector("image[title~='figure']")

-----------------其他-------------------
[abc^="def"]  選擇 abc 屬性值以 "def" 開頭的所有元素
[abc$="def"]   選擇 abc 屬性值以 "def" 結尾的所有元素
[abc*="def"]  選擇 abc 屬性值中包含子串 "def" 的所有元素

-----------------後代選擇器--------------
<h1>This is a <em>important</em> heading</h1>
<p>This is a <em>important</em> paragraph.</p>
 find_element_by_css_selector("h1 em")
2.5 獲取元素的方法之find_element_by_xpath
這個方法是非常強大的元素查找方式,使用這種方法幾乎可以定位到頁面上的任意元素。在正式開始使用XPath進行定位前,我們先瞭解下什麼是XPath。XPath是XML Path的簡稱,由於HTML文檔本身就是一個標準的XML頁面,所以我們可以使用XPath的語法來定位頁面元素。
Xpath通過路徑來定位控制項,分為絕對路徑和相對路徑。絕對路徑以單/號表示,相對路徑則以//表示。當xpath的路徑以/開頭時,表示讓Xpath解析引擎從文檔的根節點開始解析。當xpath路徑以//開頭時,則表示讓xpath引擎從文檔的任意符合的元素節點開始進行解析。而當/出現在xpath路徑中時,則表示尋找父節點的直接子節點,當//出現在xpath路徑中時,表示尋找父節點下任意符合條件的子節點。弄清這個原則,就可以理解其實xpath的路徑可以絕對路徑和相對路徑混合在一起來進行表示,想怎麼玩就怎麼玩。
快速獲取你想要的元素xpath方式:
網頁->檢查->選中對應標簽->右鍵選擇copy->copy xpath
絕對路徑寫法(只有一種),寫法如下:
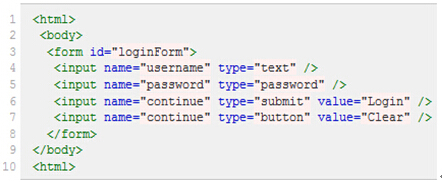
引用頁面上的form元素(即源碼中的第3行):/html/body/form
下麵是相對路徑的引用寫法:
查找頁面根元素:
//
查找頁面上所有的input元素:
//input
查找頁面上第一個form元素內的直接子input元素(即只包括form元素的下一級input元素):
//form/input
查找頁面上第一個form元素內的所有子input元素(只要在form元素內的input都算,不管還嵌套了多少個其他標簽,使用相對路徑表示,雙//號):
//form//input
查找頁面上第一個form元素:
//form
查找頁面上id為loginForm的form元素:
//form[@id='loginForm']
查找頁面上具有name屬性為username的input元素:
//input[@name='username']
查找頁面上id為loginForm的form元素下的第一個input元素:
//form[@id='loginForm']/input[1]
查找頁面具有name屬性為contiune並且type屬性為button的input元素:
//input[@name='continue'][@type='button']
查找頁面上id為loginForm的form元素下第4個input元素:
//form[@id='loginForm']/input[4]
以百度主頁為例,搜索框的HTML示例代碼如下,其xpath為//*[@id=''kw]。
獲取元素的方法之find_element_by_css_selector
獲取元素的方法之find_element_by_xpath
這兩種方法來自於百度,方便大家更好的學習,我在這裡借花獻佛總結了一下放在了這裡,因為我在寫項目的時候記錄筆記到了其他地方,具體的地址忘了,如果原創作者看到了,請留下你的地址。
三.代碼展示
import re
import time

import pandas as pd
import pytesseract
from PIL import Image
from selenium import webdriver
from selenium.webdriver import ActionChains
from selenium.webdriver.support.wait import WebDriverWait


class CrackTouClick(object):
    def __init__(self):
        self.url = ""
        self.search_url = ""
        self.driver = webdriver.Chrome()
        self.wait = WebDriverWait(self.driver, 20)
        self.j_username = laosiji_username
        self.j_password = laosiji_password

    def open(self):
        self.driver.get(self.url)
        self.driver.find_element_by_name("j_username").send_keys(self.j_username)
        self.driver.find_element_by_name("j_password").send_keys(self.j_password)
        action3 = self.driver.find_element_by_id("code")
        ActionChains(self.driver).move_to_element(action3).double_click(action3).perform()

    def get_window_png(self):
        ele = self.driver.find_element_by_class_name('logo')
        ele.screenshot('ele.png')

    def verification_code(self):
        self.driver.maximize_window()
        self.driver.save_screenshot('./element.png')  # 截取當前網頁,該網頁有我們需要的驗證碼
        rangle = (1434, 961, 1598, 1017)  # 寫成我們需要截取的位置坐標
        element = Image.open("./element.png")  # 打開截圖
        frame4 = element.crop(rangle)  # 使用Image的crop函數,從截圖中再次截取我們需要的區域
        frame4.save('./code.png')
        code = Image.open('./code.png')
        text = pytesseract.image_to_string(code)  # 使用image_to_string識別驗證碼
        return text

    def write(self):
        while True:
            code = self.verification_code()
            # 判斷驗證碼是否識別到且為4位數字與字母的字元串
            if len(code.strip()) == 4 and code.isalnum():
                self.driver.find_element_by_name("rand").send_keys(code)
                break
            else:
                action3 = self.driver.find_element_by_id("rand_img")
                ActionChains(self.driver).move_to_element(action3).double_click(action3).perform()

    def login(self):
        self.write()
        login_action = self.driver.find_element_by_class_name("btn")
        ActionChains(self.driver).move_to_element(login_action).double_click(login_action).perform()

    # 判斷是否有彈出框
    def alert_is_present(self):
        try:
            alert = self.driver.switch_to.alert
            print(alert)
            return alert
        except:
            return False

    def read(self):
        while True:
            self.login()
            time.sleep(1)

            # 如果有彈出框 點擊確定
            if self.alert_is_present():
                self.driver.switch_to.alert.accept()
                self.driver.switch_to.alert.accept()
                time.sleep(1)
            else:
                break

        time.sleep(1)
        self.driver.get(self.search_url)
        self.driver.quit()
三.開發中遇到的BUG
1.運行時chrome報錯,終端打不開
File "/usr/local/python3/lib/python3.6/site-packages/selenium/webdriver/remote/errorhandler.py", line 242, in check_response
    raise exception_class(message, screen, stacktrace)
selenium.common.exceptions.WebDriverException: Message: unknown error: Chrome failed to start: exited abnormally
  (unknown error: DevToolsActivePort file doesn't exist)
  (The process started from chrome location /usr/bin/google-chrome is no longer running, so ChromeDriver is assuming that Chrome has crashed.)
  (Driver info: chromedriver=70.0.3538.97 (d035916fe243477005bc95fe2a5778b8f20b6ae1),platform=Linux 3.10.0-862.14.4.el7.x86_64 x86_64)
原因:運行過程中開啟的進程太多
解決方法:如果你是mac,按 Command + 空格鍵來調出 Spotlight,輸入 Activity Monitor 便可啟動活動監視器。如果手動關閉幾個名稱為chromedriver的進程,然後再嘗試打開終端,按進程名殺死進程輸入killall chromedriver。
如果覺得不錯,請留下您的大拇指哦

